09/26/2021 15,097 VAZ 2107
Author: Ivan Baranov
As with any car, the generator on the VAZ 2107 injector works in parallel with the battery - these are two power sources for the car, which are used in different modes. The article discusses the generator 37.3701, the principle of operation of the generator with different characteristics, including a maximum current of 80 Amperes, and provides instructions for connecting the unit. The G222 generator set is similar, you just need to pay attention to some differences.
[Hide]
Generator VAZ 2107: purpose and main functions
As with any other car, the generator on the “seven” works in tandem with a battery. That is, these are two power sources in the car, each of which is used in its own modes. And if the main task of the battery is to maintain the functionality of electronic devices during the period when the engine is turned off, then the generator, on the contrary, produces current only when the engine is running.
The main task of the generator set is to generate electrical energy by charging the battery. That is, in many ways (if not all) the performance of the machine depends on how well the generator and battery work.
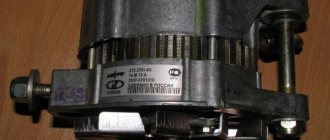
Generator sets for the VAZ 2107 have been produced since 1982. Their factory marking is G-221A.
All VAZ classic cars, including model 2107, were equipped with G-221A generators
Technical characteristics of the generator G-221A
The VAZ 2107 was equipped with two types of generators (carburetor and injection), each of which had its own factory marking: 372.3701 or 9412.3701. Therefore, the operating characteristics of the devices may differ, since injection models consume more electricity, and accordingly, the generator power must be higher.
All VAZ 2107 generators have the same rated voltage - 14 V.
The generator for a carburetor car has modification 372.3701 and is made in an aluminum cast housing with steel fasteners
Table: comparison of characteristics of different modifications of generators for VAZ 2107
| Generator name | Maximum output current, A | Power, W | Weight, kg |
| VAZ 2107 carburetor | 55 | 770 | 4,4 |
| VAZ 2107 injector | 80 | 1120 | 4,9 |
Replacing a VAZ 2107 generator with your own hands
Replacing a generator set is required in cases where the device no longer produces the required amount of current for consumer systems. The most common reasons for replacing an installation are the following malfunctions and breakdowns:
- burnt winding;
- interturn short circuit;
- deformation of the generator housing;
- resource development.
It is almost always easier and more profitable to replace the generator with a new one than to repair it.
Most often, generator sets fail due to short circuits and severe wear of the windings.
If you do not want to overpay for the work of installing a new generator, you can install it yourself, especially since there is nothing complicated in this procedure.
Required tools:
- a socket wrench with a “cardan” for 17 (for models 372.3701) or the same for 13 (for models 9412.3701);
- socket wrench 19;
- 10mm socket wrench.
Tool preparation
To dismantle and subsequently install the generator on a VAZ 2107, you will need a standard set of tools, which every driver usually has in his garage:
- wrench 10;
- wrench 17;
- wrench 19;
- a pry bar or a special shovel for installation work.
No other devices or devices are required.
Work order
- Place the car on an overpass or car inspection pit and secure it with the parking brake.
- Raise the hood, disconnect the ground wire from the battery.
- For easy access to the generator mounts, remove the battery using a 10 mm wrench;
- Using a 17 or 13 socket wrench (depending on the model), unscrew the nut securing the generator to the adjusting bar.
- Go down into the inspection hole and remove the engine protection.
- Remove the alternator belt from its pulley.
- Disconnect the wire block from the generator contacts.
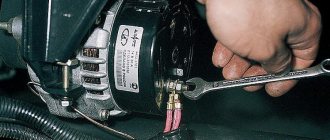
- Move aside the rubber protective cap and, using a 10mm wrench, unscrew the nut securing the ends of the electrical wires to the “positive” terminal of the generator connected to the corresponding battery terminal.
- Using a 19mm socket wrench, unscrew the nut securing the generator stator to the cylinder block bracket.
- Remove the retaining bolt and remove the generator from the bottom of the engine compartment.
- Install the new generator in place.
- Place the belt on its pulley, as well as on the water pump and crankshaft pulleys.
- Secure the generator and attach the engine protection.
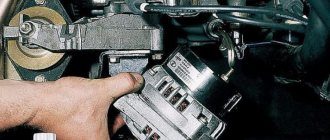
How to remove a VAZ 2107 generator
The VAZ 2107 generator is located in a rather inconvenient place. To make it easier to access, it is better to carry out work on a lift or pit. Before starting work, it is necessary to de-energize the vehicle's electrical systems by disconnecting the battery terminals. Further actions are performed in the following sequence:
- Remove the engine protection and the right front fender liner.
- Disconnect the wires from the generator (you must remember how they were connected.
- Loosen the nut holding the generator and remove the belt from it.
- Unscrew the nut from the bolt securing the generator to the bracket. If it is rusty, use WD-40.
- Remove the mounting bolt. If it does not come out, it must be treated with WD-40 and carefully knocked out.
- Remove the generator.
This is interesting: Peugeot 308 car and replacing spark plugs: a short guide with explanations
If, despite your efforts, you cannot disconnect the generator from the bracket, you will have to remove it along with it. To do this, you need to unscrew 2 (or, depending on the design, 3 bolts) securing the bracket to the engine.
Next, in order to ensure the removal of the VAZ 2107 generator along with the bracket, you will have to move the radiator. There is no need to drain the antifreeze, disconnect the pipes and remove the radiator from the car. It is enough to unscrew its fastenings and move it, providing free access to the bracket and generator.
When removing the generator, you can do without an inspection hole or lift by removing the generator through the wheel arch. This method is only suitable if the bolts and nuts are not rusty and it is possible to remove the generator without a mounting bracket.
How to install a VAZ 2107 radiator
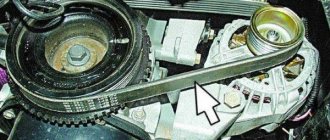
Installing the generator is not particularly difficult, since there is no need to deal with rusted bolted connections. The procedure for installation is the reverse of removal. After installing the generator, you need to install the belt and tension it. If you tighten it too loosely, the belt will slip when the generator is loaded, producing a characteristic whistle. Excessive belt tension will cause premature wear of the alternator bearing. It is easy to check the correct belt tension: it must be turned by hand along the longitudinal axis by 90 degrees. If the angle is smaller, the belt will be tightened. If more, it is weakened.
After installing the generator, connecting the wires to it and tensioning the belt, you can connect the battery terminals.
Everything is ready for testing. You can start the engine. The functionality of the generator can be checked with a voltmeter by measuring the voltage on the battery. When the car engine is running, the on-board voltage should be 14 volts.
What generators can be installed on the “seven”
The design of the VAZ 2107 allows the installation of not only the G-221A generator. Therefore, if necessary, the driver can install a more powerful device, however, this will require making some changes to the electrical circuit of the car. The question arises: what is the reason for the desire of a car enthusiast to change his “native” generator?
The G-221A was the optimal device for equipping cars at the beginning of their mass production. However, a lot of time has passed since the 1980s and today almost every driver uses modern electronic devices:
- acoustic system;
- navigators;
- additional lighting devices (tuning), etc.
Non-standard lighting devices consume the most electricity
Accordingly, the G-221A generator cannot cope with high loads, which is why drivers begin to look for more powerful units.
You can install at least three more powerful devices on the “seven”:
- G-222 (generator from Lada Niva);
- G-2108 (generator from the G8);
- G-2107–3701010 (injection model for a carburetor car).
It is important that the last two models do not require changes in the design of either the generator housing or its mountings. When installing a generator from Niva, you will have to make some modifications.
Video: principle of operation of the generator
Connection diagram G-221A
Being an electronic device, the generator needs to be used correctly. Therefore, its connection diagram should not cause ambiguity. It should be noted that drivers of “sevens” can usually easily connect all the generator terminals themselves, since the circuit is accessible and understandable to everyone.
The generator (item 2) is connected to the circuit in series between the battery (item 1) and the mounting block (item 3)
Many car owners wonder where which wire should be connected when replacing the generator. The fact is that the device has several connectors and wires, and when replacing, you can easily forget which wire goes where:
- orange is not useful for connection, it can be left as is or connected to gray directly to autostart the car;
- a gray thick wire goes to the brushes from the relay regulator;
- a gray thin wire connects to the relay;
- yellow - coordinator of the control light on the control panel.
When working independently with the G-221A, it is better to sign the purpose of the wires so as not to connect them by mistake later.
To avoid errors, all wires have their own color designation
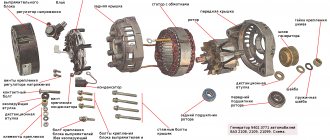
The device of the VAZ 2107 generator
Structurally, the generator on the “seven” has the shape of a cylinder. The cast body contains many small parts, each of which performs its own functions. The main elements of the G-221A are the rotor, stator and covers, which are cast only from a special aluminum alloy.
Rotor
The G-221A rotor consists of a shaft with a corrugated surface, onto which a steel sleeve and poles are pressed. The bushing and beak-shaped poles together form the so-called core of the electromagnet. The core produces an electromagnetic field during the rotation of the rotor shaft.
The excitation winding is also located inside the rotor. It is placed between the poles.
The moving element of the rotor - the grooved shaft - rotates thanks to two ball bearings . The rear bearing is mounted directly on the shaft, and the front bearing is fixed on the generator cover.
The rotor is pressed into the generator winding and does not separate from it during disassembly
Stator
The stator is assembled from special plates 1 mm thick. The plates are made of electrical steel. It is in the stator slots that the three-phase winding is located. The winding coils (there are six in total) are made of copper wire. Strictly speaking, the electromagnetic field coming from the rotor core is converted by the coils into pure electricity.
Wire breaks or carbon deposits on its surface can affect current generation
Rectifier
The generator in the described configuration produces only alternating current, which is clearly not enough for the smooth operation of the car. Therefore, in the G-221A case there is a rectifier (or diode bridge), the main task of which is to convert alternating current into direct current.
The diode bridge has the shape of a horseshoe (for which it received the corresponding nickname among car enthusiasts) and is assembled from six silicon diodes. On the plate, three diodes have a positive charge and three have a negative charge. A contact bolt is installed in the center of the rectifier.
Structurally, the rectifier really looks like a horse's horseshoe
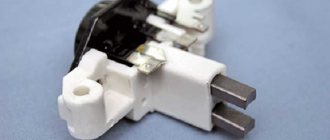
Voltage regulator
The voltage regulator on the VAZ 2107 is made together with a brush holder. The device is a non-separable unit and is fixed to the back cover of the generator. The regulator is designed to maintain the rated voltage in the network in any operating mode of the engine.
The regulator's electrical circuit controls the voltage in the device
Pulley
The pulley is not always considered an integral part of the generator, since it is mounted separately on an already assembled housing. The main task of a pulley is to transmit mechanical energy. As part of the generator, it is connected by a belt drive to the crankshaft and pump pulleys. Therefore, all three devices work in an inextricable connection with each other.
The pulley is mounted on the rotor shaft and connected by a belt drive to the corresponding parts of the pump and crankshaft
Generator faults
Unfortunately, mechanisms have not yet been invented that would not fail under the influence of time and constant loads. The VAZ 2107 generator is designed for many years of operation, but in some cases this is hampered by minor breakdowns and malfunctions of its components.
You can identify problems with the generator without the help of service station specialists: you just need to carefully monitor all the changes that occur with the car while driving.
The charging indicator light on the instrument panel came on
In the interior of the VAZ 2107, there is a terminal for several signaling devices on the dashboard. One of them is the battery charging indicator light. If it suddenly lights up red, it means there is not enough charge in the battery or there is a problem with the generator. But the alarm does not always indicate a problem with the generator itself; most often the lamp goes off for other reasons:
- slipping of the generator belt drive - you will need to stop the machine and adjust the degree of belt tension;
- there is damage in the warning lamp relay, so it does not work correctly - it is recommended to “ring” the relay in the mounting block and, if necessary, replace it;
- breakage of contacts in the excitation winding is a more serious damage that requires removing the generator from the car, disassembling it and searching for a break;
- severe wear of the brushes in the brush holder - they will need to be replaced, which is quite simple;
- short circuit in the rectifier (most likely, one of the silicon diodes has burned out) - it is recommended to disassemble the generator, test the diodes and replace the failed element.
The driver will immediately notice the signal, as the lamp begins to glow bright red on the instrument panel
The battery is not charging
VAZ 2107 drivers often encounter this problem: the generator seems to be working properly, but there is no power to the battery. The problem may lie in the following malfunctions:
- the alternator belt has stretched - you need to check the degree of its tension or replace it with a new one;
- loosening the fastening of the wire tips - just tighten all the fastening connections and thoroughly clean the contacts and connectors;
- malfunction of the battery itself;
- Damage in the wiring - it is recommended to ring all the wires between the battery and the generator and replace the damaged areas.
If there is no charging, the problem may lie in both the generator and the battery.
The battery is boiling over
Battery boiling over is a sign that the battery does not have long life left. After this, the battery will not be able to function fully, so it will have to be replaced soon. However, so that the replacement does not lead to the same sad consequences, it is necessary to find the cause of the boiling, which may be:
- contamination of the contact between the ground and the housing of the generator regulator - cleaning of the contact is necessary;
- damage to the voltage regulator board itself - replacement of the board is recommended;
- defective battery - if the battery began to boil away immediately after replacement.
It is better not to use the battery after boiling, as its resource is very limited.
When driving there is noise and grinding noise from the generator
The generator has a rotating rotor, so it must make noise during operation. However, if these sounds become increasingly loud and unnatural, you should understand the cause of their occurrence:
- loosening the nut on the pulley - you need to tighten the nut and check the degree of belt tension;
- deterioration of the bearings - in this case, the driver may hear a loud grinding noise and even a howl while driving; it will be necessary to press out the old bearings from the shaft and install new ones;
- short circuit in the winding - the entire stator needs to be replaced;
- creaking brushes - it is recommended to clean the brushes from adhering dirt.
What to do if there is no charge, weak charge (battery is discharged)?
If the battery of your VAZ 2107 is discharged, then one of three elements may be “to blame”: the generator, the voltage regulator, the connections between them. Determining “who is to blame” can be very simple, even without additional equipment. How this article will help.
We carry out testing using standard equipment
To monitor the operation of the generator on the “seven” there are two instruments: a voltmeter and a control light on the instrument panel. With their help, you can track the cause of your troubles.
1) Turn on the ignition without turning on the starter
and look at the warning light. It should shine at full intensity, as in the photo. The voltmeter needle, normally, stands on the white part of the scale (photo). Let's say everything is OK - go to point 2 - start the engine.
The battery charge control lamp is on
Position of the voltmeter needle before starting the engine (ignition on)
The lamp does not light, the voltmeter needle remains at zero when the ignition is turned on.
Check fuse No. 10 in the mounting block. 99% of the time it will be burnt out. In this case, all other lamps on the instrument panel will also be de-energized. Replace it with the same one and test again. If the fuse burns out again, you need to look for the cause, that is, a short circuit. We check whether the wires from the generator are disconnected, whether the insulation is frayed somewhere, etc. Diagram 3 at this link
The lamp does not light up, the voltmeter needle shows normal
We check the wires on the generator to see if the wire has come loose from terminal “61”. If everything is normal there, you need to check whether there is a “plus” on this wire using a test lamp, an indicator screwdriver or a multimeter.
Terminal “61” of the VAZ-2107 generator
If there is a “plus” , we check the “tablet” (aka “chocolate”) and the generator.
There is no “plus” - you will have to remove the instrument panel and check the lamp. Replace the burnt out one. How to remove the panel, watch the video
2) Start the engine
The control lamp should go out, the voltmeter needle goes into the green sector and is located from the middle to the right edge (photo). If everything is so, then most likely the generator is working normally .
The voltmeter shows normal voltage (charging is present)
The lamp remains on or dims slightly
If you give it gas, it goes out at high speeds and lights up again when they decrease. The voltmeter needle is in the white sector and goes to the edge of the green when the speed increases. The generator output is faulty . The same conclusion if the lamp continues to light at any speed, and the voltmeter needle is in the white sector and even goes to red.
Voltage too low (motor running). Weak charge
Read, it may come in handy: If the electric motor of the heater (stove motor) of the VAZ-2107 does not work
3) If the generator seems to be working, but the battery is gradually discharged
Let's do one more check. We start the engine, turn on the heater fan and low beam, take the key to “10” and, loosening the negative terminal of the battery, remove it. An idling engine (about 900 rpm) should not stall. If the engine stops, put the terminal back in place and start it again. While holding the speed at 1200-1500, remove the terminal again. Has the engine stalled again? Then turn off the headlights, leave the heater fan on and repeat the test. Now the engine with the negative terminal disconnected from the battery continues to run. output works, but does not produce the required current, it needs to be repaired, the diode bridge will need to be replaced.
Note! During such a check, it is better and safer to work together. You cannot disconnect the battery terminal without at least turning on the heater fan or other load. A voltage surge at the time of shutdown can “burn” the electronic elements of the ignition systems. You need to be especially careful on a car with an injection engine.
Generator check
Problems with the generator set can be avoided if the condition of this unit is periodically diagnosed. Checking the functionality of the generator gives the driver confidence that it is working properly and there is no cause for concern.
You cannot test the generator by disconnecting it from the battery while the engine is running. This is fraught with power surges and short circuits . The easiest way is to contact a service station specialist to check the functionality of the generator on a stand. However, convinced “seven guides” have long adapted to checking the G-221A on their own using a multimeter.
For diagnostics, you will need a multimeter of any type - digital or indicator. The only condition: the device must work correctly in both AC and DC measurement modes.
Operating procedure
Two people will be required to diagnose the generator's functionality. One of them should be in the cabin and, upon a signal, start the engine, the second should directly monitor the multimeter readings in different modes. The operating procedure will be as follows.
- Switch the device to constant current mode.
- With the engine turned off, connect the multimeter first to one terminal of the battery, then to the second. The network voltage should not be less than 11.9 and more than 12.6 V.
- After the initial measurement, start the engine.
- When starting the engine, the measurer must carefully monitor the instrument readings. If the voltage drops sharply and does not rise to operating condition, this indicates the exhaustion of the generator's life. If, on the contrary, the voltage indicator is higher than normal, then the battery will soon boil away. The best option is that when you start the engine, the voltage drops slightly and immediately recovers.
If the voltage measured with the engine running is between 11.9 and 12.6 V, then the generator is ok
Video: procedure for checking a generator with a light bulb
Checking generator operation
You can check the functionality of the generator in several ways using certain methods, for example: you can check the output current of the generator, the voltage drop on the wire that connects the current output of the generator to the battery, or check the regulated voltage.
To check, you will need a multimeter, a car battery and a lamp with soldered wires, wires for connecting between the generator and the battery, and you can also take a drill with a suitable head, since you may have to twist the rotor by the nut on the pulley.
Generator set belt for VAZ 2107
The VAZ 2107 car was produced from 1982 to 2012. Initially, the model was equipped with a smooth drive belt (old model). Over time, the “seven” was modified several times and at the end of the 1990s, the generator began to work with a new type of belt with teeth.
The most popular among car owners are rubber products from the German company. These belts fit perfectly into the operation of a domestic car and serve for the entire period specified by the manufacturer.
The operation of the generator and the entire vehicle depends on the quality of the drive belt.
The design numbers and sizes of the belts are indicated in the vehicle’s service book:
- 2101–1308020 (smooth surface), dimensions - 10.0x8.0x944.0 mm;
- 2107–1308020 (toothed surface), dimensions - 10.7x8.0x944.0 mm.
How to tension a belt on a generator
The operation of the generator, as well as the water pump, primarily depends on the correct tension of the belt on the pulley. Therefore, existing rules cannot be neglected. The belt is installed and tensioned in the following order.
- Place the assembled generator in place, lightly tightening the fixing nuts.
- Take a pry bar and use it to fix the gap between the generator housing and the pump.
- Place the belt on the pulley.
- Without releasing pressure from the pry bar, pull the belt onto the pulley.
- Tighten the top nut securing the generator until it stops.
- Check the degree of belt tension - the rubber should not sag, but it should not be too tight.
- Tighten the lower nut securing the generator.
A well-tensioned drive belt should give slight deflection when pressed, but not be excessively loose.
Video: how to tighten the alternator belt
Checking the degree of tension is done with two fingers. You need to press the free part of the belt and measure its deflection. The optimal deflection is 1–1.5 centimeters.
Thus, we can say that independent maintenance of the generator on a VAZ 2107 is quite possible and does not fall into the category of impossible tasks. It is important to follow the recommendations and algorithms for this or that work in order to carry out quality repairs or diagnostics. However, if you have doubts about your skills and abilities, you can always turn to professionals for help.