The wheel hub bearings of a vehicle, like any component whose operation is based on the principle of close interaction of parts with each other, are subject to wear. Developers of modern domestic cars have adopted the technology of foreign colleagues, which is distinguished by the use of non-separable and non-adjustable bearings in the front hubs. However, the convenience of replacing such bearings presented in this case is relative, since it (replacement) is performed together with the hub.
This article is intended for owners of modern domestic cars who prefer to independently carry out the procedure for adjusting the wheel bearings, as well as such work as replacing the rear wheel hub bearing. Contrary to the fears of skeptics, such work does not require the use of specialized tools and complex devices.
Wheel Bearing Adjustment Tools
- A set of tools (hammer, bit, screwdriver, set of keys: “12”, “27” and torque).
- Jack.
- A set of new hub nuts (the mechanism for fixing the nut on the axle shaft does not ensure reliable fastening of the hub when reused).
Signs that a bearing is out of adjustment
It is easy for the driver to notice an unadjusted, worn-out unit. The signs are:
- sharp, sudden noise from a specific rear, front wheel or pair;
- increase in extraneous sounds from the chassis during further operation;
- when turning, the noise decreases, and then recovers and intensifies;
- play in the vertical plane after hanging the body on a jack.
Important:
If the listed signs are detected, further operation of the vehicle is unsafe. Unregulated pairs experience increased load, overheat, and quickly wear out the clips.
Must read:
To study the topic, it is recommended to read the article: How to check wheel bearings.
Wheel bearing adjustment process
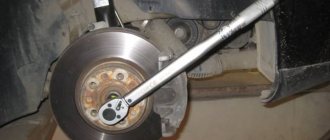
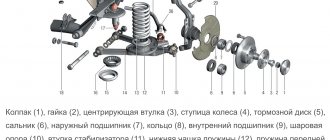
a) The vehicle is installed on a relatively flat area and secured using the parking brake, anti-roll bars and other available means. b) Raise the rear axle of the car using a jack. c) Remove the axle shaft (pos. 8), and then check the free rotation of the wheel. If rotation is difficult, we eliminate its cause (sticking of the oil seal, touching the brake pads, etc.) d) Unscrew the lock nut (pos. 7) and remove the lock washer (pos. 6). Having unscrewed the bearing mounting nut (item 5) half a turn, we re-check the freedom of rotation of the wheel. We begin adjustment measures only after achieving easy and free rotation.
e) Using a torque wrench, tighten the nut (pos. 5) applying a force not exceeding 100 Nm, while turning the wheels. This will prevent uneven placement of the rollers in the bearings. f) Unscrew the nut (pos. 5) again. To maintain the required rotation angle (<450), we use the slots on the lock washer (item 6), that is, we turn it by 1-2 slots. We install the lock washer, while simultaneously controlling the entry of the lock pin into the slot. g) Tighten the locknut (item 7) with a force of 150-200 Nm. h) When checking the adjustment, check for free rotation of the wheel and the absence of axial play. i) Install the axle shaft (pos. 8) and spring washers, and then tighten the nuts securing the axle shaft studs. j) Lower the wheel until it touches the ground, and then make a test drive. If during driving the hub (pos. 10) gets very hot (70-750C), the adjustment process must be repeated.
Another fairly common question that arises among supporters of the domestic Automotive Industry is formulated as follows: “How to remove the rear wheel hub when replacing the bearing?” Let us pay due attention to answering this question.
The process of dismantling the hub is not particularly technically difficult, but the fragility of the bearings requires careful handling. Preparation for dismantling involves lifting the car and placing it on supports. The next stage of the preparatory process will be the removal of the wheels and brake drums (on cars with disc brakes - caliper and discs). We ensure the immobility of the vehicle by engaging the gear, parking brake and installing anti-recoil devices.
Next, we perform the following operations: a) Turn the flange and unscrew the bolts securing the hub to the bracket, using a special hole in the hub body for this (alternately align it with the bolts). b) Next, unscrew the bolts securing the caliper, brake pad guides and steering knuckle. c) We remove the hub through the brake mechanism and replace the worn bearing.
Adjustment
After replacing the front wheel bearings of a VAZ 2107 during maintenance or the appearance of noise, adjustment begins as during diagnostics by “hanging” the wheel. Further:
- tighten the nut until it stops, but not too much;
- by rotating the wheel and releasing the nut, we look for a position in which its rotation will be sufficiently free, and there will be no backlash;
- lock the nut.
However, it must be added that if after tightening the nut the play disappears but there is no noise, then the bearings should also be changed.
How to remove the rear wheel hub when replacing the bearing?
Another fairly common question that arises among supporters of the domestic Automotive Industry is formulated as follows: “How to remove the rear wheel hub when replacing the bearing?” Let us pay due attention to answering this question.
The process of dismantling the hub is not particularly technically difficult, but the fragility of the bearings requires careful handling. Preparation for dismantling involves lifting the car and placing it on supports.
The next stage of the preparatory process will be the removal of the wheels and brake drums (on cars with disc brakes - caliper and discs). We ensure the immobility of the vehicle by engaging the gear, parking brake and installing anti-recoil devices.
Next we perform the following operations:
- a) Turn the flange and unscrew the bolts securing the hub to the bracket, using a special hole in the hub body for this (alternately align it with the bolts).
- b) Next, unscrew the bolts securing the caliper, brake pad guides and steering knuckle.
- c) We remove the hub through the brake mechanism and replace the worn bearing.
Instructions for self-tightening wheel bearings.
- Place the vehicle in gear or parking brake. Place something under the wheels, such as wheel chocks. This is necessary to prevent the car from flying off the jack.
- Take the balloon from the kit in the trunk (if there is one) and loosen the bolts securing the wheel. The vehicle must not be raised.
- Prepare a place to install the jack (from the kit). It should be firm and even. You can place boards under the jack if necessary. Raise the wheel until it no longer touches the ground. Place a block of wood under the lever just in case. Suddenly the jack is unreliable.
- Unscrew the bolts completely and remove the wheel.
Removing the hub cap
Unscrew the old nut
You need to tighten the nut
- Fill the cap with new lubricant and reinstall. Remember that if the wheel bearings are adjusted incorrectly, the wheel alignment changes, as a result of which the vehicle's handling deteriorates, fuel consumption increases, and tires wear out quickly and unevenly.
The described process can be clearly seen in the following video: Do not forget to periodically check the bearings. This ensures your safety on the roads. Best regards, PodshipnikTsentr.RU team
The other day I discovered vertical play in the front left wheel. The ball does not play; when you press the brake, the play disappears. So it's the wheel bearing. But there is no hum.
Read also: Tire width to rim width table
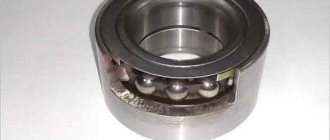
Our bearing is tapered and can be tightened) I’ll write down everything as I did it, maybe it will be useful to someone.
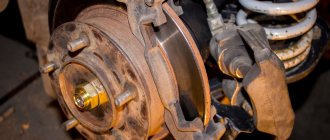
We remove the hub and see this picture
A disk with holes inside is needed to lock the hub nut. We unscrew the screws; they come through the holes in the disk and are screwed into the nut. Remove the CV joint retaining ring, washer, disc.
The hub nut is visible. We twist it clockwise, grasping the square holes; you can twist it with two screwdrivers or insert flat-nose pliers.
The minimum step is 1 hour, so holes are drilled in the disk. I tightened it for one hour, the play went away. The wheel spins normally, the hub does not heat up, and the bearing has not hummed in 90 km. If you tighten it, it will buzz almost immediately and then only change it.
Issue price: 0 ₽ Mileage: 92,000 km
see also
Comments 16
If play appears, this is not a signal to change the bearing. We have two cone roller bearings in the hub.
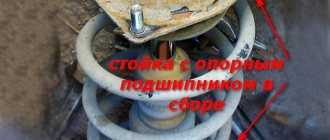
Fortunately, if there is play, then the bearing needs to be replaced. A lift is a temporary solution
It's true. But in a crisis, the solution is not bad)
In fact, I also improved myself last year. I have already bought new hub kits from Japanparts, the price tag on them is small, around two thousand it seems. I'll change it when it's warmer.
Fortunately, if there is play, then the bearing needs to be replaced. A lift is a temporary solution
I beg to differ, as in the field, the manufacturer recommends checking and tightening the thrust tapered wheel bearings based on mileage, this is a normal operation.
PS In fact, there should and always be a small gap, this is the so-called thermal gap. And if it’s not there, the bearing will roll on it sooner or later.
Read also: Registration of a vehicle under a sales contract
Tightening and final adjustment occurs after approximately 600 km on the new bearing. Further, play may be a result of excessive wear, which should be resolved by replacement. I’m not arguing about gaps; naturally, a small amount of play should always be present.
Fortunately, if there is play, then the bearing needs to be replaced. A lift is a temporary solution
I pulled up 20 thousand))))
And then I went for a swim. And after a couple of weeks the bearing jammed
I forgot to write that after tightening, it would be nice to kick the wheel, and only then check) There the brake pads will loosen and the bearing will fit better.
Well, you got scared about re-tightening it)) - nothing will happen to it, if it’s not wrapped up like crazy, in a couple of thousand it will roll it and everything will be fine.
Yes, I forgot to write) I pulled it up a little bit at a time, after each approach I pumped and kicked the wheel.
I’ll correct it a little, the play is not vertical, the play is on the rolling, axial, the bearing must be tightened when the brake pads are loose, you must tighten it all the way, and then turn the wheel and loosen the nut until the moment when the wheel can freely spin by hand and make a revolution, and there is a special one for this key.
I forgot to write that after tightening, it would be nice to kick the wheel, and only then check) There the brake pads will loosen and the bearing will fit better.
Well, you got scared about re-tightening it)) - nothing will happen to it, if it’s not wrapped up like crazy, in a couple of thousand it will roll it and everything will be fine.
I usually spin along the movement, then suddenly stop and spin in the other direction. And so a couple of times. Then I check. Everyone has their own chips)
Read also: How to remove glue after tinting
ICE. Here's a question: when I bought a sports belt, the right wheel was loose (axial play), I changed the bearings, but the play remained... I assembled it as I took it apart, i.e. first the washer then the nut. What is the order of assembly? A couple of weeks ago I installed manual hubs and assembled them in the same way. The day before yesterday, while driving to the village, I heard a sound as if a wire had been wound and broken, the steering wheel was pulled to the left, as a result, the left bearing of the khan, the wheel was dangling. How should it be installed?
First the nut and then the washer!
Understood thanks! It turns out that I didn’t make it, the bearing was broken...
There's some pretty creative work with these bearings. The idea is that you screw on the nut, tighten it and turn the wheel a couple of turns. Until then, the bearings will fit as they should, and you can do 10 pull-ups. Then, when the bearings are in place, you turn the wheel back and forth and adjust the tension. Once everything is set up, you place the puck. It has holes around the perimeter. And lock the nut through these holes. So that it does not unwind and twist more than necessary. If you assemble without these washers (read washers and then nuts), then the right side will tighten arbitrarily while moving forward, and the left side, on the contrary, will unwind. Washers are needed to hold the nut in a certain position
Well, I realized that the washer is a stopper. I had nuts with cotter pins on my machines and, as I wrote, the washer was clamped with a nut, I thought that’s how it should be...