A car generator is a device that converts the mechanical energy of rotation of the engine crankshaft into electricity. The generator powers the vehicle's on-board network and recharges the battery after the engine starts.
During operation, generator breakdowns often occur. To solve problems, the 2110 generator is repaired or replaced. In both cases, the generator must be removed from the car. To do this you will need:
- remove the generator drive;
- unscrew the VAZ 2110 generator mount;
- remove generator 2110;
On the VAZ 2110, the generator can be removed quite simply, so all the work can be done with your own hands in a regular garage. Read more in our article.
Signs of a generator malfunction
The generator on the VAZ 2110 has an average resource of about 80-100 thousand km, after which failures in its operation are possible. There can be many reasons for breakdowns: generator bearings, brushes, windings, etc.
As a result of malfunctions, a weak current is supplied to the on-board network. In this case, it is important to pay attention to the following signs:
- a battery icon appears on the dashboard (indicating that the battery is not charging);
- when the lights are turned on, the headlights burn dimly or the light pulsates (unstable voltage);
- turning on additional equipment causes the dashboard backlight to dim;
- the load on the on-board network leads to the heater fan working weakly, etc.
These signs indicate that the generator is not capable of powering the on-board network; electricity is taken from the battery. It is also important to understand that when the generator fails or malfunctions, problems arise with charging the battery, as a result of which the battery quickly discharges.
Ultimately, the lack of spark at the spark plugs will cause the engine to stall. In such a situation, it is necessary to remove the generator, since after dismantling the device, you can disassemble the generator, check it, repair it (for example, replace the brushes) or completely replace it with a new or working device.
What types of breakdowns are common?
Most often, the generator for 8 and 16 valve VAZ-2110s fails as a result of moisture and dirt. Another reason is the wear of the components of this assembly, namely the brushes. Most often, the malfunction manifests itself as follows:
- the generator does not produce electricity;
- output current is either too high or low voltage;
- During engine operation, extraneous sounds are heard, most often a squeak or squeal.
The operation of the generator is checked using special stands or a digital voltmeter. If extraneous sounds are heard in the engine compartment area, then first of all you need to check the timing belt tension. Most often this is the reason, but after checking, remove the belt from the pulley and start the engine. The absence of noise is a reason to check the performance of the generator more carefully.
Where is the generator for 2110 located?
The VAZ 2110 generator is located in the engine compartment on the left side (located closer to the engine cooling radiator).
You can also notice that the engine crankshaft is connected to the generator using a belt. Let us add that the generator on the VAZ 2112 is located by analogy with the “ten”.
In terms of operation, the installation location is not the best, however, the location of the generator is quite convenient for servicing or removing the device. In practice, before dismantling, it is advisable to treat the generator mounting with a penetrating lubricant (such as WD-40).
Studying the spare parts catalog
It turns out that a “long” alternator belt, or “accessory belt,” can be used in conjunction with the 21120 engine (16v 1.5). The tension in this case is provided by roller 8.
The "short belt" can be used with any 16 valve. In configurations with a short belt there is no air conditioning and power steering.
Generator part numbers
- 2110-1041020, −01 — drive belt for auxiliary units (until 09.2001);
- 2110-8114096-10, −13 — air conditioning drive belt (after 09.2001);
- 2110-1041056 or 2110-8114060 - tension roller;
- 2112-8114054 (“Lux”, air conditioning) or 2111-8114054 (“Normal”) - roller bracket;
- 2110-3701720, −01, −03 — alternator belt (“short” belt);
- 2112-3701010, −02, −03, −06 — generator (for any configuration).
Generator replacement
If it is necessary to remove for repair or replace the 2110 generator, the replacement must be carried out on an inspection pit, lift or overpass. You can also jack up the front of the car and remove the wheel.
As for the tools, you will need to prepare:
- set of wrenches;
- spanners.
Also, always have penetrating lubricant and clean rags on hand. When removing the generator, especially if the 2110 generator is being repaired rather than replaced, try to prevent dirt, moisture, grease, technical fluids, etc. from getting inside the device.
The device is replaced as follows:
- drive the car into a pit or lift it on a lift;
- You need to remove the “negative” terminal from the battery (to unscrew the terminal you need a wrench 10);
- remove the right front wheel from the car;
- unscrew the crankcase protection fasteners (if equipped) and the boot;
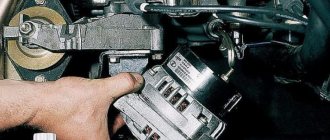
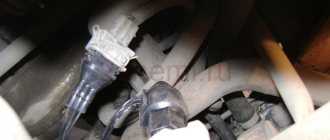
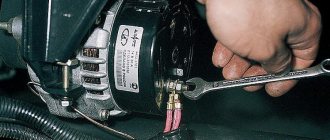
- Next, in the engine compartment of the car, you need to disconnect the wire connector from the terminal (unscrew the nut holding the terminals);
- the main task is to remove the “positive” terminal by moving the rubber cover to the side;
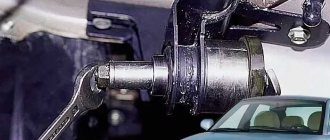
- Having disconnected all contacts, you need to loosen the upper and lower bolts securing the generator using a 13mm wrench;
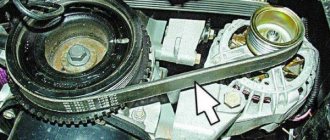
- Use a 10mm wrench to loosen the adjusting bolt, thereby releasing the tension on the generator belt and remove the belt (then the bolt can be unscrewed completely and then removed);
We also recommend reading the article about how much the generator should produce to charge the battery. In this article, you will learn how to check your car's alternator and how efficiently it can charge the battery. - the generator mounting bolts can now be completely unscrewed with a 13mm wrench (if the bolt cannot be removed from the generator, you can try to carefully knock it out with a hammer),
- normally the top mount and tension bar are removed;
- if difficulties arise, you need to go down under the car and unscrew the bolt nut, pull the bolt out of the hole;
- Next, the generator needs to be lifted, after which the generator can be completely removed from the car;
By removing the generator on the 2110, you can troubleshoot the device, repair it, or completely replace it. Having prepared the generator, installation is carried out in the reverse order of removal.
Checking and replacing the brush holder and capacitor of the VAZ 2110 2111 2112 generator
Details Parent category: Car repair VAZ 2110 2111 2112
Functions and testing of the generator capacitor on a VAZ 2110 2111 2112 car
The capacitor serves to protect the vehicle's electronic equipment from voltage surges in the ignition system, as well as to reduce interference with radio reception. Damage to the capacitor or loosening of its fastening on the generator (deterioration of contact with the housing) is detected by an increase in interference to radio reception when the engine is running. Approximately the serviceability of the capacitor can be checked with a megohmmeter or tester (on a scale of 1-10 MOhm). If there is no break in the capacitor, then at the moment the probes of the device are connected to the terminals of the capacitor, the arrow should deviate in the direction of decreasing resistance, and then gradually return back.
The VAZ 2110 2111 2112 generator has a K73-58-4 type capacitor installed. The marking is located on the side of the capacitor body. Do not install any other type of capacitor.
Criteria for serviceability of brushes on the VAZ 2110 2111 2112 generator.
If the brushes are worn out and protrude from the brush holder by less than 5 mm, then replace the brush holder with brushes. To replace, pull the brush holder out of the voltage regulator body by pressing terminal “B”. Before installing the voltage regulator with a new brush holder in place, blow the installation socket in the generator from coal dust and wipe it from oil.
PROCEDURE FOR CHECKING AND REPLACING THE BRUSH HOLDER AND CONDENSER OF THE GENERATOR VAZ 2110 2111 2112
1. Disconnect the wire from the “–” terminal of the battery.
2. Disconnect the block with the wire from terminal “D” of the generator and the wire from the contact bolt (terminal “B+”).
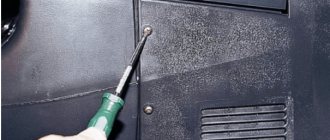
3. Unscrew the three latches and remove the plastic casing.
4. Unscrew the two screws securing the brush holder.
5
Carefully remove the brush holder so as not to damage the brushes and disconnect the block with wires from it
6. Unscrew the nut securing the contact bolt.
7. Remove the spring washer.
8. Remove the spacer washer and disconnect the capacitor wire tip from the contact bolt.
9. Unscrew the mounting screw and remove the capacitor from the generator.
10. Check the serviceability of the voltage regulator. Connect a 12V test lamp to the brushes. Apply a voltage of 12 V “+” to the terminal, and “–” to the “ground” of the brush holder. In this case, the control lamp should light up.
11. Then apply a voltage of 15–16 V - the lamp should go out. If the lamp is on or off in both cases, then the regulator with brush holder is faulty and needs to be replaced.
12. Check the ease of movement of the brushes in the brush holder and their protrusion. If the brushes protrude less than 5 mm from the brush holder, replace the voltage regulator with brush holder. If chips or cracks are found on the brushes, also replace the regulator.
13. The serviceability of the capacitor can be checked with a megometer or tester (on a scale of 1–10 MOhm). Connect the tester probes to the capacitor contacts. Before connecting, the device shows infinity. At the moment of connection, the resistance decreases and then returns to infinity again. In this case, the capacitor is OK. The faulty capacitor must be replaced. Capacitor capacity 2.2 µF ±20%
14. Install the capacitor and brush holder in the reverse order of removal
Please note that the capacitor must be precisely oriented relative to the mounting protrusion on the cover, otherwise the brush holder will not fit into place
Recommendations
- Considering that the generator is secured with bolts, it is important to monitor their condition. When removing, experts recommend treating the bolt with copper grease or any other suitable lubricant. In the future, this will make it easier to remove the generator, since the fasteners will be easier to unscrew.
- If the alternator belt has defects (stretched, cracks are visible), it is optimal to replace it with a new belt. In other words, replacing the belt is carried out in parallel with replacing or repairing the generator itself.
- When installing a new belt, it is important to correctly place the alternator belt on the pulley and adjust its tension. The generator belt is tensioned using an adjusting bolt.
When replacing the belt, it is necessary to tighten the alternator belt so as to avoid overtightening or sagging. It should be remembered that incorrect tension can lead to squeaks and whistles of the alternator belt, a reduction in its service life, as well as malfunctions of the device itself.We also recommend reading the article about what to do if the alternator belt whistles or the alternator belt whines. From this article you will learn why the accessory belt makes a whistling sound, as well as what to do if the generator belt starts whistling.
- Lack of battery charge (battery icon on the instrument panel is lit) is not always directly related to the generator. Often the relay regulator may fail, the contacts and terminals of the generator may oxidize, problems may arise with the terminals on the battery, etc. For this reason, before starting work with the generator, it is necessary to carry out diagnostics using a multimeter and clean the terminals, connectors and contacts.
Reasons for whistling
Let's look at the main reasons why the V-belt connection whistles. They boil down to this:
- The belt has low tension. At the same time, he slips, which is especially noticeable at night, when he whistles with special “zeal.” This is due to the fact that at night the generator is forced to work in increased mode, providing the car with light;
- The destruction has begun. It dries out and literally begins to fall apart. First, cracks appear, then pieces fall off. At the same time, it also whistles due to the fact that the bullies catch the pulley, contributing to slipping. It needs to be changed urgently;
- Moisture ingress occurs quite rarely, and it evaporates during operation. But if at the same time the V-belt connection whistles, this indicates that it is necessary to apply tension;
- Wedge of the generator itself.
In what cases is replacement necessary?
Like any consumable material, the alternator belt has a certain resource and requires constant technical inspection. According to the advice of the manufacturer at VAZ 2112
Regardless of whether there are 16 valves on the engine or 8, it is necessary to change the consumables after 45 thousand kilometers. But these are only tips; you need to constantly worry about the condition of the product and change it when it’s time. The service life depends on the following reasons:
- driving habits;
- operation criterion;
- product properties.
A visual inspection of the drive components should be carried out when the car has traveled a maximum of 10,000 km and before a long trip. This makes it possible to avoid nasty surprises while driving – a broken belt. It is recommended to carry a spare one in the trunk on your own, because if it breaks, the car will no longer be able to move without the help of others.
It is necessary to change the strap if it is torn, stretched, as it is also called, and has become unusable. There is an option to find a bad tension by the specific whistle that occurs when starting the engine. Tension plays an important role in the performance of a belt drive. If the tension is weak, the unit does not produce the amount of electricity required for normal vehicle operation. If it is strong, the service life of the belt, drive bearings and crankshaft is reduced.
KEY-DOP
It is natural to find the need for replacement when examining the following signs:
- the appearance of cracks and tears;
- worn surface;
An old product with a worn surface
material delamination; frayed edges; strong stretch.
It's easy to check the strap tension. It is considered normal if, with a force of 10 kg, it bends by 10-15 mm. To check, he needs to press with his huge finger approximately in the center of the belt between the crankshaft pulley and the generator.
Place to check tension (where to press)
Technical specifications
If the old generator fails, many motorists wonder which generator they should now replace the old one with.
There is no need to invent anything here. The most correct solution is to install the same generator as before, or a more powerful one.
Today, the VAZ 2110 provides for the use of three types of power supply devices:
- Katek 5102.3771. The generator produces 80 Ampere power and its voltage is approximately 14V.
- Katek 94.3701. This is a device with the same parameters. They are not seriously different.
- Catek 120 amp. A generator that is more adapted to modern realities, when in addition to standard electrical equipment, motorists install many additional devices.
If you have a powerful audio system in your car, you use an electric pump powered by the car, as well as a number of other additional consumers, it is recommended to install a 120-amp unit instead of a standard 80-amp generator.
If we take into account the size of the devices, then we can distinguish between ordinary and compact ones. They have a certain difference in design
To be specific, the differences are in the following components:
- Brackets;
- Anchor;
- Excitation wire;
- Drive pulley;
- Number of mounting bolts.
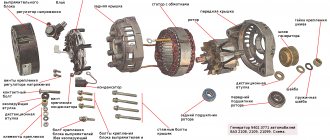
But in reality this does not play a special role. After all, the structure of all generators used for the VAZ 2110 is the same. Therefore, let's look at the circuit and structure of this unit.
| Element | Functions |
| Rotor | He's an anchor. It is a rotating element of the generator, which creates a magnetic field due to the excitation winding located on the shaft. The field wire receives power from the slip rings. They are mounted on the same shaft. There was also room for a drive pulley, field winding wire, bearing assembly and fan impeller. There may be 1-2 last ones |
| Stator | This is a stationary three-phase element that includes three windings. They provide the creation of alternating current. The windings are connected to each other using a triangle or star |
| Frame | A lightweight non-magnetic aluminum alloy is most often used to make the generator housing. The body looks like a pair of covers connected by a bolt. The front cover is located near the drive pulley, and the rear cover is located on the side of the slip rings. Each connecting bolt must be tightened. To disassemble the housing, simply unscrew the mounting bolts. |
| Fasteners | The upper mounting bracket for the generator uses two bolts, while the lower bracket is predominantly mounted on one bolt. In some cases there are two. It is not recommended to modify the brackets, since the factory one performs important functions. The purpose of the brackets is to hold the generator. It is recommended to monitor the condition of the brackets as they are subject to wear and breakage |
| Brush unit | It consists of a pair of graphite brushes, springs that press the brushes, as well as a brush holder |
| Brush holder assembly and voltage wires | This design is typical for modern Katek generators. Therefore, if the regulator fails, you will have to replace the entire assembly |
| Rectifier block | Equipped with 6 diodes, it is responsible for converting alternating current into direct current. It is direct current that is required for the operation of all auto equipment. This element charges the battery, among other functions. |
| Belt drive transmission | The belt drive allows you to increase the speed at which the crankshaft rotates. If the pulley has a small diameter, then the V-belt will wear out faster. Therefore, for small driven pulleys it is recommended to use a poly-V-ribbed drive. It is most often found in modern generators |
Internal structure
The presented device is relevant for all generators used on the VAZ 2110, regardless of their power - 80-120 Amperes.
Margin of safety
If we take into account the standard Katek generator, which is installed on domestic dozens, then its resource is enough for about 10 years of operation or 140 thousand kilometers. The specified safety margin of the device can only be relied upon if it is handled properly
The specified safety margin of the device can only be relied upon if it is handled properly.
Many people fear that a powerful 120 A generator can negatively affect the condition of the battery. In practice, nothing like this happens. Moreover, installing a more powerful unit is recommended if you plan to install an impressive audio system or video equipment on the car.
Bearing check
Many motorists know that often the cause of generator problems is problems with bearings. Diagnosis of this part begins with a careful external examination. Serviceable bearings should rotate easily. If damage is found, such bearings require replacement.
Typically, these situations include the following:
- if the generator makes howling sounds, it must be dismantled in order to troubleshoot the stator;
- if the generator does not make characteristic sounds, then it is enough to tighten the fastening nut;
- if after tightening the generator begins to make howling sounds, it means that the brushes and contact rings require wiping with a rag previously soaked in gasoline;
- If even after all the manipulations the generator is noisy, then replacement is inevitable.
How to check the rear and front bearing:
- To check the rear bearing, it is carefully rotated to detect whether the mechanism is sticking or if there is any abnormal noise.
- Checking the serviceability of the front bearing is carried out by holding the pulley with your hand. If this results in malfunctions or extraneous noise, then this part requires replacement.
It is more advisable to replace the bearing yourself by conducting a thorough inspection of the damaged part and eliminating existing problems.
To do this you need:
- First, parts such as the pulley, limiting washer, segment key and cooling impellers are dismantled.
- In addition, you need to check the brush holder, since the reason may lie there.
- If the cause has not been found, it makes sense to continue troubleshooting. To do this, you need to unscrew the generator nuts using a 10mm wrench and remove the connection bolts.
- Pull out the stator cover and dismantle it.
Having completed these manipulations, replacing the bearing will not take much time.
bracket
Most often, the reason for poor performance of cars lies not in the design itself, but in its bracket. The mounting bracket for the VAZ 2112 generator is fragile, as it is not made of metal. If the parts are installed incorrectly, the fastening of all nearby devices becomes beveled, which, in turn, causes a crack in the bracket.
Many car owners complain that car parts have to be replaced every three months. So, for example, of all cars, the VAZ 21124 generator mount breaks most often. In this case, it is better to consult with specialists and, if possible, make a metal bracket yourself or order it from a specialist.
It must be remembered that a broken bracket is a kind of indicator indicating the existence of a misalignment, improper installation of the generator, excessive tension or weakening of the belt. Only after the cause is identified and eliminated will the parts serve for a long time.
The instructions described above allow you to understand the structure and stages of installation of parts. But in order to better understand the sequence of actions, you need to familiarize yourself with the information provided in the attached video. Based on the fact that the work must be done independently, its price will be low.
With sequential steps, removal and installation will allow beginners to better understand the internal workings of the machine. The main motto in such work is care, since if the fastening is incorrect or there is a slight bevel or deviation, then many spare parts may break down, which will lead to costs.