Which APs should be used for replacement?
Now the time has come to change the TD, but the car owner does not have the money to go to a service center or he does not trust those who work in one service station for the entire small town. In this case, the car owner, if he is not too lazy, can replace the brake elements himself. The main thing is to buy original TDs.
Attention! If original brake discs are not available in auto stores in your city, then you can always order them from an online store, auto mechanics advise.
Article numbers of original brake discs on Niva Chevrolet:
- 21210-3501070-01;
- 21210350107001;
- 2121-3501070-01.
Knowing the TD article number, model and engine size of the Niva, you can select the necessary original brake elements.
Design features and purpose of Chevrolet Niva brake discs
Every car owner knows that the braking process involves friction. It helps reduce the speed of the car and stops its movement. The primary role in the braking process involving friction is played by the brake disc, which stops the movement of the wheels. This part can be cast iron, carbon fiber or ceramic. Chevrolet Niva is equipped with cast iron discs.
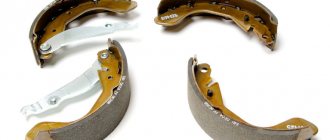
The car we are considering has brake discs on each wheel, which is why they are divided into front and rear. Their purpose is the same, but their design features are different. The rear discs are called drums with a shape corresponding to the name.
The Niva's front discs resemble a flat support, which is affected by working system elements. During the braking process, these elements heat up and eventually wear out.
The stronger the heating , the more worn out the disc is, so sooner or later the brake disc on the Niva will need to be replaced, which you can do yourself after reading this manual.
Also interesting: The ABS sensor light is on ABS on the car dashboard reasons
TD malfunctions
In what cases should brake elements be changed even if the car obeys the car owner:
- scratches. They appear due to the operation of the brake pad without coating. In this case, you need to change the pads. And only then look at the serviceability of the TD;
- steering wheel vibration when braking Niva Chevrolet. It indicates that the TD is deformed and must be urgently replaced;
- appearance of cracks. In this case, replacement is also required.
After the faults and brake elements to be replaced are identified, they are purchased strictly according to the article numbers, the Chevrolet Niva is driven into the pit and the procedure for replacing the brake parts is carried out.
Chevrolet Niva! We solve the problem with the brakes. Replacing pads and brake discs
Everything is much more difficult than in Patriot. That's for sure.
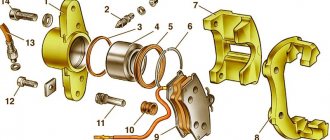
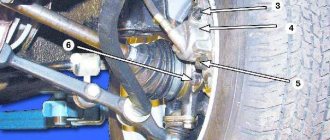
Cylinder block and brake caliper.
We remove the retainer and its spring from the socket of the brake cylinder block.
The retainer fits into the caliper hole and limits the movement of the cylinder block .
We assemble and install the front brake mechanism in the reverse order.
To facilitate assembly, use a file to remove the chamfers from the guides of the cylinder block .
Having sunk the latch into the block socket, insert the block into the grooves of the caliper. Using a hammer with a plastic striker, hammer in the cylinder block until the retainer fits into the caliper hole. To remove the shoe guide...
...remove the upper clamping lever in the same way as the lower lever (see Replacing the front brake pads).
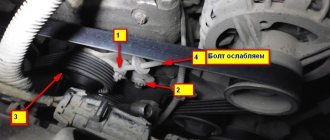
Using a 10mm socket, unscrew the bolt securing the front casing to the pad guide.
Using a chisel, loosen the two bolts securing the shoe guide to the steering knuckle.
Using a 17mm wrench, unscrew the bottom bolt.
It is more convenient to unscrew the top bolt with a head.
Remove the front cover...
...and the pad guide.
The brake disc be dismantled only after removing the hub (see Replacing the hub bearings). When tightening the bypass bolts, note that the position of the brake hoses is determined by the guide brackets. We carry out the assembly in the reverse order and bleed the brake system (see Bleeding the brakes).
Copyright © 2007-2018 All rights reserved. All trademarks are property of their respective owners.
In our short article we will look at how to replace brake discs on a Chevrolet Niva. The brake system is the most important part of any car, because it allows you to stop traffic as quickly and safely as possible. Naturally, this affects road safety - the system allows you to avoid emergency situations. It is prohibited to operate vehicles with a malfunction of the braking system; this entails not only administrative punishment. After all, if this mechanism breaks down, you can get into an accident.
Front brake element replacement process
Tools you will need:
- jack;
- gloves;
- key;
- cleaner;
- screwdriver.
The process of replacing the front discs is as follows:
- Remove the wheel.
- Unscrew the screw at the lower brake flap.
- Bend the shield stoppers with a screwdriver.
- Remove the guide block bolts.
- Remove the shield and caliper.
- You hang the last one on a rope. This is necessary so that it does not interfere with you while installing a new disk.
- Remove the hub protection.
- Hold the last one and unscrew the nut.
- Remove the brake element.
- Install a new part and repeat the process in reverse order.
There are some nuances that need to be taken into account according to experienced mechanics. We'll tell you about them.
When replacing brake discs, it is recommended to replace the brake pads. Otherwise, the procedure will be incomplete and useless. Without new brake pads, the discs will quickly fail.
For your information! Experienced mechanics also recommend paying attention to the wear of the pads. If they are only slightly worn, then you can leave them alone and change only the TD.
In urban environments, brakes wear out faster than on highways. When changing disks, it is advisable to change all four APs. If testing shows that only two front or two rear ones are too worn out, then experienced mechanics recommend leaving a pair of discs that can still last twenty thousand kilometers.
How to change brake discs on a Niva?
Lada 4×4 2121 Niva
To feel completely safe on the road, first of all, you need to be sure that the car’s braking system is in perfect working order.
This means you can brake quickly and stop quickly without losing control. Each car part has a certain service life, after which it must be replaced.
VAZ 2101-2107 (classic) – 9.0 mm VAZ 2108-21099 – 10.8 mm VAZ 2121-21213 (Niva) – 10.8 mm VAZ 1111 “Oka” – 8.0 mm VAZ 2110-2112 – 18 mm
If you are not sure that you can handle the replacement yourself, then it is better to entrust this matter to professionals.
It is necessary to constantly monitor the condition of the braking system, the main elements of which are brake discs, and all maintenance work should be trusted only to those people who have professional skills in this matter.
Important: brake discs must be replaced in pairs, and the brake pads, which are critical safety elements, must also be replaced with new ones. All work on replacing brake discs must be carried out strictly according to the instructions. In case of violation of the instructions, the seller disclaims all warranty obligations.
Removing old and installing new brake discs 1. Once the vehicle is securely stable, remove the wheel.
2. Remove the old brake pads and, using a special tool, press out the piston to make room for the new pads. Used brake pads cannot be used with new discs and must be disposed of.
3. Remove the brake frame together with the mount without disconnecting the brake hose, and install it so that it does not hang on the hose. Remove the worn brake disc.
4. The surface of the wheel hub must be thoroughly cleaned with a brush and suitable alcohol solvents to remove scuffs, rust, and dirt. Often, it is the dirty surface of the hub that causes beating and vibration of the brakes. A dirty hub and the resulting brake vibration cannot be considered a defect in the brake discs.
5. Be sure to check the hub runout. This must be done using a special device. A runout of no more than 0-0.1 mm is allowed. If you determine that the runout exceeds this value, then further work on replacing the brake discs is suspended in order to repair the hub.
6. Before installing discs, carefully remove any preservative coating using a suitable solvent. Install the brake discs
7. Before installing the wheel, check the runout of the brake disc. If all operations are performed correctly and carefully, the runout value will not exceed the permissible value (0.15 mm). See fig. 4. Larger runout results in vibrations during braking and increased brake pedal travel.
8. Reinstall the brake pads (preferably new ones) in the same way as they were removed, and screw the wheel into place.
ATTENTION! At first, until the brake pads rub against the disc, and this is approximately after a mileage of up to 500 km, you should not brake too sharply. Otherwise, local overheating zones and deformation may occur.
Source: www.drom.ru
Replacing rear TDs
All the tools that are needed to change the front brake parts are also suitable for replacing the rear brake elements. Changing disks is done as follows:
- Place the Niva Chevrolet vehicle on a jack.
- Lift one side of it and remove the wheel.
- Unscrew the bolts on the brake drum.
- Remove the drum completely.
- Using a screwdriver, try to carefully pry and remove the tie bar and spacer.
- Rotate the shank of the front pad strut.
- Move the front block to the side.
- Remove the rear tension spring.
- Remove the rear pad support post.
Install a new disc and reassemble the Niva Chevrolet brake system in the reverse order of disassembly.
Now you know how to remove and install new brake discs on a Niva Chevrolet. However, sometimes car owners who are starting to repair their car for the first time encounter problems such as difficulties in removing the disc. He just stops and the person doesn’t know what to do next.
Troubleshooting
The brake rotor is usually made of stronger materials, so its wear rate is usually less than that of the pads. But, like any part, it may need replacement. The pads wear out especially badly when exposed to dust or water if the car is operated in off-road conditions.
First of all, the malfunction can be determined by deterioration in braking performance. But it is important to remember that this problem usually occurs with severe wear and tear and can cause an accident at an unexpected moment. Therefore, there are several more signs by which, without a visit to a service station, you can determine the moment when it is necessary to replace the brake disc on a Chevrolet Niva:
- The appearance of extraneous sounds when braking: noise, grinding. The car may pull to the side.
- A visual inspection may reveal the appearance of cracks, chips and other defects.
To understand how bad the level of wear is, you may need a caliper. To do this, you need to compare the length of the new pads and those used in the car. If the difference is more than 3 millimeters, then the pads definitely need to be replaced.
If the changes in thickness are insignificant, but there are traces of wear from sand and dirt, then you can grind the wheel using a specialized tool. The thickness of the part after processing must be at least 9.5 mm.
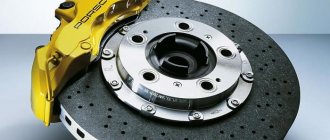
What to choose: ventilated or non-ventilated wheels
Car owners often ask mechanics which wheels are better. Recently, the production and installation of ventilated APs has increased. Because they dissipate heat better than regular ones. This increases the lifespan of the brake elements.
Ventilated discs are larger in diameter than regular ones. Therefore, they are able to cool faster and improve braking. Such TDs are effective during sudden braking. In this case, the conventional mechanism overheats, the brake fails, and the Chevrolet Niva begins to rattle.
Replacing Niva front discs
Changing disks during repairs is as easy as shelling pears.
Required Tools:
- Jack. Raise the car and be able to remove the wheels.
- Gloves. Protect your hands from any harmful substances.
- Key. To remove a wheel from a vehicle and loosen the brake caliper.
- Screwdriver. For removing the brake lining and accessing the brake disc.
- Brake cleaner. To protect the new brake disc and remove dirt.
When purchasing new wheels for installation in a car, you may notice that they are covered with a layer of paraffin . Before installation, you need to degrease the discs using a cleaner.
Replacement is required when the minimum wear thickness is reached or when any anomalies are detected (scratches, bends, cracks, breaks). Each mechanism has a predetermined minimum thickness limit below which it must be replaced. This minimum wear limit is indicated on the description sheet. If the side of the brake mechanism is equal to or less than the specified minimum limit, then replacement is necessary.
When installing a flange on a disc contour, it is difficult to accurately measure the residual thickness . To effectively measure brake thickness, you need to measure the thickness at three different heights: first near the outer flange, second at the center, and third near the inner edge. To replace the mechanisms, you will first need to remove them, that is, raise the car with a jack.
Attention! It is necessary to thoroughly clean the hub so that vibration does not occur during braking.
Replacement occurs as follows:
- The wheel is removed.
- The bolt at the lower brake flap is turned out.
- Using a screwdriver, bend the screw stoppers.
- Remove the bolts from the guide block.
- The shield and caliper are removed.
- The support is suspended on a wire or rope.
- The protective cap of the hub is removed.
- The hub is held, the nut is unscrewed and removed.
- The disk is removed.
- A new disk and removed parts are installed.