It seems banal. I wouldn’t even write))
But I encountered some minor difficulties. 1) Type of lamps.
I read the Internet, there are few posts on this topic, I found one - type h11.
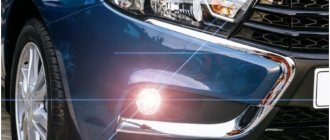
I came to the store, just in case, I asked exactly how “a light bulb for PTF grants.” People ask me “what base?” Gru - “like H11.” The seller is not a fact! And he says that in addition to H11 there is another one. And the bulbs are non-returnable, so I had to figure out exactly which one. As a result, I found out that I have an H11 from a photograph from my blog post
, where the fog lights are visible on the removed bumper.
2) Price
. Here I must say that the cheapest H11 lamp in that store was hella for 410 rubles for 1 piece! Not cheap! Unpleasantly surprised. There are lamps for 700-800! (regular ones, it seems). I googled it and decided to take Hella. Should be normal. China did not decide, as there may be problems with poor light, excess current (melting wiring, connectors, or even worse). I bought it in general.
3) Replacing the lamp
. Again, there is not enough information, there is a video on YouTube where they chat about this topic... I came across a recording here on the drive, how someone on a grant changed the lamp in the PTF, so he even cut out a “hatch” in the standard fender liner! This method is not acceptable to me. I also didn’t want to remove the factory fender liner - I still have “fangs” (bumper body kits), which are secured with 2 screws from the factory fender liner... As a result, at the dacha, the idea came to me - to bend the bumper out of engagement with the fender, having first unscrewed 2 screws, connecting the bumper to the fender liner. Everything should be clear in the photo. In the end it took about 5 minutes to get the job done. Everything went smoothly. PTF works. I'm happy )
By the way, from the Lada Granta owner's manual
:
“To free access to the fog lamp from under the front wheel arch, you must first REMOVE the wheel and partially release the fastening of the front fender flap by REMOVING 6 SCREWS.
Bend the shield, remove the inoperative lamp...” In the standard Norm, Standard, Lux, Liftback configuration, fog lights (hereinafter referred to as PTF) are not installed in the front bumper. Instead of accessories, plastic plugs are built in. Let's look at how to install fog lights on a Granta liftback step by step below.
Preparatory stage (selection of PTF for Lada Granta)
The range of PTFs is not large; it is represented by several domestically produced models. Some owners claim that PTFs from Opel and Ford are compatible, but the information has not been verified.
| Name / manufacturer / article | Price, rub.) |
| LADA Granta (VAZ 2190) / Kalina 2 / LADA Largus |
OSRAM kit 21900-3743010
*prices are as of September 22, 2018.
Step-by-step process for preparing and installing fog lights
In the auto store we purchase: PTF, corrugation (at least 3.0 m), adapters - adapters for PTF with standard wiring.
- To remove the front bumper, unscrew three self-tapping screws on each side, four plastic clips, three “10” bolts in the lower perimeter;
- We remove the structure along with the radiator grille;
It is important to know. In the Norma and Standard models, there is no hole for adjusting the fog lights. The owners independently cut out a diameter of “8”. In the Liftback body modification, the opening is factory-made.
- We cut out the opening for the fog lights along the contour, it is factory-made;
- To make it smooth, treat the surface with a household hairdryer;
- We fix the headlights on three standard mounts;
- We connect adapters to each of the lamps, since the standard block with wires is short, its length is not enough;
- We put on the front bumper, screw it in with bolts and plastic clips.
If you drive in fog and there are no PTFs, what should you do?
The rules, as we mentioned above, regulate the use of external lighting devices - specifically, section 19 establishes under what conditions which light devices should and can be used. As for the fog lights, they turn on:
in conditions of insufficient visibility (this includes fog, twilight and any visibility less than 300 meters), PTF should also be turned on in their presence, when it is dark outside and only on unlit sections of roads, together with headlights, instead of daytime running lights during the day, together with dimensions in conditions of insufficient visibility when stopping/parking on an unlit section of the road (please note that roadsides and sidewalks are included in the road according to traffic regulations).
But the main subtlety is that there is no obligation to use fog lights in all of the above cases.
Clauses 19.3 and 19.4 of the Rules indicate that they can be included under such conditions, but are not necessarily necessary. This is true, because PTF may not be provided for by the design of your car, and it is absurd to oblige you to include something that is not required by law!
Wiring diagram for fog lights Lada Granta liftback
Engine compartment
- We lay an additional wire from the right PTF headlight to the left one. We solder it and bring it into the engine compartment to connect to the relay.
- We fix the mass to the body at the place where the bumper is attached, maybe under the license plate, in the center.
- Do not forget to lay all electrical wiring in a corrugated material made of fireproof material.
Interior of the Lada Granta liftback car
- We lay the corrugated hose through the hole in the hydraulic corrector seal.
- The connection is best made at the ignition switch. That is, when turned off, the headlights will go out automatically.
- Open the glove box lid, press the side stops, and remove the lid.
- We stretch our hand into the cavity and carefully squeeze out the block of two buttons for controlling the heated glass and PTF.
- We power the minus from the heater button. Plus we won’t take it, since they will be activated at the same time.
- We connect the positive cable and install the unit again.
- We connect to the positive from the ignition switch unit (blue wire), it is located under the steering wheel.
- Finally, we power the relay - regulator: ground - wire from the button - end to the PTF - plus to the ignition.
In each specific configuration, the color scheme of the wire may differ. Read the diagram in the instruction manual for details. Classic colors: red, yellow, blue, brown. If you do not want to supply power through the ignition switch, the connection diagram is simplified with one less procedure.
Advantages and disadvantages
Experts and users note the advantages and disadvantages of headlights in comparison with LED light sources:
- Long service life - up to 50 thousand hours. They are reliably protected from mechanical damage, dust, dirt and moisture entering their interior;
- Due to their low power consumption, LED headlights do not place a large load on the car's alternator;
- During operation, the color of the luminous flux of such headlights practically does not change; LED headlights emit bright white light for good illumination;
- They can be easily installed on any convenient place on the car body: bumper, roof, body kit elements.
- if at least one LED fails, the entire PTF will have to be replaced; installed on the external elements of the car body, such headlights can be easily stolen;
- high cost when compared with other types of lighting fixtures.
Step-by-step instructions for installing a rear fog light
Many Lada Granta Liftback car owners are surprised to hear about this, but it is a fact. Of course, we are not talking about PTF in its classic form, but about a laser brake light. It is installed in the rear of the car and informs the driver behind about the vehicle. Since there is no strictly defined installation location, it is customary to fix it in the area of the license plate, under the lower contour of the bumper, in the spoiler. There are known cases of embedding an accessory inside.
A bright red light beam informs drivers behind, preventing accidents. The brake light is also used when it is necessary to notify the driver of the need to switch the high beam headlights. An alternative way to use lighting when backing up or parking in conditions of limited visibility. The maximum effective beam length is 25.0 meters. Exceeding the length does not guarantee the quality of lighting.
The voltage is supplied from the left/right brake light. Activation is possible either by pressing the brake pedal or by a separate button. The owner makes the decision based on personal beliefs. In practice, activation occurs with an autonomous button, since when driving backwards it is not always advisable to use the standard brake pedal. It is strictly forbidden to point the laser beam at the windshield area behind the driving driver.
Why are fog lights needed?
By installing fog lights on the Grant, you can achieve uniform illumination of the roadside and a stronger light beam near the nose of the car.
Installing PTF on Granta in the official service will require large expenses. The dealer will also impose a service for adjusting the optics, which will not be cheap. Self-installation will take about 3-5 hours, depending on the skills of the car owner.
The kit includes all the necessary wires, fuses, plugs and terminals. The set also comes with lamps, power supply wiring diagram and original on/off switch.
Reviews
| from 2800 | |
| Kit 21900-3743011 | —/— |
| —/— 2190-3743011 | —/— |
| —/— 2190-3743010 | —/— |
| PTF wiring kit for LADA Granta (2190 2874498) | from 600 |
| PTF "LUCH" set 1118-3743010/11 | from 1800 |
| PTF glass (02B08507) Granta / Kalina 2 / Largus, Datsun | from 750 |
| AUTOMOTIVE LIGHTING / BOSCH (982469641) | from 2000 |
| № | Positive |
| 1. | Kirill , 36 years old: after purchasing a Lada Grant from the showroom, I immediately purchased a PTF from OSRAM 21900-3743010. I didn’t install it at the service station because I can do it myself. In general, I am satisfied with the quality of lighting, no complaints. |
| 2. | Vitaly , 29 years old: it is obvious that there are not enough foglights out of the box. I often drive at night and need a good view of the road. Since I don’t understand manufacturers, I entrusted it to a specialist at a service station. PTF Lada Granta liftback - my advice. |
| 3. | Georgiy , 37 years old: I’ve been working as a taxi driver for the second year, my shift often ends after one in the morning. The disadvantage of the standard lighting system is obvious. I bought a “LUCH” set 1118-3743010/11 at the market. The cost is 1850 rubles, the quality is good, installation couldn’t be simpler. |
| 4. | Victor , 25 years old: I work as an entrepreneur, purchasing goods from hundreds of kilometers away. By morning the products should be on the counter. To help the standard headlights, I installed PTF. Second week, no complaints. |
| 5. | Maxim , 28 years old: I leave my positive review of BOSCH fog lights (982469641). Special thanks to the store manager for his practical advice. |
| 6. | Konstantin , 37 years old: during scheduled maintenance, he ordered the service of installing a PTF from a technician. I chose OSRAM 21900-3743010 because the price and quality are at a decent level. Numerous positive reviews. |
| 7. | Vladimir , 48 years old: I was a little upset by the lack of fog lights from the box on the Lada Granta liftback. I had to install it myself last weekend. The lighting is good, no complaints. |
| Negative | |
| 1. | Alexander , 36 years old: not only are fog lights not included in the kit, but they also provide poor lighting. We are talking about a domestic manufacturer. Installed by BOSCH (982469641). I use it myself and recommend it to others. |
| 2. | Vitaly , 39 years old: installed domestic PTF OSRAM 21900-3743010. I regretted buying it, wasted money. The quality is below average, the angle of inclination is several degrees. I don't recommend it. |
| 3. | Vyacheslav , 37 years old: not happy with the installed fog lights, they don’t cover the side of the road, visibility is mediocre, the light is dim. |
Conclusion Every product has its own buyer. If you don’t find fault with a budget car, which is the Lada Granta Liftback, the quality of PTF lighting is good, it is enough for visibility. Of course, when compared with headlights from foreign brands in the premium segment, the advantage of the latter is obvious. In order to increase the service life of accessories, purchase products exclusively from certified points of sale. Require the provision of documents, check the functionality on site.
About the design and purpose of headlights
In Lada Kalina 2, the headlights are endowed with their own design features. Each headlight unit contains three sections that perform the following functions:
- road lighting in low beam mode;
- the same, only in long-range mode;
- dimensions lighting;
- direction indicators.
Headlights must be adjusted correctly, otherwise they can cause not only the driver, but also other traffic participants a lot of inconvenience. Correctly adjusted optics will allow you to confidently illuminate the side of the road and will not dazzle oncoming drivers.
By activating a special switch in the interior of the Lada Kalina 2, the driver turns on the low beam mode. If the same handle is switched to the high beam mode, then in parallel with the switching on of the corresponding lamps, the lighting devices responsible for the low beam also remain active.
The turn signal lamps have bright orange bulbs, and the section housings have transparent lenses.
In Lada Kalina, the headlight units are equipped with electromechanical drives, which makes it easy to adjust the light beam depending on the load on the body and the road situation. A special regulator is located on the panel in the cabin, and the drive mechanism is in the headlight.
When assembling the Lada Kalina body, the manufacturer uses headlights from such well-known manufacturers as Bosch and Avtosvet. To find out which brand produced the headlight for a particular car, you should carefully examine the body of this optics. The “AL” symbol will indicate that the headlight was produced in “Bosch” (Russia). This brand uses material such as polycarbonate. This headlight model does not use a cap that would be visible above the low beam bulb.
Avtosvet products are also made of polycarbonate, but the design already includes the specified cap.
Having disassembled the headlight, the owner of the Lada Kalina can discover the presence of many parts and other elements in it, including:
- wiring;
- lamps and reflectors;
- glass;
- fastening brackets and plugs;
- drive mechanism, etc.
Thanks to the active work of the manufacturer's engineering corps, the headlight design is constantly being improved. This is how neon headlights appeared in the Lada Kalina arsenal. Although their light transmittance is slightly lower compared to standard options, however, during testing, this modification of optics demonstrated enviable results.
Next, we will tell you how to remove the headlight and replace it.
Where can I install PTF
In the design of the modern Granta, the installation locations are precisely worked out: under the license plate, on the sides. Some bumpers even have recesses there . In any case, for proper installation, the front bumper of the car will have to be removed.
But before that, you should go shopping and find the necessary parts. Today's market offers both bumpers with recesses and bumpers with headlights already installed. The choice, as always, remains with the owner.
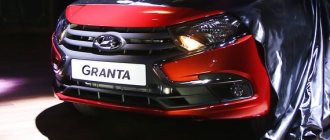
Most Lada Granta cars do not have fog lights, but there are recesses in the bumper for do-it-yourself installation
Instructions for installing headlights for dummies
The entire process of equipping a car with foglights can be divided into several stages:
- Removing the bumper.
- Installation of headlights.
- Wiring.
- Connecting headlights.
- Reassemble the parts in reverse order.
Removing the front bumper
The Granta's bumper is integral with the radiator grille, so in order not to distort the latches under the wings, it is advisable to remove it together with a partner.
Photo gallery: necessary tools
- crosshead screwdriver;
- 10 mm wrench, 10 mm socket;
- 8 mm wrench;
- TORX T-20 wrench.
Bumper removal algorithm
- Unscrew the front license plate.
To access the mounting bolts, remove the front license plate
With the hood open, find and unscrew the bolts securing the radiator grille
The next step is to unscrew one of the bolts and a pair of screws securing the bumper,
Unscrew a pair of screws on one and the other side of the bumper
Unscrew four screws in the wheel arches - a pair on each side
Video: step-by-step process of removing the front bumper
DIY headlight installation
For the Lada Granta, two types of headlights are offered today:
- Bosch - with flat glass;
- Kirzhach is convex glass.
Both headlights are standard, so their choice is up to the consumer.
What tool do you need?
In addition to headlights, to equip a car with PTF you must have:
- self-tapping screws (6 pieces for attaching headlights);
- drill;
- set of drills;
- countersink or sandpaper;
- stationery knife;
- sealant.
Experts recommend installing headlights in accordance with the following plan:
- A hole with a diameter of up to 10 mm is drilled in the center of the oval for the headlight.
Make a 10mm hole in the center of the notch to start cutting
Starting from the center of the hole, carefully cut out a circle of the required size.
It is better to cut the hole in several steps so that your hand does not slip and damage the bumper.
After cutting the hole for the headlight, sand it down so that it does not extend beyond the outer diameter
Secure the headlight using self-tapping screws
After installing the headlight, coat all joints with sealant.
The last paragraph of the instructions is optional. However, experts recommend not to neglect it, otherwise dirt, snow or water may get into the cracks.
The steps described above are repeated in the same sequence to install the second headlight.
How to wire and connect a headlight
To connect the PTF you will need various tools:
- installation kit for connecting fog lights on Grant. It includes a button, a relay, wiring in the cabin, wiring under the hood;
- corrugation (for example, 9 mm for the interior and 16 mm for the hood);
- insulating tape;
- drill;
- set of drills;
- 10 mm head;
- 13 mm wrench.
An installation kit for connecting fog lights on a Grant will make the car owner’s work much easier
Replacing the dome light bulb and removing the dome light
Figure 1 shows the interior lamp (part 21700-3714010-00)
The lampshade is usually removed to replace a lamp or to replace the headliner.
Disconnect the negative terminal of the battery.
Use a screwdriver to pry up the edge of the lampshade
We remove the lampshade from the hole in the ceiling lining
Disconnect the wire block from connector 2 of the wire block
Removing the lamp from the lampshade
We install the new C10W lamp in the reverse order.