It’s terribly useful to do both the first and the second, and the third is basically “oil”! This is how you can cure any patient - disconnect the oxygen, go for a smoke, you come.
and he smokes too!
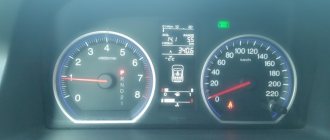
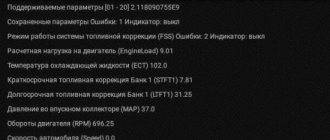
These are messages about factory testing of BOSCH 7.9.7+ Euro3 KSUD, as far as I understand. Try this: 1. Starting position: ignition off, battery on. 2. While holding down the daily mileage reset button, turn on the ignition. All positions of familiarity areas (segments) should light up on the LCD, which indicates the start of self-testing. 3. Press any of the on-board computer control buttons. The LCD should display the program version (Ver 1.0 and higher). 4. Press any of the control buttons again. The following error codes (if any) should be displayed on the positions of the first and second lines of the LCD:
2 – increased voltage of the on-board network; 3 – fuel level sensor error (if a break in the sensor circuit is detected within 20s); 4 – coolant temperature sensor error (if an open circuit of the sensor is detected within 20 s); 5 – error of the external temperature sensor (if there are no sensor readings within 20 s, the indication on the LCD is “-C”); 6 – engine overheating (the criterion for triggering the acoustic alarm is met); 7 – emergency oil pressure (the criterion for triggering the acoustic alarm is met); 8 – defect in the brake system (the criterion for triggering the acoustic alarm is met); 9 – the battery is discharged (the criterion for triggering the acoustic alarm is met); E – error detection in the data packet stored in the EEPROM.
5. If necessary, you can reset error information. To do this, press and hold down the daily mileage reset button for 3 seconds. 6. Press any of the control buttons again. All positions of the familiar areas (segments) should light up on the LCD - the system has returned to the state of point 2. 7. If you do not press any control buttons for about 15-30 seconds, the panel goes into operating condition.
Where did you see the zero? I’m curious. You had or have the following errors: 3 – fuel level sensor error (if an open circuit of the sensor is detected within 20 s); 4 – coolant temperature sensor error (if an open circuit of the sensor is detected within 20 s);
5 – error of the external temperature sensor (if there are no sensor readings within 20s, the indication on the LCD is “-C”; Resetting does not cure. Before resetting, always read what happened. If there are repetitions of the same errors, you need to figure it out. Anyone who thinks that a reset He’s treating something there, they’re just idiots.
Using the Scanner
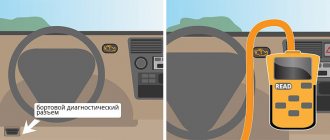
Using a scan tool is the easiest way to reset your check engine light. Here are 5 simple steps:
- Connect the scan tool to the OBD connector under the steering column. A laptop or tablet with the appropriate software is installed in the holder;
- Then turn on the car’s ignition and turn on all the gadgets accordingly;
- On your mobile device, in the appropriate section, press the “READ” button to view engine error codes. We write down the codes with a pen in the order in which they were received. This will be necessary for subsequent repairs.
- We delete the error code. Press the “ERASE” button on the scanner. The Check Engine light will turn off when all error codes are cleared. Some scanning tools have many options, such as freeze frame, which captures the sensor readings. When deleting codes, these readings will also be deleted. Note: in some scanners, the option to clear codes may be automatic and the “CLEAR” or “YES” button instead of the “ERASE” button.
- Be sure to turn the ignition on before clearing codes.
In what cases is it necessary to remove the instrument panel?
Dismantling the Priora tidy is required for tuning or replacing burnt out lamps. The VAZ 2170 is a modern model, so there are not many fastenings on the panel. To disassemble you will need a set of screwdrivers. Don't forget to turn off the negative battery.
The process begins with removing the mounting block. To do this, you need to turn the latches on the fuse cover and then remove it;
Turn the marked clamps to remove the cover. It is not necessary to remove the steering wheel, just lower the steering column down. Using a Phillips screwdriver, unscrew the screws of the trim; use the same tool to unscrew the screws of the instrument cluster. Tilt the top towards you and then remove the combination from the slots. Now you can turn the lock;
Pull the cover out to remove it from the groove Sources used:
- https://priorik.ru/gorit-chek-na-priore-prichiny-nado-znat/
- https://inkam-auto.ru/raznoe/kak-sbrosit-chek-na-priore-samomu.html
- https://www.veber-service.ru/blog/4-sposoba-kak-sbrosit-oshibku-dvigatelja-check-engine.html
- https://remontvazov.com/panel-priborov
Battery disconnect method
Disconnecting the battery is an old way to reset the check engine light. Here are three steps to clear the check using this method: Step 1: Disconnect the cables from the battery. At this point, you should use a wrench to unscrew the positive and negative cables.
Step 2: Discharge the remaining electricity. The next thing you should do is press and hold the car horn for about 30 seconds. This action will help drain the car battery.
Step 3: Wait and reconnect the battery. After disconnecting the battery cables and draining the remaining electricity, all you have to do is wait about 15 minutes and then plug the battery back in. Error codes will be cleared. (Note: This method may not work on some vehicles.) If after this procedure the “check” lights up again, this may mean that the problem is still much more serious.
Malfunctions of auxiliary systems and ignition
Camshaft sensor location
P0337 - crankshaft sensor shorted to ground;
Return to contents
Allow the check engine light to go off on its own.
Wait until the “check” goes out on its own. The simplest method because you don't have to do anything. The computer system in most vehicles will automatically recheck for problems that may activate the error light. If it is a minor problem, it will automatically correct itself and the check will go off. However, if the check light is still on after three days, you need to apply the methods mentioned above to reset it.
If this continues to happen despite the following reset procedures, you should take your vehicle to your nearest auto repair shop and have it diagnosed by a professional mechanic. Professional diagnostics use more sophisticated tools and can identify precise problems.
REMEMBER: You can always contact our car service center, where your car will be happy to receive professional technical assistance. You can also make an appointment with us for a scheduled technical inspection! Please familiarize yourself with our car repair and diagnostic services.
How to reset a check on a Priora yourself
Probably every VAZ owner has encountered such a problem when, out of the blue, the “chek” error comes on. Here many people immediately panic. Don't worry, there's nothing wrong with it. Firstly, this error appears when any sensor fails (here you will have to suffer and determine which one), but all this is determined by changes in the behavior of the car: dynamics, consumption, etc. Secondly, this error appears when the wrong mixture enters the combustion chamber. This can happen in two cases: some sensor is not working correctly, or low-quality gasoline. Try using higher quality fuel the next time you fill up.
However, even if you correct the problem, the “check” will continue to light up. Many people go to computer diagnostics to clear an error, where they pay about 150-200 rubles per minute. Although it’s not a lot of money, why? If you can reset the error yourself, spending the same minute on it, and you don’t have to go anywhere. Don’t know how to reset the check error yourself? Very simple, read below.
We reset the error.
- To do this, turn on the ignition without starting the car.
- Open the hood and remove the positive terminal of the battery.
- We wait from 10 seconds to a minute and seat the terminal back.
- Close the hood.
- Turn off the ignition.
- Turn on the ignition and start.
And then a miracle, the error light stopped lighting.
Even if you cannot decide why your check light came on, do not immediately run to diagnostics. Try to reset this error using the method described above. There are simply cases of accidental operation (there was an impurity in gasoline and the like). And then after the reset the error simply will not appear again. And if, nevertheless, there is some kind of problem, then the “check” will pop up again, after 50 kilometers.
Check Engine Light comes on when your vehicle's computer detects a problem with the powertrain. This may indicate a serious or minor complication, but ignoring it will definitely make the problem worse, leading to significant damage and costly repairs. You can avoid all troubles if you know the reasons for the signal. However, it sometimes does not turn off despite solving the problem. In this case, it won’t hurt you to find out how to reset the “check”.
Most drivers get annoyed if the check light still does not go off, even if the car problem has been corrected. In this case, your car's computer is faulty and a little intervention is required to resolve the issue.
Error 0422
The efficiency of the Priora 16 neutralizer has fallen below the normal level - this is what error p0422 reports to the owner of the Lada Priora 16 valves. As practice shows, codes 0422 pop up quite rarely. If code 0422 appears on the on-board computer screen, then you need to perform the following steps:
- We examine the catalytic collector. Its body and filling must be in good condition;
- If damage is found, the catalytic collector should be replaced with a serviceable one;
- If the catalytic converter is not the cause of the message, then the remaining actions to eliminate p0422 must be entrusted to specialists from the service center.
To get rid of 0422 you will need to reflash the cathode collector. If you have the equipment to set the settings, you can do the work yourself.
Using the Scanner
Using a scan tool is the easiest way to reset your check engine light. Here are 5 simple steps:
Deciphering faults in the fuel and air systems
- P0030 - the oxygen sensor heater wire to the exhaust gas converter has broken;
- P0031 - the same electrical wire has shorted to ground;
- P0032 - the same wire has shorted to the on-board network (BS);
- P0036 - the wiring of the oxygen sensor heater is broken, after the converter;
- P0037 - the same wiring has shorted to ground;
- P0038 - it has shorted to BS;
- P0102 - weak signal in the mass air flow sensor network;
- P0103 - very strong signal in the network of this device;
- P0112 - weak signal in the air temperature sensor network;
- P0113 - very strong signal in the network of the same device;
- P0116 - antifreeze temperature sensor signal is out of operating range;
- P0117 - poor signal from the antifreeze temperature sensor network;
- P0118 - very strong signal from the antifreeze temperature sensor;
P0122 - poor signal in the throttle position sensor circuit;
- P0123 - very strong signal in the same circuit;
- P0130 - the oxygen sensor before the converter does not work;
- P0131 - weak outgoing signal on the network of this device;
- P0132 - signal too strong on the same network;
- P0133 - slow response to changes in mixture quality in the network of the same device;
- P0134 - oxygen sensor circuit inactive;
- P0136 - the oxygen sensor after the converter is broken;
- P0137 - poor signal in the circuit of this device;
- P0138 - signal too strong in the same circuit;
- P0140 - the same sensor circuit is inactive;
- P0141 - the oxygen sensor heater after the converter is broken;
- P0171 - there is a lot of air in the fuel mixture;
- P0172 - there is a lot of gasoline in the fuel mixture;
- P0201 - injector wire No. 1 is broken;
- P0202 - injector wire No. 2 is broken;
- P0203 - injector wire No. 3 is broken;
- P0204 - injector wire No. 4 is broken;
- P0217 - engine overheated;
- P0230 - failure in the electric fuel pump relay network;
- P0263 - injector driver No. 1 does not work;
- P0264 - the injector circuit of cylinder No. 2 has shorted to ground;
- P0266 - injector driver No. 2 does not work;
- P0267 - injector circuit No. 3 has shorted to ground;
- P0269 - injector driver No. 3 does not work;
- P0270 - injector circuit No. 4 has shorted to ground;
- P0262 - the injector circuit of cylinder No. 1 is shorted to the BS;
- P0265 - injector circuit No. 2 is shorted to BS;
- P0268 - injector circuit No. 3 is shorted to BS;
- P0271 - injector circuit No. 4 is shorted to BS;
- P0272 - injector driver No. 4 does not work.
Here we are looking for an electrical problem that has arisen.
P0261 - the injector circuit of cylinder No. 1 has shorted to ground;
Battery disconnect method
Disconnecting the battery is an old way to reset the check engine light. Here are three steps to clear the check using this method: Step 1: Disconnect the cables from the battery. At this point, you should use a wrench to unscrew the positive and negative cables.
Step 2: Discharge the remaining electricity. The next thing you should do is press and hold the car horn for about 30 seconds. This action will help drain the car battery.
Step 3: Wait and reconnect the battery. After disconnecting the battery cables and draining the remaining electricity, all you have to do is wait about 15 minutes and then plug the battery back in. Error codes will be cleared. (Note: This method may not work on some vehicles.) If after this procedure the “check” lights up again, this may mean that the problem is still much more serious.