Adjusting belt tension
Incorrect tension of the alternator belt can have an extremely negative impact on the operation of the components and assemblies that depend on it. Thus, too weak a tension will lead to its slipping, leading to unstable operation of the generator (due to poor transmission of torque) and interruptions in the on-board network (including rapid battery discharge).
On the contrary, an excessively tight belt tension can cause excessive stress on the generator bearings, thereby leading to their rapid wear or even destruction. It is for this reason that the tension value is extremely important and should be checked periodically.
In order to correct it and return the belt to normal operating condition, you need to:
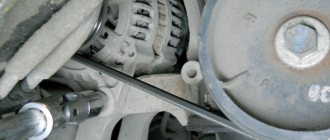
- loosen the generator fasteners from below and from above;
- turn the adjusting bolt and thus tighten the tension (to increase the tension, rotate the bolt to the right, to loosen it, to the left);
- Using a wrench, turn the crankshaft several turns and check the tension;
- If the tension is OK, tighten the generator fasteners.
Belt tension on the VAZ 2114 generator
The tension check itself can be done by simply pressing the belt with your hand. If it is tensioned correctly, its deflection will be about 8 mm. If the deflection is greater, the tension should be increased; if it is less, it should be weakened.
You can check the correct tension in another way - just put the multimeter in DC voltage measurement mode with a limit of 20 volts and measure the voltage at the battery terminals with the engine running. Stable readings will indicate that the belt is tensioned well (which means that rotation is transmitted smoothly to the generator). If the voltmeter readings fluctuate, the belt tension should be adjusted.
Another clear sign of proper belt tension is that it runs silently. If it moves smoothly, without making a whistle, hum or other extraneous sounds, then everything is fine. If any noise is heard during its operation, it means that the tension was performed incorrectly (in some cases, the cause of the noise may be jamming of the generator, as discussed above.
That is why, if after repeated attempts to adjust the belt tension it is not possible to remove the whistle, you should pay attention to the condition of this device).
Performing tension
If there is no wear on the V-belt drive, but there is a whistle, first of all, check the tension level. We will not use complex terminology, but will simply advise you to press with some force on the belt in the middle.
If the tension is done correctly, then the belt will bend no more than 8 millimeters. If the deflection is greater, then the element will have to be tensioned, and if it practically does not deflect, the tension will have to be loosened. The problem is not the whistling. Due to weak tension, the battery does not charge effectively, and the drive itself begins to wear out faster. Excessive tension can lead to damage to the alternator bearings and stretching of the belt.
Correct tension of the VAZ 2110 generator belt is performed as follows:
- Loosen the generator from the bottom and top. A nut is used for this;
- Turn the adjusting bolt and adjust the belt;
- If you want to increase the tension, the bolt is turned to the right. Thus, you move the generator away from the cylinder block;
- To loosen the tension, move in the opposite direction - to the left;
- Use a wrench to grab the fastening bolt and turn the crankshaft a couple of turns, then check the tension;
- If all is well, the tension is correct, the nut can be tightened back.
Replacing the alternator belt
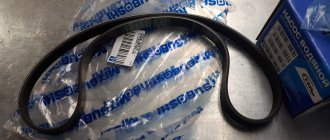
If, after checking and inspecting the belt, it turns out that it is cracked or crumbled, then it should be replaced with a new one, which is extremely important - a similar one. Thus, the size of the VAZ 2114 8-valve generator belt is individual. It differs from the size of the belts of other VAZ cars, and therefore you should purchase the belt for the 14th model at the auto store. Its standard length is 698 mm (if power steering is installed on the car, the belt length will be longer).
Replacing the VAZ 2114 alternator belt
The replacement itself is performed in the following sequence:
- loosen the belt tension adjustment nut and the lower mounting nut of the generator;
- loosen the tension on the alternator belt;
- move the generator towards the engine - this will loosen the belt as much as possible;
- remove the belt from both pulleys - the generator and the crankshaft;
- put a new belt on the drive pulley (on the crankshaft axis);
- put the belt on the driven pulley (on the generator axis);
- tension the new belt according to the scheme described above.
Thus, replacing the drive belt is quite simple, and the procedure itself will take very little time.
How to tension the alternator belt
There are times when when the car gets into a puddle, or simply when there is high humidity, the alternator belt begins to whistle. Often the reason lies precisely in insufficient tension. Of course, to fix this problem, you just need to tighten the belt to the desired level.
The tool you will need to solve this problem:
- Head for 10 and 13 mm
- Ratchet handle
So, depending on the VAZ 2110-2112 model and the installed engines, the design of the alternator belt tensioner may differ slightly. But in essence, there is not much difference and everything is done by analogy.
- So, open the hood of the car and look towards where the generator is located.
- Loosen the top nut securing the generator and use the adjusting bolt to tighten it
What is needed to replace the alternator belt on a VAZ-2114
On a VAZ-2114 car, replacing the alternator belt takes place quite quickly and without the use of special tools. Depending on the replacement method, we will select the necessary tool, and work on replacing the alternator belt on a VAZ-2114 can be done either from under the hood or from the wheel arch.
In terms of time, both methods are almost identical, so if the work is carried out in Murmansk and in December, then it’s easier to do everything from under the hood, and if it’s warm and dry outside, then you can slowly remove the wheel, it’s a little more convenient, or you can replace the belt from -under cars.
New alternator belt
Apart from the standard tools and a new belt, you won’t need anything else, except for unforeseen circumstances, such as rusted fasteners, but this happens extremely rarely. In these cases, either WD-40 spray or brake fluid will come in handy. If everything is ready for replacement, all that remains is to install the car on a flat surface, and if we change the belt by removing the right front wheel, then a jack with a wheel wrench will also come in handy. Now that's it, let's go.
Belt removal algorithm
The replacement procedure itself will not create any difficulties, but you should adhere to some general rules, and here is the first of them.
God protects those who are careful, so when doing any work on the on-board electrical system, you need to turn off the power to the car. The easiest way to do this is using a ground switch, and if there is none, then you just need to remove the negative terminal from the battery. This will reduce the risk of an accidental short circuit.
Precautionary measures have been taken, the tool has been prepared, a new belt has been purchased. You can get to work.
- For convenience, remove the side protection from dirt. Generator without side protection from dirt and water Side protection mounting bolt
- Loosen the nut of the bolt securing the generator housing to the cylinder block.
This can be done from under the hood using a socket with a wrench, or from under the car with a regular spanner. Alternatively, you can remove the wheel, fender liner, engine mudguard and do all the work from the side. Loosen the nut of the bolt securing the generator housing to the cylinder block - Loosen the top nut securing the generator with a 13mm wrench. It presses the generator body against the guide rail. It is enough to unscrew it a few turns. Loosen the nut securing the generator to the mounting plate. Upper bolt securing the generator
- Release the tensioner mechanism until it stops.
You can loosen the generator and not completely, we will be able to remove the old stretched belt, but it is unlikely to install a new one. Therefore, it is better to release the generator all the way. We loosen the belt tension by rotating the bolt counterclockwise - We remove the old alternator belt and assess its condition before throwing it away. Its damage or traces of liquid can tell a lot about the condition of the cooling system and lubrication system. In addition, it is worth wiping the generator pulleys and the drive pulley on the engine before installing a new belt on the VAZ-2114. Condition of the old alternator belt Worn alternator belt
- Install the new belt on the engine in the reverse order.
Since the belt is new, we will tighten it in two stages. Having moved the generator to the cylinder block, install a new belt - Pre-tighten the belt. 100 N (10 kg) to one of the belt branches , and it should bend no more than 10-15 mm. 100 N at the factory is a mystery to everyone, but an experienced motorist knows how much force needs to be applied.
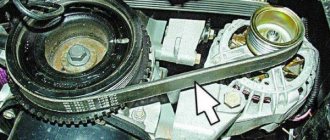
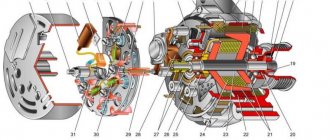
LAYOUT
On this car, however, as on the VAZ 2113 and VAZ 2115 models, the power unit is located across the body. With this engine arrangement, if you open the engine compartment hood, the generator set will be located on the left side of the engine.
On this side of the engine, the timing gear drive pulleys, water and oil pumps are also installed. This drive is covered with a plastic cover, and the generator drive passes over it. The belt installation diagram is shown in the figure.
Alternator belt installation diagram
The figure shows the generator drive parts:
- Bracket for attaching to the engine block;
- Connection of the generator with the bracket;
- Tension screw;
- Generator set pulley;
- Axial screw;
- Drive belt;
- Generator pulley on the crankshaft.
The red arrow indicates the place to check the deflection of the belt drive, and the letter “A” shows its value. If the tension of the generator belt is done correctly, then the bending at the point being checked should not be more than 10 mm, under a load of 10 kg.
Adjusting the tension of the generator belt
The belt is installed, but the work is not finished yet. It needs to be tightened and adjusted correctly. In this case, they make two common mistakes - either they tighten the belt until it turns blue, or they don’t tighten it enough. Both one and the other are bad for the engine:
- if the belt is not tightened enough , it will slip on the generator pulley, and the latter, in turn, will not give the required charge to the battery, as a result of which the battery will discharge and quickly fail;
- if the belt is overtightened, the load on the bearings of the VAZ-2114 generator will be too high, which will lead to their premature wear or destruction.
This is why it is very important to correctly adjust the belt tension immediately after installation. Initially, we tension the belt as required by the instructions, after which we start the engine, turn on the maximum consumers of electricity on board and listen to the generator (see “selecting a generator”) - it should not emit an excessive hum or squeak, and with a sharp change in engine speed, the belt does not should slide on the pulley with a whistle.
If everything is normal, turn off the engine and collect the fender liners and mudguards. The new belt may stretch slightly, so after a few kilometers it is worth checking the belt tension again.
Checking the tension of the generator belt
There is another way to calculate the correct belt tension. It is more accurate in terms of generator output. The method is simple and easy to check, and then anyone who has ever used a multimeter can tighten or loosen the belt.
We connect the multimeter to the battery terminals in voltage measurement mode, after which we change the belt tension; if the multimeter readings are unstable, the belt slips along the pulley and needs to be tightened. We tighten the belt until the device readings stabilize. After this, you can verify the correct tension of the alternator belt in the usual way.
In this way, you can quickly and without unnecessary hassle replace the generator on a VAZ-2114 and similar VAZ models. Stable tension and good travels to everyone!