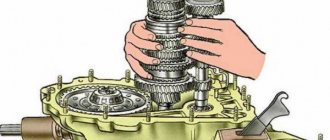
Timing belt with chain drive on VAZ 2101
The “kopek”, like all other “classic” models, has a timing chain drive. The mechanism consists of a double-row metal chain and additional elements that ensure its tension and prevent vibrations. The well-coordinated operation of the motor directly depends on the integrity and serviceability of each part of the mechanism. The chain drive connects the crankshaft and camshaft and ensures their synchronous operation. When the shafts rotate, the pistons in the engine cylinders are set in motion, and the valves in the cylinder head (cylinder head) open and close in a timely manner.
The main elements of the VAZ 2101 timing drive are a chain, a damper, a shoe, a tensioner and sprockets
Tranquilizer
The damper performs the function of damping circuit vibrations. Without it, the chain may jump or fly off the sprockets of the timing mechanism. If the damper breaks down, the drive may simply break off. Such a nuisance is possible at high engine speeds. If the chain breaks, the pistons and valves are damaged, requiring expensive repairs. Therefore, the condition of the damper must be monitored and replaced in a timely manner. The part is a durable metal plate with special holes for fastening.
The chain damper dampens its vibrations when the engine is running.
Opposite the damper there is a shoe, which is also responsible for calming and tensioning the chain. It is made of a special polymer material, which gives the part high wear resistance.
The tensioner shoe is responsible for tensioning the chain and damping vibrations together with the damper
Tensioner
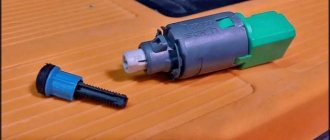
The “penny” chain drive tensioner prevents the chain from loosening when the motor is running. The element comes in several types:
- auto;
- mechanical;
- hydraulic.
Automatic tensioners began to be produced recently, but with regard to this part, it is already possible to note the pros and cons. The main positive point is that there is no need to make periodic adjustments, i.e. the drive is constantly in tension. The disadvantages include fairly quick failure and high cost of the part. In addition, based on reviews from car enthusiasts, the auto tensioner does not tension the chain very well.
The operation of hydraulic devices is based on the supply of oil under pressure from the engine lubrication system. With this design, the driver does not need to worry about periodically tightening the chain. However, over time, the part may malfunction, which manifests itself in the form of jamming of the mechanism.
The VAZ classic uses a mechanical tensioner. The part has a significant drawback: over time, it becomes clogged with small particles, the plunger jams and the device loses its ability to produce tension.
The chain tensioner is designed to keep the chain taut at all times.
Chain
One of the key elements of the timing chain drive is the chain itself, made of metal and having a certain number of links: on the VAZ 2101 there are 114 of them. Compared to a belt drive, the chain is more reliable and has a longer service life.
The chain is considered a more reliable element compared to the belt
Depending on the quality of the chain and the operating conditions of the vehicle, it is replaced every 60–100 thousand km. There are cases that a part lasts for 200 thousand km, but it’s hardly worth the risk, because a broken chain will result in a much more expensive repair than its timely replacement.
The chain is tightened every 10 thousand km, even in the absence of signs indicating sagging.
Ignition adjustment
Next, let's look at how all this is done. Before setting the ignition of the VAZ-2101, you need to set the gap on the breaker contacts. To do this, remove the cover from the breaker distributor, unscrew the bolts securing the breaker rotor and remove it.
Next, use the key to turn the crankshaft until the breaker contacts are completely open. Then this gap is measured with a feeler gauge and adjusted if necessary; it should be 0.4 mm.
Next, the rotor is put in place, and the cover remains removed for now. After this, you can begin adjusting the advance angle.
On the ebb of the cylinder block near the pulley there are three marks, two short and one long. The long mark corresponds to TDC of the first cylinder. The short mark next to it corresponds to 5 degrees. crankshaft position to TDC, the next short one is 10 degrees.
There is also a mark on the pulley itself, but there is only one. In order for the ignition setting on the VAZ-2101 to occur correctly, you need to unscrew the spark plug from the first cylinder and rotate the cranks. shaft until air begins to escape from the spark plug hole, which will signal the start of the compression stroke in it.
Next you need to look at the pulley and turn the knees. shaft, align the mark on the pulley with the second mark (5 degrees) on the ebb of the cylinder block.
Next we move on to the breaker-distributor. First, the nut securing it is loosened, this will ensure that it can be rotated around its axis. It must be turned clockwise until it stops.
Then the control light is connected. It can be made from two pieces of wire, a 12 V light bulb and a socket for it. One of the wires is connected to ground, and the second is connected to the terminal of the distributor wire going to the ignition coil.
Then you need to turn on the ignition at the ignition switch. While turning the distributor counterclockwise, you need to keep an eye on the light; as soon as it lights up, the distributor is secured with a nut. All ignition is set.
Chain mechanism fault detection
The timing drive, equipped with a chain, is structurally located inside the engine. To determine the condition of the parts of this mechanism, it is necessary to partially disassemble the motor. The fact that there are problems with the chain or drive elements is indicated by characteristic signs.
The chain is noisy
A circuit can have different types of noise:
- noise under load;
- knocking on a warm engine;
- extraneous sounds when cold;
- constant noise with a metallic character.
If the motor begins to make sounds that are uncharacteristic of its normal operation, it is necessary to find out as soon as possible what problems have arisen with the chain drive and eliminate them. If this is not done, wear on the timing drive elements will increase, which can lead to costly repairs.
Video: chain knocking in a VAZ “classic” engine
Timing drive components may fail prematurely for the following reasons:
- the use of oil not specified by the car factory, or its untimely replacement;
- use of low-quality parts;
- low lubricant pressure in the engine;
- failure to comply with engine maintenance regulations;
- low quality of repairs.
Often the chain is noisy due to stretching or problems with the tensioner. Attempts to tighten it turn out to be useless, and the engine sounds like a diesel engine. The sound most often appears on a cold engine when idling.
The timing chain stretches over time, so it needs to be periodically tightened or replaced
Jumped the chain
With high mileage of the vehicle, the timing chain stretches. As a result, it can simply jump to other teeth of the camshaft or crankshaft gears. This problem may occur when the timing drive parts are damaged. If the chain jumps by at least one tooth, the ignition is greatly shifted and engine operation becomes unstable (sneezes, shoots, etc.). To fix the problem, you will need to check the integrity of the parts, and if damage is detected, make repairs.
Installing the chain by marks
The need to install marks on the timing mechanism may arise during the repair process or when the chain is severely stretched. If the marks do not match, the stable operation of the motor is disrupted due to a phase shift. In this case, an adjustment is required. The work is carried out with the following tools:
- Screwdriver Set;
- key for rotating the crankshaft;
- a set of keys.
To install the chain according to the marks, you will need a standard garage tool kit.
We carry out the procedure according to the following instructions:
- We dismantle the air filter box and the valve cover with the seal by unscrewing the fasteners.
- Loosen the tensioner clamp, press the screwdriver against the shoe and tighten the nut.
- Using a 38 mm wrench or a crank, turn the crankshaft until the marks on its pulley and the timing cover match, and the mark on the camshaft sprocket should be located opposite the protrusion cast on the body.
- If any of the marks do not coincide, turn on the fourth speed and unbend the lock washer on the camshaft sprocket.
- We unscrew the bolt and remove the gear.
- Remove the chain from the sprocket and set the desired position (step 3). After installing the marks, we perform reverse assembly.
You can turn the crankshaft with a 38 mm spanner.
Video: how to set timing marks on classic Zhiguli cars
How to set valve overlap in a classic VAZ engine
When installing a non-standard tuning camshaft (hereinafter referred to as TC), an important point in obtaining the desired engine characteristics is not only the camshaft itself, which has changed timing phases, but its installation in the optimal position relative to the position of the crankshaft. The factory timing gear of the classic VAZ engine, located at the end of the camshaft, has a fixed position and does not allow fine tuning of the phases, however, there is a tuning solution - a split camshaft gear (hereinafter referred to as the camshaft gear).
Thanks to the RS, it is possible to set the camshaft phases in accordance with the recommendations of the camshaft manufacturer or try to independently find the position of the timing phases that corresponds to the best engine characteristics, and here a certain starting point will be to install the camshaft in the overlap.
| Split timing gears VAZ classic |
Overlap is the position in which the piston is at TDC and both valves in a given cylinder are open to the same height.
How can you find this position if you cannot determine by eye how much the valves are raised, and the recommended method using dial indicators is quite expensive due to the purchase of instruments? You won’t believe it, but there is a very simple, but at the same time quite high-precision way to align the camshaft of a classic VAZ 2101-21 engine with mechanical bolts according to valve overlap, which you can learn about below.
To work, you only need a set of measuring probes from 0.05 to 1 mm, for example, a fan set from a car store costing 100 rubles.
| Fan set of styli |
► It’s time to tell why such a gap was chosen and the principle of the entire technological procedure using the example of setting the overlap for the 2101 camshaft. Since the amount of valve lift at the overlap point of the standard 2101 camshaft is 0.
8mm, we need to make a larger gap, then at the overlap point both valves will have a gap of 0.2mm, which we can determine using a feeler gauge.
For a tuning camshaft with a larger valve lift in the overlap, a gap should be made that exceeds this lift.
Clarification! The numbers indicated as gaps are arbitrary and do not have much significance. You can choose the adjustment gap not 1mm, but larger, for example 1.5mm. or 2mm., and the gaps in the overlap area may not be 0.2mm, but more or less, the only important thing is that they are the same.
Don't forget to crank the engine by hand to make sure you haven't made a mistake and the valves aren't pushing against the pistons. This completes the adjustment of the split gear to the valve overlap point. See also the video manual for setting up the split gear according to the valve overlap point.
Do not forget to familiarize yourself with the material that will help with the principles and characteristics of choosing a tuning camshaft for a classic VAZ engine - read.
| Tuning camshaft Estonian+ |
Adjusting chain tension
The need to tighten the chain may be necessary in different situations:
- engine repair;
- replacing the chain drive;
- chain stretching.
To work you will need the following tools:
- 13 and 38 mm keys;
- flat screwdriver;
- pliers.
Tensioning the chain consists of several steps:
- We place the car on a flat surface, turn on neutral, placing stops under the wheels.
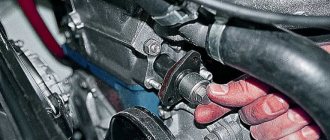
- We unscrew the chain tensioner clamp, and a characteristic click will be heard.
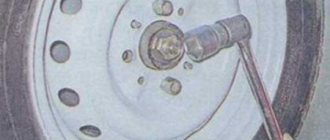
- Use a 38 mm wrench to rotate the crankshaft, making several revolutions.
- Stop rotation at maximum force and tighten the tensioner nut.
If the valve cover is removed, you can determine the tension of the chain by pressing it with a screwdriver . If the chain is tensioned normally, it will be stiff.
The chain tension with the valve cover removed can be checked with a screwdriver.
Adjusting the thermal clearance of VAZ 2101 valves
To adjust the valves, we need the following set of tools: socket wrenches for “8″, “10″ and “13″”, a screwdriver with
flat blade, two “17” wrenches, a special wrench for turning the crankshaft, a feeler gauge 0.15mm thick. If all
If you have what you need, you can begin repairs. The first thing you need to do is remove the cylinder head cover.
Let's start adjusting the valves. Take the dipstick and insert it into the gap of the valve that you will now adjust, that is, the sixth or eighth.
Move the dipstick in different directions to check the gap. A normal gap is considered to be such that the feeler gauge will move with
sufficient resistance, but at the same time it will not move too tightly and bend. If the gap is different from the norm, then loosen the locknut with a seventeen wrench and then use another
Using a wrench, rotate the upper adjusting nut to achieve the optimal clearance. Having established the required clearance, hold the upper adjusting nut with a wrench from turning, and tighten the lower lock nut.
After tightening the locknut, the adjusting nut may move, so recheck the clearance and, if necessary,
adjust it again. Adjust the clearance of the next valve in the same way.
To complete the work, you will need a special flat feeler gauge 0.15 mm, open-end wrenches 13 and 17, a key for turning the crankshaft using a ratchet.
Before checking and adjusting the thermal clearances of the valves, it is necessary to remove the distributor cover and the valve cover of the car engine, and adjust the tension of the chain (engines 2101, 21011, 2103, 2106) or belt (engine 2105). Checking and adjustment should be carried out on a cold engine.
On engines of rear-wheel drive VAZ 2101, 21011, 2103, 2105, 2106 cars, the thermal gap between the rear part of the camshaft cam and the working surface of the valve lever is measured. It is 0.14-0.17 mm for intake and exhaust valves.
The procedure for checking and adjusting thermal valve clearances on engines of VAZ 2101, 2102, 2103, 2104, 2105, 2106 cars
— Check and adjust the clearance at the 8th and 6th valves
We turn the crankshaft by the ratchet with a special wrench clockwise until the installation mark on the camshaft sprocket (pulley) coincides with the mark protrusion on the camshaft bearing housing.
The contact of the distributor “runner” looks at the socket of the high-voltage wire of the fourth cylinder in its cover (to determine the location of the required socket with the distributor cover removed, we focus on the screws on four sides of the distributor body; they coincide with the location of the sockets).
When the marks coincide, a compression stroke occurs in the fourth cylinder, and an intake stroke occurs in the third. Accordingly, the 8th exhaust valve in the fourth and the 6th intake valve in the third cylinder will be closed, and there will be a certain gap between the working surface of their levers and the back side of the camshaft cams. This is what should be checked and regulated.
We check the thermal gap - insert the probe between the cam and the lever, it should enter with a slight pinch and not “bite”.
If the gap is too small or too large, loosen the locknut of the adjusting bolt with a 17 wrench, hold it from turning, and use another 13 wrench to rotate the adjusting bolt, decreasing or increasing the gap. We check the gap with a feeler gauge and if it is normal, tighten the locknut, holding the adjusting bolt with a 13mm wrench.
Installing a resistor for an LED
— Check and adjust the thermal gap at the 4th and 7th valves
To do this, turn the crankshaft 180º using the ratchet. The “runner” contact rotates 90º and looks at the second cylinder. We check and, if necessary, adjust the thermal gap.
— We check and adjust the thermal clearances at the 1st and 3rd valves
Again we turn the crankshaft 180º using the ratchet. The contact rotates another 90º and looks at the 1st cylinder.
— Check and adjust the thermal gap at the 5th and 2nd valves
Again, turn the crankshaft 180º using the ratchet. The contact rotates another 90º and faces the 3rd cylinder. We check and adjust in the same way.
All checking and adjustment of thermal clearances of engine valves has been completed. After this, you may have to slightly adjust the engine idle speed using the carburetor adjusting screws.
Table of the sequence of adjusting the thermal clearances of the valves of engines 2101, 21011, 2103, 2105, 2106, 2107
Notes and additions
— Thermal clearances in the valve actuator are necessary to compensate for the thermal expansion of its elements during engine warm-up and operation. If the gaps are small or absent at all, the valves do not close tightly, their edges burn, the combustion process of the fuel mixture in the combustion chambers is disrupted, and the power and throttle response of the engine are accordingly reduced.
Fuel consumption increases. If, on the contrary. The gaps are too large, a metallic clatter is heard under the valve cover at idle, the valves do not open enough, the filling of the combustion chambers and their subsequent ventilation are disrupted.
Again, this leads to a drop in engine power and throttle response, increased fuel consumption, and uneven idling.
More articles on VAZ 2101, 2102, 2103, 2104, 2105, 2106, 2107 engines
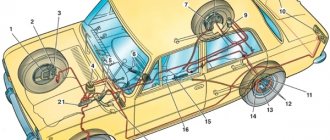
The first car to roll off the assembly line of the Volzhsky Automobile Plant was the VAZ-2101 model. Subsequently, the manufacturer produced 6 more models, up to the VAZ-2107.
All these cars are popularly designated “Classic” due to the layout features.
All these models were produced in a sedan body (except for 2102 and 2104 - which are station wagons), equipped with an in-line 4-cylinder engine with a longitudinal arrangement, as well as rear-wheel drive.
It is noteworthy that almost identical engines were installed on all these cars. And although as a result of modifications it was possible to change the performance characteristics of the power plants, their layout was the same.
Features of timing belt
For example, the gas distribution mechanism - with the upper position of the valves and camshaft. shaft The timing drive of the engine was carried out via a chain, and this is on all models.
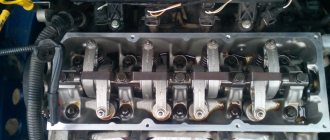
A special feature of the valve mechanism is the use of push levers, also known as rockers. They are located between the camshaft and the end of the valve stem. That is, the cam acts on the valve not directly, but through the rocker. Also, thanks to the push lever, it is possible to adjust the thermal gap.
This gap is needed in order to compensate for the change in the geometric parameters of the constituent elements of the valve mechanism that occurs as a result of heating, during which the metal expands.
If this gap did not exist, then after heating the power plant there would be a violation of the valve timing.
To put it simply, when heated due to the expansion of the metal, the valves do not close completely, which leads to loss of compression and, as a result, a drop in power.
The list of maintenance work for the power plants of these models included such an operation as adjusting the valves. This is due to the design features of the valve mechanism. During operation, the working surfaces of the valve end, rocker and camshaft cams are erased, which leads to a violation of the thermal clearance.
Crossovers with galvanized body list
Fortunately, the same design is quite simple, so the adjustment work is quite simple and you can do it yourself.
It is only important to know the order of work and the sequence of adjusting the valves on the “Classic”.
It is noteworthy that the operation is identical for almost all models, so the procedure for adjusting the valves of the VAZ-2101 and, for example, the VAZ-2105 is the same, only in the VAZ-2107 it is slightly different.