Repair of voltage regulator relay on VAZ 2107
Usually the fact that the VAZ 2107 has a voltage regulator is remembered when a problem arises with charging the battery.
To be completely precise in the definitions, the voltage relay comes to mind immediately as soon as it turns out that, despite the presence of charging, the battery is almost completely discharged. Let's take a closer look at why a voltage regulator is needed in a VAZ 2107 car. Without going into the intricacies of electronics, the voltage regulator is designed to regulate the voltage at the generator output depending on the engine operating mode. It is quite natural that as the speed changes, the voltage level also changes. And if it drops to 12 volts or lower, the battery stops charging.
Therefore, if you suspect a malfunction in the VAZ 2107 charging system, you must first check the voltage at the battery terminals. This can be done using a regular voltmeter or multimeter (tester). In normal mode, the voltage should be approximately 13-14 volts. If it falls below 13, you should pay attention to the relay; it may need to be replaced.
Depending on the type of generator used in the car, the regulator can be internal three-level and external. The internal one is built into the generator and is usually used in VAZ 2105 and 2107 cars, while the external one is used in earlier classic models and is located in the engine compartment on the left arch.
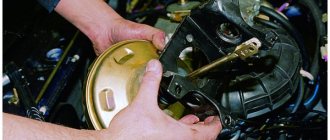
Depending on the type of regulator, replacing it has its own characteristics. Replacing the external regulator is no problem. Using a size 8 wrench, unscrew the two fastening nuts and disconnect the wires from terminals 15 and 67. The new relay is installed in the reverse order. After checking that the wires are connected correctly to the terminals of the regulator, and that its body is in reliable contact with ground, you can start the engine and measure the voltage again to ensure that the fault has been eliminated.
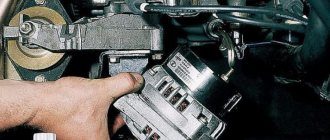
The internal three-level one is somewhat more difficult to change due to limited access to the generator. But, despite this, the task is quite doable even without removing it. Replacing the regulator, as in the case of an external one, comes down to disconnecting the wires and unscrewing two mounting screws using a Phillips screwdriver. After this, the relay is removed from the generator housing. Installing a new regulator occurs in the reverse order. After assembly, the voltage level is checked.
It should be noted that the regulator is not always replaced due to its failure. Recently, more and more often, car enthusiasts have resorted to replacing the generator along with the relay from an old model to a new one. This kind of tuning becomes possible thanks to the complete interchangeability of both models. The reason that prompts car owners to take such a step is the high efficiency that distinguishes the three-level regulator from the standard one.
New type relays provide the required voltage level in automatic mode. Plus, it has a wider adjustment range than the standard one, so the battery receives an optimal charge. Under such conditions, the service life of the battery is significantly increased. In the schematic diagram of the electrical circuits of the VAZ 2107 shown below, the relay is indicated by the number 7.
Product replacement
Replacing the voltage regulator on a VAZ 2107 is very simple. To do this, you need to unscrew two bolts using a screwdriver or a wrench, which depends on the generator model, then disconnect the terminal, and then remove the part itself, which looks like the one shown in the photo below.
Replacing the voltage regulator is quite easy, and there is no need to even remove the generator. Before carrying out work, be sure to disconnect the negative terminal from the battery to avoid a short circuit.
You can replace the product with a similar one, but it is recommended to use a three-level regulator. It allows for more reliable stabilization, and three adjustable output voltage levels.
This is interesting: Installing electronic (contactless) ignition on a VAZ 2107
The brush mechanism is installed in place of the standard relay, and the box with the board and three-position switch is fixed anywhere in the engine compartment, but always with a mass on the coupling bolt. After replacement, the switch should be set to the appropriate position, depending on the temperature conditions.
Removing and installing the voltage regulator
Replacing the external voltage regulator VAZ 2107
1) Using the “8” socket, unscrew the two nuts and remove the regulator.
2) Disconnect the two wires.
3) Attach the new regulator to the mudguard and connect the wires: orange to terminal “15”, and gray to terminal “67”.
Voltage regulator relay connection diagram
ATTENTION! Before starting the engine, make sure that the contact between the voltage regulator housing and the vehicle ground is reliable, and that the wires to terminals “15” and “67” are connected correctly.
Checking the VAZ 2107 voltage regulator relay
If you suspect a malfunction, you should check the voltage directly at the battery terminals. If the voltage is below 13 or greatly exceeds 14 volts, there may be several reasons:
- voltage regulator relay malfunction;
- generator breakdown;
- poor contact in the electrical connections between the battery, alternator and relay.
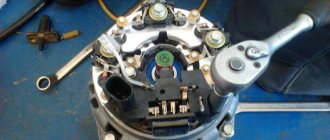
The serviceability of the VAZ 2107 charging relay can be checked by disconnecting it from the vehicle’s on-board network. This is easy to do with the external one - just remove a couple of terminals from it and unscrew the nuts securing it to the body using a size 8 wrench. It is more difficult to dismantle the internal relay, but the operation is quite feasible without dismantling the generator. To do this, you need to unscrew a couple of screws securing the relay to the generator housing.
There are three reasons for a relay malfunction:
- poor contact of the relay with the terminals of the brush holder (relevant for new types of relays);
- breakdown of semiconductors;
- open circuit in the device.
To check the VAZ 2107 relay-regulator, you need a voltmeter or test lamp and an adjustable current source with a voltage of 12-22 volts.
To check, you need to connect the minus of the power supply to the relay ground or terminal “W” (depending on the type of relay), and the plus to terminal “B”.
A voltmeter or test lamp must be connected to the brushes or relay output. If the relay is working properly, when a voltage of 12-14 volts is applied, voltage should appear at the output (brushes) (the control lamp lights up). When a voltage of 16-22 volts is applied, the lamp should go out. If the lamp is constantly on, then the relay is broken. If it does not light up regardless of the input voltage, it is broken. In both cases, the relay must be replaced, since it cannot be repaired.
Important: the reason for the lack of charge voltage may be wear or “sticking” of the generator brushes. The brushes must protrude from the brush assembly by no less than 5 mm. With an external regulator relay, this indicator is controlled separately, after disassembling the generator.
Generator brushes.
Generator brushes are a part that is found in almost every generator.
The more modern the car, especially a foreign car, the more electrical consumers it has, which in one way or another make life easier for the car owner. Accordingly, an increasingly important role among automobile units is played by the autogenerator, which supplies electricity to all consumers in the car.
What are generator brushes used for?
Using the generator brushes, the voltage from the regulator relay is supplied to the excitation winding - the rotor. The rotor has commutator rings attached to it - the rotor commutator to which the brushes fit tightly. To transfer current from the voltage relay to the rotor winding, the brushes must be in a certain position and pressed against the commutator rings with a certain force. To do this, they are installed in the seats of the brush holder and are pressed by a spring on the reverse side.
The material from which the brushes of foreign manufacturers' generators are made - a mixture of copper and graphite - differs from domestic ones in better wear resistance and conductivity. For this reason, it is not recommended to install this element on foreign cars from domestic cars.
How do you know when you need to replace your generator brushes?
- Car mileage, 150-200 thousand km. is the period when the part is worn out.
- The battery charging indicator light comes on and goes off again. This may continue for several days until the icon lights up completely.
- Loss of power or voltage drop due to a loose fit of a worn part.
- Voltage surges in the vehicle's on-board network may indicate a faulty part.
- If a lot of motor oil or other technical fluid gets on the generator, then the part is subject to increased wear.
How to check whether replacing the generator brushes is really necessary?
To determine the causes of the malfunction, it is necessary to disassemble the generator and inspect the generator brushes - they must be long enough and in contact with the slip rings.
If the remaining length of at least one element is less than 3 mm, replacement is necessary in any case. Also, the generator brushes must be well movable in their seats, have approximately equal residual length, must not be dirty, and the springs must press with the same force.
How to replace brushes on a generator? Procedure.
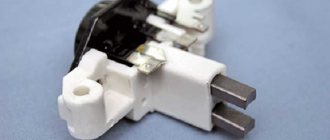
On many modern autogenerators, the brushes are integral with the voltage regulator relay, for example, this is true for Valeo, Bosch, Mitsubishi, Magneti Marelli; for Denso, the relay regulator is made separately from the brush assembly.
To replace the generator brushes , if they are built into the regulator relay, the tools you will need are a 40-100 W soldering iron, solder, flux, a 1.5-3 mm drill, a drill or screwdriver, as well as a tool for removing the regulator.
- Remove the protective cover
- Remove the voltage regulator relay (or brush assembly)
- From the side where the brush harness is attached, we drill out the contact so that the remaining parts come out. We try not to damage the spring, which is located inside the brush assembly.
- We take new brushes and check whether they move freely in their seats
- We insert the spring and insert the harness into the hole so that the required working length remains.
- We solder the contact point and cut off the remaining strands.
- We assemble everything in reverse order.
On some relay regulators it is possible to replace the generator brushes , but on some it is not possible to replace the part; you can replace the relay regulator assembly.
For example, on Bosch generators since about 2000, the relay regulator comes complete with brushes; replacement is not possible.
Replacing the VAZ 2107 voltage regulator relay
If the external relay of the VAZ 2107 generator breaks down, you should replace it with a new one. If the cause of the breakdown lies in the brushes, only the brush assembly must be replaced.
The old internal relay-regulator can be replaced with a new “three-level” one, which provides more reliable voltage stabilization, taking into account the temperature conditions and the load on the generator.
They are called three-level because of three pre-configured adjustment modes that can be switched manually. The switch itself is installed separately from the relay, in a place convenient for the driver and protected from moisture and dirt.
When installing a new relay regulator, you need to pay special attention to the quality of the electrical contacts. If necessary, it is necessary to clean the terminals and nuts securing the external relay to the housing.
To avoid a short circuit, connect the ground wire to the battery only after installing the relay and power wires.
Replacing the VAZ 2110 generator relay on your own
Relay regulator VAZ
Replacing the VAZ 2110 generator relay can be done in two ways: with removing the generator and without removing it. Both options can be done at home, although the second involves fewer manipulations with the car. But despite this, the first option may be simpler for some. Anyone can replace the VAZ 2110 generator regulator relay if they read and study the instructions below.
Signs of brush failure on a VAZ 2107/VAZ 2105 generator
In the event of a generator malfunction, the vehicle's electrical system provides a breakdown indication. When the generator is faulty, the battery lamp icon lights up. But you need to take into account that the cause of the breakdown may be a banal failure of the fuse in the circuit , therefore, after checking the fuse, you must further continue troubleshooting by checking the brushes, rectifier, and voltage regulator.
To check the voltage regulator, you need to connect a voltmeter to the brushes. We connect the “plus” from the 12V battery to the regulator terminal, and connect the “minus” to the “ground” terminal. If there is no voltage, then the regulator is defective and requires replacement.
Sometimes a malfunction or imminent failure of the brushes is indicated by a disruption in the current supply to the car's power supply : the light of lighting fixtures and headlights disappears or dims, the cigarette lighter or radio stops working, the stove stops heating, or the battery discharges too quickly.
Tips for replacing generator brushes VAZ 2107/VAZ 2105
If you are sure that it is necessary to replace the brushes, then you can change them yourself and without removing the generator. To do this, turn off the power to the battery, unscrew the two screws of the brush assembly holder and change the assembly. In another case, when it is not possible to unscrew the bolts or you need advanced diagnostics of the serviceability of generator parts, it is necessary to remove the generator.
It is forbidden to start a car generator with a disconnected battery. This will lead to a short-term increase in voltage at terminal “30”, as a result of which the parts of the rectifier and the vehicle’s electrical network will become unusable.
To replace the brushes you will need the following tools:
- ring wrenches for “8”, “13”;
- ratchet;
- a set of nozzles “for 13”, “for 10”, “for 17”; "at 19";
- flat and Phillips screwdriver;
- penetrating fluid WD 40;
- vice (if needed);
- new brushes for the VAZ 2107 generator.
The price of brushes VAZ 21013701470 is 34 rubles. Their analogue from UTM with article number HE0703A is 120 rubles.
The price is valid for Moscow and the region for summer 2021.
A problem in the power supply system is indicated by the battery charging arrow. This indicates that when the engine is running, the battery is not charging well.
The voltmeter showed a voltage of 11.2 volts. Ultimately, suspicion falls on the generator.
Let's start the renovation. First, remove the terminals and remove the battery.
Using a 17mm wrench, unscrew the nut and remove the adjusting bar.
We move the insulating cover, use a “10” wrench to unscrew the nut securing the wires at terminal “30” of the generator and disconnect the wires.
Disconnect the wire block from terminal “61” of the generator.
Using the socket “19” we unscrew the nut of the lower mounting of the generator.
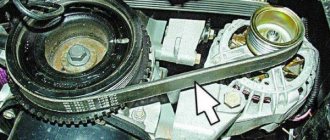
Remove the drive belt from the generator pulley.
We knock out the bolt and remove the bushing. Please note that in this case the generator will be supported on a bracket.
We remove the generator from the car by lowering it down between the bracket and the front axle beam.
And here is the culprit of the “long journey”: a screw with torn edges.
We install the generator in a vice and use a screwdriver to unscrew the two brush holder bolts.
Voltage regulator VAZ 2107 - purpose and first signs of malfunction
The voltage regulator is designed to automatically maintain the current strength so that the voltage generated by the generator is within specified limits, regardless of the rotation speed of the generator shaft (from the engine speed) and the current consumption of the car's electrical network. In VAZ 2107 cars, as a rule, an electronic voltage regulator is installed on the generator.
It is extremely rare that some models may come across an old-style device - a relay regulator. They were installed on generators 37.3701, produced before 1996, and on G-222. First, the device is tested on a running car. To do this, you need a voltmeter with the ability to measure DC voltage. The device must be equipped with a scale for values up to 15–30 V and have an accuracy class of at least 1.0. After starting the VAZ 2107 engine, it is allowed to run with the headlights on for 15 minutes at medium speed.
Then the voltage at the generator output is measured. To do this, the positive probe of the device touches terminal “30” on the generator, and the negative probe touches the ground (generator or car - it doesn’t matter, it’s the same thing). The voltmeter should show a voltage in the range of 13.6–14.6 V. If the measurement result is higher or lower than specified, and the vehicle is experiencing systematic overcharging or undercharging of the battery, then most likely the regulator is faulty and needs to be replaced.
Regulator device
The main source of current in a car is the battery. Consumers are powered from it: lighting and alarm devices, electronic devices, air conditioning and others.
While the car is moving, the battery is charged from the generator if it is working properly. Otherwise, the battery will quickly discharge, and deep discharge will lead to failure of the device.
The number of volts produced by the generator is highly dependent on the engine speed. At low speeds it is lower, and at high speeds it can reach an unacceptable value. Normal voltage is 13.4 V. The regulator maintains it within specified limits.
Checking the removed voltage regulator
To clarify the condition of the regulator, it must be removed. It is better to test the device complete with brushes and brush holder. This will allow you to immediately detect:
- poor contact between the terminals of the brush holder and the voltage regulator;
- breaks in the output conductors of the brushes.
Electronic devices are produced already assembled with a brush holder and one-piece brushes. The relay regulator will need to be connected to the removed brushes.
A voltmeter or a 12 V lamp with a power of 1–3 W is connected to the brushes of the device removed from the generator 37.3701. For the regulator from the G-222 generator, the connection is made to terminals “B” and “W”. The “plus” of the power supply is connected to the terminals “B”, “C” (when they exist), and the “minus” to ground. First, a voltage of 12–14 V is applied, and after that – 16–22 V. A sign of the device’s serviceability will be the lamp lighting up (deviation of the voltmeter needle) in the first case and going out (zeroing the voltmeter) in the second.
When the lamp lights up in both cases, this means that there is a breakdown in the device. If in both cases the lamp does not light, then there is no contact between the regulator terminals and the brushes, or there is a break in the device. Another cause of improper voltage regulation can be worn or stuck brushes. They must protrude from the housing of the electronic device or the brush assembly of relay regulators by no less than 5 mm.
Replacing the voltage regulator VAZ 2107
If the regulator is faulty, the brushes are worn out or stick, then the device must be replaced. It cannot be repaired. For a relay-regulator in case of brush failure, it is sufficient to replace only one brush assembly. Usually they change it to a new electronic one, but you can install a three-level one, like 67.3702-02. They provide better voltage stabilization than standard regulators, taking into account the ambient temperature and vehicle operating conditions.
They are called three-level because they contain 3 voltage regulation modes. Their selection is carried out manually with a switch on the regulator, which is installed separately from the generator itself in a convenient protected place. The device is connected to the generator by wires through a brush assembly, which is supplied complete with the regulator.