A car generator is a device that converts the mechanical energy of rotation of the engine crankshaft into electricity. The generator powers the vehicle's on-board network and recharges the battery after the engine starts.
During operation, generator breakdowns often occur. To solve problems, the 2110 generator is repaired or replaced. In both cases, the generator must be removed from the car. To do this you will need:
- remove the generator drive;
- unscrew the VAZ 2110 generator mount;
- remove generator 2110;
On the VAZ 2110, the generator can be removed quite simply, so all the work can be done with your own hands in a regular garage. Read more in our article.
Signs of a generator malfunction
The generator on the VAZ 2110 has an average resource of about 80-100 thousand km, after which failures in its operation are possible. There can be many reasons for breakdowns: generator bearings, brushes, windings, etc.
As a result of malfunctions, a weak current is supplied to the on-board network. In this case, it is important to pay attention to the following signs:
- a battery icon appears on the dashboard (indicating that the battery is not charging);
- when the lights are turned on, the headlights burn dimly or the light pulsates (unstable voltage);
- turning on additional equipment causes the dashboard backlight to dim;
- the load on the on-board network leads to the heater fan working weakly, etc.
These signs indicate that the generator is not capable of powering the on-board network; electricity is taken from the battery. It is also important to understand that when the generator fails or malfunctions, problems arise with charging the battery, as a result of which the battery quickly discharges.
Ultimately, the lack of spark at the spark plugs will cause the engine to stall. In such a situation, it is necessary to remove the generator, since after dismantling the device, you can disassemble the generator, check it, repair it (for example, replace the brushes) or completely replace it with a new or working device.
We identify the reason
In order to carry out the test, you need to start the engine and warm it up, bring the crankshaft speed to approximately 3000 per minute. Now turn on all the lighting devices (turn the headlights to high beam) as well as the heater, windshield wiper, emergency lights, and heated glass.
If the battery voltage measurement is below 13 V, it can be assumed with a high probability that there are breaks or short circuits in the generator windings. Another reason may be a malfunction of the voltage regulator or the contact rings of the field winding have simply oxidized.
This material will help you figure out why the battery on a VAZ 2110 is discharged and cannot crank the starter:
Various breaks in the components of the generator can be checked if only it is removed. Do-it-yourself repairs can help in some ways, however, if the problem is serious and you do not have enough skill or driving and plumbing experience, then the best solution is to replace the failed unit assembly.
Where is the generator for 2110 located?
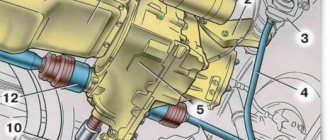
The VAZ 2110 generator is located in the engine compartment on the left side (located closer to the engine cooling radiator).
You can also notice that the engine crankshaft is connected to the generator using a belt. Let us add that the generator on the VAZ 2112 is located by analogy with the “ten”.
In terms of operation, the installation location is not the best, however, the location of the generator is quite convenient for servicing or removing the device. In practice, before dismantling, it is advisable to treat the generator mounting with a penetrating lubricant (such as WD-40).
Generator repair for VAZ 2110
To carry out repairs, the generator must be completely disassembled.
If it is necessary to replace the conductors of the VAZ 2110 generator, the car owner should select only those cables that correspond to the length and cross-section.
Belt adjustment
To adjust the belt, follow these steps:
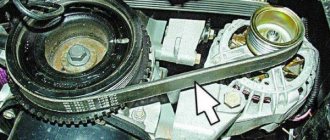
- Use a wrench to loosen the tightening of the nuts on the lower and upper fastenings of the generator device.
- To perform tension, the assembly is moved away from the internal combustion engine cylinder block; for this, the adjusting screw is turned clockwise. To loosen the strap, the bolt is turned in the opposite direction, only the generator device moves towards the BC. The approximate play between the threaded surface for the adjustment bolt and the black frame should be about 1.3-2 cm.
- Using a key, the crankshaft of the power unit is turned by the screw that secures the pulley two turns. Scrolling is done clockwise. Then the strap is re-diagnosed. If necessary, it is adjusted.
- Upon completion of the work, the nuts securing the assembly are tightened.
The channel “In Sandro’s Garage” showed in detail the process of adjusting the tension of the drive belt on “ten” generators.
Repair of brushes and regulator
The brush assembly repair procedure looks like this:
Using a construction brush, the outer surface of the generator unit is cleaned. If there is a compressor, the housing is purged. If it is not available, a vacuum cleaner may be used. Further steps to disassemble the device are performed on a workbench or clean table
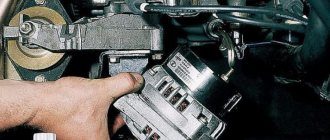
The generator unit is installed on the working surface with the shaft down. Using a flat-head screwdriver, carefully release the three spring-loaded metal clips. The plastic cover located on the back of the device body is removed. Using a Phillips-blade screwdriver, unscrew the bolts securing the brush holder
This element is carefully dismantled. When performing the task, you must be careful not to damage the brush assembly. The central terminal of the electrical circuit is disconnected from the mechanism. The nut is unscrewed from the screw of the contact elements. The spring part is removed. The second washer is being dismantled. The conductor connected to the capacitor device is disconnected from the contact screws. Then the screw that secures the part is unscrewed. The capacitor element is dismantled. Before installing a new brush mechanism, it is necessary to diagnose the main elements of the device. The brushes should be located 0.5 cm from the body of the holder itself. When performing a task, it is recommended to immediately check the capacitor device.
To repair the control device, do the following:
- Three spring elements are disconnected. The protective cover located on the diode bridge is dismantled.
- The two bolts that secure the control device are unscrewed. To complete the task you will need a Phillips head screwdriver.
- The block with the conductor is disconnected from the output of the regulatory device. The part is dismantled and replaced with a new one. Assembly is carried out in reverse order.
The MegaMeyhem channel talked about the procedure for repairing and replacing the regulatory device on domestic “ten” generators.
Generator replacement
If it is necessary to remove for repair or replace the 2110 generator, the replacement must be carried out on an inspection pit, lift or overpass. You can also jack up the front of the car and remove the wheel.
As for the tools, you will need to prepare:
- set of wrenches;
- spanners.
Also, always have penetrating lubricant and clean rags on hand. When removing the generator, especially if the 2110 generator is being repaired rather than replaced, try to prevent dirt, moisture, grease, technical fluids, etc. from getting inside the device.
The device is replaced as follows:
- drive the car into a pit or lift it on a lift;
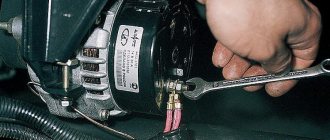
- You need to remove the “negative” terminal from the battery (to unscrew the terminal you need a wrench 10);
- remove the right front wheel from the car;
- unscrew the crankcase protection fasteners (if equipped) and the boot;
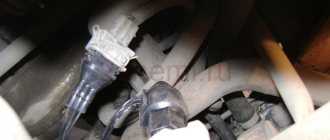
- Next, in the engine compartment of the car, you need to disconnect the wire connector from the terminal (unscrew the nut holding the terminals);
- the main task is to remove the “positive” terminal by moving the rubber cover to the side;
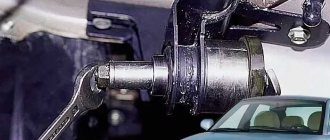
- Having disconnected all contacts, you need to loosen the upper and lower bolts securing the generator using a 13mm wrench;
- Use a 10mm wrench to loosen the adjusting bolt, thereby releasing the tension on the generator belt and remove the belt (then the bolt can be unscrewed completely and then removed);
We also recommend reading the article about how much the generator should produce to charge the battery. In this article, you will learn how to check your car's alternator and how efficiently it can charge the battery. - the generator mounting bolts can now be completely unscrewed with a 13mm wrench (if the bolt cannot be removed from the generator, you can try to carefully knock it out with a hammer),
- normally the top mount and tension bar are removed;
- if difficulties arise, you need to go down under the car and unscrew the bolt nut, pull the bolt out of the hole;
- Next, the generator needs to be lifted, after which the generator can be completely removed from the car;
By removing the generator on the 2110, you can troubleshoot the device, repair it, or completely replace it. Having prepared the generator, installation is carried out in the reverse order of removal.
Recommendations
- Considering that the generator is secured with bolts, it is important to monitor their condition. When removing, experts recommend treating the bolt with copper grease or any other suitable lubricant. In the future, this will make it easier to remove the generator, since the fasteners will be easier to unscrew.
- If the alternator belt has defects (stretched, cracks are visible), it is optimal to replace it with a new belt. In other words, replacing the belt is carried out in parallel with replacing or repairing the generator itself.
- When installing a new belt, it is important to correctly place the alternator belt on the pulley and adjust its tension. The generator belt is tensioned using an adjusting bolt.
When replacing the belt, it is necessary to tighten the alternator belt so as to avoid overtightening or sagging. It should be remembered that incorrect tension can lead to squeaks and whistles of the alternator belt, a reduction in its service life, as well as malfunctions of the device itself.We also recommend reading the article about what to do if the alternator belt whistles or the alternator belt whines. From this article you will learn why the accessory belt makes a whistling sound, as well as what to do if the generator belt starts whistling.
- Lack of battery charge (battery icon on the instrument panel is lit) is not always directly related to the generator. Often the relay regulator may fail, the contacts and terminals of the generator may oxidize, problems may arise with the terminals on the battery, etc. For this reason, before starting work with the generator, it is necessary to carry out diagnostics using a multimeter and clean the terminals, connectors and contacts.
When should a generator be repaired?
If it stops supplying current and the voltage going to the battery drops (By the way, the voltage can be checked using a voltmeter, to do this it will be enough to start the car and connect the wires of this device to both terminals, if the device itself shows too low a voltage and while the car is running the volts will drop, then this indicates that the generator is faulty and needs to be replaced), then it must be replaced, in addition to this method, you can also check the generator like this: start the car and let it work for a while, then pull out the choke to about the middle and remove the minus terminal from The battery, if the car stalls, then the generator needs either repair or replacement (This operation cannot be performed on injection cars, and on a carburetor it is also not advisable, because the diode bridge can burn out, so carry out it at your own peril and risk and if everything after all, they threw it off and the car did not stall, immediately install the terminal in its place and tighten the nut that secures it), the last way to understand whether it needs repair or not is the battery charge lamp (by the way, it is indicated by an arrow in the photo below) , so if this lamp suddenly lights up while the engine is running, then again, there is a high probability that the generator is not producing current and needs to be repaired.
As you already understood, the best way to check is with the help of a multi-meter that has a voltmeter function (And everyone has it), so if you still decide to check with it, then remember the current that should be on the battery when the engine is running equals approximately 13-14.5 volts, if it is less, then either the battery is completely discharged, or the generator has become unusable, in this case, try accelerating, to do this, briefly press the gas pedal and remove your foot from it, if the current supply increases, then the battery is discharged , if nothing happens, then try to do this again and remember, if the current is less than 12 volts, which is no longer acceptable, then in a very short time the battery will be completely discharged and you will no longer be able to start the car (To start the car, you need at least 11.5 volts , if the battery produces less, then starting the engine will be problematic)!