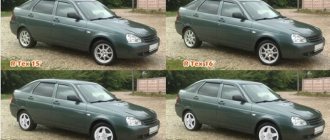
Modern Lada
Most Lada Priora owners know that the domestic car has front disc brakes and rear drum brakes. It is no secret that the drum braking system was developed a long time ago, back in the middle of the 20th century, and no longer meets current standards.
In the modern automotive industry abroad, you can hardly find drum brakes anywhere; many companies have switched to rear disc systems. The only exception is budget cars, which cannot afford to have a better braking system.
Rear brake discs can be installed on almost any front-wheel drive vehicle of the VAZ family, including modifications with ABS. If you care about your convenience and comfort, then it’s time to think about installing brake discs for the Priora. In addition to comfort, the ZDT system significantly increases the safety of the car, and this is very important on unreliable Russian roads. Let's consider whether it is worth installing disc brakes on the Priora, as well as their advantages and disadvantages.
Advantages and disadvantages of rear disc brakes
Rear brake discs are installed on foreign cars not only because of their high efficiency, but also to ensure simultaneous and uniform operation of the braking system. If any mechanism operates more sharply or slowly, this will entail a loss of control over control.
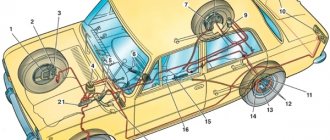
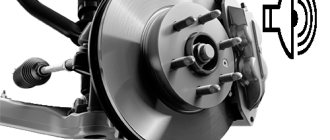
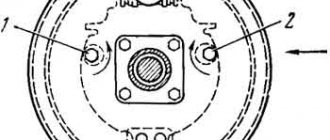
Disc brake unit
Rear disc brakes have the following advantages.
- The braking distance is reduced several times.
- Brake response time is noticeably reduced.
- Frequent maintenance is not required, brake pads can be replaced without much effort.
- Increased security.
- Uniform operation of the braking system.
- Unsprung masses are noticeably reduced.
- Fast heat dissipation, which is essential at high speeds or when cornering sharply.
- The need to constantly tighten the handbrake is eliminated.
- Aesthetic appearance.
- They do not freeze in the cold season after washing (a similar problem is observed in drum brakes).
It is worth remembering that the Volzhsky Automobile Plant does not install rear disc brakes on the Lada Priora, based on its standards. By replacing drum brakes with disc brakes, you will be making changes to the stock configuration of the car, which will affect its technical characteristics.
Rear disc brakes have their drawbacks. For each brand of car, good braking systems are developed over a considerable period of time, based on the technical characteristics of the model and certain standards. In other words, the stock brakes are always well balanced and tuned.
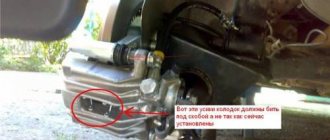
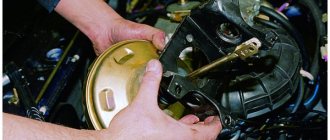
A typical mistake of inept installation
Buying a new brake system and simply installing it will not achieve the desired result. Rear disc brakes need to be adjusted and their functionality checked in the field. Otherwise, you will encounter problems such as uneven operation of the brake system, which will lead to skidding, whistling, squeaking and even overheating.
Let's talk about the essence of the issue.
We assume that the owner of the Vehicle has decided to replace the drum brakes installed on the vehicle with disc brakes. Why it is recommended to do this on Russian cars, we reveal in another article: “Technical issues of creating and operating Rear Disc Brake Systems on VAZ cars”
Intermediate conclusions from the position of the formal logic of the traffic police:
The use of an unregistered brake system is considered a malfunction of the vehicle's braking system as a whole and thus falls under Article 12.5, Part 2 of the Code of Administrative Offenses of the Russian Federation. The punishment applied under this article includes a fine, cessation of operation of the vehicle on public roads and moving the vehicle to a impound lot (evacuation). In the future, you can either (by moving the car on a tow truck to the work site) restore the standard brake system, or register the installed brake system according to the procedure provided for such cases.
That is, the traffic police officer has every opportunity to take your car to the parking lot or, for monetary compensation, turn a blind eye to the violation. This is not our way.
When purchasing a Rear Disc Brake system, you must ensure that the system you choose has two documents:
1. Certificate of conformity.
The product certificate is an absolutely necessary document, without which the purchase and operation of Rear Disc Brakes is prohibited. This is confirmation of the functionality of the Rear Disc Brake system.
2. Conclusion by NAMI “On the possibility of making changes to the design of the vehicle.”
It should be noted that even if there is a certificate and with the above-mentioned systems fully operational, the car will be declared faulty and subsequently evacuated to a impound lot. BUT, if you provide the traffic police officer with a document recognizing the HRT system on your car as legally installed and approved for use on public roads, everything is in order. This document is the OUR Conclusion “On the possibility of making changes to the design of the vehicle”
The key document is undoubtedly the NAMI Conclusion and this is due to the peculiarities of control of motor vehicles by the traffic police.
Rear Disc Brakes "AvtoSportTekhnika" have complete immunity to the described situation, unlike ALL analogues from other manufacturers represented on the Russian market.
The delivery set of the AvtoSportTekhnika ZDT includes copies of these two documents certified by the manufacturer.
And the last thing (for those who like to use our documents for similar systems). The text of the Order of the Ministry of Internal Affairs of Russia dated December 7, 2000 No. 1240 describes in detail the actions of traffic police officers in the event of detection of forgery or discrepancy in the documents provided for registration of a traffic accident. Forgery is classified as fraud. Up to the initiation of a criminal case.
You purchased Our product, installed it, and YOU are an absolutely law-abiding citizen. You write an application to the State Traffic Safety Inspectorate, pay for changes to the documents and, after a while, receive documents with registration of the AvtoSportTekhnika motor vehicle license on your car.
We Solved in Advance All Legal Problems with the Installation of Rear Disc Brakes “AvtoSportTekhnika” on Your Car.
What are the risks of installing a non-standard brake mechanism?
Installing brake discs on a Priora does not always have a good effect on the car. Of course, the costs will pay off and you will get the desired effect, but at the same time, some problems may arise.
- You may fail your MOT inspection as it is illegal to tamper with the car's standard equipment, although rear disc brakes have a number of advantages over drum brakes.
- Since the rear disc brakes are very conspicuous, a meticulous law enforcement officer on the road may well find fault with the presence of non-standard mechanisms installed on the car. But in most cases this is rarely paid attention to.
- There may be problems fitting a standard cable handbrake. Installing a hydraulic brake will help here, allowing you to brake at high speed, but weakening over time if used as a parking brake. Some car enthusiasts completely refuse to have a handbrake and even manage to pass MOT without any problems.
- If you get into an accident, the scales will tip against you due to the presence of non-standard spare parts in the car, even if you are not the culprit.
Having installed rear disc brakes on the Lada Priora, you need to start adjusting the brake force distribution system, which is called the “Sorcerer”. If this is not done, the rear brakes will apply faster than the front brakes. This will lead to unwanted skidding, worn tires, squealing and overheating of the disc brakes.
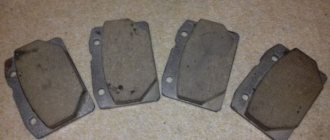
Sometimes skillful owners take on the grinding of brake pads themselves, reducing their contact with the brake discs by up to 50%.
Several explanations in the picture
Several explanations in the figure show how you can safely operate a car with our brakes. The block diagram is shown in Fig. 1.
You choose path 1 in this diagram:
Its essence is as follows. Having installed the vehicle's vehicle, you register changes to the vehicle with the traffic police.
An appropriate entry is made in your Vehicle Passport (Vehicle Registration Certificate), and you are forever freed from questions from employees of this organization regarding your Disc Brakes.
The procedure for making Changes to the PTS with the AutoSportTekhnika PTS is as follows:
Provide the Documents required by the traffic police:
-Certificate- (in your hands, from the AST kit)
-Conclusion- (in your hands, from the AST kit)
-Document from the Technical Service Station on the installation of the AutoSportTekhnika ADT on your car.
And this is enough to register the AST ZDT in the PTS and the Vehicle Registration Certificate.
You choose path 2 in this diagram:
You purchased Our product, installed it, and began operating the car without registering its changes in the Vehicle Passport. The inspectors will be so busy checking the fire extinguisher that your fire safety inspectors won't pay attention.
You choose path 3 in this diagram:
Even if a traffic police officer sees changes in the car, show him our “Certificate...” and “NAMI’s conclusion...”, and having stipulated that you will make changes to the PTS at the next maintenance, you will be sent home by this overly zealous employee. During the Technical Inspection you come across a lazy inspector, then the set of documents will be sufficient to obtain a maintenance ticket.
Selecting rear brake discs for Priora
One of the main advantages of installing brake discs yourself is significant savings in money, about 10,000 rubles.
Important: when carrying out installation, it is better to purchase devices with a certificate and install them in specialized service stations, which also provide certificates stating that the brake system is adjusted and meets all standards. However, this will not provide any guarantee that you will not be picked on during maintenance.
If you still decide to install the brake system yourself, then you need to decide which brake discs are best to install. Of course, you can go to the auto parts market or look for suitable ones on the Internet. It is also possible to adapt front disc brakes from the same Priora or any other car of the VAZ family. If you're a speed enthusiast, you might be interested in ventilated brake discs, which provide much better cooling and help prevent overheating.
Spare part from a reliable brand
The most common and high-quality solution in Russia are Italian Brembo brake discs, which are widely used throughout Europe and are certified by the German Federal Bureau of the Automotive Industry. Brembo has a wide range of discs, among which you can find those that suit you, including price. In addition, Brembo has official technical support in Russia.
Brake discs from this company can be installed in conjunction with any other pair, since they do not require in-depth adjustment. If you have extra money, you can also buy Brembo MAX front brake discs, which are produced specifically for cars of the VAZ family, including Priora.
Thanks to the presence of a special wear indicator, brake discs will be replaced in a timely manner. There is a notch on the disc that completely disappears when the disc wears out, allowing you to determine its reliability at any time.
Documents regulating the activities of the traffic police in this matter:
-Technical regulations “On the safety of wheeled vehicles” were approved by Decree of the Government of the Russian Federation dated September 10, 2009 No. 720″ (as amended on September 10, 2010).
-Resolution of the Government of the Russian Federation of September 10, 2010 No. 706 “On amendments to the technical regulations on the safety of wheeled vehicles”
The full text of these documents can be found on the website of the Federal Agency for Technical Regulation and Metrology (ROSSTANDART) Link Here
-Order of the Ministry of Internal Affairs of Russia dated December 7, 2000 No. 1240.
The full text of the order can be found on the traffic police website Link here
Installation of the HTD on Priora
- Stage 1
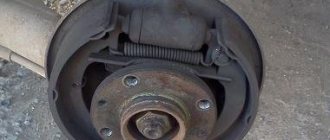
The rear drum brakes need to be removed. If you have any difficulties, you can refer to the Lada Priora service manual. Carefully remove the hub from the lever while still assembled. The brakes on a Priora with ABS are removed by first removing a special sensor with a clip from the supporting panel. Disconnect the connector and prepare the necessary spare parts for installation along with the ABS sensor fasteners.
Clean the pressure controller, its spare parts, the disc release ring journal and the hub axle. The presence of dirt on the coating can affect incorrect balancing. Unscrew the screw that holds the cable brackets and remove it.
Installing new brakes
- Stage 2
Proceed with the installation of a special adapter plate, a cover with protection against dirt and the hub axle. It is necessary to connect the adapter plate to the housing right in the middle of the beam and the hub axle. There is no need to remove the hub from the axle. The bolts are attached to the flanges using screws with groovers. The bolts must be tightened using a torque wrench, which is designed to regulate the tightening torque. It should be 5.6 kgf/cm. If the tightening is less than necessary, this will eventually lead to deformation or even complete destruction of the disks, making it difficult to unscrew the bolts.
- Stage 3 (brakes on Priora with ABS)
Attach the 9 mm plastic sensor spacer. Install the ABS bracket and the sensor required for its operation using the standard fasteners and screws. Install the ABS sensor into the trigger connector and connect it. Check whether the sensor is touching the rotor coating; to do this, simply spin the disk. The gap should be about 1 mm.
- Stage 4
The guide caliper bracket is installed on the adapter plate using screws with groovers and washers. The tightening moment should be 5.6 kgf/cm.
- Stage 5
Attach the brake disc to the hub using two guide rods and begin installing the caliper. It must be installed with the fitting facing up. Apply glue to the rod bolts, insert the first one into the armhole and tighten thoroughly. Adjust the cylinder and attach the brake pads. Tighten the second bolt taking into account a tightening torque of 2.5 kgf/cm.
- Stage 6
Apply lubricant to the handbrake cable spring and insert it into the armhole of the bracket. Attach the bracket and cable to the beam using a screw clamp, first disconnecting it and threading it into the bracket itself.
- Stage 7
It is necessary to disconnect the cable from the handbrake and remove the mudguard. Remove the cable from the caliper and dismantle it by unscrewing the fastening hardware. The brake cylinder must be carefully brought in by turning it with a wrench and thus checking whether the pads pass freely between the caliper and the brake disc. It is worth taking a closer look to see if the protrusion on the block fits into the opening on the caliper piston. Pass the cable through the armhole of the holder and secure the protective rubber cover.
The cable loop is put on the handbrake trigger. The brake hose is attached parallel to the surface of the beam arm flange, and the hose tip is screwed into the caliper using a hydraulic rod.
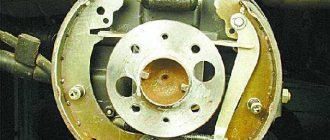
Installed unit
- Stage 8
Finally, you need to connect the brake line. Bend the brake pipe so that the tip can be positioned at the hole in the handbrake cable bracket. Insert the tip of the hose into the opening of the bracket, fasten the brake pipe to it and securely fix the structure.
Check again to make sure everything is securely fastened and screwed down. All elements must be connected correctly.
Progress
First you need to dismantle the old mechanism. After you remove the wheels, you will be faced with the hubs, which need to be removed from the rear beam. If you have a Priora with ABS, you will need to additionally remove the sensor from the supporting panel. You will also need to remove the screw from the cable bracket.
At the same time, you should already have on hand all the necessary materials to replace the brakes and clean parts that will not be dismantled. Clean components and sensors. Further work includes the following steps:
- Installing the adapter plate.
- Securing the sensor washer. This is necessary for vehicles equipped with an ABS system.
- Installation of the ABS bracket, as well as a special sensor designed for its operation.
- Installing the caliper bracket.
- Mounting the disc on the rear beam.
- Lubricating the handbrake spring, threading the cable into the bracket, fixing the bracket.
- Disconnecting the handbrake cable and adjusting the cylinder.
- Brake line assembly.
The work is quite complex as it needs to be done with extreme caution. Otherwise, you may be left without brakes or face the need for an emergency replacement.
Maintenance Recommendations
After the installation of the HCD is completed, grinding and heating of the working coating may occur, which is caused by the grinding in of new spare parts. Do not try to brake hard until you have driven 350-550 km so that the new parts can get the necessary break-in.
In combination with rear brake discs, it is advisable to install Brembo MAX front discs on the Priora. This will allow you to achieve the highest quality of uniform braking. In addition, front disc brakes will give an organic and aesthetic look to your car.
We recommend reading:
- If the Priora engine stalls when cold
- The procedure for replacing the fuel filter on a Priora
- Replacement of rear struts: done on Priora
- Common error codes for Lada Priora
- Selection of oil for the Priora gearbox
- What is Priora tuning?