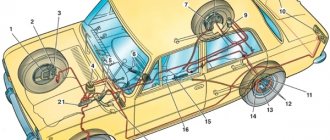
Modern Lada
Most Lada Priora owners know that the domestic car has front disc brakes and rear drum brakes. It is no secret that the drum braking system was developed a long time ago, back in the middle of the 20th century, and no longer meets current standards.
In the modern automotive industry abroad, you can hardly find drum brakes anywhere; many companies have switched to rear disc systems. The only exception is budget cars, which cannot afford to have a better braking system.
Rear brake discs can be installed on almost any front-wheel drive vehicle of the VAZ family, including modifications with ABS. If you care about your convenience and comfort, then it’s time to think about installing brake discs for the Priora. In addition to comfort, the ZDT system significantly increases the safety of the car, and this is very important on unreliable Russian roads. Let's consider whether it is worth installing disc brakes on the Priora, as well as their advantages and disadvantages.
Advantages and disadvantages of rear disc brakes
Rear brake discs are installed on foreign cars not only because of their high efficiency, but also to ensure simultaneous and uniform operation of the braking system. If any mechanism operates more sharply or slowly, this will entail a loss of control over control.
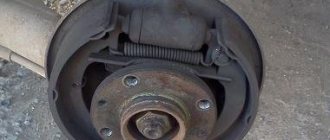
Disc brake unit
Rear disc brakes have the following advantages.
- The braking distance is reduced several times.
- Brake response time is noticeably reduced.
- Frequent maintenance is not required, brake pads can be replaced without much effort.
- Increased security.
- Uniform operation of the braking system.
- Unsprung masses are noticeably reduced.
- Fast heat dissipation, which is essential at high speeds or when cornering sharply.
- The need to constantly tighten the handbrake is eliminated.
- Aesthetic appearance.
- They do not freeze in the cold season after washing (a similar problem is observed in drum brakes).
It is worth remembering that the Volzhsky Automobile Plant does not install rear disc brakes on the Lada Priora, based on its standards. By replacing drum brakes with disc brakes, you will be making changes to the stock configuration of the car, which will affect its technical characteristics.
Rear disc brakes have their drawbacks. For each brand of car, good braking systems are developed over a considerable period of time, based on the technical characteristics of the model and certain standards. In other words, the stock brakes are always well balanced and tuned.
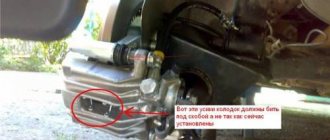
A typical mistake of inept installation
Buying a new brake system and simply installing it will not achieve the desired result. Rear disc brakes need to be adjusted and their functionality checked in the field. Otherwise, you will encounter problems such as uneven operation of the brake system, which will lead to skidding, whistling, squeaking and even overheating.
Minuses
Replacing brakes with disc brakes was not without the famous “fly in the ointment,” although it rather concerns precisely those problems that their installation can cause.
Firstly, our law enforcement agencies consider their installation on a VAZ 2110 as a design change.
What might this entail?
- Fine when passing a technical inspection;
- You can be simply wrong in a controversial accident if traffic police officers emphasize that you have “wrong” brakes;
- And the insurance company may also consider this a reason for non-payment of insurance.
Secondly, the handbrake will additionally need to be modified - or replaced with a hydraulic handbrake, although the latter weakens over time.
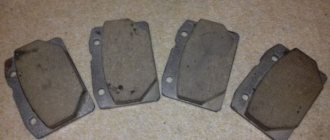
Thirdly, it is necessary to refine or carefully adjust the sorcerer so that on the VAZ 2110 the rear wheels do not brake more than the front ones, as this will certainly cause a skid, especially on ice or wet asphalt. To do this, sometimes you even have to grind down the pads by a quarter, or even more.
What are the risks of installing a non-standard brake mechanism?
Installing brake discs on a Priora does not always have a good effect on the car. Of course, the costs will pay off and you will get the desired effect, but at the same time, some problems may arise.
- You may fail your MOT inspection as it is illegal to tamper with the car's standard equipment, although rear disc brakes have a number of advantages over drum brakes.
- Since the rear disc brakes are very conspicuous, a meticulous law enforcement officer on the road may well find fault with the presence of non-standard mechanisms installed on the car. But in most cases this is rarely paid attention to.
- There may be problems fitting a standard cable handbrake. Installing a hydraulic brake will help here, allowing you to brake at high speed, but weakening over time if used as a parking brake. Some car enthusiasts completely refuse to have a handbrake and even manage to pass MOT without any problems.
- If you get into an accident, the scales will tip against you due to the presence of non-standard spare parts in the car, even if you are not the culprit.
Having installed rear disc brakes on the Lada Priora, you need to start adjusting the brake force distribution system, which is called the “Sorcerer”. If this is not done, the rear brakes will apply faster than the front brakes. This will lead to unwanted skidding, worn tires, squealing and overheating of the disc brakes.
Sometimes skillful owners take on the grinding of brake pads themselves, reducing their contact with the brake discs by up to 50%.
How disc brakes are superior to drum brakes
Rear disc brakes have a number of advantages:
There are nuances when using rear disc brakes; it takes a lot of time to develop a high-quality braking system for different car models, taking into account existing requirements. Specifically speaking, excellent tuning and balancing was done on the stock brakes.
On a note! After installing the disc brake system for the rear wheels, it is important to carry out the adjustment procedure and be sure to check their functionality. Otherwise, troubles associated with uneven braking may occur and endanger the lives of the driver and passengers.
Selecting rear brake discs for Priora
One of the main advantages of installing brake discs yourself is significant savings in money, about 10,000 rubles.
Important: when carrying out installation, it is better to purchase devices with a certificate and install them in specialized service stations, which also provide certificates stating that the brake system is adjusted and meets all standards. However, this will not provide any guarantee that you will not be picked on during maintenance.
If you still decide to install the brake system yourself, then you need to decide which brake discs are best to install. Of course, you can go to the auto parts market or look for suitable ones on the Internet. It is also possible to adapt front disc brakes from the same Priora or any other car of the VAZ family. If you're a speed enthusiast, you might be interested in ventilated brake discs, which provide much better cooling and help prevent overheating.
Spare part from a reliable brand
The most common and high-quality solution in Russia are Italian Brembo brake discs, which are widely used throughout Europe and are certified by the German Federal Bureau of the Automotive Industry. Brembo has a wide range of discs, among which you can find those that suit you, including price. In addition, Brembo has official technical support in Russia.
Brake discs from this company can be installed in conjunction with any other pair, since they do not require in-depth adjustment. If you have extra money, you can also buy Brembo MAX front brake discs, which are produced specifically for cars of the VAZ family, including Priora.
Thanks to the presence of a special wear indicator, brake discs will be replaced in a timely manner. There is a notch on the disc that completely disappears when the disc wears out, allowing you to determine its reliability at any time.
Installation of the HTD on Priora
- Stage 1
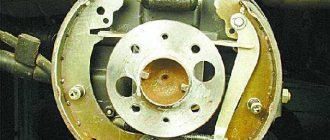
The rear drum brakes need to be removed. If you have any difficulties, you can refer to the Lada Priora service manual. Carefully remove the hub from the lever while still assembled. The brakes on a Priora with ABS are removed by first removing a special sensor with a clip from the supporting panel. Disconnect the connector and prepare the necessary spare parts for installation along with the ABS sensor fasteners.
Clean the pressure controller, its spare parts, the disc release ring journal and the hub axle. The presence of dirt on the coating can affect incorrect balancing. Unscrew the screw that holds the cable brackets and remove it.
Installing new brakes
- Stage 2
Proceed with the installation of a special adapter plate, a cover with protection against dirt and the hub axle. It is necessary to connect the adapter plate to the housing right in the middle of the beam and the hub axle. There is no need to remove the hub from the axle. The bolts are attached to the flanges using screws with groovers. The bolts must be tightened using a torque wrench, which is designed to regulate the tightening torque. It should be 5.6 kgf/cm. If the tightening is less than necessary, this will eventually lead to deformation or even complete destruction of the disks, making it difficult to unscrew the bolts.
- Stage 3 (brakes on Priora with ABS)
Attach the 9 mm plastic sensor spacer. Install the ABS bracket and the sensor required for its operation using the standard fasteners and screws. Install the ABS sensor into the trigger connector and connect it. Check whether the sensor is touching the rotor coating; to do this, simply spin the disk. The gap should be about 1 mm.
- Stage 4
The guide caliper bracket is installed on the adapter plate using screws with groovers and washers. The tightening moment should be 5.6 kgf/cm.
- Stage 5
Attach the brake disc to the hub using two guide rods and begin installing the caliper. It must be installed with the fitting facing up. Apply glue to the rod bolts, insert the first one into the armhole and tighten thoroughly. Adjust the cylinder and attach the brake pads. Tighten the second bolt taking into account a tightening torque of 2.5 kgf/cm.
- Stage 6
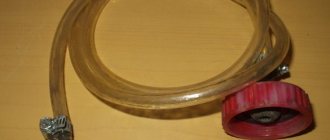
Apply lubricant to the handbrake cable spring and insert it into the armhole of the bracket. Attach the bracket and cable to the beam using a screw clamp, first disconnecting it and threading it into the bracket itself.
- Stage 7
It is necessary to disconnect the cable from the handbrake and remove the mudguard. Remove the cable from the caliper and dismantle it by unscrewing the fastening hardware. The brake cylinder must be carefully brought in by turning it with a wrench and thus checking whether the pads pass freely between the caliper and the brake disc. It is worth taking a closer look to see if the protrusion on the block fits into the opening on the caliper piston. Pass the cable through the armhole of the holder and secure the protective rubber cover.
The cable loop is put on the handbrake trigger. The brake hose is attached parallel to the surface of the beam arm flange, and the hose tip is screwed into the caliper using a hydraulic rod.
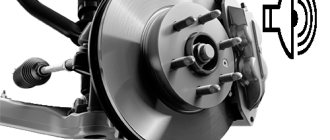
Installed unit
- Stage 8
Finally, you need to connect the brake line. Bend the brake pipe so that the tip can be positioned at the hole in the handbrake cable bracket. Insert the tip of the hose into the opening of the bracket, fasten the brake pipe to it and securely fix the structure.
Check again to make sure everything is securely fastened and screwed down. All elements must be connected correctly.
How to replace a brake disc on a VAZ 2170-VAZ 2172?
Note! If you are planning to change the brake disc in the front part, then it is better to take your time and save up some money to buy a second exactly the same disc, we will warn you right away, it is best to change two discs in the front part and not one, as many do, since the discs are erased at the same time (Unless, of course, one was replaced before, otherwise in this case uneven erasing will result) and most importantly, the car can brake on each brake disc with different strength (Manufacturers make them with different compositions and some brake more strongly, and some on the contrary, it’s worse), and because of this, the car will be pulled away from a straight-line course during emergency braking, so to prevent this from happening, it’s best to change both discs at the same time and the car will start to slow down much better and will not be pulled away from straight-line motion at all (First 100 km ., this may be due to the fact that the brake pads will be worn in)!
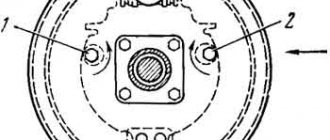
Removal: 1) First, you will need to remove the wheel from the car and then the brake pads (How to remove a wheel, read “here”, and how to remove the pads, read “here in this article”), when the operation has already been carried out and the pads are in place will be to the side (By the way, if you have the means, you can buy new pads, it’s just that when replacing brake discs, the pads are also mostly affected and replaced with new ones), use a 17-size wrench to unscrew the two bolts that secure the brake pad guide (The location of the bolts is indicated in the large photo with arrows, and in more detail the location of these bolts is shown in the small photo which is located in the corner) and immediately after that remove it from the brake disc, as it will get in the way very much and under no circumstances let the guide hang on the brake hose (it may burst), but best of all, tie it to the spring with a wire carefully so that it does not hang down, but stays there tightly.
2) Now, taking the wrench and putting a “7” socket head on it (If there is no wrench, then ordinary keys will do), unscrew the two guide pins that secure the disk (see small photo), but they will only be very difficult to unscrew , if the car is no longer young (In this case, a penetrating lubricant will help, such as WD-40 or something like it), and as soon as the pins are unscrewed, take a hammer (a rubber one is best, if you don’t have one, then also stock up on a piece of wood) and with its help, knock the brake disc out of its seat (the seat is indicated by a blue arrow, by the way, we also recommend that you lubricate it with penetrating lubricant so that the disc can be easily removed), but only when you hit, do not do it all in one place, but in different, otherwise you will be pounding on it for a long time and there will be practically no benefit from it.
Installation: Install the new disk in its normal place, in the reverse order of removal, but if it turns out that you will be installing the old disk again (For example, you removed it to get to the hub, etc.), then be sure to carefully remove the shoulder from it with a file, which formed as the brake disc wears out.
Additional video: You can see how to clearly replace a brake disc with a new one in the video below:
Symptoms: the front wheel practically does not brake, there is no braking effect by the front wheel, vibration in the front wheel drive when braking.
Possible cause: The brake disc is damaged or worn.
Tools: set of sockets, set of wrenches.
Note. After dismantling the disk, inspect its working surface for burrs, deep grooves, cracks, chips and other defects. You should also check the thickness of the disc (minimum permissible thickness is 17.8 millimeters) and its axial runout (runout exceeding 0.15 millimeters is not allowed). If defects are found, the disk should be replaced.
The discs should be replaced in pairs (i.e., one for each brake mechanism of the front wheels), otherwise the car may skid when braking.
1. Remove the wheel and brake pads.
2. Unscrew the two brake pad guide mounting bolts to the steering knuckle using a 17mm wrench.
3. Remove the front wheel brake assembly without removing the brake hose from the wheel cylinder.
4. Hang the brake mechanism to the front suspension telescopic strut using a rope or wire. Do not over-tighten or kink the brake hose.
5. Clean the brake disc from dirt. Lubricate the guide pins and the interface between the disc and the hub with liquid. Wait a while for the liquid to dissolve traces of corrosion.
We recommend: How to adjust the valves of a VAZ 2109
6. Unscrew and remove the two guide pins using a 7mm wrench.
7. Remove the brake disc of the front wheel brake mechanism.
8. Install the new disk in the reverse order of removal.
Brake discs always wear out; on the Lada Priora their diameter reaches the minimum permissible size, which is about 17.8 mm. Beyond this limit, the brake disc becomes ineffective and it is time to change it. How to do it?
The usual method of replacing Priora brake discs involves dismantling the caliper; for this you will need a 7 key. Then we proceed in this way: using a previously prepared key, we unscrew the guide pins and manually remove the brake disc. And in case of difficulties, we knock it down with a hammer or sledgehammer.
After this, we unscrew both guide pins. Subsequent steps should be performed in strictly reverse order. In this case, all mating surfaces of the hub and disk must be cleaned of dirt, rust and scale. The smallest particle of unwanted impurities can lead to vibration and beating of the brake disc during braking of the car. If you want your car's brake system to work like a clock, completely replace the set of brake pads.
Maintenance Recommendations
After the installation of the HCD is completed, grinding and heating of the working coating may occur, which is caused by the grinding in of new spare parts. Do not try to brake hard until you have driven 350-550 km so that the new parts can get the necessary break-in.
In combination with rear brake discs, it is advisable to install Brembo MAX front discs on the Priora. This will allow you to achieve the highest quality of uniform braking. In addition, front disc brakes will give an organic and aesthetic look to your car.
We recommend reading:
- If the Priora engine stalls when cold
- The procedure for replacing the fuel filter on a Priora
- Replacement of rear struts: done on Priora
- Common error codes for Lada Priora
- Selection of oil for the Priora gearbox
- What is Priora tuning?