Print this article Font size 16
Regardless of the level of quality and reliability of a car part, each of them has a certain safety margin. Nothing is eternal. Especially the car and its components.
Therefore, the only solution for a modern car owner is to carry out timely prevention. And if the breakdown turns out to be unpredictable, then repair will help. Independently or with the help of service stations is a completely different question, essentially depending on the degree of complexity of the breakdown.
Agree that it is extremely important to maintain the functional characteristics of your engine. One of the reasons for its malfunction is a worn crankshaft oil seal. The instruction manual states that this element must be diagnosed approximately once a year, and replacement is scheduled to be carried out every three years. But sometimes not everything goes according to plan, and the oil seal fails ahead of schedule. Today we will talk about how to act in such situations, what may be the reasons for the premature breakdown of the SC, as well as how to replace it with your own hands.
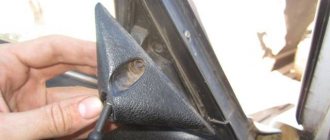
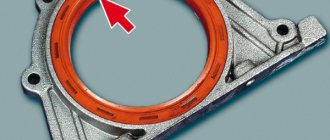
Element appearance
Causes of failure
The most obvious factor indicating problems with the crankshaft oil seal is numerous traces of oil on and near the engine. There may be several reasons for the loss of strength of the crankshaft oil seal (CS). Here are the main ones:
- Natural physical wear of the part associated with a long service life, which has already approached 3 years or even exceeded it;
- Problems that arose during the last installation of a new SC;
- Incorrect assembly of the unit, which resulted in a violation of the tightness and integrity of the cuff;
- Presence of mechanical damage on the element;
- The use of rubber of dubious quality, which even theoretically could not last long.
The design of the “ten” provides for the presence of two crankshaft oil seals - front and rear. Their replacement is somewhat different. Therefore, they should be considered separately.
Tools and materials
What's a repair without tools?! You will need a certain set of everything you need. This set includes:
- Car keys;
- Timing belt tensioner;
- Set of screwdrivers with bits;
- Waste collection container;
- Antifreeze or high-quality graphite lubricant;
- Container with motor oil;
- Heat-resistant sealant;
- New crankshaft seals.
Why is it necessary to change on time?
Naturally, timely repair of parts that have become unusable will extend the life of both the engine and the VAZ-2110 vehicle itself. The time after which it is necessary to change the oil seal directly depends on how old or new the car is, on the driving style of the car owner and operating conditions.
If you change them in a timely manner, this will help reduce the cost of car repairs, because such measures eliminate engine oil leaks, which negatively affect the operation of the engine.
If you do not change it in time, the VAZ-2110 car will “eat” more motor oil, and the engine itself will begin to collect dirt and dust, which cannot but affect the stability of its operation. Engine oil leaks negatively affect car parts that are not made of metal, and the contact in the terminals will become much worse, which, in turn, will affect how the car starts.
What is needed for repair
If you decide to repair it yourself, take care of the site where you plan to inspect the machine. This could be an overpass or an inspection ditch in which it will be convenient to make the replacement.
The set of tools for work should include screwdrivers, cuffs, new oil seals, a set of heads and keys. Be sure to use sealant when making repairs. Remember that parts and consumables must be purchased only from the manufacturer, in order to avoid purchasing low-quality products or counterfeiting original parts.
Replacing the crankshaft oil seal on a VAZ 2110 16 valves
In order to remove and replace the front crankshaft oil seal of a VAZ 2110 (16 cl), you will need the same standard set of tools. All actions are also similar to the procedure for replacing the cuff on an 8-valve engine. So, the algorithm for removing the front cuff from the crankshaft is as follows:
- Remove the timing belt.
- Remove the generator belt.
- Remove the front right wheel and, if necessary, the fender liner.
- We unscrew the bolt securing the crankshaft pulleys and dismantle them.
- We replace the cuff and put everything back together in reverse order.
If you are replacing the front cuff, it makes sense to replace the back one as well. And if you do this at the same time, you will save time, since the components are replaced from one place with the removal of the wheel and, possibly, the fender liner.
Replacement procedure
The procedure for replacing the oil seal on a VAZ-2107, 2106 and other “classic” models is no different. Front-wheel drive vehicles have some differences in the preparatory work due to the different location of the power unit. At the same time, engines with 8 valves (VAZ-2115, 2110) and 16 valves (Kalina, 2112) do not have any fundamental differences in replacing the elements in question.
Replacing cuffs on a “classic”
Replacing the rear crankshaft seal on a “classic” is carried out exclusively on a pit or a lift, since only such conditions allow you to safely dismantle the gearbox. The procedure is performed in the following sequence:
- installing a car in a pit;
- dismantling the driveshaft;
- dismantling the gearbox;
- dismantling the clutch;
- dismantling the rear cover of the clutch housing;
- dismantling the holder;
- removing the old element and pressing in the new one;
- reverse assembly.
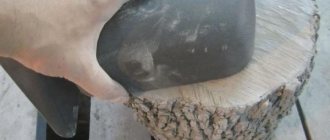
The old seal is removed using a hammer and a drift, inserting the latter into the holes for the crankcase mounting bolts and applying light blows with a hammer. Before pressing, the new cuff is lubricated with engine oil or silicone sealant. Pressing is carried out by carefully striking the seal with a hammer or using a mandrel.
To dismantle and replace the front gasket, you will need to remove the power unit cooling fan and the generator belt. After this, you need to unscrew the nut and remove the crankshaft pulley. The element itself is located below it. To avoid difficult work on removing the front engine cover, the element is removed using a slotted screwdriver.
If this cannot be done, dismantling and replacing the VAZ-2107 crankshaft oil seal is carried out using a self-tapping screw. It is screwed into the side of the cuff, after which the element is pulled out with an ordinary nail puller. Before pressing in a new gasket, its seat should be cleaned of dirt. Pressing is carried out by analogy with the rear cuff.
Replacing oil seals on front-wheel drive cars produced by AvtoVAZ
Replacing the VAZ-2110 crankshaft oil seal, located in the timing drive area, is relatively simple.
To do this you should:
- remove the front drive cover;
- set the timing belt to the TDC position;
- remove the timing belt;
- remove the crankshaft pulley;
- Use a slotted screwdriver or self-tapping screw to remove the old rubber band;
- press in a new element.
Replacing the rear crankshaft oil seal on VAZ models equipped with front-wheel drive also requires dismantling the gearbox, clutch housing, and plate. After this, you should remove the holder or remove the old part with a self-tapping screw. The seat is washed with gasoline or kerosene and dried. The pressing procedure itself does not differ from that described above.
Note: despite the simplicity of the description, doing such work with your own hands requires knowledge of some technical subtleties. If there is a lack of experience in performing such extensive manipulations, it is better for an inexperienced car owner to turn to specialists.
Work order
- First of all, we disconnect the negative terminal, as a result of which we de-energize the VAZ-2110. After this procedure, it is necessary to remove the protection of the timing belt and the car engine.
- We loosen the tense timing belt, and then simply remove it, making sure that the marks match.
- We remove the right wheel in front of the VAZ. After completing the manipulations with the wheel, the generator drive belt is also removed, after which you must unscrew the bolt securing the crankshaft pulley.
- The engine oil is drained and the oil pump, to which the front oil seal is attached, is dismantled. We replace the cuff and carefully coat it with sealant.
- The cuff on the inside is generously coated with oil, then remove the seal and take out the front cuff of the car. We collect all this in the reverse order of the above steps.
Replacing the rear cuff will be much more difficult. The procedure for carrying out repair actions is as follows:
- We remove the negative terminal from the battery, after which it is necessary to remove the clutch basket. After these procedures, we proceed to dismantling the flywheel, and then to removing the crankcase casing.
- The rear oil seal holder is removed by unscrewing the tightened bolts securing it. We unscrew the bolts that secure the flywheel.
- While holding the latch, you need to pull out the seal. To do this, you can use a vice and inspect the fixing part of the cuff. If there are any defects in it, this part is also replaced, and then the working edge of the new cuff is placed inside the retainer and the gasket is replaced.
- The edge of the crankshaft together with the flange is generously coated with oil. We install the holder, very carefully tucking the working edge of the sealing ring onto the flange. Reassembly after repair is carried out in the reverse order. After making repairs, you need to check from time to time to see if engine oil is leaking.
Necessary tool
In order to change the seals, you need to prepare the following set of tools:
- A set of keys or sockets. Among them there must be keys for 10, 13 and 19.
- Several screwdrivers.
- Pliers.
- Prepare a special container for draining the oil. It can be made from a plastic canister, which is cut into two parts. Cut-up five-liter water bottles will also work.
- New seals.
Front crankshaft oil seal.
Rear crankshaft oil seal.
Articles
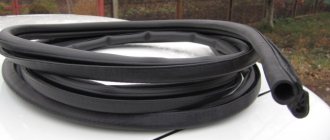
As for new oil seals, it is better to change the front and rear at once. They are also called big and small.
- The most popular parts are from AvtoVAZ, with article numbers 21080100516000 and 21081005034.
- A better quality seal kit is from ESPRA, with catalog number E07418. A foreign manufacturer costs twice as much.
A set of branded ESPRA oil seals.
Replacement algorithm
In order to replace a part, you need to perform the following sequence of actions:
- First of all, you need to drain the oil from the engine. To do this, you will need an empty container of at least four liters.
- Next, remove the front timing belt cover.
Unscrew the two bolts on the sides of the cover.
Unscrew one bolt in the center of the cover.
Remove the timing cover.
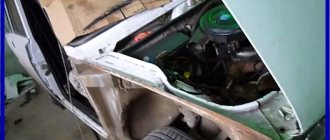
- You need to raise the right front part of the car using a jack and remove the front wheel.
Jack up the front and remove the wheel.
- The camshaft must be turned clockwise by the bolt. You need to align the marks on the pulleys.
Align the mark on the pulley with the installation tab on the cover.
- The crankshaft must be fixed.
You can fix the crankshaft with a screwdriver...
...or lock the camshaft pulley.
- The generator drive pulley is removed.
First, under the hood, loosen the tension of the generator belt, then through the wheel arch, using a 17-mm spanner, unscrew the bolt and remove the pulley.
- Next you need to remove the timing belt. To do this, the tension roller must be turned so that the belt is in its loosest position.
Loosen the roller and remove the timing belt.
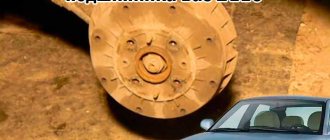
- The toothed pulley is removed. For this, two screwdrivers are used.
Usually the pulley can be easily removed.
But you may need a puller.
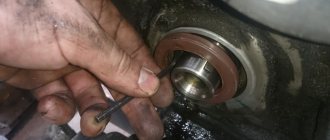
Only after this can the old oil seal be removed. For this you also need to use a screwdriver.
Under the pulley we see oil and an old oil seal.
We take out the worn oil seal and clean the surfaces.
Before installing a new oil seal, you need to lubricate its edge with machine oil. Only after this is it pressed in.
If the toothed pulley is completely rusted and there is no puller at hand, watch a video on how to remove the gear using the third method:
Rear oil seal
In addition, to replace it you will need to remove additional components and parts. If the VAZ-2110 car owner has already had to change various oil seals, then he will definitely cope with this task. An inexperienced car enthusiast can ask a friend who has had to do similar work for help.
The procedure goes as follows:
- You need to drain the oil from the gearbox.
Using a 17 key, unscrew the plug and drain the oil into a container; when finished, put the plug back in place.
- The wheel is removed. It is for this reason that it is recommended to change two oil seals at once in order to avoid unnecessary disassembly procedures.
- The CV joint is brought out.
To remove the drive, you need to unscrew the bolts securing the ball joint.
- The drive shaft is taken out along with the CV joint.
We push out the hinge using a mounting spatula.
- The gearbox is removed. Before doing this, you need to disconnect the drive rod.
We unscrew the jet rod.
Remove the clutch housing cover.
We unscrew the bolts securing the box.
Together we move the gearbox to the side.
- Now you need to remove the flywheel.
Before removing the flywheel, put marks.
- Having removed the flywheel, we see the oil seal.
View of the seal.
- The old oil seal is removed using a screwdriver.
We clean the seat from dirt and install a new oil seal.
Next you need to lubricate with oil and install a new crankshaft oil seal. Assembly occurs in reverse order.
When is it time to change?
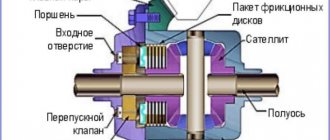
The car crankshaft has two oil seals: front and rear. They are dense elastic rings in a hard cage.
Their purpose is to prevent dust and dirt from entering the crankcase and to prevent oil leakage. The service life of the sealing rings is 150 thousand kilometers. But consumables may wear out sooner. The reason for this may be:
- poor quality product;
- work under increased loads;
- overheat;
- untimely replacement of oil and filter;
- use of oils that do not meet the recommended ones.
You can diagnose the replacement of oil seals by the oil stains that appear on the engine and gearbox. An oil leak can cause the timing belt to break, causing damage to the valves. In this case, it may be necessary not only to replace the valves, but also to overhaul the engine.
Symptoms of a problem
The malfunction of the valve stem seals can be determined by several symptoms - the engine will begin to consume oil, and the more worn the valve seals are, the more intensively.
A blue tint will appear in the exhaust, indicating oil has entered the cylinders.
If you do not pay attention to these symptoms for a long time, then in the future there may be a drop in engine power due to a decrease in compression.
If all this is observed on the car, then it is worth performing repair work, which boils down to replacing the valve seals.
This can be done at a service station, but it will be expensive, since the process of replacing them is labor-intensive.
But if you have skills in repairing car power units, then it is quite possible to do all the work yourself.
Front SC
We recommend starting with the front one, since this oil seal is the easiest to replace. Even a car owner without much experience can handle it. Once you learn how to change it, you will most likely be able to replace the rear crankshaft oil seal yourself. But it is better to act according to the circumstances.
Retrieving an element
The steps for replacing the front oil seal are as follows:
- Remove the protective cover located on the timing belt;
- Remove your engine protection. You will have to get under the bottom and unscrew the corresponding fasteners;
- Set the piston of the first cylinder to top dead center on the compression stroke;
- Slightly loosen the timing belt tension, after which it can be easily removed;
- Remove the front right wheel;
- Remove the generator drive belt, and also do not forget to remove the pulley;
- Now we dismantle the fasteners of the crankshaft pulley and take it out. Here you will need to first remove the key;
Front SC
- Be sure to drain the engine oil from the system. To do this, prepare an appropriate container in advance. If you plan to refill the oil, be sure to keep the container clean and dry;
- Remove the oil pump. It is on this that the desired crankshaft oil seal is located;
- To remove the SC, you will need a flathead screwdriver;
- At the same time, check the condition of the oil filter. Replace it if necessary;
- Having dismantled the old front crankshaft oil seal, you can now install a new one in its place;
- Installation of the SC is carried out with a 27 mm nozzle or head;
- Assembly of the unit is carried out exactly in the reverse order.
Since replacing the AC requires serious dismantling work, it is not superfluous to simultaneously check the condition of other units, replace the oil, filter or other parts.
Why do you need to change crankshaft seals?
Oil leaks on the rain cover may also indicate wear of the crankshaft oil seal.
Replacing parts that have expired and do not perform the necessary functions allows you to avoid failure of other parts, which extends the overall life of the vehicle.
Replacing crankshaft oil seals does not depend on operating time or total mileage. It depends on the:
- Operating conditions.
- The age of the car.
- Driving style.
- Periods of engine maintenance and prevention.
Oil seals can be changed in a timely manner if cracks are visible on their surface and the rubber loses elasticity . Such measures will significantly extend the life of the motor.
Consequences
A worn oil seal is no longer able to hold oil, which begins to come out and settle on surfaces.
If you do not change the seals in time, this can lead to the following consequences:
- Oil consumption will increase significantly.
- Dirt will begin to accumulate under the hood, which can lead to unstable engine operation.
- Rubber parts under the hood that get oil on them will begin to deteriorate.
- If oil gets on the battery terminals, it will break the contacts and, accordingly, there will be problems with starting the car.
And the oil seal may simply suddenly collapse, which can lead to undesirable consequences on a long journey.
Causes of wear of crankshaft oil seals
The service life of the crankshaft cuffs is 150,000 km, but in fact this has to be done earlier due to premature wear and other mechanical damage. Knowing the main reasons for the failure of these elements, you can extend their service life. We list the main causes of wear on the crankshaft seals:
- Poor quality oil. In addition to negatively affecting the metal parts of the engine, bad oil can also affect rubber parts.
- Engine overheating. If you have caused the engine to overheat, immediately check for leaks where the shafts exit the engine housing.
- Active driving through mud, puddles, etc. – all this can negatively affect the condition of the crankshaft axis seals.
As you can see, there are plenty of reasons, but malfunctions can be avoided if you regularly monitor your car. Next, we will answer the question of how to replace the crankshaft oil seal on a VAZ 2110 in various modifications.
Work order
- First of all, we disconnect the negative terminal, as a result of which we de-energize the VAZ-2110. After this procedure, it is necessary to remove the protection of the timing belt and the car engine.
- We loosen the tense timing belt, and then simply remove it, making sure that the marks match.
- We remove the right wheel in front of the VAZ. After completing the manipulations with the wheel, the generator drive belt is also removed, after which you must unscrew the bolt securing the crankshaft pulley.
- The engine oil is drained and the oil pump, to which the front oil seal is attached, is dismantled. We replace the cuff and carefully coat it with sealant.
- The cuff on the inside is generously coated with oil, then remove the seal and take out the front cuff of the car. We collect all this in the reverse order of the above steps.
Replacing the rear cuff will be much more difficult. The procedure for carrying out repair actions is as follows:
- We remove the negative terminal from the battery, after which it is necessary to remove the clutch basket. After these procedures, we proceed to dismantling the flywheel, and then to removing the crankcase casing.
- The rear oil seal holder is removed by unscrewing the tightened bolts securing it. We unscrew the bolts that secure the flywheel.
- While holding the latch, you need to pull out the seal. To do this, you can use a vice and inspect the fixing part of the cuff. If there are any defects in it, this part is also replaced, and then the working edge of the new cuff is placed inside the retainer and the gasket is replaced.
- The edge of the crankshaft together with the flange is generously coated with oil. We install the holder, very carefully tucking the working edge of the sealing ring onto the flange. Reassembly after repair is carried out in the reverse order. After making repairs, you need to check from time to time to see if engine oil is leaking.
Rear crankshaft oil seal VAZ 2110. Replacement on an 8-valve engine
Replacing the back cuff is a more difficult task compared to replacing the anterior cuff. It will take a little more time and effort to get the job done. Let's take a closer look at how to do this:
- Disconnect the battery.
- We remove the flywheel; to do this, you need to disconnect the gearbox from the engine.
- Loosen the bolts securing the holder and carefully press out the part.
- Carefully press in the new cuff. It's better to use a mandrel.
- Coat the joints of the holder with sealant and assemble everything in reverse order.
The difficulty is that you need to get to the back of the engine, which requires you to do the routine work of disconnecting the gearbox from the engine and removing the flywheel.
→ Get useful materials for VAZ 2101-2110 Thanks for subscribing!