Print this article Font size 16
Every car owner should be prepared for the fact that his car will malfunction sooner or later. Consequently, you will have to carry out repairs and change some parts. Many people prefer to use the services of service stations, but in the case of cars such as the VAZ 2114, a number of repairs can be carried out with your own hands. You just need to know how to do it.
Today we will talk about how to change the brake pads on the rear of a VAZ 2114. Rear pads fail very rarely, so the problem is quite common.
Necessary tool
To replace the pads you do not need to use a special tool, just have:
- Set of wrenches;
- Balloon wrench;
- Pliers;
- Hammer;
- A soft metal drift or wooden block;
- Screwdrivers.
It is better to have a WB-40 cylinder on hand, since the mechanism is susceptible to corrosion and it is not always possible to disassemble it easily.
It is better to replace it in a garage or in a fenced area with little traffic around, so as not to interfere with other road users.
Dimensions of Infiniti QX80
Infinity QuickX is a premium SUV with 7+1 seats. Its overall dimensions are: length 5290 mm, width 2030 mm, height 1925 mm, and wheelbase 3075 mm. The ground clearance of the Infiniti QX80 is 261 millimeters. Thanks to such a solid ground clearance, the car will become a faithful friend and assistant. wherever you go. It will easily overcome deep ruts, climb high curbs and maintain an excellent ride even on rough paved roads.
The trunk of the Infiniti QX80 is truly gigantic in size. With the backrests of the third row of seats raised, up to 470 liters of free space remain in the rear. Thanks to this volume, the car will perfectly cope with the daily tasks of a city dweller and will be able to go on a long journey at any time with an abundance of luggage and several passengers on board. If the driver does not plan to take more than five passengers on board, he can always fold the third row and free up 1400 liters, and if you also sacrifice the second row, you can get up to 2690 liters.
Signs of rear pad wear
Unlike the front pads, where wear can be determined visually, the rear pads are covered by a drum. To inspect the mechanism inside, you will have to remove the wheel and the drum itself. Few car owners would want to do something like this just for the sake of diagnostics.
Of the obvious signs by sensation, only two can be identified:
- Weak handbrake. This does not always happen due to a cable that has been stretched over time, since when the pads are worn, the travel of the parking brake lever increases, because more force is required to lock the wheel.
- Poor responsiveness to the brake pedal. The car will stop less effectively during braking, since only the front ones will work fully. If the rear pad lining is worn down to metal, there will be creaking and vibrations on the body. This can lead to overheating of the drum and boiling of the brakes.
The minimum thickness of the rear pads, as stated by the manufacturer, should be 1.5 mm .
What are they needed for
Rear pads are an important element of the braking system, which allows you to stop the car in a timely manner. Its action is quite simple - when the brake pedal is pressed, the braking force is transmitted to the pads, which are pressed against the drum. This stops its rotation and the machine stops.
Preparing for replacement
The principle, although simple, does not make the pads lose their great importance for the braking system.
Cost of rear pads and article number
When purchasing a set of rear pads, it is best to give preference to original parts. Car owners recommend them for purchase, rather than analog brands, because they have a better price-quality ratio.
You should look for the part by article number: 21080-3502090-55 . This will help you avoid running into a fake in packaging similar to the original.
It is worth noting that when replacing the rear pads on a VAZ 2114, most often a failed brake cylinder is also discovered. It becomes sour in certain positions and when the brake is pressed and does not provide a proper seal.
Features of pedal settings
The driver controls this entire complex assembly with just one pedal.
That is why it is very important to monitor the condition of these mechanisms and correct errors in a timely manner.
It is necessary to pay attention to the following features:
- Each owner of this vehicle must remember that when the engine is not running, the pedal must have free play. The adjustment can be made with the vehicle turned off. This can be done by moving the brake light switch and lowering its nuts.
- When the switch at the brake light is very close to the pedal itself, this risks the fact that it will not return to its original state. But even here there is a possibility of only partial release of the wheels when the pedal is released.
- When it was not possible to correct errors using a brake light and eliminate incomplete release of the brakes, you can simply disconnect the master cylinder at the brake drive and double-check that the adjusting bolt is not too far from the plane to which the flange of this cylinder is attached (the difference can be from 0.2 to 0.25 mm). This size will be optimal for adjusting the pedal.
Replacing rear pads on a VAZ 2114
How to replace the rear brake pads on a VAZ 2114 with your own hands? First of all, after driving the car to the work site, you should wait a little until the brake drum cools down. While driving due to frequent braking, it heats up, which can become an obstacle when dismantling it.
The replacement process itself occurs according to the following points:
- Since we cannot install a handbrake, we need to engage first gear and, for safety, put supports under the front wheels.
- Use a wheel wrench to remove the wheel nuts, then jack up the car and remove it.
- The next step is to treat the area where the drum meets the hub with WD-40. Then unscrew the drum mounts. It is held on by two 12mm bolts.
- By tapping with a hammer through a block or drift, we evenly remove the drum. Be sure to try to hit in different places, turning the hub after each hit so as not to cause mechanical damage.
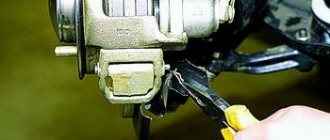
- Now we need to loosen the handbrake mechanism. To do this we need to unscrew the adjusting pin. It is located on the bottom of the car in the area where the handbrake is attached to the body.
- You can start removing the pads. We pull out the fixing cotter pin on the mechanism pin. We press out the fixing spring (soldier). Remove the upper and lower return springs and the spacer bar. Now we can remove the old pads.
- After removal, be sure to inspect the brake cylinder for wear. Before installing new parts, it is worth cleaning the rear shield and all seats from old dirt.
- Next, you can begin installing new pads. Before installation, it is better to replace the upper return spring and spacer bar. Carefully put the new brake pads in place and secure them with the lower spring and soldiers.
- Having assembled one side, we begin replacing the second side according to the same points.
- After the work has been done, the parking brake needs to be adjusted. An ideally tuned handbrake raises 4-5 clicks.
This completes the replacement process. Remember that the mechanism needs some time to get used to and therefore the effectiveness of the brakes from the beginning will be lower than it should be. Please take this into account when traveling by car.
Price issue
There is no point in buying expensive imported rear brake pads for your VAZ 2114. This will not allow them to be used longer. But, of course, it is not recommended to purchase cheap parts.
High-quality and reliable rear pads today cost between 300-500 rubles. The price depends on the manufacturer and the store where you purchase the parts.
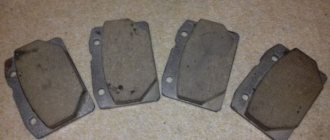
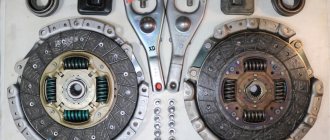
Rear brake lining kit
After what mileage should the rear brake pads be changed?
There is no exact answer to the question of how long brake pads last. Since in this case it all depends on your driving style. If it is calm, with smooth braking, then the parts can travel up to 170,000 km , and when jerky, with sharp braking, then about 100,000 km.
Also, a lot depends on the manufacturer. If you bought a used car, then it is unknown what quality of parts are installed in it. Pay attention to the signs of wear that were listed earlier, or carry out a visual inspection once a year during maintenance.
Carrying out car repairs yourself is not difficult. You don't need to use a specialized tool or have any special skills. The repair itself takes place within a couple of hours and does not require extensive knowledge. It is enough to be guided by the information obtained from this article.
Pay attention to the quality of the products you purchase for replacement so that you don’t return to repairs after 40-50 thousand km.
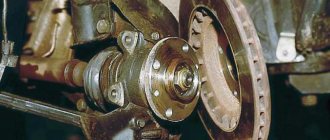
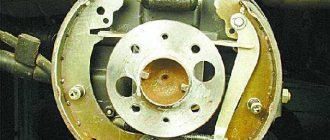
The device of the rear wheel brake mechanism on a VAZ 2114
The brake system must be maintained in good condition, as it is directly related to traffic safety. And because brakes are not something to joke about, it is necessary to change the brake pads on time, monitor the condition of the disc and drums, and check the operation of the hand brake. Not only the condition of the car, but also the safety of its passengers depends on how carefully the maintenance is carried out and the timely replacement of parts.
The device of the rear wheel brake mechanism on a VAZ 2114
The brake system of the VAZ model 2114 is hydraulic type, dual-circuit. The contours of the front and rear wheels are separated from each other, discs are installed on the front suspension of the car, and drums are installed on the rear suspension. The system is equipped with a vacuum booster to reduce the effort required to press the brake pedal. The master cylinder ensures stable operation of both circuits. The front working cylinders in the brake system are made in the form of calipers, the rear ones are made in the classic shape of a cylinder, inside each of which there are two pistons with cuffs.
Unlike disc pads and discs themselves, drum pads and drums have a longer lifespan. But sooner or later a replacement still has to be made.
In this article we will look at how to replace the rear brake pads on a front-wheel drive VAZ family car. It should be immediately noted that the rear suspension of models 2108, 2109, 2113, 2114, 2115 is no different.
There is no strict framework for how long it takes to change the rear brake pads, but usually replacement for the VAZ 2114 is done somewhere after 70 thousand kilometers. But the frequency may be different, this is influenced by various factors:
- Driving style of the car owner;
- Conditions in which the machine is operated;
- Condition of the drums;
- The quality of the pads themselves and the friction linings on them.
Constant emergency braking leads to premature wear of the friction layer of the pads; the rubbing elements of the brake system operate faster in wet, rainy weather. A brake drum on a VAZ with uneven wear on the inner surface also wears the pads unevenly.
Rear brake pads for the VAZ 2114 are now manufactured by various companies, and the quality of the products also varies. The most proven and reliable parts are those produced by AvtoVAZ. The companies TRIALLI and ALLIED NIPPON have proven themselves to be quite good; the cost of a set of pads can range from 700-1200 rubles. You should not be tempted by cheap goods - there are various nuances here:
- Rear brake pads may squeak due to poor quality friction linings;
- Also, due to poor quality, the pads will wear out quickly.
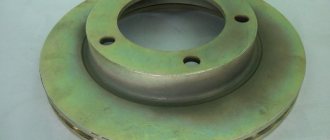
The drum is one of the main elements of the brake system and interacts with the pads during braking. The car stops due to friction between these parts when you press the brake pedal. Drums are considered a somewhat outdated design that is less efficient than a disc system. But the service life of drum brakes is much longer than disc brakes.
Drum (brake)
On average, drums cost from 600 to 1300 rubles, prices depend on the region and the manufacturer of the parts. There are original spare parts produced by VAZ, and there are also products from BelMag, Autoreal, and Trialli.
When to change, how to understand that it is time to change the pads? Change in the following cases:
- The handbrake cannot be adjusted, the car cannot be held on a hill, although the handbrake lever in the cabin is raised to the very top,
- The rear brakes are not effective and practically do not “take”;
- There was a grinding noise from the rear pads when pressing the brake pedal.
It is possible that when the rear brake pads are replaced, additional faults in the brake system will be revealed. Therefore, before carrying out work, it makes sense to carry out diagnostics and at least do an external examination.
It is better to drive the car onto a lift, but you can also inspect it in a pit. Things to check:
- Condition of hand brake cables;
- Are the rear cylinders leaking?
To replace you will need the following tools:
- A set of car keys (most likely, you will only need a 12 key);
- Balloon wrench;
- Pliers;
- Hammer or sledgehammer;
- A wooden beam or a drift made of soft metal (bronze, copper, brass);
- Screwdrivers.
It's a good idea to have a can of WD-40 liquid.
WD-40 - very often used in car repairs
If a lift is not used for replacement, then a jack will be needed. You can change the pads without a hole, but it won’t be as convenient to carry out the work.
Now the actual replacement of brake pads on a VAZ 2114:
- To change the pads, put the car on a jack and remove the rear wheel (if the replacement does not take place on a lift). Without a lift, it is better to do the replacement on the sides one by one - first we completely do one side, then the other.
- We unscrew the two 12mm bolts that hold the drum and also guide the wheel.
- Then you need to remove the rear drum. It is not always easy to remove; here we may need a hammer or sledgehammer, a wooden block or a brass drift.
- We dismantle the springs that tighten the pads. We start with the side springs in the center of each, then remove the bottom and top. A screwdriver and pliers will come in handy here. The springs are not so easy to remove (especially the upper ones); most likely, you will have to tinker with them quite a bit. It is especially difficult to do work without skills.
- After dismantling the springs, the pads are easily removed, and the handbrake cable is unhooked last.
- The brackets for the handbrake cable on the new parts are not included in the kit, so we replace it with the old ones. The bracket is easily rearranged; you just need to remove the cotter pin, disconnect the bracket, install it on a new block and tighten it.
- Then we put everything back together in reverse order. Assembly should begin from the top: put on the upper spring, place the pads in the grooves of the brake cylinder, and install the spacer on top. It is also necessary that everything below falls into the grooves. Then we install the side springs, and lastly we install the lower spring.
- Then we mount the drum and wheel, and carry out exactly the same work on the other side.
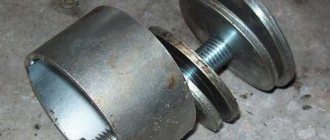
Let's look at how to remove the rear brake drum on a VAZ 2114 in a little more detail. To move it, instead of guides, you can use other bolts with the same threads, but longer. When the bolt is tightened to its full length, the drum will move forward. Just don’t use too much force when tightening, otherwise you can break the bolt. It is necessary to tap the drum only through a drift or wooden beam and not on one side, but over the entire surface.
It is possible that the drum also needs to be changed and it is changed if its internal diameter is more than 200.5 mm . The distance is measured using a caliper. If after replacement the wheel does not spin, you should check the correct assembly and also make sure that the hand brake lever is fully released.
If the rear brake cylinder on a VAZ is even a little wet, it needs to be replaced.
12.02.2013
Brake pads should be replaced immediately after purchasing a car. You also need to constantly monitor their condition and change them as they wear out: as a rule, the rear brake pads last twice as long as the front ones and they need to be changed only after 70 thousand km or earlier (How often do you change brake pads?), if the thickness of the pad linings will become thinner than 1.5mm.
So, depending on your riding, check your brake pad wear regularly (How Do You Tell Brake Rotors and Pads Wear?).
Let us remind you that the brake system of the VAZ 2114 is fully consistent with the system of other VAZ models: VAZ-2108, 2109, 21099, 2110, 2115, 1117, 1118, 1119; therefore, this manual will be useful not only for drivers of four.
The process of replacing rear brake pads is slightly different from the process of replacing front ones (How to replace front brake pads?) and requires a lot of physical and mental effort: either the drum will not fit into place, or something will become rusty, etc.
In order to replace the rear pads, you will need an inspection hole or overpass, because you'll have to deal with the handbrake. But after wandering around the Internet, I often see that car owners change the pads even without a hole: propping up the removed wheels under the body, driving onto a curb, and the like. These methods are not safe maintenance methods, so I strongly DO NOT recommend doing so.
Before replacing the rear brake pads, it is worth familiarizing yourself with the “unexpected” ones that may come out during the work:
- the brake drum is worn out - the internal diameter of the working brake surface of the drum should not exceed 201.5 mm. If the diameter of your drum is larger, then you need to replace it;
- The handbrake cable is jammed - if this happens, then no matter how you adjust or loosen the handbrake, it will not work. It’s okay if you temporarily drive without a handbrake, but in such a situation you simply will not be able to put the drum on the pads;
- the brake cylinder is leaking or jammed - here I think everything is clear, there is no need to joke about this, you will need to replace the brake cylinder (How to replace the rear brake cylinder?);
- the drum is boiling - if you can’t remove the drum, you will have to use a sledgehammer and a block
- There are also other pitfalls, but they are of an individual nature.
To work we will need the following tools:
- Jack,
- balloon,
- key sets,
- small sledgehammer,
- bar,
- screwdriver,
- pliers,
- wd-40.
GTZ malfunctions
The VAZ 2101 brake system has many parts that can fail due to wear, poor quality or untimely maintenance. The following characteristic symptoms of problems can be identified:
- slow stopping of the vehicle after pressing the brake pedal. One of the reasons is that the lip seals of the pistons have become unusable, which led to a loss of tightness;
- high pedal effort. This problem appears when the cuffs increase in size, for example, when installing a low-quality repair kit;
- The brake pedal has a short stroke. The working environment, i.e. the brake fluid, has nowhere to go due to the fact that the compensation hole is clogged. In addition, the canal may be blocked by swollen cuffs;
- The car only brakes when the pedal is pressed to the floor. This indicates a complete failure of the lip seals when the liquid goes into the tank and not into the system;
- Brake pads do not move away from the discs and drums, causing them to become hot while driving. The reason lies in the jamming of one of the pistons or the formation of a blockage in the bypass hole.
These symptoms may also occur if there are problems with other parts of the braking system. For example, the pedal may fail if there is no fluid in one of the wheel cylinders or if air gets into the system
Therefore, for a final diagnosis, it is necessary to pay attention to additional features of the car’s behavior. For example, there are certain signs that clearly indicate problems with other components of the brake system, and not with the GTZ:
- pulling the car to the side when braking;
- jamming of the brake mechanisms on one of the wheels;
- the appearance of sounds uncharacteristic of normal brake operation (creaking, squeaking, grinding);
- heating of brake pads or discs on one wheel.
Checking the brake master cylinder
The most common cause of GTZ problems is wear of the seals. When replacing cuffs, you need to take into account that repairs only make sense if the piston and cylinder walls do not have wear. Otherwise, replacing the rubber seals will not bring any results and soon you will still have to install a new part. Before you start checking the main hydraulic brake drive, you should make sure that there are no problems with other elements of the system:
- Inspect the wheels from the inner surface to identify any leaks of brake fluid from the brake fluid brake system.
- Check the integrity of the tank and hoses connecting it to the gas turbine engine, as well as the presence of fluid and its level.
A clear sign that there is a problem with the master cylinder is the appearance of liquid on the unit body. A working mechanism should always be dry without a hint of leakage. If the hydraulic drive has lost its seal, it must be dismantled for further disassembly and repair. You can determine that the gas turbine engine bypasses fluid, i.e., it does not enter the system, but returns to the expansion tank when you press the pedal:
- Open the tank lid.
- An assistant is seated in the driver's seat. The engine does not start.
- Your partner presses the brake pedal, and you listen to the sounds coming from the reservoir.
- If gurgling is heard from the container, and the pedal is pressed lightly, it means that the liquid is entering the tank instead of the system. The malfunction lies in the wear of the seals, which are unable to create the necessary pressure in the cylinder circuits.
How to remove rear brake pads?
- We drive the car onto the overpass and put it in first gear.
- For reliability, we put so-called “shoes” under the front wheels so that the car does not roll away.
- We check whether the handbrake is removed and climb under the car. Remove the exhaust system pipe (muffler) from the rubber cushions in the area of the handbrake tensioner. (It is not necessary to remove all the cushions from the muffler; you must leave the last cushion, which is located under the trunk next to the bumper, so that the exhaust system does not hang in the air).
- We loosen the handbrake; to do this, unscrew the cable tensioner nuts with a key set to “13” (look at Figure 1). Loosen the cable as much as possible so that there are no installation problems in the future.
- Take the wheel wrench and loosen the wheel fastenings on both sides.
- We put the jack on, raise the car and completely unscrew the wheel.
- Using clamps or other improvised means, unscrew the guide bolts on the drum (see Fig. 2).
- Next, we try to rotate the drum in some direction. After rotating the drum about 30 degrees, tighten the guide bolts back evenly. Since there are no bolt holes under the current position of the drum, screwing the bolts into the cast surface will pull the drum out.
What to do if the drum does not spin? To do this, we take our sledgehammer and a handle.
We place the handle on the surface of the drum and begin to hit it with a sledgehammer. You don't need to knock in one place, you need to go around the whole circle. We knock until the drum begins to spin. Attention: do not hit the drum with a sledgehammer, otherwise you will split it.
- Having removed the drum, we see in front of us two pads, springs and a brake cylinder.
- We disconnect the guide springs from the pads using pliers, homemade hooks and other devices (see Figure 3).
- Remove the tension spring (see Figure 4).
- We remove the pads together with the lever, transfer the lever to a set of new pads.
- After removing the pads, compress the side lubs of the brake cylinder. Make sure that the new pads fit strictly into the grooves of the brake cylinder and the handbrake bar fits into the connector on the pads (see figure). Next, we hook the springs into place, do not forget about the handbrake cable - it needs to be hooked to the drive lever on the block.
Work procedure
Rear brake pipes VAZ 2109
Before you take action, you need to prepare first. During the preparatory work, it is necessary to clean the surface of the fitting tubes from contamination. You also need to apply a special compound to all threaded connections, this will make it much easier to unscrew the nuts. In addition, you need to prepare a wrench, spare brake fluid for topping up, a small container to drain the remaining fluid from the system and a suitable vinyl tube. For convenient repairs, it is recommended to install the machine either on an overpass or on a pit for inspection:
- First, use a Phillips screwdriver to unscrew two self-tapping screws that secure the tube to the body of the vase.
- Using a suitable wrench, unscrew the 2 fittings through which the tubes are attached to the hose with the regulator.
- The tube is removed.
- After all necessary work has been carried out, the tubes are installed in the opposite order to dismantling.
- Add brake fluid.
- The quality of repaired brakes is checked.
On newer VAZ models, the tubes are first unscrewed from the main cylinder and brake hose, only after that the holes are plugged. In this case, you will have to unscrew the 3 fastening nuts and remove the plastic covering. Next, dismantle the metal plates and disconnect the necessary tubes from the clamps; if they are damaged, they will need to be replaced.
Replace the rear brake pipe of a VAZ 2109
Signs of air penetration into the system are considered to be increased travel and softened sagging of the brake pedal when pressed. It is necessary to follow a certain sequence of bleeding the brakes:
- rear right;
- front left;
- rear left;
- front right.
In addition to changing the brake line, the brake hose may also need to be replaced.
How to install brake pads?
Compressing the brake pads towards the brake cylinder
- Having placed the pads, we squeeze them together in order to recess the brake cylinder once again “just in case”.
- Install the brake drum. If the drum does not fit, then the handbrake may be loose, the cable may be stuck, or the brake cylinder may not be fully clamped.
- We put the wheel on, get into the car and press the brake pedal several times so that the pads fall into place.
- Spin the wheel by hand: the wheel should spin without much effort, without rubbing the pads.
We perform the same operation on the other side and tighten the handbrake: How to tighten the handbrake? All that remains is to check the handbrake; to do this, you need to hang the wheel on a jack, spin the wheel manually, and pull the handbrake. The wheel should stop and lock firmly. To be sure, try turning the wheel manually - it should be motionless.
I found posts on the Internet about how people sand the pads with sandpaper to make the drum go in easier, we absolutely do not recommend doing this, thereby reducing the life of the pads.
Sources used:
- https://vaz-2114.info/vaz-2114-zamena-zadnih-tormoznyh-kolodok/
- https://autovaz-2114.ru/brake-system/pravilnaya-zamena-zadnix-tormoznyx-kolodok-na-vaz-2114/
- https://vaz-2114-lada.ru/2013/02/kak-zamenit-zadnie-tormoznye-kolodki/
Chevrolet Niva Manual
We carry out the work on an inspection ditch or overpass. We remove the cylinder head complete with throttle assembly, receiver, fuel rail, intake pipe, exhaust manifold and thermostat. Relieve the pressure in the fuel rail (see Replacing the fuel filter). Disconnect the wire terminal from the negative terminal of the battery. Drain the coolant from the radiator and cylinder block (see Replacing the coolant). We remove the tips of the high-voltage wires from the spark plugs (see Checking the condition and replacing spark plugs) and remove the oil level indicator from the guide tube. We disconnect the tip of the throttle valve drive cable from the throttle assembly sector (see Removing the throttle drive, replacing the cable). Then we disconnect from: • the receiver - the throttle cable and the brake booster hose (see Replacing the receiver gasket); • cooling jacket outlet pipe - upper radiator hose (see Removing and installing the engine); • thermostat - lower radiator hose and fluid supply hose to the coolant pump (see Replacing the thermostat); • cylinder head pipe and heater radiator outlet pipe - heater radiator hoses (see Removing and installing the engine); • canister purge valve - a tube connecting the valve to the adsorber (see Removing elements of the fuel vapor recovery system); • fuel rail - fuel supply hose (see Removing the fuel rail and injectors); • exhaust manifold - exhaust pipe (see Removing the exhaust pipe) and starter shield (see Replacing the gasket of the intake pipe and exhaust manifold); We disconnect the engine management system wiring harness connectors from the injector wiring harness, the control system coolant temperature sensors and the coolant temperature indicator, the crankshaft position sensor, the phase sensor, the idle speed controller, and the canister purge valve (see the relevant sections). Remove the cylinder head cover. Turn the crankshaft until the mark on the camshaft sprocket aligns with the mark on the camshaft bearing housing (see Removing the camshaft and valve drive levers). Remove the hydraulic timing chain tensioner (see Removing the hydraulic timing chain tensioner). We remove the sprocket from the camshaft toe and tie the chain with wire. Remove the camshaft and valve drive levers (see Removing the camshaft and valve drive levers). Using a 13mm socket, unscrew the cylinder head mounting bolt located next to the upper mounting bolt of the generator bracket. Using the E16 head, unscrew... ...ten bolts securing the head to the cylinder block... ...and remove the bolts. Remove the cylinder head assembly with thermostat, throttle assembly, receiver, intake pipe, fuel rail and exhaust manifold. The cylinder head can also be removed from the engine by first removing the intake pipe and exhaust manifold (see Replacing the intake pipe and exhaust manifold gasket). Remove the cylinder head without the exhaust manifold and intake pipe. Remove the cylinder head gasket. Before installing a new gasket, clean the mating surfaces of the head and cylinder block from remnants of the old gasket, deposits and oil. Using a syringe with a needle or a rubber bulb, remove oil and coolant from the holes in the cylinder block for the head bolts. We install the gasket and cylinder head using two centering bushings. When installing the head on the cylinder block, we thread the chain with wire through the hole in the head. Having installed the cylinder head bolts, tighten them in the order shown in the figure. Procedure for tightening the cylinder head bolts. To ensure a reliable seal and avoid tightening the bolts during vehicle maintenance, we tighten them in four steps: 1st step - tighten bolts 1–10 with a torque of 20 N m (2.0 kgf m); 2nd step - tighten bolts 1–10 to a torque of 69.4–85.7 Nm (7.1–8.7 kgf m), and bolt 11 to a torque of 31.4–39.1 Nm ( 3.2–4.0 kgf m). Then we turn bolts 1–10 by 90° (3rd step) and another 90° (4th step). We carry out further assembly in reverse order.
Additional recommendations
- If you cannot depress the brake cylinders, open the cap of the brake fluid reservoir to reduce the pressure.
- If the pads wear unevenly, pay attention to the caliper. Most likely it will need repairs.
- When replacing the rear pads, change all the springs as well. They are inexpensive, but they will protect you from possible failures until the next replacement.
- The front caliper guides can be lubricated with graphite grease for smoother operation.
Replacing the pads on the front axle will not cause problems even for “dummies” of automotive repair. But from the back it’s not so simple. Assess your strengths and capabilities in advance: can you reach the handbrake cable and cope with a stuck brake drum? If yes, then everything will definitely work out.
Didn't find the information you are looking for? on our forum.
Instructions for replacing front pads
The first thing to do is to secure the rear wheels in the car with special stops. Using a jack, you need to lift the car, and then follow a strict sequence of processes:
- Remove the wheel and rubber rings that are attached to the brake hose.
- Using a regular screwdriver, press the caliper piston into the cylinder.
- Bend the lock washers away from the guide pin mounting.
- Unscrew the fastening bolt on the guide pin, simultaneously fixing the hexagon.
- Remove the front pads by lifting up the stupor bracket.
Before installing the linings on the VAZ 2114, it is recommended to thoroughly clean the seats from corrosive deposits.
The next stage of repair is to inspect the clamping springs, which should be placed in a parallel plane relative to the top of the part being replaced. Do not forget about the state of the stupor finger. If necessary, clean and lubricate it.