Brake pads on the VAZ 2106 do not have to be changed so often, and the frequency of replacement directly depends on the quality of the parts used and driving style. To carry out the work, it is not necessary to contact a service station, because this simple procedure can be completed independently.
- What are they used for?
- What are there
Front brakes
- Rear brakes
- Brake pad malfunctions
Screech
- Shocks when braking
- Car skidding
Video: why a car pulls to the side when braking
- Removal
Video: replacing front brake pads on a “classic”
- How to remove a brake drum
Video: replacing rear brake pads on a “six”
Purpose and types of brake pads
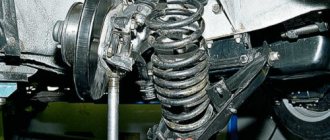
Friction is used to stop a car. In the case of the VAZ 2107, this is the friction force of the pads on the brake disc (or on the brake drum, if the pads are rear). In general, the block is a steel plate with mounting holes, to which an overlay is attached using rivets. This is a rectangular plate made of a special material with a very high coefficient of friction. If the friction coefficient of the lining decreases for some reason, braking becomes less effective. And this immediately affects the quality and safety of driving.
Front pads
To brake the front wheels, flat, rectangular paired pads are used. The front wheels of the “seven” are equipped with massive steel discs that rotate synchronously with the wheels. When braking, rectangular pads compress the rotating disc on both sides. After this, the friction force provided by the linings comes into play, and the discs and wheels stop.
The front pads of the “seven” are ordinary rectangular plates with overlays
The pad plates are installed in a special device called a caliper. This is a massive steel housing with several holes, which houses the above brake disc with a pair of pads. The movement of the pads is ensured by special pistons in the braking cylinders. Liquid is supplied to the cylinders under high pressure and the pistons extend from them. The rod of each piston is attached to the pad, so that the pads also move and compress the brake disc, stopping it along with the wheel.
Rear pads
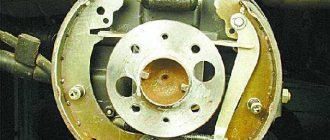
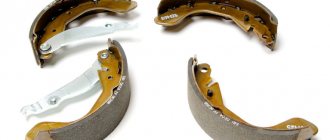
The rear pads on the “seven” have a fundamentally different design. If the front pads press on the disc from the outside, then the rear pads press from the inside, and not on the disc, but on the massive brake drum. For this reason, the rear pads are not flat, but C-shaped.
The rear brake pads of the “seven” are much longer than the front ones and have a C-shape
Each pad also has its own rectangular pad made of a special material, but the rear pads are much narrower and longer. These pads are also driven by cylinders, but they are double-sided cylinders, that is, the rods from such a cylinder can extend from both sides, so that it can move two brake pads at the same time. The pads are returned to their original position not by the rods (because they are not attached to the rods of the double-sided cylinder), but by a powerful return spring stretched between the pads. Here we should also mention the inner surface of the brake drums. Very serious requirements are placed on the quality of this surface. It's simple: the pads can be the best, but if the inner surface of the drum is worn out, if it is covered with cracks, scratches and chips, then braking will be far from ideal.
We remove the old ones
We jack up the rear wheel of the VAZ 2107 and remove it. You must first take the necessary safety measures: install shoes under the wheels, place a safety stand under the body. This task is usually not difficult. Next it will be a little more difficult. It happens that the brake drum gets stuck to the axle shaft, and it is impossible to remove it using standard means.
In this case, the drum is “torn off” - the guides are unscrewed, the car is started, the gear is engaged and the speed is increased, and then the brake is sharply pressed.
Be very careful when performing this operation - ensure that the VAZ 2107 is securely secured so that it does not fall off the jack.
- We remove the brake drum and check the condition of the brake pad linings. In addition to wear, there may be a partial breakage of the linings, since, unlike the front ones, the rear ones are not solid. We determine whether one or both pads need to be replaced.
- Using a flat-head screwdriver, remove the lower tension spring;
- Using pliers, remove the spring clamps from the guides, turning them until the slots match;
- Using a screwdriver, press on one end of the upper spring and remove it.
This is the last action, after which nothing holds the pads anymore, and they fall.
Checking the hand brake
To check the condition, or rather the functionality, of the handbrake, you should set the car on a slight slope and, if the handbrake is tightened 3 to 4 clicks with the lever, it holds the car on the slope, we can assume that everything is in perfect order.
If the travel of the hand brake lever is large, it must be adjusted using a tensioner, for which the following operations should be performed:
- move the handbrake control lever to the lowest position
- Pull the lever up two clicks (two teeth of the sector)
- from an inspection ditch or from under an overpass using a 13 mm wrench. and use pliers to loosen locknut 3, rotate adjusting nut 2 to tighten cable 1, then tighten the locknut again.
Adjusting the hand brake
After completing the operation, check in action whether the adjustment was carried out correctly.
Dismantling the mechanism
- The brake drum is removed, after which the brake mechanism is cleaned from dirt with a clean rag and a wire brush. The use of mineral solvents such as gasoline, diesel fuel, kerosene, etc. when cleaning brake pads is unacceptable.
- The tension spring is disconnected from the pads and, holding its rod from the back, press the upper cup, at the same time turning it slightly in any direction, and remove the spring. After this, remove the lower cup and spring rod.
- Disconnect the tension spring of the left block and remove it along with the spacer bar. The same operation is repeated with the right block.
- Disconnect the end of the handbrake cable, remove the cotter pin securing the finger of the handbrake lever, remove the lever, along with the finger and washer.
When product replacement is required
Both the front and rear wheels are characterized by the use of 4 brake pads to ensure effective braking. Only in design these products are very different, although the principle of operation is similar.
The rear pads of the VAZ 2107 are presented in the form of an arched steel structure, on the outer part of which a friction layer is applied. It is due to the friction of this layer against the inside of the drum that the car stops. If you do not replace the brake elements in a timely manner, this will be fraught with the development of unpredictable consequences, because the most important thing for any car is the serviceability of the braking system.
It will not be possible to determine this fact without removing the wheel and dismantling the drum. But this is one of the main ways to determine whether the brake system is faulty. There is a second option, which is more convenient and does not require dismantling the rear wheel. To do this, you need to listen for signs of squeaking of the rear wheels, as well as grinding and lack of braking effect, but this can lead to damage to the drum itself. You can squeeze the handbrake while standing on a slope and check that it is working correctly. Of course, the cable on the handbrake may become loose, but if you tighten it and still have no effect, then it’s time to start replacing the pads. If the rear brakes are not functioning, then it is time to change the pads. It is recommended to change them as a set on both rear wheels, since they are often worn out at the same time. What is the process of replacing rear brake pads on a VAZ 2107 will be determined further.
On a note! All four pads on the rear wheels need to be replaced at the same time, even if the friction linings are worn unevenly.
Instructions for replacing rear pads
At the beginning of the work, it should be noted that the handbrake must initially be lowered to its lowest position. This will allow you to dismantle the brake drum and thereby get to the worn parts. To begin replacing the brake pads of a VAZ 2107, it is necessary to remove the rear wheel:
- There is a drum behind the wheel, which also needs to be removed. There are no problems with this, so we move on.
- After removing the drum, it is necessary to inspect the worn pads. If the thickness of the friction lining exceeds 1.5 mm, then there is no need to replace the products. Before carrying out further work, it is necessary to clean the mechanism from dirt and dust. To do this, you can use a brush or cloth.
- If the products need to be replaced, then you need to take a screwdriver and then remove first the upper, then the lower connecting springs. If you can’t dismantle it with a screwdriver, then you should use pliers. The photo below shows the springs that should be removed.
- Next, you need to remove the clamps, which consist of a rod, a washer and a spring. These washers must be rotated 90 degrees to remove them through the slots. This is what the washers that hold the pads look like.
- Similar procedures are carried out with the second block.
- After removing the springs and clamps, the pads are removed independently.
- The parking brake locking pin is straightened. The photo below shows the location of the locking pin. Now you need to unscrew the parking brake lever. This can be done using pliers. After this, the washer is removed, then the lever.
- During the dismantling process, you will have a question, what to do with the parking brake tip? It must be disconnected from the product and then left hanging.
- If necessary, it is recommended to replace all parking brake parts that were removed from the old product with new ones.
The rear brake pads on the VAZ 2107 should be installed in the reverse order of removal. Before installation, remember to bring the brake cylinder pistons as close as possible. Despite their simple design, installing them is much more difficult than the front ones.
But having completed the procedure once, all subsequent repairs will be much easier for you.
The cost of new pads starts from 800 rubles per set, but it is important to purchase high-quality products, and not Chinese “consumer goods”. Not only the service life of the products, but also the braking of the car will depend on this
This completes the replacement procedure; if you have any questions, be sure to ask them.
Procedure for removing and installing front wheel pads
I suggest you first watch my video instructions, which I specially prepared for this article. Below is a video in which everything is clearly shown and the entire operating procedure is explained:
Then you can see my photo report on the work done, if suddenly the video does not load (and this can happen).
First, lift the front of the car with a jack and remove the wheel:
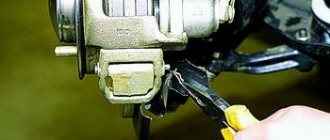
After which we see the brake mechanism of the front wheels, which it is advisable to spray with penetrating lubricant so that there are fewer problems with dismantling. Then we first need to pry with a screwdriver and remove the cotter pins of the upper and lower rods, as shown in the photo below:
And take them out, putting them aside so as not to lose them:
Now we take a Phillips screwdriver and squeeze out the rods from the outside, since they have become quite rusty over time:
If the rods cannot be removed due to the force of the screwdriver, you can tap the screwdriver with a hammer, or use some kind of punch to avoid splitting the screwdriver:
And now you can easily remove the spring clips (brackets) that hold the pads:
After which you can remove the brake pads outwards, first the outer ones, as shown in the photo below:
And then we extract the inner one in the same way:
If problems arise when replacing the pads, that is, they cannot be removed normally by hand, then you can insert a screwdriver into the holes in the housing and pry them up with it to remove them:
Now we buy new pads for our VAZ 2106 and install them in the reverse order.
And we try again to put new brake pads in place. After sinking the pistons everything should work out easily.
Recommendations
If for some reason you do not want to install new ones, then you can swap the inner pad with the outer one. Thanks to this, their wear will be uniform, and they will brake with uniform force.
Front brake pads are replaced when the friction lining thickness is 1.5 cm or less. With such wear, you will be bothered by squeaks and squeaks when you press the brake, and the quality of braking will be worse.
Before you start removing it, it is recommended to buy a repair kit for the front calipers. It includes: “gulls”, guide fingers, and their springs. This is necessary so that during the replacement process the pressure springs may “fly out” in an unknown direction, the fingers will not want to lick out of their seats, they will have to be cut off, the guide springs and “gulls” may lose their elasticity.
Before installing the fingers, it is recommended to lubricate them with a thin layer of lubricant (lithol) so that they fit freely into the holes. If the new pad does not want to “climb” into place, you need to try to recess the piston of the brake cylinder even more or lightly tap it with a hammer, driving it in. Knock only on the steel part of the block, without catching the feredo. It will fit in with tension, but after several tens of kilometers it will rub in and take its position.
Before leaving, be sure to press the brake pedal several times to bleed the brakes. During the replacement process, we compressed the cylinder pistons; now they need to be returned to their original position so that they press the pads against the brake discs. Don't be alarmed, the pedal may fall to the floor the first two times. After the brake fluid fills the cylinders, it will regain its former elasticity.
About choosing pads
Today on store shelves you can find a lot of pads from a variety of manufacturers, both well-known and not so well-known. In addition, there are a lot of counterfeits that copy products from well-known brands. It is often very difficult to recognize these fakes, so the only criterion for a novice driver here will be the price. You should understand: a set of four high-quality pads cannot cost 200 rubles. So which pads should you choose given the abundance available on the market? Today, the owner of the “seven” has three options:
- purchase and install original VAZ pads. These pads have two advantages: they can be found everywhere, plus an affordable price. Currently, the cost of a set of four rear pads does not exceed 700 rubles;
- pads from the German company ATE. This is the second most popular manufacturer of pads represented on the domestic market. ATE pads last longer than standard VAZ ones, but they are becoming more and more difficult to find every year. In addition, they cost more: the price of a set of ATE rear pads starts from 1,700 rubles;
- PILENGA pads. This manufacturer occupies an intermediate position between the two above. A set of PILENGA rear pads will cost the car enthusiast 950 rubles. Today they are also not easy to find (although literally two years ago store shelves were littered with them). But in terms of durability they are still inferior to ATE pads.
That, in essence, is all the major pad manufacturers represented on the domestic spare parts market. Of course, there are many other, less well-known small brands. But there is no particular point in presenting them here, since buying products from a little-known company is almost always a lottery for a car enthusiast. In addition, there is a high probability of buying a fake, as mentioned above.
The conclusion from all of the above is simple: the main factor when choosing pads is the driver’s budget. If you want to install pads and not think about them for several years, you will have to fork out for ATE products. If you have less money, but have time to go shopping, then you can look for PILENGA pads. And if money is tight and there is no time, then you will have to install VAZ pads. As they say, cheap and cheerful.
How to properly install pressure springs
This question has divided all professional car mechanics into two camps. Some argue that it is correct to install from the brake disc side, as shown on the left side of the screenshot below, others - from the brake cylinder side, as shown on the right.
The first ones say - there is no difference, the main thing is that they press the pads and do not let them “rumble”. The latter explain it this way: if you install “gulls” on the disc side, then with their edges they will press the brake element against the disc, increasing wear on the friction clutch. If you install it with the side facing the cylinders, they seem to move them apart; they do not come into contact with the disk, so there is no wear during movement.
If you think logically, then the second part of the people is right. The springs have a design in which they, with their rounded edges, attract the pads in the direction of their installation. Therefore, if you place the springs on the inside, their edges will slightly press them against the disk - they will wear out faster. If from the inside, then there will be no such effect.
Video on how to shoot a classic in a garage:
Bleeding the brake system of VAZ 2106
Bleeding the brakes is done to remove air trapped in the brake system. It is easy to determine the presence of air: the brake pedal is initially pressed too softly, and after several presses it suddenly acquires an unusual “hardness”. These are signs of an air lock.
Sequencing
First of all, it should be said that it is best to bleed the brakes with an assistant. But with some skill, this can be done alone.
- First, check the brake fluid level. The tank must be filled to the upper marks.
- The fitting on the rear brake drum is unscrewed, a rubber hose is inserted in its place, and the other end of the hose is lowered into a plastic bottle.
- After this, the assistant sitting in the cab should press the brakes two or three times and then hold the pedal down for one minute.
- At this moment, the fitting is unscrewed so that brake fluid flows out of it through the hose. Air bubbles will be visible in it.
- After some time, the brake pedal will finally fall to the floor, which will be reported by the assistant. As soon as this happens, tighten the fitting and repeat all the above steps. This must be done until liquid with bubbles stops flowing from the hose.
- When the leaking brake fluid becomes normal, the bleeding procedure should be done with other wheels.
Video: bleeding the brakes alone
So, the brake system is the most important part of the car. And you should treat this part very responsibly. Fortunately, the brakes on the VAZ 2106 have never been particularly difficult. The main thing that a novice car enthusiast should do is to inspect and check them more often. And at the slightest suspicion of a malfunction, repair it immediately.
Instructions for replacing rear pads
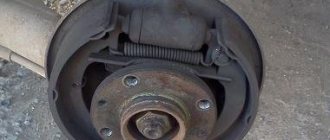
Raise the rear of the car with a jack from either side. Install wheel chocks under the front wheels. Remove the wheel by unscrewing the mounting bolts and lockers. Now you need to remove the drum from its seat. As a rule, during the operation of the car, it settles and “sticks,” which complicates the dismantling process. It is recommended to use a hammer to give several gentle blows to the surface of the drum between the studs. After removing the drum, it is necessary to clean the brake mechanism itself and the seat from dust and dirt with a brush. Check the drum for wear
If there are severe chips, cracks or burrs, replace with a new one. Remove the upper tension spring using a screwdriver or pliers. Press the support spring plate with pliers. Turn the plate ¼ turn. Remove the support strut of the second block in the same way. Move the brake pads apart and remove the clearance adjuster. Remove the lower tension spring by hand. Now you need to pay attention to the handbrake mechanism, which is located on the rear block. It needs to be dismantled
To do this, you need to remove the locking ring and remove the pin using pliers. Check the condition of the brake pads. If necessary, replace with new ones. After replacing the pads, it is necessary to adjust the gap between the pads and the drum itself. To do this, you need to remove the rubber plug from the inside of the dirt shield and use a flat-head screwdriver to turn the regulator gear. The wheel rotates only in one direction to spread the pads. It is necessary to achieve light contact between the pads and the drum. Before assembling all parts of the brake drum system, it is necessary to wash all parts in gasoline, disassemble the clearance adjuster and lubricate it with graphite or silicone grease. Assembly is carried out in the reverse order of dismantling. Place the vehicle on the ground and secure the wheel mounting bolts. Repeat the procedure with the second wheel.
After replacing the brake pads on the drums, you need to drive to a quiet place and check the functionality and effectiveness of the pads. It is highly recommended that you replace any damaged or worn brake drum parts. Adjustment of the pads must be done once a year, or 15-20 thousand km. This is necessary for uniform wear of the rear pads and maintaining the braking efficiency of the rear wheels. It is recommended to perform this procedure in a lifting box, but if necessary, a jack with an inspection hole will do.
Replacing rear brake pads on VAZ 2101-2107 cars
Reasons why you should start replacing the rear brake pads on VAZ-2101, VAZ-2104, VAZ-2105, VAZ-2106, VAZ-2107, Classic cars:
- The thickness of the rear brake pads is less than 2mm
- The lining of one of the pads has come off the metal surface (brake pads are always replaced as a set).
- oil or brake fluid getting on the linings.
List of tools and choice of work location for replacing rear brake pads on VAZ-2101-2107, Classic cars. Everything is simple here. It is better to carry out the work on a viewing hole or a lift, for two reasons - convenient access to the parking brake adjustment mechanism and the ability to quickly remove a stuck rear brake drum. An arsenal of necessary tools: a hammer, pliers, socket wrenches for 12, 13 and 7. Also, a special hook for removing and installing the tension springs of the rear brake pads will be useful. You can make such a device yourself or buy its analogue at the car market. Yes, you can do without it, using a screwdriver or pliers, but it will waste much more nerves.
Adjusting the brakes
To correctly perform operations on adjusting the rear wheel brakes and handbrake, you can use the following recommendations:
- prepare the necessary tools for this case: a 13 mm open-end wrench, pliers, a combination wrench for fastening wheels, a 17 mm socket wrench. and probe 0.1-0.15 mm.
- place the car on an overpass or inspection ditch
- remove the rear wheel caps and loosen the wheel bolts
- raise the rear of the car and install stands
- Unscrew the wheel mounting bolts and remove the wheels.
It should be recalled that performing the described operation is quite inconvenient, since an assistant is required, who must be in the car while checking the brakes and carry out your simple commands.
If such an assistant is found, he, at your command, must press the brake pedal, and at this time, by rotating the drum, you determine whether the pads are in contact with the drum mirror.
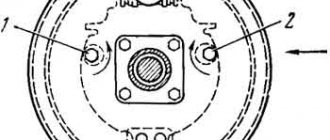
If adjustment is required:
- keeping the pads pressed, turn the nut of the adjusting eccentrics 1 and 2 until they come into contact with the pads
- After releasing the brake pedal, turn the nuts in the opposite direction by about 10° so that the gap between the pads and the drum mirror is 0.10 - 0.15 mm.
- use a feeler gauge to check the set gap
- To be more sure, press the brake pedal sharply 3-4 times and check the gap again. If necessary, the adjustment should be repeated
- install the wheels, tighten their mounting bolts and check for ease of rotation. The wheels should rotate completely freely.
Scheme for adjusting the gap between the brake pads and the brake drum
There are times when the required gap between the pads and the drum cannot be established. This is a symptom of excessive wear on the brake pads and should be replaced with new ones.
The linings are replaced, naturally, with the drums removed. Removing a brake drum, even in a service station, is a rather labor-intensive operation.
The fact is that during operation, as a result of electrochemical corrosion, a drum cast from an aluminum alloy is, as it were, “welded” to the flange flange of an axle shaft made of steel. There are numerous recommendations and tips on how to quickly remove the drum.
It should be recalled that the use of various types of pullers does not give the desired result; moreover, the puller most often breaks the drum collar.
The easiest way to remove the drum is to use two mounting bolts 1, which are screwed into the technological holes 2 until the drum separates. However, as practice has shown, this method is effective when the car is “young,” i.e., its mileage is 3–5 thousand km.
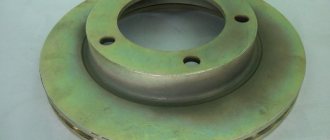
Brake drum
If you cannot remove the drum using this method, you can do the following as a last resort:
- unscrew the guide pins from the drum
- lubricate the drum seat on the axle shaft with engine oil, start the engine and press the brake pedal
- engage first gear.
With the help of the described manipulations, it is almost always possible to free the drum, since it is held in place by the blocks, and the axle shaft rotates.
While rotating, the axle shaft makes a very unpleasant squeaking sound, but after 10 - 15 seconds, you can turn off the engine, release the brake pedal and remove the drum.
How to remove the front brake pads of a VAZ
- We lift the car on a jack and install a safety log under the lever (a safety measure to prevent the car from falling off the jack).
- Lubricate the contact points between the caliper and the guide pins with WD-40 or its equivalent.
Dirt often accumulates in these places and corrosion occurs. To simplify the work process and remove the guides without problems, it is necessary to lubricate these places with a special lubricant.
- Pull out the cotter pins that secure the guide pins
The cotter pin (retainer) may “resist.” To remove it, lightly press on the guide rod to relieve tension on it. Use a screwdriver or pliers to remove it from its seat. At this point, the fasteners may become damaged. Therefore, it is recommended to buy a repair kit in advance, which will contain new ones. This will save you from inconvenience when installing them in place.
- Use a punch to knock out the guides, holding the pressure springs from flying out
They serve to press the pads to the caliper, to the guide pins, so that when the car moves, the brake pads do not rattle in the pits. Over time, these springs lose their properties, stop pressing tightly, and on bumps, drumming occurs in the area of the front brakes. If you press the brake at this moment and the noise disappears, it is the springs (“chains”) that have weakened and must be replaced.
- Using pliers we open (retract) the pistons of the brake cylinders
We grasp the bottom of the cylinder with one edge of the pliers or a mechanic's wrench, and with the other we grasp the protruding side of the block. Smoothly squeeze the pliers, pushing the cylinder piston inside. We do it without “fanaticism” so as not to crush the cylinder.
You don't have to do this, maybe you can pull out the pads this way. But it is worth remembering that when replacing them, you will install new ones with thicker friction linings. There is a possibility that they will not fit into the old sizes of worn parts. In this case, you will still have to recess the cylinders to fit new ones.
- We take out the pads
Installation is carried out in reverse order.
Installation
Installation is always carried out in the reverse order of dismantling. But in order not to get confused in this work, we will discuss this issue in more detail.
- To begin with, we need to push the piston of the brake system cylinder all the way inside.
- It is necessary to attach the handbrake rod to the new rear block. This must be done in exactly the same way as was the case with the old node, and in no other way.
- We put the cotter pin in place.
- How much we suffered before we pulled out the guide spring. Now it's time to bring her back. We attach it to the block.
- The cable is connected to the handbrake rod.
- The previously removed upper spring is now attached to the pads at one end and the other.
- Now get ready to perform the most important stage of the work: we place the block on the brake cylinder, in the place where it should be. We tighten it a little from below so that the spring stretches and makes it possible to place a spacer bar in the niche. We insert the bar. After this, we put the second block in place, but only so that it does not fit into the hole of the strip.
- Armed with pliers, we engage another spring with the assembly. But here, keep in mind one important nuance: the cable should under no circumstances touch the parts of the drum that are in motion , otherwise it can lead to serious consequences.
- We are approaching the end of the work process. We install the drum in place, fasten it with bolts, and install the wheel.
The work is completed. For the first time, it is better to put detailed instructions in front of your eyes, so as not to get confused and make a mistake, it would be good to also watch video materials on installing brake pads.
The second time, this work will be performed automatically and will take no more than half an hour. The main thing is not to delay replacement: brake pads are a serious matter that cannot be tolerated, because they ensure the safety of the vehicle.