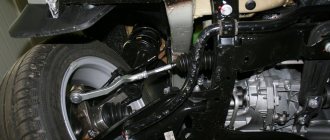
The role of ball joints in the front chassis of most vehicles is fundamental. The ball joint provides the suspension with a stable position relative to the road and allows the steering knuckles to maneuver in terms of changing the trajectory. The part was invented about 40 years ago in Italy. Its creator is considered to be a Fiat engineer. Since then, this product has undergone almost no global design changes. These supports are also present in the design of the chassis of the practical station wagon of Russian origin Lada Largus.
Parameters of supports for Largus
A ball joint has a basic structural unit - its load-bearing element - a special metal pin. Its lower part rotates in a hemisphere, and the upper end of this component is connected to the steering axle bracket. The hemisphere is located in the support body and rotates in a polymer shell, which is designed to dampen vibrations and prevent mutual friction of the metal surfaces of the part (hemisphere and body).
The product body itself is pressed into the suspension arm cage. To prevent dirt and other debris from getting into the working element (hemisphere), there is a rubber boot between the finger and the body.
Regarding Lada Largus. Note that on versions of the model produced before 2013, the ball joint had a pin with a groove and a diameter of 16 mm.
On modern modifications of the station wagon, the support pins have a pin increased to 18 mm in diameter, which has a side groove.
Due to their purpose, supports endure increased loads during operation, so the requirements for their reliability and quality are very high. For example, a finger must withstand the applied external force aimed at tearing it out of the body, reaching 5 tons.
To guide manufacturers in terms of quality indicators of supports, GOST 52433-2005 “Ball joints” was specially developed and implemented. Technical requirements and test methods." The provisions of this regulation must be followed not only by Russian, but also by foreign manufacturers.
Today's spare parts market will delight you with a wide range of support offers, each of which has its own catalog number, among which the following brands are the most profitable and confidence-inspiring:
- "Febi", "Ruville", "Mapco" and "Meyle" (all Germany);
- "Monroe" and "Delphi" (both USA);
- "Tork avto" (Türkiye).
The price of these products can vary by 40% or more, although the quality indicators will be approximately the same level. Here, the particular choice includes the personal preferences of the particular owner of the Lada Largus..
Tools for work
While working we used some tool:
- hammer,
- 2 open-end wrenches, sizes “18” and “16”,
- socket wrench "30"
- flat screwdriver.
A puller would be a good help, but not everyone has one in stock.
An example of a homemade puller
Malfunctions, inspection and possibility of repair
Among the main reasons for premature wear of bearings is the ingress of dirt and abrasives into the hinge body. This option is possible if the protective boot breaks. The initial stage of this situation is accompanied by a suggestive creaking of the finger. There are also less difficulties when turning and unauthorized changes in the trajectory of the Lada Largus car, which runs in a straight line. This situation involves checking the condition of the supports and, if a defect is detected, urgent replacement.
It is possible to diagnose the part yourself. For this purpose, we hang out the required side of the car. We check the play of the steering knuckle by applying force to the hinge. We use a suitable mount. A worn-out product will immediately make itself known with a characteristic clicking sound inside the body of the part. If there is no play, and there are places where the shell is torn on the boot, then such a support should also be replaced, since it has very little time left to “live”.
Sometimes owners of Lada Largus. they resort not to replacing supports, but to their repair (so-called restoration). This work is very labor-intensive and requires the use of special equipment (press and other devices). You will also need to acquire polymer materials that will be integrated into the body of the product. We recommend entrusting work of this nature to professionals who have experience and equipment, although there are plenty of videos on this subject on the Internet.
DRL Largus
Lada Largus or Lada Vesta
Let us remind you that the supports are one of the parts that are responsible for safety, so the best measure would still be to replace the ball joint, preferably with the original version.
Checking the Lada Largus chassis and transmission
Tools:
Notes:
We check the condition of the chassis and transmission every 15 thousand kilometers.
- The parts of the chassis (wheels, suspension arms, anti-roll bar, front suspension subframe, rear suspension beam, shock absorbers and suspension springs) and transmission (front wheel drive shafts) must be free of deformations, cracks and other mechanical damage affecting the shape and strength of parts.
- Checking the condition of wheel hub bearings
- Alternately hanging the front and rear wheels (while the car must be securely fixed on stands), we check the condition of the wheel hub bearings.
- Note:
- Use only factory-made stands.
- The wheel should rotate evenly by hand, without jamming or knocking.
Holding the wheel in a vertical plane, we alternately sharply pull the upper part of the wheel toward ourselves, and the lower part away from us, and vice versa.
We make sure there is no play (knock). If there is a knock on the front wheel, ask an assistant to press the brake pedal. If the knocking noise disappears, then the wheel bearing is faulty, and if the knocking noise remains, then the ball joint is most likely worn out.
The hub bearings of the front and rear wheels are not adjustable and must be replaced if there is play.
Checking the condition of the ball joint
1. To check the serviceability of the ball joint, insert a mounting blade between the steering knuckle eye (which includes the ball joint pin) and the suspension arm.
2. While pressing the lever away from the steering knuckle with a mounting blade, we monitor the movement of the ball joint housing relative to the steering knuckle eye.
If there is play in the connection, replace the ball joint.
3. Check the condition of the protective covers of the front suspension ball joints.
We replace ball joints with torn or cracked covers.
Checking the silent block of the front suspension arm
1. Alternately insert the mounting blade between the subframe and the end of the outer bushing of the silent block (on one side) and the subframe and the lever head (on the other side of the silent block).
2. We try to move the lever head along the axis of the bolt, first in one direction and then in the other direction.
If the lever head moves freely, without effort, it means that the silent block of the lever is badly worn or damaged and needs to be replaced. Ruptures, cracking and swelling of the rubber bushing of the silent block are unacceptable.
3. Similarly, we check the condition of the other silent block of the lever.
Checking the condition of the anti-roll bar cushions
1. Inspect the stabilizer bar cushions.
If ruptures, cracks or severe deformation are detected on the rubber cushions, they must be replaced.
2. Grasping the stabilizer bar with your hand next to its attachment point to the lever, sharply swing the bar up and down.
If play is detected in the connection of the stabilizer bar with the front suspension arm, replace the rubber bushings of the screw securing the stabilizer bar to the arm.
Checking the condition of the silent block of the rear suspension beam arm
To check the condition of the silent block of the rear suspension beam lever, we insert a mounting spatula between the body bracket and the end of the outer hinge bushing and try to move the lever head along the axis of the bolt.
If ruptures or peeling of the rubber of the hinge are discovered, then replace the silent block.
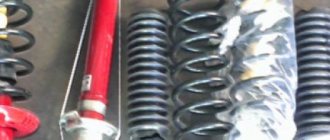
Checking the condition of springs and shock absorbers
1. Check the condition of the springs and shock absorbers of the front suspension.
2. Check the condition of the springs and shock absorbers of the rear suspension.
The suspension springs must not be damaged. Tearing, cracking and severe deformation of rubber bushings, cushions and compression buffers of shock absorbers are unacceptable. Liquid leakage from shock absorbers is not allowed. A slight “fogging” of the shock absorber in its upper part, while maintaining the characteristics, is not a malfunction.
Checking the condition of the protective covers of the outer and inner joints of the front wheel drives
Alternately rotating and turning the front wheels, we inspect the protective covers of the outer and inner joints of the front wheel drives, and check the reliability of their fastening with clamps.
Covers that are cracked, torn or have lost elasticity must be replaced.
Checking the condition of the wheel drive inner joint seals
We check that there is no oil leakage from the gearbox through the seals of the internal joints of the wheel drives. If there is a leak, replace the seals.
The article is missing:
- Photo of the instrument
- High-quality photos of repairs
Why change and how to choose?
Significant wear of the support suggests the presence of a large gap formed by the filler of the product body and directly by the hemisphere of the pin. This condition of the part is characterized by a knocking sound that occurs when driving over uneven surfaces. If the repair is delayed, the finger may spontaneously release from the housing, which will lead to an accident.
Do not forget to regularly inspect the integrity of the support boots for damage. Over time, cracks form on the rubber surface, which develop into tears. It is also very important to check for play in the pin, because early diagnosis and replacement of the ball joint will avoid all sorts of unpleasant situations.
We recommend choosing original supports for Lada Largus. Refurbished analogues should be taken with a grain of salt. Here, the low price should not become a temptation, since the owner needs to think about the safety of both his own and those around him. When choosing, take into account the year of manufacture of your car, since the pins have differences in diameter.
Reasons for replacement and rules for choosing parts
With significant wear of the ball, a large gap is formed between the spherical part of the pin and the plastic filler of the support body. This leads not only to a characteristic knock in the suspension, but also to the pin being pulled out of the body and the wheel folding under the car. At high speeds, the consequences can be unpredictable.
You should regularly check the condition of the boot on the ball joint for damage and cracks, especially after off-road driving. It is also important to control the wheel play in the vertical plane.
When choosing a ball, it is advisable to give preference to the original ones. Refurbished supports should not be used, despite their low cost. It is necessary to take into account the year of production of Largus in order to select a part with the correct groove and pin diameter.
Replacing the ball joint
Replacing the ball joint can be done independently, but this labor-intensive operation will require high-quality tools and accessories. The instructions will also not be superfluous and will allow you to correctly carry out the entire list of manipulations.
- We hang the LADA Largus car or install it over a pit or overpass.
- We remove the wheel from the side we need (if there is a need to lift the car with a jack, then do this).
- Loosen the tightening torque of the bolt holding the transverse arm to the subframe.
- Now we disconnect the fastening of the ball pin to the steering axle.
- Next, you will need to spread the cheeks of the steering knuckle bracket to release the LADA Largus support pin. A thin chisel or a powerful screwdriver will work here.
- We lower the lever together with the support.
- We finally unscrew the fastening of the lever to the subframe and remove the product.
- We begin to press out the worn ball from the lever bracket. First you will need to remove the retaining ring. Here you will need a press. If it is missing, then you will have to do “creativity”, where a hammer and a mandrel will become your assistants.
- We act carefully.
- We prepare a new support and clean the seat from dirt. We press it into the opening of the lever until a groove appears on the reverse side for mounting the locking ring.
- After putting the stopper on, apply the lubricant included with the part into the hinge body.
- We put on the boot, which we also secure with rings.
- We install the assembled lever, but do not tighten the fasteners.
- We reinstall all dismantled components.
- We load the suspension of the LADA Largus car by placing it on the wheels. We perform the final tightening of the fastening components of the lever.
The ball joint replacement is complete. A video can also help you with this matter.
Lada Largus 7 seats equipment 02D › Logbook › Changed the ball joints
Popular reviews from Lada Largus owners with photos
I haven’t written anything for a long time, I don’t like to write banal things, but something brilliant doesn’t come to mind, the car is three years old, the warranty has expired, I insured for the next year, but who cares?