Payment for goods and downloading of the book in electronic form (PDF format) is made on the website.
To do this, you need to find the book you are interested in and click on the “Buy” button. The price of the book is indicated on the button.
For convenience, the price on the website for residents of Russia, Belarus and Kazakhstan is presented in rubles.
For residents of Ukraine in hryvnias, and for all other countries - dollars.
After clicking on the “BUY” button, a payment window will open where you can select a payment system with which you can pay for the selected book using any bank card (Visa, MasterCard, MIR, etc.)
When you click on the “Pay by bank card” button, the Portmone payment system will open, which is the easiest way to make a payment.
In addition, the website offers four payment systems for payment:
- Yandex (payment from any bank cards, Yandex Money account, QIWI Wallet, terminals, etc.);
- Portmone (payment from any bank cards, Portmone account);
- PayPal (payment from any bank cards, PayPal account);
- WebMoney (payment from any bank cards, payment from WebMoney wallets).
Payment via Yandex Cashier
After selecting payment via Yandex, the Yandex Cashier payment system will launch, where you need to select a convenient payment method (bank card, QIWI, Yandex Money account, etc.)
After specifying payment details and confirming payment, payment for the goods will occur.
If you have a bank card in a currency other than the ruble, then the money will be debited from the card at the rate of the Central Bank of Russia at the time of the purchase.
This payment method is optimal for residents of Russia, Kazakhstan and Belarus.
Official website of the Yandex Kassa payment system https://kassa.yandex.ru
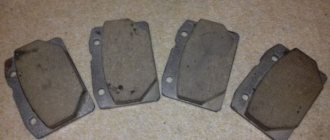
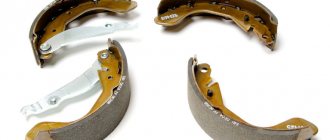
What rear brake pads can be installed on a VAZ 2106
The original rear brake pads are 3.5mm thick. With use, the friction lining wears out and is erased. When the thickness reaches 1.5 mm, the part must be replaced. Further operation of the machine is unsafe.
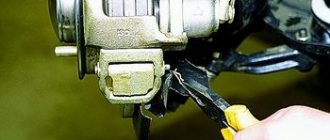
The process of replacing rear pads is as simple as replacing the front ones. Unless a handbrake cable is added, which should be removed. It is not necessary to have any special experience or skills. Please resort to the help of service station workers if you identify a large-scale breakdown that requires prompt intervention from professionals.
Payment via Portmone
After selecting payment through Portmone, the payment system will launch, where you need to select the payment method: bank card or Portmone account.
The price in the Portmone payment system is converted into dollars at the exchange rate of the Central Bank of the country where you are located.
If you have a bank card in a currency other than the dollar, then the money will be debited from the card at the rate of the Central Bank of your country at the time of the purchase.
After specifying payment details and confirming payment, payment for the goods will occur.
Official website of the Portmone payment system https://www.portmone.com
Substitutes
| vendor code | Price, rub.) | vendor code | Price, rub.) |
| 0026400 TRW | 570 | 41062 | TRW |
| GDB140M ABS | 650 | ADB0281 | ABS |
| 98271307 Allied Nippon | 750 | Delphi 65139 | 780 |
| LP92/S | 800 | Delphi 0065139 | 780 |
| 98271307 Allied Nippon | 750 | Delphi 65139 | 780 |
| 98271307 Allied Nippon | 750 | Delphi 65139 | 780 |
| Allied Nippon | 65139 |
Payment via PayPal
After selecting payment via PayPal, the PayPal payment system will launch, where you need to select the payment method: bank card or PayPal account.
If you already have a PayPal account, then you need to log into it and make a payment.
If you do not have a PayPal account and you want to pay using a bank card via PayPal, you need to click on the “Create an Account” button - shown with an arrow in the picture.
PayPal will then prompt you to select your country and provide your credit card information.
After specifying the information required to make the payment, you must click on the “Pay Now” button.
Official website of the PayPal payment system https://www.paypal.com
Substitutes
| vendor code | Price, rub.) | vendor code | Price, rub.) |
| Delphi 65140 | 850 | Finwhale 23593 | 800 |
| LS1219/S | 850 | VR311 | 800 |
| Bosch 17888 | 950 | TRW 26401 | 800 |
| 986487217 | 850 | GS8164 | 850 |
| HZTS 79927 | 800 | 2101-3502090 | 800 |
| Start 63275 | 800 | 21010-3502092 | 850 |
| MASTER SPORT 2103-3502093 | 850 | 030137-02332 | 800 |
The lists are presented for informational purposes. Before purchasing, be sure to consult with a specialist from a service center or auto store to determine the compatibility of the catalog article with the make/model of your car.
Payment via WebMoney
After selecting payment via WebMoney, the payment system will launch, where you need to select the payment method: bank card or WebMoney wallet.
If you already have a WebMoney wallet, then you need to log into it and make a payment.
If you do not have a WebMoney wallet and you want to pay in another way, you need to select any of the methods that WebMoney offers and make the payment
After specifying payment details and confirming payment, payment for the goods will occur.
Official website of the WebMoney payment system https://www.webmoney.ru/
We install new ones
Before installing new pads, it is necessary to release the parking brake cable, as it may not allow the drum to fit onto the new pads. Assembly occurs in reverse order. The springs can cause difficulties, but if you act slowly, everything should work out. This is where the file mentioned earlier comes in very handy. Thanks to the pointed shank, you can easily hook the spring loops into the mounting holes.
During the assembly process, it may turn out that, despite the parking brake cable being completely released and the working brake cylinder being fully compressed, it is not possible to put the drum on the newly installed pads. The reason for this phenomenon may be the thickness of the linings, which often slightly exceeds the permissible limit. In this case, it is recommended to change them one at a time - first replace the more worn one with a new one, after a while we replace the second one.
Downloading a book
After successfully completing the payment (by any method) and returning to the KrutilVertel store from the payment system website, you will be taken to the successful payment page:
On this page you need to indicate your e-mail, where access to download the book will be sent.
If you are already registered on our website, then simply follow the link to your personal account.
The book you purchased will be in your personal account, from where you can always download it.
Please note that after making the payment, you need to return back from the payment system website to the KrutilVertel website.
If for some reason you did not return back to the site and closed the payment system tab with a message about the successful completion of the payment, please let us know - we will send you a letter indicating access to download the book.
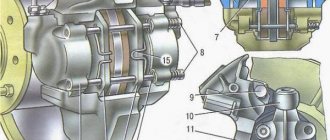
Adjusting the brakes
To correctly perform operations on adjusting the rear wheel brakes and handbrake , you can use the following recommendations:
- prepare the necessary tools for this case: a 13 mm open-end wrench, pliers, a combination wrench for fastening wheels, a 17 mm socket wrench. and probe 0.1-0.15 mm.
- place the car on an overpass or inspection ditch
- remove the rear wheel caps and loosen the wheel bolts
- raise the rear of the car and install stands
- Unscrew the wheel mounting bolts and remove the wheels.
It should be recalled that performing the described operation is quite inconvenient, since an assistant is required, who must be in the car while checking the brakes and carry out your simple commands.
If such an assistant is found, he, at your command, must press the brake pedal, and at this time, by rotating the drum, you determine whether the pads are in contact with the drum mirror.
If adjustment is required:
- keeping the pads pressed, turn the nut of the adjusting eccentrics 1 and 2 until they come into contact with the pads
- After releasing the brake pedal, turn the nuts in the opposite direction by about 10° so that the gap between the pads and the drum mirror is 0.10 - 0.15 mm.
- use a feeler gauge to check the set gap
- To be more sure, press the brake pedal sharply 3 - 4 times and check the gap again. If necessary, the adjustment should be repeated
- install the wheels, tighten their mounting bolts and check for ease of rotation. The wheels should rotate completely freely.
Scheme for adjusting the gap between the brake pads and the brake drum
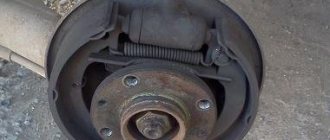
There are times when the required gap between the pads and the drum cannot be established. This is a symptom of excessive wear on the brake pads and should be replaced with new ones.
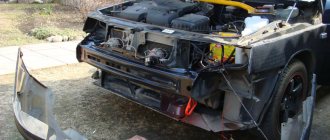
The linings are replaced, naturally, with the drums removed. Removing a brake drum, even in a service station, is a rather labor-intensive operation.
The fact is that during operation, as a result of electrochemical corrosion, a drum cast from an aluminum alloy is, as it were, “welded” to the flange flange of an axle shaft made of steel. There are numerous recommendations and tips on how to quickly remove the drum.
It should be recalled that the use of various types of pullers does not give the desired result; moreover, the puller most often breaks the drum collar.
The easiest way to remove the drum is to use two mounting bolts 1, which are screwed into the technological holes 2 until the drum separates. However, as practice has shown, this method is effective when the car is “young”, i.e. its mileage is 3-5 thousand km.
If you cannot remove the drum using this method, you can do the following as a last resort:
- unscrew the guide pins from the drum
- lubricate the drum seat on the axle shaft with engine oil, start the engine and press the brake pedal
- engage first gear.
With the help of the described manipulations, it is almost always possible to free the drum, since it is held in place by the blocks, and the axle shaft rotates.
While rotating, the axle shaft makes a very unpleasant squeaking sound, but after 10 - 15 seconds, you can turn off the engine, release the brake pedal and remove the drum.
Problems when paying with bank cards
Sometimes difficulties may arise when paying with Visa/MasterCard bank cards. The most common of them:
- There is a restriction on the card for paying for online purchases
- A plastic card is not intended for making payments online.
- The plastic card is not activated for making payments online.
- There are not enough funds on the plastic card.
In order to solve these problems, you need to call or write to the technical support of the bank where you are served. Bank specialists will help you resolve them and make payments.
That's basically it. The entire process of paying for a book in PDF format on car repair on our website takes 1-2 minutes.
If you still have any questions, you can ask them using the feedback form, or write us an email at [email protected]
If something went wrong
Difficulties often arise in the process of replacing front and rear pads. The most common problems and ways to solve them are below.
Brake drum won't come off
- It is necessary to loosen the handbrake cable;
- WD-40 is used;
- If both of the above methods do not help, you need to carefully hit the wooden lining with a hammer several times.
The fluid level in the brake reservoir has dropped
- The required amount is added;
- The brakes are being pumped;
- Brake fluid is added again.
Parsing order
It is better to carry out the repair operation on an overpass (you can use an inspection hole), or just a flat area with a hard surface, because you will have to remove the rear wheels, naturally, first jacking up the car.
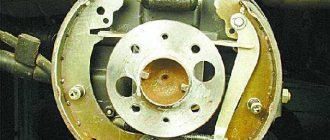
- Remove the wheel and disk;
- We unscrew the guide bolts, of which there are 2, and remove the drum;
- A common problem is the drum sticking, so sometimes it is not so easy to remove it. The problem has long been solved by tapping a drum with a hammer (through a board);
- Using pliers, remove the tension spring;
- After this, a fixing guide spring holding the block;
- We remove the block from the support bar that is not connected to the handbrake rod. To do this, pull its free edge to the side and along the shield;
- Loosen the upper spring. To do this, you need to turn the block to the side until you can disconnect the spring;
- We do the same with the spring of the second pad;
- Remove the spacer bar;
- Disconnect the handbrake rod from the cable;
- We note to ourselves or sketch how the connection to the rod is made;
- Unhook the spring, remove the cotter pin, and disconnect the brake pad.
Thus, the disassembly process is completed.