Malfunctions of the vacuum booster result in the driver being unable to apply the necessary force for normal operation of the vehicle's braking system. Thus, there are only three malfunctions of the vacuum brake booster (abbreviated as VUT). This is depressurization of the pipeline (its connection points), breakdown of the VUT check valve, depressurization of its working chambers.
The third reason is quite rare, but the first ones are the main ones. Checking the amplifier is usually not difficult, and even a novice car enthusiast can do it. As for repairs, restoring the tightness makes sense only at joints (clamps); in other cases, as a rule, the entire VUT or its connecting tubes are replaced.
What is VUT and why is it needed?
To determine the malfunction of the VUT, it makes sense to describe its purpose, operating principle, as well as the effect of the vacuum booster on engine operation. So, the main task of the “vacuum man” is to increase the physical force (usually 3...5 times) applied by the driver to the car’s brake pedal. This is vital because even a very strong person is not able to create enough force in the hydraulic brake system so that all the brake pads are compressed to the required value at the critical moment. This force is created due to rarefaction of air, and the area in the engine intake manifold is used as its source or is pumped by an additional pump.
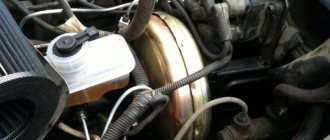
Structurally, the VUT consists of two chambers - atmospheric (on the driver’s side) and vacuum (on the engine side). The vacuum chamber is connected to the intake manifold using an appropriate pipeline. When you press the brake pedal, the vacuum chamber is connected to the atmospheric chamber using a pusher, which has a so-called tracking valve. Next, the diaphragm is connected to the rod and brake fluid is pumped to the brake cylinders. If there is no force on the brake pedal, then under the influence of the return spring the diaphragm returns to its place, the pressure on the brake fluid weakens, which is why the brake pads move apart and braking stops.
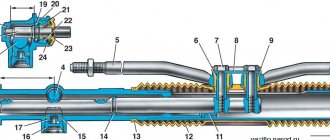
VUT device
In the simplest case, the vacuum brake booster takes vacuum from the intake manifold. To do this, it is connected to it by an appropriate pipeline. However, in many modern cars there are separate vacuum pumps for the vacuum pump. They come in two types. The first is mechanical, it is driven by the engine camshaft. The second is electric and is driven by a separate electric motor. The use of additional pumps not only increases the comfort of using the braking system, but also increases its reliability (for example, in the event of damage and/or depressurization). But still, the pump is only an auxiliary element, and the main vacuum is taken from the intake manifold.
Node examination
The need to replace the vacuum booster on a VAZ 2109 should already be stated in the event of an increase in the force applied to the brake pedal. However, a simple check will help ensure the correctness of the diagnosis:
- turn off the engine;
- press the brake pedal 5-6 times;
- hold down the brake pedal;
- start the engine.
The identifier of a serviceable VUT is an immediate, noticeable movement of the brake lever forward.
An alternative symptom will help diagnose a unit malfunction: when the engine is running, a “hissing” can be heard under the hood in the area where the intake manifold pipeline connects to the VUT check valve fitting. Experienced specialists additionally prefer to check:
- integrity of the suitable pipe; tight fit of the main element on the fitting (hissing may appear as a result of a loose connection).
The initial stage of failure of the vacuum booster is especially clearly identified on “nines” with a carburetor power system. The brake pedal is activated, as expected, with a light force, braking is good and informative, but:
- at idle speed the engine “troits”;
- when you press the brake pedal, the idle speed stabilizes;
- after applying pressure to the accelerator in neutral gear, “dips” occur, regardless of carburetor adjustments.
If the symptoms described above are present, it is advisable to remove the pipe from the “vacuum manifold” fitting with the engine running and plug the hose with a suitable object or finger - the idle speed has returned to normal and, therefore, replacing the vacuum booster on the VAZ 2109 is inevitable. If a malfunction is detected along the way in this way, the movement should be continued with the VUT turned off: the pedal will be hard, but the information content will remain.
Signs of VUT malfunction
Partial output of the vacuum brake booster will certainly manifest itself, and from the worst side and quite clearly. So, symptoms of a malfunctioning amplifier include:
- Significant effort when pressing the brake pedal . To feel this for yourself, you can press the pedal four or five times with a known good vacuum seal and the engine turned off. At the last squeeze, the force on the pedal will increase significantly. Sometimes the opposite situation occurs - the pedal is too soft. This indicates “airing” of the brake system.
- The influence of the vacuum booster on engine operation . Since the VUT takes vacuum from the intake manifold, the engine can change its operating mode during braking (although this should not happen in normal mode). This happens because excess air is sucked into the manifold, affecting the composition of the air-fuel mixture.
- The vacuum brake booster hisses . In particular, hissing occurs when the pedal is depressed. A hissing sound clearly indicates the presence of depressurization either in the vacuum amplifier itself (for example, when the diaphragm ruptures), or in its pipeline or in the check valve (for example, when its rubber seals are significantly worn).
- Vacuum pumps knocking . If a mechanical vacuum pump fails, the usual sign of this is a hum emitted by its drive rod (error p1479 may also appear). If an electric vacuum pump is installed on a car, then motorists often experience overheating of its drive motor.
- Knocking noise when braking hard . Moreover, the sound is inertial in nature, since it is caused by the membrane fastening becoming loose.
Accordingly, the occurrence of one or more signs directly indicates to the car owner that it is necessary to check the vacuum brake booster and its components.
Error p1479
In modern cars equipped with an electronic control unit (ECU), an error code p1479 is often generated in the device’s memory - “Brake booster vacuum system mechanical malfunction.” Owners of a wide variety of cars encounter it - Audi, Volkswagen (Touareg, Passat), Ford and others. The cause of an error in the control unit can be very different. For example, when air is sucked in the hose between the intake manifold and the vacuum brake booster itself.
Another common option is the result of measuring the vacuum value with a vacuum sensor. In particular, it occurs if moisture appears inside the vacuum booster and/or its tubes. The solution is to clean and dry the tubes, and in rare cases, replace the sensor itself.
It also makes sense to check the integrity of the fuse going from the control to the sensor. Each machine will have its own electrical circuit, so it is impossible to provide specific information within the framework of this material.
Another option is the performance of the electric vacuum pump. In particular, its electric motor, impeller, bearings, fastenings, connection blocks, as well as relays and fuses.
Checking status
The corresponding signs may indicate the need to change the vacuum booster or the brake master cylinder.
The primary sign of VUT failure is an increase in the force that must be applied to the pedal to brake.
To be sure of the problem, perform the following check:
- Turn off the engine;
- Press the brake pedal 5-6 times in a row;
- Press the pedal to the floor;
- Start the engine;
- If the VUT is working properly, the pedal will immediately go up.
Checking the condition
If you have a VAZ 2109 carburetor engine under the hood, you can determine the VUT malfunction a little differently in the initial stages:
- Initially, the pedal will work normally, you will have to apply a little force, braking occurs normally;
- But at the same time the engine stalls at idle;
- When you press the brake pedal, the idle speed calms down;
- By pressing the gas in neutral gear, failures occur in the carburetor;
- If such symptoms are observed, with the engine running, remove the pipe from the VUT fitting and plug it with your finger or other available tool;
- Has the idle speed stabilized? In this case, replacing the vacuum seal cannot be avoided.
If such a malfunction is detected while driving, you can continue driving only if the VUT is turned off.
Causes of vacuum booster malfunction
The vacuum brake booster and its accompanying elements are fairly simple devices, so experts identify the following main and possible malfunctions of the VUT:
- Depressurization of the vacuum pipeline . It creates a vacuum necessary for normal operation of the braking system. Accordingly, if air is sucked into it from the outside, the VUT will not work. Depressurization (air leakage) due to old rubber can occur in a variety of places - in rubber hoses, joints, clamps.
- Check valve malfunction . Its task is to remove air from the brake system and prevent it from entering both the system itself and the master brake cylinder. The valve itself may be faulty, for example, due to natural wear, or due to significant wear of its rubber seals.
- Depressurization of the working chambers of the vacuum amplifier . This is a fairly rare cause, which most often occurs due to mechanical damage to the VUT. For example, during repairs or an accident.
- Diaphragm rupture . This is a critical failure, since it occurs inside the amplifier itself, and it is usually irreparable and, accordingly, must be replaced. In this case, the amplifier will poison the air and emit a hissing sound.
- Formation of an additional gap in the VUT . The fact is that as a result of the operation of the car and, in particular, the mounting mechanism of the vacuum booster, its membrane moves slightly forward, which actually makes it easier for the driver to press the brake pedal. However, as a result of this, an extra gap appears in the mount, which can sometimes cause a knocking noise during heavy braking. To solve this problem, simply adjust the rod by moving it forward a little. Such repairs are possible both in a garage and in a car service center.
If the car is equipped with an additional vacuum pump, then a fourth fault is usually identified - partial or complete failure of this unit. In this case, the brake system itself will work, but not in optimal mode. In particular, during sharp braking, the force that the driver will need to physically exert on the pedal will increase significantly.
How to check the vacuum brake booster
A logical question arises: how to determine whether the vacuum brake booster is faulty. In fact, this is quite simple to do, and without the use of additional equipment, the test can be performed in a garage or even on the street.
The simplest check is performed using the following algorithm:
- With the engine off, it is necessary to pump up the vacuum booster (brake system). This is done by pressing the brake pedal about 4...5 times.
- At the end of the last press, the pedal must be locked in the pressed position.
- Start the engine at idle speed.
- If the “vacuum reservoir” is working properly, then when the engine starts, a vacuum will immediately enter it, as a result of which the brake pedal will move down a little, which will be clearly felt when your foot is placed on it.
- Accordingly, if the pedal does not move and does not respond to starting the engine, then there is a depressurization in the system.
It makes sense to perform another check if the brake system seems to be working properly, but when you press the brake pedal, a change in the operating mode of the internal combustion engine is observed. So, the check is performed according to the following algorithm:
Disconnect the pipe from the intake manifold.
- Its fitting must be hermetically sealed. To do this, you can use a clamp or a tightened rubber tube with a clamp.
- Start the engine and let it warm up a little.
- Press the brake pedal several times.
- If, at the moment of pressing the corresponding pedal, no changes occurred in the engine operating mode (its speed did not increase or decrease), it means that there is depressurization in the vacuum brake booster system.
- Accordingly, if the engine begins to “choke” when you press the pedal, it means that the “vacuum reservoir” and its system are working normally.
Please note that the described check must be carried out with the car stationary, since in this mode the vacuum brake booster will not work with all the ensuing consequences.
If the check reveals the presence of depressurization, then the next step is to localize the location of the damage. This is not always easy to do, since the crack or leak can be very small and sometimes located in the most unexpected places. However, as a check and preventative measure, it is necessary to check the following elements of the vacuum booster system:
- tightening and general condition of VUT pipeline clamps;
- VUT sealing tube at the clamping points and along the entire length (if possible), often the cause of depressurization is the appearance of a crack in the said tube;
- condition of the vacuum booster check valve seal, this is also a common cause, especially on older cars (for example, VAZ classic).
If the check does not produce results, then it makes sense to simply replace all the vacuum booster tubes with clamps.
Check valve
You can check the VUT check valve using one of two methods. The first of them involves dismantling the specified element, and the second involves holding the brake pedal with the engine running.
How to check a removed brake booster
After the valve is removed, you just need to blow into the fitting that was connected to the amplifier with your mouth or using an air compressor. If the valve is working properly, then air should flow freely. The next step in this case is to draw air from that fitting. Best by mouth. Accordingly, the valve should not let air back in. Otherwise, the check valve is partially or completely damaged and must be replaced. Instead of a mouth, you can use a thick rubber bulb, for example, from a hydrometer.
However, removing the check valve is not the best solution, since the process of removing it can damage the seal of the vacuum brake booster system. It is better to check the brake booster check valve on a car in the simplest way. In accordance with the second verification method, it is recommended to proceed as follows:
- start the engine and let it run for about one to two minutes;
- press the brake pedal all the way and turn off the engine;
- if the check valve is working properly, it will close, since there is no vacuum on the side of the manifold, and a vacuum will remain in the chamber, accordingly, the pedal will not press up (there will be no need to exert additional force to hold it);
- otherwise (if the pedal is pulled up sharply), the VUT check valve is damaged.
As in the case of a pipeline, it is easier and faster to replace the check valve with a new one, since this unit is usually non-removable and cannot be repaired, and its price is relatively low.
Replacement
VAZ 2109 vacuum brake booster
To do this, you need a simple set of keys:
The repair is carried out in the garage, where the hood should be raised and a support installed.
Removing the vacuum
Sequence of work:
- remove the negative terminal from the battery;
- disconnect the rubber tube from the brake vacuum, first unscrew the clamp;
- disconnect the electrical power supply terminal for the level sensor from the brake master cylinder cover;
VAZ 2109 checking the vacuum brake booster
- then, inside the car, move the driver’s seat to the farthest position, as far as the runners will allow;
- lower under the steering column towards the brake pedal.
Note: if necessary due to lack of lighting, use a portable lamp with a safety flashlight.
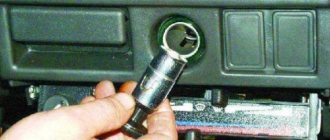
- Using pliers, remove the locking ring from the sleeve that connects the pedal itself to the vacuum rod connector;
- remove the rod, lower it to the floor of the body.
Note: the rod connector is a U-shaped plate with holes for attaching to the pedal bar.
- return to the set vacuum;
- Now you have to carefully remove the brake master cylinder;
VAZ 21093 vacuum brake booster
- it must be removed together with the corresponding brake system pipes.
Note. This must be done so as not to add additional work of filling the brake fluid and pumping the entire brake system to all four calipers.
- clean the threaded connection on the master cylinder bushings and use a metal brush to carry out this work.
Note. Carefully unscrew the nuts, turning them forward and backward several times, so as not to strip the threads on the screws. Remove the nuts from the screws, and also remove the washers that are in a compressed state.
Vacuum brake booster
To make the work easier, use a flat screwdriver to go along the cylinder body and lightly, as carefully as possible, release them from sticking.
Note: if the nuts cannot be unscrewed, you need to drop a few drops of 70% acetic acid on them, wait 30 minutes, clean the threads with a wire brush and repeat unscrewing.
After removing the washers, you need to begin removing the brake master cylinder. It will be difficult to remove. Therefore, you need to be careful, so as not to break or bend the brake pipes too much, to apply force sharply, but not too much. The brake cylinder must be removed forwards, without deviating to the side. The last final step is removing the vacuum. It is attached to the interior partition on a bracket.
- The bracket is attached to two studs; clean the threads as indicated above.
- Unscrew the nuts and remove the vacuum along with the bracket.
Then after removal, unscrew the two blind bolts from the vacuum. Set it aside. Carefully screw the new vacuum to the bracket. Reassemble in reverse order. The price of a vacuum brake booster is 2,500 rubles. When choosing it, you should pay attention to the packaging. Manufacturer's guaranteed packaging must be made of corrugated cardboard.
How to troubleshoot
It makes sense to repair the vacuum brake booster system only in the event of partial failure of the booster pipeline, its check valve, or the valve seal. If replacing the listed elements does not produce results, then it is necessary to replace the entire VUT, since its design is non-separable and cannot be repaired.
Replacing a pipeline with mounting clamps makes sense for several reasons:
- low price of materials;
- difficulty in localizing the location of depressurization;
- Difficulty in repairing cracks or other damage in the pipeline.
Replacing the pipeline itself is not difficult, and even a novice car enthusiast can easily handle it. The main thing is to buy a new set of pipes, clamps and appropriate gaskets from the auto store. Next, using plumbing tools, simply change one tube for another.
Repair of auxiliary pumps
As mentioned above, when a mechanical vacuum pump partially fails, some car enthusiasts simply remove their rod, thereby turning them off and eliminating the knocking noise that occurs when the pump operates. In this case, the brake booster will work, but not as effectively, which will result in a harder pedal. Some car enthusiasts get out of the situation by turning the rod 180 degrees. Sometimes this helps because it is only present on one part of them.
As for electric vacuum pumps, these units are usually irreparable; accordingly, they are simply replaced with new ones.
Let's start replacing the VUT.
We take the key 17 and unscrew the fastening of the GTZ to the VUT.
Now we can decide whether we need to unscrew the brake pipes from the GTZ or not.
We carefully try to move the GTZ away from the vacuum brake booster ; if the tubes are long enough and the GTZ can be moved, then you are lucky. No need to bleed the brakes.
Next, we go to the salon and disconnect the VUT rod from the brake pedal.
Now, using a 17mm wrench, unscrew two more fastening nuts.
The second nut is on the other side from the bottom.
We pick up the new and old amplifiers and look at the rod that goes into the GTZ. We recess the rod in both amplifiers completely and look at how much the rod protrudes on the old amplifier and tighten it in approximately the same way on the new one (incorrect adjustment of the rod can lead to insufficient braking force or a wedge of the brakes).
Having adjusted the rod, we put the amplifier in place of the old one.
Video on the topic of replacing VUT VAZ 2109-15. In the video you can look at all the steps in more detail.
Happy journey everyone! Be careful with your brakes!
We are waiting for you on our website! Subscribe to RSS and like