Step-by-step instructions for replacing the cylinder head gasket in a Niva Chevrolet
In the engine of any car, a special sealing gasket is installed between the cylinder block and the cylinder head, which seals the combustion chambers and coolant channels. Over time, it becomes unusable, which leads to fuel combustion products getting into the antifreeze, oil and coolant leaks. In this case, it is necessary to replace the cylinder head gasket on a Niva Chevrolet. You can change it yourself by following the step-by-step instructions.
The cylinder head device in a Chevrolet Niva car
The Chevrolet Niva engine traces its origins to the 1.7 liter VAZ 21213 engine . It has the same cylinder diameter of 82 mm and a piston stroke of 80 mm. The differences lie in the design of the cylinder head (cylinder head). Hydraulic compensators and a single-row chain with a hydraulic tensioner appeared. The cylinder head itself is cast from aluminum alloy and is designed to attach the gas distribution mechanism, valves, spark plugs and form an optimal combustion chamber in the cylinders. This head received the index 21214, it has been produced since 2003.
Important! The cylinder head, camshaft, tensioner mechanism in VAZ 21214 engines differ from modifications 21213 and 2121 and are not interchangeable.
The gasket between the head and the engine block performs the following functions:
- sealing of engine cooling channels;
- sealing the oil supply channel to the block head;
- creating optimal gas pressure in the combustion chambers and preventing them from escaping into the block.
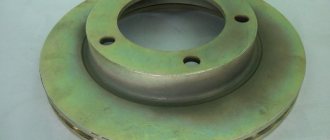
To ensure reliable connection, the cylinder head gasket is made of a composite with a metal base or all-metal. The mating surfaces must be smooth, without scratches or cavities; surface curvature of no more than 0.1 mm is allowed.
Causes of cylinder head gasket failure
A crack or burnout of the gasket is a fairly common occurrence on the Niva Chevrolet . The vehicle is operated in extreme conditions; the engine runs at high speeds or with poor cooling off-road. The temperature in the combustion chambers reaches 1000°C, so the appearance of the slightest crack leads to rapid burnout of the gasket in this place.
A damaged node can be easily identified by the following symptoms:
- white steam from the exhaust pipe of the car (antifreeze enters the cylinders);
- drop in coolant level in the expansion tank;
- bubbling of antifreeze in the expansion tank;
- the appearance of an emulsion on the oil dipstick and timing components under the valve cover;
- increase in oil level due to antifreeze entering the crankcase;
- oil leaks from under the gasket outside the engine;
- the engine begins to stall and run intermittently;
- low compression in the cylinders.
Attention! The main reason for cylinder head gasket burnout is severe overheating of the engine, which leads to bending of the light-alloy cylinder head and the formation of cracks between the cylinder block.
The manufacturer does not regulate gasket replacement on a Chevrolet Niva . It is designed for the entire service life of the engine - 125 thousand km. This part is disposable and is replaced with a new one every time the cylinder head is removed. Dismantling the engine head may be necessary to repair valves and their seats, replace pistons and piston rings.
Step-by-step instructions for replacing the cylinder head gasket
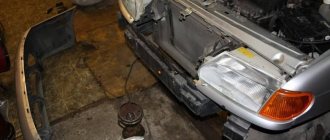
The design features of the Niva Chevrolet car make it possible to remove the cylinder head without good access from below . However, the presence of an inspection hole or lift greatly facilitates access to some nuts and the coolant drain valve. There is no need to remove the engine, but it is advisable to clear the space under the hood of interfering hoses and wires.
The following tools will be needed for repairs::
- set of keys and socket heads;
- powerful wrench, ratchets, extensions;
- hammer;
- flat screwdriver;
- head or special wrench 38 for cranking the crankshaft;
- torque wrench;
- brake pipe wrench (suitable for oil line).
Advice. In addition to standard tools, wire for securing removed parts, rags, white spirit or solvent for cleaning surfaces may be useful.
Conventionally, all work on replacing the cylinder head gasket on a Niva can be divided into 2 stages : removing all attachments and all electrical sensors from the cylinder head, removing the timing mechanism and attaching the head to the cylinder block.
Procedure for removing the cylinder head of a Chevy Niva
The work algorithm is as follows:
- Drain the antifreeze from the radiator and engine block . To do this, unscrew the plug on the block with a 13 key. In this case, there is no need to drain the oil from the crankcase. Remove the terminal from the battery. We move the gearbox to neutral position.
- While the coolant is draining, we begin to disassemble the engine from the hood side . We unscrew the throttle valve, remove the throttle cable, remove the wires from the spark plugs, disconnect the electrical connectors of the injectors, TPS, IAC, oil pressure and coolant temperature sensor.
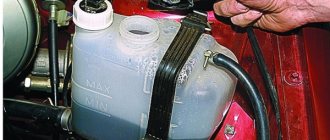
- Now you can disconnect all the cooling system hoses going to the thermostat, heater core and throttle body heating. Remove the brake booster hose from the intake manifold.
- We take the engine wiring harness and all removed hoses to the side and secure them if necessary.
- We unscrew the exhaust manifold protective screen , loosen the 4 nuts securing the exhaust pipe to the exhaust manifold. For the convenience of further actions, the exhaust pipe can be removed from the lower mounts and completely lowered under the car.
- On a Chevy Niva with power steering, the pump mounting bracket will interfere with us. It is not necessary to remove it completely - just unscrew the fastening bolts and carefully hang it on the wire.
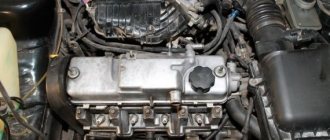
- Now you can start opening the engine . Remove the valve cover. Using a special wrench, unscrew the oil line to the hydraulic compensators and chain tensioner.
- Set the piston of the first cylinder to TDC until the marks align by turning the crankshaft. Loosen the chain tensioner and unscrew the top sprocket. We immediately fix it in this position with wire to prevent the circuit from jumping and phase failure.
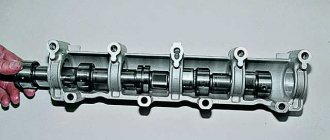
- Unscrew the 10 nuts securing the camshaft housing with bearings. You need to unscrew evenly around the entire perimeter (according to the tightening order in the instructions). Remove the assembly from the engine.
- Access to 10 cylinder head mounting bolts is now . You need to tear them off with a wrench, starting from the middle and moving to the outer bolts. The bolts are removed from their places and checked for thread condition and possible elongation (no more than 117 mm).
- Gently tapping and prying from below with a screwdriver, pull the cylinder head out of its place. After which you can remove it from the engine along with the collectors. The mass of this unit allows you to perform the operation yourself.
Advice. The camshaft and engine head mounting bolts are tightened to a sufficiently large torque to avoid accidental damage; only socket heads should be used. The fit on the bolt head should be tight without any play.
After removing the old gasket, possible damage and wear of the surfaces are assessed . If no repairs are required, the valves do not have carbon deposits, and all dimensions are within tolerance, then you can immediately begin replacing the cylinder head gasket and assembling the engine.
Assembly procedure and tightening torque of the Chevrolet Niva cylinder head
The surface of the cylinder block and cylinder head is thoroughly cleaned of old contaminants and degreased. Sharp objects cannot be used for this operation, otherwise there is a risk of leaving a scratch on a smooth surface. The new gasket is installed in its place and pressed against the top by the cylinder head. At this stage, it is important not to damage the gasket and accurately align all the channels inside.
It is allowed to use old cylinder head bolts if they have not stretched out or lost their shape. They are first lubricated with clean engine oil and allowed to drain a little. Each bolt is lowered into place and screwed into the body by hand. Now the most important operation awaits - to maintain the required tightening torque of the Niva Chevy cylinder head bolts (similar to VAZ 21213). The further performance of the engine and its service life depend on this.
Work is carried out only with a torque wrench in the following order:
- tighten with a force of 20 Nm according to the standard pattern (from the middle to the edges);
- tighten in the same order, but with a force of 70-85 Nm;
- turn each bolt 90 degrees;
- Once again tighten each bolt 90 degrees.
Important! The total tightening torque should not exceed 110-115 Nm, otherwise deformation of the bolts or cylinder head may occur.
Completion of repairs to replace the cylinder head gasket
We carry out the rest of the assembly in reverse order . We observe the tightening torques for the hydraulic compensator (20 Nm), camshaft sprocket (40-50 Nm), camshaft housing (23 Nm). We set the timing timing, make several engine revolutions and check that the marks are correct. We connect the wires, hoses, fill in coolant and test run the engine. The oil pressure lamp should definitely go out soon after starting, and there should be no engine errors.
Replacing the cylinder head gasket Niva Chevrolet
The cylinder head gasket is replaced if it is damaged.
The main signs of damage to the head gasket:
– insufficient compression (below 1 MPa (10 kgf/cm2)) in one or more cylinders;
– breakthrough of gases into the cooling system (seething, foaming of liquid in the radiator, rapid drop in the liquid level in the expansion tank in the absence of external leaks);
– coolant entering the lubrication system (emulsion on the oil level indicator, stratification of oil drained from the crankcase - especially noticeable in a transparent container);
– oil getting into the cooling system (oil film on the surface of the liquid in the expansion tank).
You will need: a torque wrench, a screwdriver, pliers, wrenches (regular and socket) “8”, “10”, “13”, “17”, E-Torx head.
2. Drain the liquid from the engine cooling system (see “Replacing the Niva Chevrolet coolant”).
4. Disconnect the throttle drive cable from the throttle assembly and receiver.
5. Remove the bearing housing together with the camshaft from the cylinder head studs (see “Replacing hydraulic valve compensators for Niva Chevrolet”).
6. Remove the valve drive levers, unscrew all hydraulic lever mounts from the holes in the cylinder head
7. Remove the oil supply ramp to the hydraulic mounts.
8. Disconnect the wiring harness connector from the throttle position sensor
9. Disconnect the wiring harness connector from the idle air control.
10. Disconnect the wiring harness connector from the engine management system coolant temperature sensor.
11. Disconnect the injector wiring harness connector.
12. Disconnect the wiring harness from the knock sensor.
13. Move the motor harness to the side.
14. Disconnect the wires from the spark plugs.
15. Slide the protective cap and disconnect the wire from the coolant temperature gauge sensor.
16. Disconnect the exhaust pipe from the exhaust manifold.
17. Unscrew the upper bolt securing the intake pipe strut and, loosening the lower bolt securing the strut, move it to the side
18. Loosen the fastening clamp and disconnect the adsorber purge hose from the throttle assembly
19. Loosen the fastening clamps and disconnect the radiator hoses of the cooling system from the cylinder head pipe
20. Loosen the fastening clamp and disconnect the hose of the lower thermostat pipe
21. Loosen the fastening clamp and disconnect the hose of the thermostat side pipe
22. Loosen the fastening clamp and disconnect the fluid supply hose to the heater radiator from the cylinder head pipe.
23. Unscrew the nuts of the fuel pipes and disconnect the fuel supply and drain lines.
24. Remove the upper bolt securing the rear intake pipe strut, loosen the lower bolt of the strut and move it to the side.
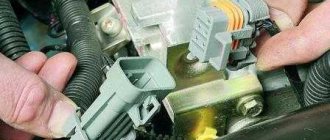
25. Unscrew the two nuts securing the starter heat shield
This is how the heat shield mounting nuts are located
26. Move the shield to the side.
27. Remove the chain tensioner
28. Disconnect the power steering pump bracket from the engine and move it to the side along with the pump
29. Remove the chain from the camshaft sprocket
30. Carefully place it on the tensioner shoe.
Make sure that the chain does not disengage with the oil pump drive shaft sprocket.
It is best to tie the chain with wire.
31. Remove ten cylinder head bolts.
The bolt heads are made with an “E-Torx” wrench, but if necessary, you can use a “13” head.
32. Remove the block head.
It is more convenient to remove the cylinder head with an assistant, since it is quite heavy.
33. Remove the gasket located under the head.
To determine the cause of gasket failure, carefully inspect it. On the edging of the gasket holes, traces of burnout will be visible between the combustion chambers of adjacent cylinders
between the combustion chamber and the cooling system jacket channel
36. or between the combustion chamber and the lubrication system channel.
37. Thoroughly clean the surface of the block from any remnants of the old gasket.
Remove foreign deposits from the cooling system jacket passages (if any).
The photo shows the removal of old sealant.
Tightening procedure for cylinder head bolts
Install the cylinder head, centering it along the two guide bushings, screw in the bolts securing it and tighten them in four steps in a certain sequence (according to the figure):
– preliminary torque 20.0 Nm (2.0 kgf m);
– pull with a torque of 69.4–85.7 Nm (7.1–8.7 kgf m);
The best replacement for Chevrolet Niva cylinder head gaskets in St. Petersburg
Motor Service is a high-quality and inexpensive replacement of the cylinder head gasket for a Chevrolet Niva 1.7 in St. Petersburg. Own fleet of high-precision machines, high-quality spare parts, competitive prices, over 17 years of experience! We will replace the Chevrolet Niva cylinder head gasket efficiently, on time and with a guarantee!
The gasket seals three important engine systems: cooling, oil and gas distribution. Therefore, they do not skimp on the cylinder head gasket; it is a one-time use item and is replaced every time the cylinder head is opened.
Another case of replacement is the presence of one of the signs of a gasket failure.
Signs of a bad cylinder head gasket
- Engine oil leaks along the connection line between the cylinder head and the cylinder block.
- Coolant leaks. Right there.
- White emulsion (antifreeze) on the oil dipstick. The seal of the gasket may be broken.
- Presence of oil in the expansion tank or radiator. Same reason.
- Presence of bubbles in the expansion tank or radiator. Same reason.
How we solve the problem of replacing the cylinder head gasket
The replacement technology is simple, but there are important points to consider:
- We select a new gasket: it must meet the characteristics recommended by the manufacturer, including the tightening force with a torque wrench.
- We disconnect the attachments, having previously marked the parts to be disconnected.
- Before opening the cylinder head, we clean the heads and the slots of the tightening bolts from dirt for a reliable grip with the keys.
- To relieve stress at the cylinder head joint, first loosen all the bolts by 1 turn, starting from the middle.
- We remove the cylinder head, replace the gasket, paying attention to the centering sleeves or grooves.
- We tighten the fastening bolts with a torque wrench according to the recommendations and according to the manufacturer’s technological map.
- We connect the attachments.
Recommendations for car enthusiasts
Replace the gasket whenever signs of failure are detected. The cylinder head gasket is an engine health indicator. Perhaps the cause of the gasket failure lies deeper, but only an autopsy will show this. And it's better to do it early.
What brands of cars do we repair:
- VAZ
- GAS
- Acura
- Alfa Romeo (Alfa Romeo)
- AUDI
- BMW (BMW)
- Cadillac (Cadillac)
- Chevrolet (Chevrolet)
- Chrysler
- Citroen
- Daewoo
- Cummins (Cummins)
- Dodge
- Fiat (Fiat)
- Ford (Ford)
- Great Wall
- Honda
- Hummer
- Hyundai
- Infinity
- Isuzu
- Jaguar (Jaguar)
- Jeep
- MAN
- KIA (Kia)
- Land Rover
- Lexus (Lexus)
- Mazda (Mazda)
- Mercedes (Mercedes)
- MINI
- Mitsubishi (Mitsubishi)
- Nissan (Nisaan)
- Opel (Opel)
- Peugeot
- Porsche (Porsche)
- IVECO (Iveco)
- Renault (Renault)
- Rover
- SAAB (Saab)
- Seat
- Skoda
- SSANGYONG
- Subaru
- Suzuki
- Toyota
- Volkswagen (Volkswagen)
- Volvo
- Scania
How to change the cylinder block gasket on a Chevrolet Niva?
Sooner or later, the engine of any car will need maintenance or repair. Especially if the car is operated in difficult and extreme conditions, which is especially important for domestically produced SUVs. Now you will learn how to replace the cylinder head gasket in a Niva Chevrolet and what should be prepared for this.
When is it necessary to change the cylinder head gasket?
The need to replace the cylinder head gasket of a Chevrolet Niva and, accordingly, the need for its tightening torque arises in some cases. The gasket in a vehicle needs to be changed if it is damaged. This refers to the occurrence of cracks and breakdowns in the structure of the cylinder head gasket. In this case, the owner of a Chevrolet Niva will be faced with a breakthrough of gases into the cooling system, as evidenced by the regular bubbling of antifreeze.
Tightening diagram for cylinder head screws for Niva Chevrolet
In addition, the need to replace the Chevrolet Niva cylinder head gasket appears due to insufficient compression levels in the combustion chambers. Perhaps the gasket has worn out and is no longer able to fully perform its tasks. In addition, if a crack appears in the cylinder head gasket, antifreeze will leak into the engine fluid and vice versa.
In these cases, replacing the cylinder head gasket is simply necessary. If you let this matter go, things could turn out even worse. Therefore, if at least one of these signs mentioned above is found in your Chevrolet Niva, you need to start replacing the cylinder head gasket as quickly as possible.
Replacement process and tightening torque
Required Tools
To carry out this work on replacing the cylinder head gasket of the Niva Chevrolet and tightening the cylinder head bolts, you should prepare:
- Phillips and slotted screwdriver;
- set of open-end wrenches;
- torque wrench.
Without the last element, tightening the cylinder head pulleys will be impossible.
Step-by-step instruction
- Initially, of course, you need to dismantle the cylinder head cover itself.
- Then place a container under the bottom of the car to collect the waste refrigerant. Unscrew the drain plug and drain the antifreeze.
- Then you should disconnect the throttle cable from the receiver and assembly.
- After this, the timing pulley should be removed along with the bearing housing.
- Next, we dismantle the valve lever, and then unscrew the lever supports themselves. Also dismantle the engine fluid supply ramp to the hydraulic supports.
- Now you need to disconnect the cable harness from the TPS. In the same way, disconnect the wiring from the idle speed sensor and antifreeze.
- You need to squeeze the plastic clip and then disconnect the connector with the wires that are designed to power the injectors. Here you also need to remember to disconnect the wiring harness from the knock sensor.
- Now disconnect the high voltage cables from the spark plugs. Also disconnect the cable that powers the engine temperature control device.
- Slightly compress and disconnect the exhaust pipe from the intake manifold. Then the upper screw securing the inlet tube spacer and, slightly loosening the lower screw, the spacer should be moved to the side.
- The clamp should be loosened slightly, then the adsorber purge pipe should be disconnected from the throttle assembly.
- The clamps must be loosened and the cooling system pipes must be disconnected from the cylinder head.
- Using open-end wrenches, you now need to disconnect the fuel lines. To do this, unscrew the nuts of the fuel hoses intended for draining and supplying gasoline.
- Now use a wrench to remove the top screw that secures the rear intake tube brace. The bottom screw should also be loosened a little. After these steps, the spacer must be removed to the side.
- When all the above steps have been completed, the camshaft pulley drive chain tensioner should be removed.
- Then dismantle the brackets that secure the power steering device.
- Now you can remove the chain with the timing pulley star.
- After this, using a socket with an extension, you will need to unscrew the screws securing the cylinder head, and then dismantle it.
- The cylinder head gasket can now be removed. Mount a new component in its place, having previously lubricated its perimeter with sealed glue. Actually, at this point the work on replacing the cylinder head gasket in the Chevrolet Niva can be considered completed. All further work on assembling the power unit must be performed in the reverse order. But that is not all. To ensure a reliable fit of the cylinder head to the block itself, you need to correctly tighten the screws and maintain the tightening torque.
- The procedure itself consists of several stages. First of all, using a torque wrench and following the order indicated in the diagram, you need to tighten the screws from the first to the tenth. In this case, the tightening torque of the Niva Chevrolet cylinder head should be 20 Nm.
- Next, when all the bolts are tightened in turn, you need to tighten all the cylinder head screws again. The tightening torque should now be 69.4–85.7 Nm. The last, eleventh pulley needs to be tightened to 31.4–39.1 Nm.
- After these steps, the screws marked with numbers from one to ten need to be turned 90 degrees, and then, when they are all screwed, you should repeat the procedure and turn them again 90 degrees. At this point, the screw tightening procedure can be considered complete.
Torsion bolts (plastically deformable)
Part number: 21213-1003271-01-0. Name: Torx cylinder head bolt. This name (torsion bar bolts) is fundamentally incorrect, but what can you do if they are called that on all forums and in all stores. According to science, when they say torsion bar, they mean deformation from twisting. And in this case, tensile deformation. In stores, these bolts are also called cylinder head bolts for Niva Chevrolet or cylinder head bolts of a new type. I also came across the name torx or chamomile. These bolts, unlike hardened ones, provide a constant load. That is, in a very primitive way we can talk about the grommet effect, that is, about the constant force to compress the cylinder head gasket in the axial direction of the bolt. These bolts are widely used on imported engines because they avoid human factor errors. In fact, you don't need to tighten with the precision of a torque wrench. The final values are taken as angular values. I don’t really like this approach, but such things are now commonly called “assembly guarantee”.
Niva Chevrolet cylinder head gasket replacement
- (8452) 783-983
- Saratov, 6 Sokolovogorsky proezd, 12
- Lada Largus
- VAZ-2110
- VAZ-1118 Kalina
- VAZ-2106
- VAZ-2108
- VAZ-2121 Niva
- VAZ-2123 Niva
- VAZ-21090 Granta
- VAZ-2192 Kalina 2
- Lada XRAY
- VAZ-2180 Vesta
- Chevrolet Lanos
- Chevrolet Aveo
- Chevrolet Lacetti
- Chevrolet Cruze
- VAZ-2107
- VAZ-2170 Priora
- VAZ-2109
- VAZ-2112
- VAZ-2101
- Renault Sandero
- Renault Logan
- VAZ-2191 Granta
- VAZ-11196 Sport
- VAZ-2131 Niva
- VAZ-1117 Kalina
- VAZ-2113
- VAZ-1119 Kalina
- VAZ-2114
- VAZ-2111
- VAZ-2103
- Daewoo Matiz
- Datsun on-DO
- Chevrolet Captiva
- VAZ-2105
- VAZ-2104
- Bumper
- Bolts
- Silencers
- Engine
- Body parts
- Harnesses
- Foreign cars
- Transmission
- Light bulbs
- Motor oil
- Hardware
- Optics
- Plastic
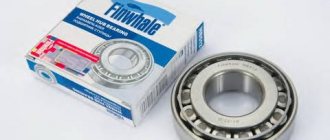
- Bearings
- Gaskets
- Other
- Radiators
- Transfer case
- Rubber products
- Glass
- Clutch
- cable
- Tuning
- Filter
- Electrical equipment
- Electrical equipment
I think that many Niva owners have encountered the problem of oil or even antifreeze leaking at the junction of the head and cylinder block. This problem can often be solved by tightening the cylinder head bolts to a certain torque using a torque wrench. But if this does not help, then the gasket must be replaced. So, to perform this repair you will need the following tool:
Open-end wrenches 10 and 13 Long wrench Extensions (several pieces of different sizes) Hammer Torque wrench Ratchet handles Flat screwdriver
Removing the cylinder head on a Niva VAZ 2121 (VAZ 2106 engine)
First of all, unscrew all the valve cover bolts:
Then carefully lift it and remove the rubber gasket, approximately as shown in the photo below:
Then you need to unscrew the camshaft gear with a 17 key:
And lightly hitting it from the back with a hammer, it should come off easily, after which we remove the chain from it:
Next, you can begin to unscrew the Niva camshaft mounting bolts, for which you can completely get by with a spanner wrench:
Then carefully remove the camshaft assembly from the studs, lifting it up from the head:
Now you can begin to unscrew the 10 bolts securing the Niva cylinder head. To do this you will need a long wrench and an extension to create decent leverage.
And you will need to unscrew one more bolt, which can be unscrewed with a ratchet with a 13-mm head. This is what it looks like, as shown in the photo below:
Now you can carefully remove the head by grasping its body from below:
Most likely, the gasket will stick thoroughly to the head, so you will have to pry it off with a screwdriver and remove it.
And after all this, it is necessary to thoroughly clean both the head and the block itself from traces of the old gasket and other contaminants, and it is advisable to degrease the whole thing so that the surface is perfectly dry and clean.
We install a new cylinder head gasket and put the head back. And then you just need a torque wrench to tighten the bolts with a certain torque. They must be pulled in a strictly defined order, as shown in the visual diagram below:
And now the most important thing. The head on a VAZ engine is pulled in two steps:
First technique: moment of force from 33-41 N*m. The second is from 95 to 118 N*m. That is, first, in the above sequence, we tighten the cylinder head bolts from a torque of about 40 Newton, and the second time we finally tighten it to a maximum of 118 Newton. I couldn’t tighten it to this point, since the scale on my Ombra key is only 110 N*m.
Having finally tightened all the connections, install all the removed parts in the reverse order of removal.
What is a cylinder head and its functions in a car engine
To ensure that the connection between the head and the cylinder block itself is sufficiently tight and airtight, a gasket is used. It performs three functions:
- seals the cooling system channel;
- prevents oil leakage;
- distribution - the cylinder functions normally, as a result of which the mixture of gasoline and air does not leak out.
The seal is used only once and is changed during any engine repair. You can use the following types - asbestos, non-asbestos, steel. Each gasket is good in its own way: metal gaskets distribute mechanical stress well, asbestos gaskets are more elastic and can withstand high temperatures.
You will need the following equipment: a 10 mm wrench, pliers and a flathead screwdriver. Different cars have their own design features, engine models and bolt patterns. It is impossible to create the same algorithm for all machines. Let's look at exactly how to do this with your own hands.
Replacing the cylinder head gasket Niva Chevrolet
Replacement of the cylinder head gasket on a Niva Chevrolet car is carried out in the event of a breakdown, when gases break through into the cooling system, which is observed by the seething of the liquid, as well as due to insufficient compression in the combustion chambers, coolant getting into the oil or, conversely, getting into the oil into the cooling system. To carry out repair work, prepare a standard set of tools and perform the following sequence of actions:
- First of all, we dismantle the cylinder head cover.
- Drain the coolant.
- We disconnect the throttle drive cable from the throttle assembly and receiver.
- Remove the bearing housing along with the camshaft.
- Next, remove the valve drive levers, and then unscrew the hydraulic bearings of the levers.
- Remove the oil supply ramp to the hydraulic supports.
- Disconnect the block with power wires from the throttle position sensor.
- Similarly, we disconnect the supply wires from the idle speed regulator and the coolant temperature sensor.
- Squeeze the plastic clip and disconnect the connector with the injector power wires.
- Disconnect the connectors with wires from the knock sensor.
- We move the engine harness with wires to the side so that it does not interfere with work.
- Disconnect the wires from the spark plugs.
- Slide the rubber cap and disconnect the power wire from the temperature indicator sensor.
- Disconnect the exhaust pipe from the exhaust manifold.
- Unscrew the upper bolt securing the intake pipe strut and slightly loosen the lower one, move the strut to the side.
- Loosen the clamp and disconnect the adsorber purge hose from the throttle assembly.
- Loosen the clamps and disconnect the cooling system hoses from the cylinder head.
- Disconnect the thermostat side pipe and the coolant supply hose from the cylinder head pipe.
- Using two open-end wrenches, we disconnect the fuel lines by unscrewing the nuts of the fuel supply and drain pipes.
- Next, unscrew the upper bolt securing the rear intake pipe strut and, loosening the lower bolt, move the strut to the side.
- Unscrew the nuts of the starter heat shield and move it to the side.
- Remove the camshaft drive chain tensioner.
- Next, remove the hydraulic power steering mounting brackets.
- Remove the chain with the camshaft sprocket. Carefully place the chain on the shoe, making sure that it does not disengage with the oil pump sprocket.
- Using a socket with an extension, unscrew the bolts securing the block head and remove it.
- Remove the sealing gasket.
At this point, the repair work on removing and replacing the cylinder head gasket on a Niva Chevrolet car has been completed. Having completed the necessary repairs, we carry out the installation in the reverse order.
Why does coolant mix with oil?
This is because the cooling and lubrication channels are usually quite close to each other. When the gasket or the head itself is damaged, the fluids in both circuits begin to mix with each other.
If oil gets into the cooling system, there is a risk of overheating. It's even worse if coolant gets into the oil. Then the risk of engine seizure increases significantly.
A healthy engine does not consume coolant at all. If the antifreeze level drops, there are no visible leaks and all pipes are sealed, then two options are possible. First, the gasket or head of the block is damaged. Second, the exhaust gas recirculation cooler has lost its tightness, which has been happening quite often lately. The symptoms will be the same in both cases.
Gasket and head problems do not always mean that the coolant will mix with the oil. Sometimes coolant does not enter the lubrication system, but into the cylinders. In this case, thick white smoke appears from the exhaust system. You cannot drive for such a long time, since a large amount of antifreeze in the cylinders threatens complete destruction of the engine as a result of water hammer. The fluid cannot be compressed, which places greater stress on the pistons, connecting rods and bearings.
It happens that the cylinder head gasket burns out in such a place that the coolant or oil simply begins to flow out of the engine, but mixing or entering the cylinders does not occur. The situation is not always easy to diagnose, since the coolant, in contact with hot engine parts, quickly evaporates. And a white coating, indicating a malfunction, may be hidden in nooks and crannies that are inaccessible to the eye.