There are models in which the ordinary operation of changing the oil turns into a whole cycle of work involving the removal of the power unit, at least that’s what is written in the maintenance and operation manual. It’s good that replacing the VAZ 2112 16-valve timing belt occurs practically without complex manipulations and trips to a car service center. This operation can be carried out directly in the parking space. Although, if you read the official recommendations for removing and installing gas distribution, you can learn how to remove the wheel in order to unscrew the gear from below. Some people simply turn the steering wheel all the way to the right.
Gas distribution mechanism
Content
Serves for timely opening (intake of the combustible mixture) and closing (exhaust gases) of the engine cylinders.
The belt drive is compact and has low noise levels during operation. The timing belt of the VAZ 2112 16 valves can simultaneously drive, in addition to the camshaft, other units: the oil pump, the ignition distributor and even the fuel pump.
How to change it yourself?
Before changing the timing belt yourself, you need to study the diagram of the gas distribution mechanism, stock up on the necessary tools, and also imagine the order of work in the form of a sequence of actions.
Before replacing, study the timing diagram. There are differences between modifications of the VAZ 2112, but the basic algorithm is approximately the same for all modifications. This algorithm can also be used on VAZ cars of other modifications, for example, 2110. It is necessary to have a good manual that explains the progress of work step by step. And if you have at least a little experience in car maintenance and minor repairs, we can calmly carry out timing belt maintenance ourselves and change the necessary parts.
Signs of a worn timing belt on a VAZ 2112
Signs of a worn timing belt on a VAZ 2112
- On the surface you can observe cracks, chips, scratches more than 1 mm deep, delamination and visibility of the cord;
- The ring gear on the inside has the following defects: different heights of the teeth, longitudinal grooves (if any, check the gears for integrity. They may have a slight deviation along the ring, which will be enough to accelerate wear);
- Traces of oil. Because of this, slippage will be observed, which will lead to deviations in the valve timing - untimely opening and closing of the channels, which, in turn, will lead to incomplete combustion of the combustible mixture, lack of “purging” of the cylinder (the moment when both the intake and exhaust channels are open) , engine coking.
Video
Our website is made possible by displaying online advertisements to our visitors. Please consider supporting us by disabling your ad blocker.
Dear friends, today we will tell you the basics of setting timing marks using the example of a VAZ 16 valve engine. It's no secret that correctly set timing marks are the key to proper engine operation. If the marks are set incorrectly, then normal engine operation is impossible.
It is also important to tension the belt correctly, this greatly affects its durability. So, when do we have to deal with the procedure for setting timing marks? When, according to the regulations, we need to replace the timing belt at the next maintenance, by the way, the rollers are also necessarily changed along with the belt in this case
Also, if our pump is “covered,” the timing belt will have to be removed, since it is this that drives our “water pump.” Well, if (the worst case scenario) – our belt broke. Here, if the engine is “plug-in”, then this is a huge nuisance, the pistons meet the valves, and at a minimum, we are guaranteed to remove the cylinder head and replace the valves.
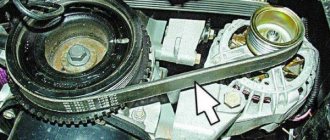
So, what are timing marks and where are they applied? The first is the marks on the camshaft pulleys, both on the intake and exhaust:
They must coincide with the mark on the crankshaft, and there are already several methods for calculating this mark. It’s quite difficult to remove the generator belt pulley (it doesn’t allow you to see the mark) and see if the marks match.
With such a coincidence, the piston marks are at TDC (Top Dead Center). The second method is to calculate the DPKV sprocket using the teeth. And finally, the third option for setting the crankshaft position is the marks on the flywheel, they can be seen if you remove the rubber plug on the gearbox:
These are the options for comparing timing marks that we offer you using the example of 1.5 16V engines installed on the VAZ-2110, VAZ-2112 and VAZ-2111. If you still have questions regarding timing marks on your particular engine, ask them on our forum, in the appropriate section.
I’ll tell you an interesting incident that many masters do not pay attention to. The car is an unremarkable VAZ 2112 with a 16 valve engine 21124. The owner’s complaint is that it has already started to throttle, and has lost power.
Before that, he went to many services where almost everything was changed for him, but things are still there. I approach my work with complete immersion, and if I don’t find the reason right away, I find it in an hour.
But people, apparently because of the high dollar, go to have their cars repaired at local tire shops, which will inflate the tires and do diagnostics and chip their brains.
But let's move on to our sheep, hmm, more precisely one. The problem with the car was eliminated quickly, a quick inspection revealed 2 non-working ignition coils, the fuel filter and the mesh in the tank were also condemned. But after replacing everything, there was a residue that something was wrong. And the decision was to screw it in pressure sensor in the first cylinder and see how everything is there.
Those who know will understand what I mean, but those who don’t know just read what other methods there are for repairing your cars.
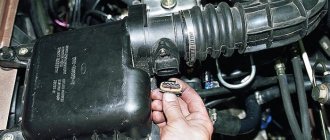
I screwed the sensor in like this and connected it to the oscilloscope
This is a device for holding the hoodAnd what we see, and this is what we see
the area marked with a blue circle shows the spark moment with a red line, and the top of the hump is TDC. And what can you say, but the fact is that the spark is supplied after TDC, but should be before TDC, otherwise how can we ignite the mixture. From this it turns out that the drive pulley has turned (which is the green pulley).
But that’s not all, with a green circle I highlighted the place where the exhaust valve opens, in our case two valves. For all normal engines, opening begins at 140 degrees after TDC, but for us (green small circle) at 125 degrees. The difference is 15 degrees and from experience I will say that this is equal to 1 tooth.
Therefore, the timing belt is incorrect. After disassembly, a discrepancy between the timing marks and a broken groove on the drive disk and crankshaft gear was revealed. It’s a pity there are no photos; it was already dark; the car needed finishing.
I replaced the crankshaft gear and the drive disk and the car started working so I said “I like it,” which means only one thing that everything is fine with the car. By the way, here’s an oscillogram taken after the repair, I didn’t mark the location, but you can see the spark went to TDC, and the opening degrees of the exhaust became 140. I think if you compare it, you’ll see the before and after.
For ordinary car owners, this entry may not arouse interest, but the purpose of all this is to make it clear to the owners that everyone should mind their own business, a tire fitter should do the wheels, and diagnosticians should do the diagnostics.
- autodvig.com
- avtogrm.ru
- www.vazdriver.ru
- www.drive2.ru
Causes of timing belt breakage on a VAZ 2112
- Insufficient or excessive tension of the timing belt VAZ 2112 16 valves;
- Vehicle operating conditions unacceptable by the manufacturer:
A. Using a car in difficult climatic conditions with increased dust or humidity;
b. Lack of tension control;
- Operation of the drive beyond its service life;
- Contact of lubricating liquids on surfaces not intended for lubrication;
- Water pump malfunction;
- Worn tension and guide rollers.
Stories from our readers
“Fucking basin. "
Hi all! My name is Mikhail, now I’ll tell you a story about how I managed to exchange my two-wheeler for a 2010 Camry. It all started with the fact that I began to be wildly irritated by the breakdowns of the two-wheeler, it seemed like nothing serious was broken, but damn it, there were so many little things that really started to irritate me. This is where the idea arose that it was time to change the car to a foreign car. The choice fell on the melting Camry of the tenth years.
Yes, I had matured morally, but financially I just couldn’t handle it. I’ll say right away that I am against loans and taking a car, especially not a new one, on credit is unreasonable. My salary is 24k a month, so collecting 600-700 thousand is almost impossible for me. I started looking for different ways to make money on the Internet. You can’t imagine how many scams there are, what I haven’t tried: sports betting, network marketing, and even the volcano casino, where I successfully lost about 10 thousand ((The only direction in which it seemed to me that I could make money was currency trading on the stock exchange, they call it Forex. But when I started delving into it, I realized that it was very difficult for me. I continued to dig further and came across binary options. The essence is the same as in Forex, but it’s much easier to understand. I started reading forums, studying trading strategies. I tried it on a demo account, then opened a real account. To be honest, I didn’t manage to start earning money right away, until I understood all the mechanics of options, I lost about 3,000 rubles, but as it turned out, it was a precious experience. Now I earn 5-7 thousand rubles a day. I managed to get the car buy after half a year, but in my opinion this is a good result, and it’s not about the car, my life has changed, I naturally quit my job, I have more free time for myself and my family. You’ll laugh, but I work directly on the phone)) If If you want to change your life like me, then here’s what I advise you to do right now: 1. Register on the site 2. Practice on a Demo account (it’s free). 3. As soon as you get something on the Demo account, top up your REAL ACCOUNT and go to REAL MONEY! I also advise you to download the application to your phone, it’s much more convenient to work from your phone. Download here.
As a result, if the timing belt tension is correct, then when the casing is removed, its long part will fluctuate within 1 cm. from the axis.
Source
Replacing the timing belt VAZ 2112 16 valves
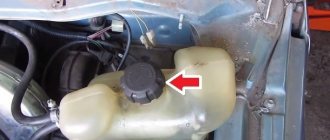
Adjustments should only be made when cold.
You need to place the car on a flat surface, open the hood and disconnect the ground from the battery to avoid electric shock.- Remove the front cover of the VAZ 2112 16 timing valve drive. It consists of two parts: upper and lower. It is necessary to unscrew the five bolts of the top cover and two of the bottom with an inbus key.
- Then you need to remove the flexible transmission of the generator. To do this, loosen the nut of the lower mounting bolt of the generator and the tension bar nut. Move the generator, remove the branches.
- Unscrew and remove the crankshaft pulley, return the bolt to its place.
- Match the marks on the camshafts and crankshafts with the marks on the drive housing and oil pump, respectively.
- Use a screwdriver or pry bar to secure the position of the gears. To do this, it must be installed between the crankcase and the flywheel, resting against the flywheel ring gear.
- Unscrew the bolt on the tension and guide rollers.
- Installing a new gear must begin with the crankshaft, the teeth of the branch on the left side must engage with the coolant (coolant) pump. Then press the flat side against the eccentric. On the right side, the flat part should slide along the guide. And finally put it on the camshafts.
- Tension both branches by turning the eccentric clockwise in accordance with the manufacturer's requirements.
Further assembly of the engine is carried out in the reverse order of disassembly.
Which timing belt to choose?
| Original manufacturer of spare parts for VAZ 2112 timing belt. They are low cost and designed specifically for Lada cars. Their tolerances, clearances, who else but the plant engineers should know what is best for their car? | |
| Products for VAZ 2112 from the Japanese - Lynx . They have a low service life, although they themselves are of high quality. The Japanese produce spare parts in accordance with the requirements of vehicle maintenance intervals. | |
| Bosch is a well-known manufacturer of tools and spare parts. Only they know what German quality is. Their rubber products are made from wear-resistant, non-toxic materials. | |
| ContiTech is also a manufacturer from Germany. Good quality, but little known. When a car enthusiast buys Bosch products, he also overpays for a well-known brand, but here the company earns its popularity through quality and responsibility. | |
| Optibelt - make products for twelve-valve engines. The products are inexpensive and of high quality, and car enthusiasts install them on sixteen-valve engines. However, it is worth considering that the camshafts have 16 more torque. That is, you just need to monitor the drives more often. | |
| Gates 5631XS . The most popular brand in the domestic spare parts market. The materials are simply good, they last as long as needed. For the VAZ 2112 timing belt, 16 valves are the best option. | |
| BRT is a domestic manufacturer. It makes well-proven products from local raw materials. Don’t think that this is low-quality consumer goods; it is a direct competitor of foreign companies. |
Part numbers for replacing the timing belt
Originals
- 21126-1006040 – timing belt (137 teeth);
- 21126-1006238-00 – automatic tension roller;
- 21126-1006135-00 – guide roller.
Gates produces analogues
- 5631XS – drive belt;
- T43147 – roller with automatic tension;
- KO15631XS – repair kit: belt + roller T43147 + guide roller.