- Using a Phillips screwdriver, unscrew and remove the clamp securing the crankcase ventilation hose;
Remove the hose;
The rest of the procedure is performed in reverse order. We perform the same actions for the 2nd valve of this cylinder. Next we move on to cylinder 4. Having changed the caps on it, we rotate the crankshaft 180°. Using the same principle, they are replaced on the valves of cylinders 2 and 3. Replacing oil seals on a 16-valve engine differs only in the need to remove 2 camshafts. When installing the camshaft, be sure to tighten the nuts with a torque wrench. This should be done from the middle to the edge.
Conclusion
. The engine of any car requires attention. Therefore, it is extremely important to correct even small problems in a timely manner. Therefore, replacing valve seals on VAZ 2114 (2115) 8 and 16 valves should be done at the first sign of a problem. You don't need any additional equipment for this. When carrying out repairs, you need to do all actions as carefully as possible.
Replacing valve stem seals
You can replace the valve stem seals without removing the head from the cylinder block.
You will need: a tin rod with a diameter of about 8 mm (for example, solder), tweezers, a screwdriver, a mandrel for pressing the caps, oil seal pullers and valve springs.
1. Disconnect the wire from the “-” terminal of the battery.
3. Remove the timing pulley from the camshaft (see “Replacing the cylinder head gasket”.
4. Unscrew the two nuts 1 securing the ground wires and remove the wire ends from the studs. Then unscrew two nuts 2 and bolt 3 securing the rear cover of the cylinder head. Please note: there is an O-ring under the bolt head. Remove the back cover from the block head.
5. Unscrew evenly the four nuts securing the front 1 and six nuts securing the rear 2 camshaft bearing housings and remove the washers. Then remove both housings.
6. If the key in the camshaft groove does not fit tightly, remove it so as not to lose it.
How repairs are made
To replace the seals yourself, you must have:
- a device for dismantling the oil seal;
- device for removing crackers;
- tweezers;
- two flat screwdrivers;
- hammer;
- spanners;
- socket heads;
- ratchet;
- rags;
- soft metal rod (no more than 8 mm);
- pliers;
- new seals;
- press-fit mandrel for new seals.
Replacement instructions:
- First, the hood is opened and the terminal with a minus sign is disconnected from the battery.
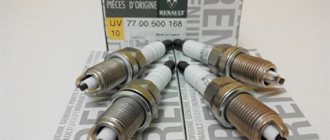
- Then the high-voltage wires are removed and the spark plugs are unscrewed.
- The timing belt is removed, the GB head cover and the camshaft toothed pulley are removed. At the same time, it is necessary to monitor the key so as not to lose it.
- Next, unscrew the back cover fasteners so as not to damage the block gasket and other connections.
- Now you need to remove the camshaft, leaving only the bushing.
- Then the crankshaft must be turned until the piston stops at the TDC position, where the seal must be replaced. Note: to prevent the valve from falling into the cylinder, it is necessary to unscrew the spark plug and insert a rod made of material that will not damage the thread (for example, tin) into the connector.
- By squeezing the valve spring, the crackers can be easily removed with tweezers. The upper and lower plates are also disconnected. Then the cap is removed from the guide sleeve, a collet is installed on it, and the oil scraper cap is pressed out with a quick and precise blow of a hammer. Next, everything must be repeated with the second valve.
- New oil seals (the inside of which must be lubricated with engine oil in advance) are inserted into the frame and then pressed into place. And then you can mount springs and plates. The crackers must be inserted into the lower groove of the valve using a special device. The crankshaft is then rotated until there are two cylinders at TDC. The rod is removed from the spark plug hole and inserted into the next socket. All work is repeated exclusively in the order in which the parts were removed.
- The camshaft supports, as well as washers, adjusting tappets, journals and cams must be lubricated with oil. Note: before installing the support seal, it is recommended to check its technical condition.
- If necessary, the gap between the valves is adjusted.
- Finally, the terminals are connected to the battery and the engine is started. If the work and installation are done correctly, the motor will run smoothly and without unnecessary noise.
The bottom line can be summed up as follows: take care of your car, check it in a timely manner in order to track all faults in time and eliminate them, and it will serve you for a long time.
A visit to a service station: how much does it cost to replace valve stem seals from a private owner?
The story when a cheap part brings a lot of inconvenience begins with the valve seals. There is one problem associated with the same rubber band placed on the valve stem - over time, the part leaks oil into the combustion chamber. Trouble unites millions of car owners: from VAZ classics to modern BMWs, since not a single internal combustion engine will work for a long time without these seals.
Repair it yourself or trust the professionals - that is the question. We will outline the price tags and the level of complexity of independent intervention, and you choose what you can afford and what you can do.
Video author Sergey Tarasov
As mentioned above, the oil pressure sensor needs to be replaced, which will be done first. The engine temperature condition in this case is not critical.
A few more words about the condition of the pressure sensor. When you remove the protective cover on the sensor wire, there is oil inside the cover, which once again confirms the version that it has failed and needs to be replaced.
To replace, you must have a sensor with an X22 key. Unscrew the old one and install the new sensor. Having first cleaned the protective cover from traces of oil, we put the terminal in place.
Service price: how much does it cost to replace worn valve stem seals at a service station
Agree, a laconic answer is not appropriate here. What good is it if you look at special services for a number with the prefix “from” next to the name of the work. Not a word about the brand of the engine, the list of related actions and about the main thing - whose spare parts are.
It is almost impossible to collect data on prices for the operation of replacing valve stem seals on all cars within the framework of one article. Therefore, we will introduce a classic division by brand and classify the type of work - with or without removal of the cylinder head (cylinder head).
Table of cost of service station services for replacing MSK
With the “head” removed
The complexity of the design of Toyota and Mazda engines is not inferior to BMW, so the price tag is approximately the same - within 15,000 without dismantling the cylinder head. Servicing Kia Rio and Hyundai Solaris will cost a couple of thousand more than Lada Vesta.
The more cylinders, the greater the total. Making 1 valve costs an average of 500 rubles. The work is complicated by the intelligent phase control system. For example, the N46B20, a four-cylinder engine, is more complex than the M54B30 due to the presence of the Valvetronic valve lift control system.
conclusions
- It is not recommended to use screwdrivers when removing oil seals to avoid damaging the bushing.
- Remove the compression spring when installing the seal onto the valve stem.
- Be sure to lubricate the inner surface of the bushing.
- When turning the crankshaft and moving to the next cylinder, do not forget to remove the tin rod from the spark plug socket.
- Sealant should be applied to the cylinder head in the area of the outer camshaft supports.
Caps based on fluorine rubber are considered attractive and in demand seals from the point of view of long-term operation. This is evidenced by the products of “Goetze” and “Elring” with a long service life.
What is included in the list of works for changing MSK
The VAZ classic has the shortest path to the caps, which is why repairs are cheap:
- Removing the valve cover.
- Removing the timing chain.
- Removing the camshaft.
- Valves desiccation.
- Changing rubber deflectors.
- Reassembly.
Already on injection-powered Priors, VAZ 2110 and Vestas you will have to work hard to remove the intake manifold. On foreign cars, it is necessary to contrive to dismantle the camshaft phase shifters and the valve lift control system. Getting all systems back on track is not an easy job.
Is it worth taking on?
Once you find out how much it costs to replace valve stem seals on an engine, you will probably begin to be interested in the complexity of the technology and the list of required tools. And indeed, oil seals cost nothing: about 500-1,000 rubles, why not replace them yourself?
We hasten to warn against such a temptation to save money. Theory is theory, and practice is practice:
- When performing an operation for the first time, you will probably encounter incomprehensible moments, and your ingenuity will work at the wrong time. For example, what do you think about a cracker flying into the engine compartment or a valve falling into the cylinder?
- It is unlikely that you will be able to assemble a BMW Valvetronic system or its analogues on other cars and adjust the unit the first time.
The downside is that once you have gained experience, you will definitely complete the task better than many servicemen.
Mistakes on their part are not uncommon. For example, many people damage the working edge of the valve stem seal, which is why it does not last long. If you decide to act alone, we recommend setting aside not 2-3 hours, as they write on many landing pages of private services, but a whole day, or better yet, two. The first time around, a 16-valve head takes 10 to 14 hours.
Which valve stem seals should I buy?
What is definitely worth taking on is the issue of selecting MSCs. Why? There are many fakes and quality problems with many official products.
Recently, Corteco products have been performing well. Many note that this is the only alternative to the original. By the way, not a single car manufacturer makes valve seals in its own production - they buy everything. For example, Toyota has an agreement with NOK, and Mercedes-Benz has an agreement with Viktor Reinz.
What you definitely shouldn’t take are the following products:
- Popularly known as Viti Reinza.
- FEBI.
- SWAG.
Viktor Reinz is not recommended to buy because of the large number of fakes and unreasonably high prices, others - simply because of mediocre quality. Erling caps are similar to Corteco, but have a more oaky feel. According to reviews, Erling is held a little worse than Cortek products, but they are highly popular due to their abundance in regional retail chains.
Attention! When choosing and installing, take into account the manufacturer's markings. For example, on Toyota 1ZZ-FE/3ZZ-FE engines, the original caps for the intake valves have a gray end painted, and for the exhaust valves - black.
Educational program
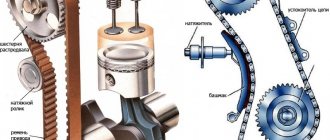
Valve seal design
MSK is a reinforced rubber bushing with a spring installed near the edge. The function of the compression ring is to press the seal against the valve stem. Excessive demands are placed not only on molds, but also on rubber:
- Resistant to high and low temperatures (-40°C…+115°C).
- Oil resistance.
Based on this, acrylate rubber (ACM) or fluorine rubber (FPM) can be used as a rubber material. There is no ideal option. ACM has a weak indicator of residual deformation during compression, while FPM has poor resistance to hot steam and low temperatures.
When to change oil caps
Based on the price that service stations charge for replacing old oil seals with new ones, I would like to change these parts less often. There is a list of main symptoms when intervention is definitely required:
- Increased oil consumption (in the case of BMW, this is more than 400 ml per 1,000 km).
- Blue smoke during cold start-up, and in advanced cases - when revving above 2,500 rpm.
- The exhaust smells like burnt oil.
- Oil rim on spark plugs.
The nature of the oil burn with current oil seals is special. Usually the engine takes lubricant only in the morning, during a cold start. In this case, immediately after starting there is a slightly blue smoke from the exhaust, then everything returns to normal.
What will happen if you do nothing
Oil in the combustion chamber is harmful. The service life of the catalyst is reduced and coke is formed in the working space of the cylinder. Lubricant that gets from under the caps is doubly harmful: the valve stem and plate coke, which is why it does not close tightly and burns out over time. And here decarbonizing the engine with dimexide will not help.
Expert advice
When replacing valve stem seals on a VAZ-2114 (8 valves), experts recommend paying attention to important nuances:
- Before installation, new seals should be fitted with guides on the bushings that are included with the valve stem seals;
- after installing new oil seals, be sure to remove the guide bushings;
- as soon as the oil seal is installed in its place, you need to put on the spring;
- the replacement procedure should begin with the second valve of the cylinder, then move on to the fourth, etc.;
- after replacing the oil seals, the crankshaft must be rotated 180 degrees;
- after installing the camshaft, the nuts are made from the middle to the edge;
- All actions when replacing oil seals must be carried out clearly and accurately.
If you yourself are not sure that you will be able to correctly replace the valve stem seals yourself, then you can always turn to the nearest car service center for help.
In order for the VAZ-2114 oil seals (8 valves) to have good performance, experts recommend using high-quality motor oil. Poor quality engine oil can cause carbon deposits to accumulate in the cylinders, which will lead to a drop in compression.
Features of valve seals VAZ-2114 (8 valves)
Valve seals, also known as valve stem seals, are located directly on the cylinder head valve; in the VAZ-2114 engine there are 8 such valves. This part serves as a seal in the place where the valves of the gas distribution mechanism adhere to the guide bushings. Thanks to valve stem seals, excess oil does not enter the combustion chamber of a car engine. With their help, oil is consumed more economically.
Rapid wear of valve stem seals is associated with the heavy load they bear:
- at idle the crankshaft makes 700-800 rpm;
- when driving, the crankshaft makes up to 4500 rpm;
- valves range from 150 strokes per minute to 1200 strokes per minute;
- affected by an aggressive chemical environment - excess oil and exhaust gases.
Due to the above factors, the rubber from which the valve stem seals are made gradually becomes hard.
A change in the structure of the material leads to the fact that the working edges of the valve stem seal are abraded. You can determine the wear of the oil seal by looking at the exhaust smoke from the corresponding pipe - it turns blue when braking or starting the engine. Another symptom that the oil seal requires replacement is increased oil consumption rates - up to one liter per thousand kilometers.
The procedure for replacing oil seals should be carried out regularly at the first signs of wear. If this is not done in a timely manner, rough idling will occur. At the same time, the power of the vehicle is reduced, and the car engine may fail for a long time, which will lead to major repairs of the car.
Symptoms
Over time, the caps are destroyed, subject to aging, delamination of rubber with loss of technical properties. This is noticeable by the appearance of bluish smoke from the muffler of a car operating under heavy loads during engine braking. Indirect reasons for oil seal wear are considered to be increased engine oil consumption .
Caps lose their technical properties during operation
Oiling of the spark plug electrodes is also a symptom of cap wear. Aggressive environments and high temperatures negatively affect the durability of rubber and its durability. As a result, the material of the product hardens, and the working edge cracks, wears out, and wears out.
How to correctly replace valve seals on a VAZ-2114 (8 valves)
To replace the valve stem seals of a VAZ-2114, you need to use a set of the following tools:
- Pliers.
- Tweezers.
- Hammer.
- Frame.
- Solder tin.
- Valve spring compressor.
Experts recommend using the following instructions to replace valve stem seals:
- The terminals from the battery are removed (both “+” and “-”).
- The candles are taken out.
- The timing belt is removed.
- Removing the toothed pulley from the camshaft:
- the wire of the first fastening is removed;
- Unscrew the nuts and the third mounting bolt.
- All remaining nuts (on the front and rear covers) are unscrewed.
- The washers are removed and the covers are removed.
- The automotive camshaft is removed.
- The crankshaft is rotated so that the cylinder piston stops at its dead center at the top.
- The candle is turned out, and tin for soldering is inserted into the candle well.
- The valves are dried with a special device.
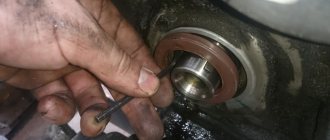
- The seals are removed from the bushing (you must make sure that there is no damage to the valve guides).
- New seals are pressed in.
Next, all other oil seals are replaced, and assembly is carried out in the reverse order of removing the old oil seals:
- tin for solder is removed from the candle well;
- the entire working area is lubricated with engine oil;
- the camshaft block head support is mounted;
- the camshaft and bearing housings are installed;
- all nuts are tightened.
If you follow these instructions, you can replace the valve stem seals yourself at home.
Preparatory operations
We unscrew the candles. We remove the timing belt and camshaft, then remove the cups, they are also valve pushers along with adjusting washers.
Be sure to arrange them in order or mark them with numbers so as not to confuse them during assembly.
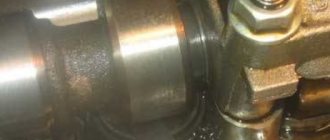
The picture should look like this. It’s unclear how the previous “masters” did the repairs, everything is dirty, so if they removed it, what should be washed?
cylinder head.