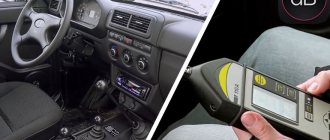
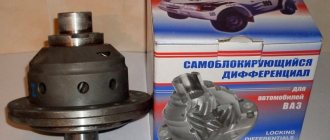
The transfer case is one of the main sources of vibration and noise in the VAZ 21214 and the modernized Urban.
The peculiarity is due not only to the specific design solutions of the unit, but also to the method of attaching the part to the car. So, instead of mounting it on the power components of the body, as is customary in the global automotive industry, engineers implemented a method of communication through silent blocks directly to the floor of the car.
The result is a rapidly collapsing bottom at the points of engagement and “splitting” at speeds above 80 km/h.
One way to relieve stress is to install a transfer case subframe on the Niva. At the same time, the owner will notice a decrease in vibration load, an increase in the natural service life, and also the protection of the transmission.
The disadvantages are the relative complexity of implementing the idea and the ground clearance reduced by 2-3 cm (corrected by a suspension lift).
Manufacturing according to the scheme
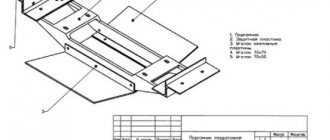
Although the market has no shortage of offers, it is possible to save money by making a subframe for Niva 2121 with your own hands according to the drawings.
Drawing 2.
Drawing 3.
Scheme 4.
Fig 5
Fig 6.
In the creation process, you will need a 4 mm sheet of cold-rolled steel 0.525x0.350 m, angles 35x35, 70x50, 70x70 with a length of 0.7 m, 0.4 and 0.4 m, respectively, as well as a 0.73 meter channel 16. Used as fasteners bolts M8, M10, M12x1.25 and M12x1.5.
Shaking problem
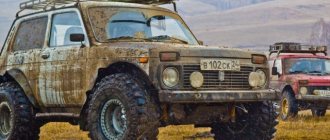
Many drivers who have a VAZ 2121 Niva at their disposal have encountered the fact that the cabin vibrates strongly while driving, especially off-road or at high speed. Vibrations that spread almost throughout the entire cabin cause a lot of inconvenience and constant discomfort. Technically, this was not corrected, so the people’s minds had to independently find a way out of the current situation.
Also interesting: How to properly use the transfer case on Niva 2121
The ready-made protective metal frame Niva Comfort is suitable for models 2121, 21213, 21214. The main purpose of the protective part is to eliminate all vibration from the transfer case. But the benefits of installing a subframe on a field turn out to be much greater:
- protection appears for the transfer case when driving off-road;
- the noise level in the cabin is reduced;
- the service life of parts that were previously damaged by excessive vibration increases;
- if you add a few parts, you get excellent protection for the Niva’s crankcase and engine.
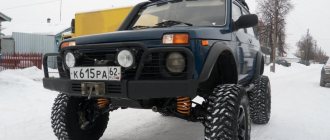
After installing the transfer case subframe, the ground clearance will slightly decrease, but the car will be much more comfortable to drive.
Standard tool
- angle grinder;
- drill;
- caliper and ruler;
- core;
- hammer.
An alternative tuning option is permissible using not corners, but a square profile with a section of 60x30 or 40x25.
There are ideas of placing the RC and the checkpoint on the same “frame”.
Variety of design solutions
There are several design options for this part of the car: from fully welded subframes to devices with many bolted connections. There are designs for one-piece monolithic mounts for the transfer case and gearbox; you can purchase ready-made devices such as Niva Comfort. One of the simplest and most reliable stretcher frames is considered to be a device made of a durable channel, an angle and a steel protective plate. Let us consider the technology of self-manufacturing and installation of this device in more detail.
Types of subframes for the transfer case of the Niva car
Design modification
To strengthen the subframe and reduce the profile height (up to 2 times), it is possible to additionally equip the side shelves of the channel with 4 corners at the level of the hole under the transfer case, followed by cutting off the sidewalls to the corner flange.
Finer tuning is provided by connecting the spar and subframe through couplings/bushings.
Preparation.
1. After the initial preparation of the elements, finishing processing and connection into a single structure is carried out: 1. In the channel, in accordance with the diagram, rectangular windows are cut out, ending no closer than 0.8 cm to the edge of the edge. Bevels (chamfers) are eliminated;
Also interesting: Buy auto parts 2121 transfer case cushion axle for foreign cars in the AUTOPITER online store
2. In corners measuring 70x50 or 70x70, holes are made for bolted connections, after which they are tacked by welding.
3. Corners of 35x35 cm are fixed to the lower edge of the channel, to which sheets are welded to protect against impacts and dirt. In the latter, for the purpose of access to the drain plug and regular cleaning, service holes are cut out.3. Corners of 35x35 cm are fixed to the lower edge of the channel, to which sheets are welded to protect against impacts and dirt. In the latter, service holes are cut out in order to gain access to the drain plug and regular cleaning.
Installation
For ease of installation, the car is fixed on a lift or above a pit. Pre-preservation of surfaces (attachment points, subframe) is carried out using protective agents, for example, Movil.
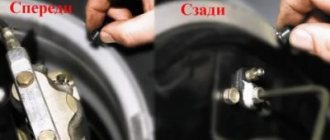
The finished product is tried on site individually for each vehicle. 4 holes are drilled along the perimeter of the structure, symmetrical relative to the center line. Having previously loosened the transfer case fasteners.
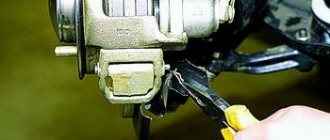
Having placed the plates on the interior side, as in the photo, the subframe is attached to the side members with M12x1.25 bolts.
The RK brackets are sequentially removed, turned over and freely fixed to the subframe. The position of the shaft flanges is adjusted until minimal gaps are formed by moving the entire structure. Alignment is performed at 3000 rpm with the machine standing.
The bolts are thoroughly tightened.
Additional holes
An additional window is cut under the drain plug to drain the oil. You can drill holes in any place convenient for you, without bothering with the accuracy of the markings. Car enthusiasts also make technological windows to drain the water formed between the sidewalls of the channel and the dirt that gets there. The protection is enhanced by corners that are attached to the box support and the frontal part of the entire device. This design will protect the transfer case from all kinds of impacts on stumps, ditches and other obstacles that can lead to deformation of the subframe.
How to make a trunk with your own hands
Many motorists think about how to make a trunk. After all, it is better to transport large-sized and inconvenient things for transportation in a special compartment, and the purchase of such structures is quite expensive.
It’s not difficult to do this kind of work; you just need to follow a number of sequential steps:
- Preparation. Depending on whether the trunk is installed on a Chevrolet Niva or on a classic model, the dimensions of the trunk also differ. Therefore, first of all, measure the roof and determine the locations of future supports. Then select the main parameters, decide on the future design: think over the mounting locations, calculate the frames and components. Draw up a drawing of the platform with data related to the technical specifications for the vehicle;
- production of a supporting frame. Cut the racks and weld them into a rectangle, and attach the rods to the middle of the resulting frame. Add a few more stiffeners made of professional metal to the inner plane at equal distances. You will receive a lattice frame with parallel crossbars;
- strengthening the structure. Weld small sections of profile pipe inside the frame so that square cells are formed;
- improving the aerodynamic qualities of the structure. Weld a trapezoid-shaped structure of selected dimensions to the front part: its base should be equal to the width of the platform, and the smaller part should be chosen arbitrarily. To make a grinder, divide the profile pipe into sectors, and then heat and bend to obtain the desired shape. Treat the corners with gas welding and connect them to the platform. At the end, install 2 – 3 jumpers;
- production of boards. Make the side trapezoidal crossbars according to the principle described above. Makes sure that the angle of inclination of both trapezoids is the same. Weld sections of studs on the front and back sides, and a sleeve at the obtuse corner of the trapezoid. Pass the ends of the studs into the bushings and weld again;
- attachment to the main frame. Drill holes at the points intended for supports and reinforce them with bushings. Insert them into the drilled grooves and weld them to the metal base. Drill several grooves in the profile with a diameter of no more than 10 mm, insert a threaded rod into each and weld them. Cut the liner to the required length and secure with threads;
- giving a presentable appearance to the trunk. Clean the platform from scale, remove burrs, degrease and prime. Wait a day and cover the surface with a layer of paint or enamel.
This device can be equipped with additional accessories - for example, headlights or load securing straps. They can be installed according to your own developed projects
However, it is important to take into account the technical capabilities of the car, otherwise its operation may be disrupted.
Frame for Niva in detail. 1. — Lada 4×4 3D, 3.0 l., 1993 on DRIVE2
Hi all!
With God's help and such and such a mother, today I started making a frame for my zombie field. I wrote about the reasons for such serious “tuning” earlier in my logbook.
Having studied the drawings, I did not put off the matter. In the morning I went to the metal depot and bought 12 linear meters of 80x60 mm profile pipe. By lunchtime the metal was at my house.
Full size
Metal has arrived
Next, I built something like a welding table from scrap materials. To do this, I used two wooden stools that I made a long time ago and are used in all occasions in life :))) On them I placed an I-beam 200mm wide. I checked the plane using the rule. I also put a flat chipboard slab on top, 4 cm thick. I checked the plane again, everything is level. I’m not interested in horizontality yet, I’m interested in a flat plane on which I can weld the parts together.
Full size
Improvised welding table
Full size
Tormenting the drawings
I cut several frame parts and assembled them with tacks. I measure everything 20 times, it converges to 1 mm. I cut the profile with a small turbine, I don’t have another. So that the disc does not move away and the cut is smooth, I use a clamp for pieces of wood and a piece of channel with a flat side. A piece of channel serves as a kind of ruler-stop; I move the disk along it.
Full size
This is how I cut my profile
I tested my homemade sandblasting machine, I’ll post a detailed report on it later. I'm happy with the preliminary result, I saw some mistakes, I'll fix them tomorrow.
Full size
Sandblasting test
Full size
More sandblasting
To be continued, good mood everyone!
www.drive2.ru