2283-15-14-07
By pressing the lamp and turning it counterclockwise, remove the combined brake signal and side light lamp from the holder.
By pressing the lamp and turning it counterclockwise, remove the combined brake signal and side light lamp from the holder.
By pressing the lamp and turning it counterclockwise, remove the combined brake signal and side light lamp from the holder.
We install the new P21/5W lamp in the reverse order. The protrusions on the base of the combined brake signal and side light lamp are located at different levels and during installation must fit into the corresponding grooves in the holder socket.
Instructions on how to dismantle plugs on Largus
To dismantle the plugs and subsequently install additional lighting devices instead of the plugs, we proceed according to the following algorithm.
- We remove the standard stern lights. For this purpose, unscrew a couple of screws and disconnect the connectors.
- Now we remove the upholstery from the internal panels of the body pillars of the Lada Largus trunk.
- We remove three fastening components holding each pad on the outside, and the same fastening clamp from the inside.
- We remove the pads. In the 7-seater version, you will additionally need to remove the window fastening elements, pistons and bolts securing the seat belt holders.
- Next, we remove the studs from the plugs, which after installing the optics will need to be screwed into identical mounting sockets.
- We install the lighting fixtures in place of the plugs and secure them with nuts.
- After connecting to the network, we check the functionality of the devices.
- After making sure that everything works, you can begin installing the standard optics.
To connect additional Largus optics according to the attached diagram you will need:
- Disconnect the terminals from the battery.
- Connect the wiring of new devices to the section of the cable network that provides power to the main optics.
- The wires in these lighting devices are marked in different colors, where: the yellow cable is responsible for the side lighting, the black cable is ground, and the red cable provides the functionality of the braking mode signal.
- The cable network of pre-installed optics is marked as yellow, black and blue cables. They respectively provide connection: brake signal, ground and dimensions.
- We insulate the connection areas of the cable ends.
- Before checking the operation of the installed devices, we connect the battery.
- Turn on the side lights and press the brake pedal.
This is how you can make tuning on your car and instead of plugs, install additional rear lights, which are decorative in nature.
Source: zamenarenault.ru
2283-15-14-08
Similarly, we replace the turn signal lamp (PY21W) and the fog light lamp (P21W) (reverse lamp in the right lamp).
Similarly, we replace the turn signal lamp (PY21W) and the fog light lamp (P21W) (reverse lamp in the right lamp).
Similarly, we replace the turn signal lamp (PY21W) and the fog light lamp (P21W) (reverse lamp in the right lamp).
Other section materials
| Technical description |
| Vehicle specifications |
| Vehicle registration details |
| Safety precautions during maintenance and repair |
| Location of the main components and assemblies of the car |
| Vehicle technical check |
| Maintenance schedule |
| Checking the condition of wheels and tires |
| Wheel replacement |
| Replacing the windshield and trunk door glass wiper blades |
| Checking the fluid level in the windshield washer reservoir |
| Checking the oil level in the 1.6 (8V) engine |
| Changing the oil and oil filter of the 1.6 (8V) engine |
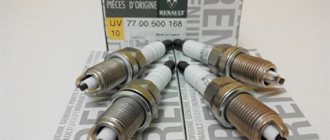
| Replacing spark plugs for 1.6 (8V) engine |
| Replacing the replacement element of the 1.6(8V) engine air filter |
| Replacing the accessory drive belt |
| Checking the condition and replacing the timing belt of the 1.6 (8V) engine |
| Checking the level and adding engine coolant 1.6(8V) |
| Replacing engine coolant 1.6 (8V) |
| Checking the oil level in the 1.6 (16V) engine |
| Changing the engine oil and oil filter |
| Replacing spark plugs for a 1.6 (16V) engine |
| Replacing the replacement element of the 1.6(16V) engine air filter |
| Replacing the 1.6(16V) engine accessory drive belt |
| Checking the condition and replacing the timing belt of the 1.6 (16V) engine |
| Checking the level and adding engine coolant 1.6(16V) |
| Checking the level and adding oil to the gearbox |
| Checking the fluid level in the master cylinder reservoir |
| Replacing fluid in brake and clutch hydraulic drives |
| Bleeding the hydraulic brake system |
| Checking the fluid level in the power steering reservoir |
| Checking the condition of the brake system |
| Checking the chassis and transmission |
| Checking the steering condition |
| Engine 1.6 (8V) |
| Replacing the cylinder head cover gasket for a 1.6 (8V) engine |
| Checking and adjusting thermal clearances in the valve drive of the 1.6 (8V) engine |
| Replacing the camshaft oil seal of the 1.6 (8V) engine |
| Replacing the exhaust manifold gasket for 1.6 (8V) engine |
| Replacing the exhaust manifold gasket for 1.6 (8V) engine |
| Replacing the rear crankshaft oil seal of a 1.6 (8V) engine |
| Replacing the 1.6 (8V) engine oil pressure warning sensor |
| Replacing the oil pan gasket for 1.6 (8V) engine |
| Removing the 1.6 (8V) engine oil pump |
| Replacement of engine power unit mounts 1.6 (8V) |
| Removal and installation of 1.6 (8V) engine engine |
| Engine 1.6 (16V) |
| Replacing the 1.6 (16V) engine oil pressure warning sensor |
| Removing the fuel rail protection for the 1.6 (16V) engine |
| Removing the oil separator for the engine crankcase ventilation system 1.6 (16V) |
2283-15-14-09
The turn signal lamp has two protrusions, located asymmetrically relative to the axis of the lamp, which must fit into the corresponding grooves in the holder socket.
The turn signal lamp has two protrusions, located asymmetrically relative to the axis of the lamp, which must fit into the corresponding grooves in the holder socket.
The turn signal lamp has two protrusions, located asymmetrically relative to the axis of the lamp, which must fit into the corresponding grooves in the holder socket.
Payment via PayPal
After selecting payment via PayPal, the PayPal payment system will launch, where you need to select the payment method: bank card or PayPal account.
If you already have a PayPal account, then you need to log into it and make a payment.
If you do not have a PayPal account and you want to pay using a bank card via PayPal, you need to click on the “Create an Account” button - shown with an arrow in the picture.
PayPal will then prompt you to select your country and provide your credit card information.
After specifying the information required to make the payment, you must click on the “Pay Now” button.
This is interesting: Removing and installing the Kalina rear bumper
2283-15-14-10
Each lamp holder socket is marked with the type of lamp.
Each lamp holder socket is marked with the type of lamp.
Each lamp holder socket is marked with the type of lamp.
Install the rear light in the reverse order.
[How to save on maintenance of Lada Largus] [Maintenance of Lada Largus at 15,000/45,000/75,000/105,000 km] [Maintenance of Lada Largus at 30 thousand km] [Maintenance of Lada Largus at 60 thousand km of run] [Maintenance of Lada Largus for 90 thousand km of run] [Maintenance of Lada Largus for 120 thousand km of run] [Independent maintenance - general recommendations] [Safety rules for self-carrying out maintenance] [Tools required for carrying out maintenance Lada Largus maintenance] [Lamps used in the Lada Largus car]
Changing the lamps in the rear light of Lada Largus
Tail light for Largus
The kit included: 1. Two lights 2. Two pieces of wiring with chips for additional lights 3. Plastic nut - 2 pcs.
Here are the instructions from the manufacturer of these lights, Tune Auto LLC. Photo 1 instructions
The instructions provide a general installation diagram for these lights. The manufacturer's plant diagram requires improvements. Moreover, these improvements are cheap! And without them, installing lights can bring an unpleasant surprise in the form of water in the cabin! I already encountered something similar on 2112. .
On a seven-seater Largus, you should pay attention to the linings, they are numbered 10 in the diagram. Plastic corners break easily. Without seeing the diagram, I broke one antenna on one. Fortunately, from the side where there are two of them. On the second window, all the mustaches remained intact. I unscrewed the Torx screwdriver in several steps.
Comparison of the standard rear fender trim and the additional Largus rear light.
Standard linings have additional stops to the car body. There are additional holes for them on the body. And a hairpin in the lantern. In general, I sealed everything with pieces of vibration insulation.
The wires coming from the top light were wound on the side, one at a time. Well, vibration rules here too)
Wiring Largus copper wires and aluminum, which is used for twisting on lamps, is of course not comme il faut (But simple and fast) There is a small current flowing there, a good twist of the wires will hold. I cleaned the wires with a lighter. Twisting wires.
This completes the first installation of the lights) Good luck on the roads! Subscribe!
A long-awaited new product for members of the Lada Largus Club forum - additional taillights for the Lada Largus . They are installed without modifications in the body instead of black plastic plugs.
You simply need to remove the black plugs, install the new lights and connect them to the car's existing wiring.
Material of rear lights: body is made of impact-resistant imported ABS plastic, glass is German PMMA, high-quality diodes from “CREE” Product warranty: 6 months Operating mode: dimensions and brake light. You can independently change the operating mode to another scheme (performed independently). Contents: 2 LED lights (left/right light of Lada Largus), wiring harnesses, installation instructions
Excellent match to the color of the factory lights. Thus, the appearance of the car looks complete. A big plus for road safety is that now the car’s dimensions and brake lights are clearly visible.
Please note that the appearance and placement of LEDs may be subject to change by the manufacturer without further notice.
Video on installing additional LED tail lights on Lada Largus
PTF from reflectors.
The next day I removed the rear bumper reflectors. Carefully cut the diffuser from the base with a construction knife. We glue sealed LED strips (I used SMD 5050), two in each reflector, 9 pcs. in each segment.
It turned out to be two rows of 18 LEDs, the third row did not fit. Having drilled holes in the base of the reflectors, I ran the wires through there and soldered the tape to the finished two-pin connector so that it could be removed if anything happened. I sealed everything, and for tightness and reliability I soldered the edges with a soldering iron, it’s still not visible.
Left reflector.
I ran the wires from the right reflector to the left along the rear bumper and further up the bumper to the left lamp. The ground wire for the reflectors (I had a green one, there was no black one) was connected to the headlight ground (black wire), and the power wire (mine was purple) was connected to the pink PTF power wire left over from last time. We don’t look at the numbering of contacts in the diagram, it doesn’t quite match.
Left lamp diagram.
If you do not secure the wire to the bumper, it will hang, and may even melt from the exhaust fumes. I examined everything and found that the bumper is attached to the body with TORX screws, and they are screwed not into the body, but into a plate nut under the screw...
1 – bumper mounting points
You need to place a plate (can be cut from an aluminum can) with a hole for a screw between this nut and the bumper, and bend the plate itself up and inward, after laying the wires there. I only used two points for fastening...
We put everything back together again and enjoy the result. Now the reversing lights illuminate everything well, and the PTFs burn brightly and look nice...
About related faults
A lighting device for any purpose that refuses to perform its function can signal to the owner of the Lada Largus that the fuse is faulty. If it is discovered that the jumper in the fuse link has burned out, then such an element requires unconditional replacement, which also means replacing the marker light bulb. This is quite easy to do. The mounting block is located on the left edge of the interior panel in close proximity to the unit for switching the modes of lighting devices. Here are the inserts numbered F1 - F39. Fuses numbered 9 and 10 are responsible for ensuring the operation of the low and high beam, respectively for the left and right headlights of the Lada Largus car.
Insufficient contact at the terminals in the fuse block can also cause problems with the normal functioning of the head optic components.
There may be cases of premature burnout of the contact inside the lamp itself or banal oxidation of contacts with the ground. The last option can be easily eliminated. To do this, it is necessary to thoroughly clean the contacting surfaces of the cable lugs. A wire brush will do.
If these methods do not give the desired result and the functionality of the Lada Largus lighting devices is not restored, then you will need to contact professionals for a more thorough diagnosis of the causes of the malfunctions and their subsequent elimination.
Car headlights are designed to provide a full view of the road at night. The proper condition of all lighting sources on the car is a necessary condition for safety while driving. Traffic regulations set very strict requirements for the serviceability of headlights. A driver who does not comply with them is subject to a fine.
Headlights on Lada Largus may have the following types of problems:
- burnt out lamps;
- broken lamps;
- cracks on the surface of the optics;
- dimming of lights;
- incorrect formation of the light beam, etc.
The reasons for these problems may vary. Clouding of the optics is caused by the matting effect of dust particles in the oncoming air flow; cracks and broken lamps are usually the result of a collision with an obstacle while driving. Scratches on the surface of the optics can be the result of driving on roads with bushes and trees with spreading branches growing on the sides.
Driving with headlights that have any of the above factors is unacceptable. To carry out repairs, you can contact a service station, where qualified technicians will provide you with the required assistance. But car service costs money - not all vehicle owners are ready to incur financial expenses.
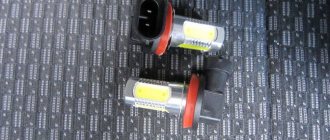
Burnt out bulb H4
If you want to avoid spending money, try doing it yourself. On Lada Largus cars, replacing lamps and lights does not cause any particular difficulties. And use the information you glean from this article as a guide.
Replacing a light bulb
Choice
First of all, it should be said that the low beam lamp for the Lada Largus uses a halogen H4 standard, i.e. contains two threads and is responsible not only for near, but also for distant lighting.
Currently on the market you can find such lamps from a variety of manufacturers, among which are the following:
In addition, domestic Mayak light bulbs have recently proven themselves to be quite good. Their advantages include not only low price, but good quality.
Advice! It is advisable to purchase light bulbs in specialized stores, since recently a lot of counterfeit products from China have appeared that quickly fail or produce poor-quality light.
Of course, when choosing lamps you need to pay attention not only to the brand, but also to the following characteristics of the lighting element:
Characteristics Optimal parameters Brightness (light beam power) Up to 1550 lm Service life Up to 1500 hours Power 45-60 W
Standard halogens provide an unnatural yellowish glow. However, recently light bulbs have appeared with a bluish glow. People call them pseudo-xenon.
However, it should be noted that such light illuminates the road well only in dry weather. In fog or rain, ordinary lamps are preferable.
Moreover, in bad weather, even the expensive “xenon” and “LEDs” are inferior to the latter, the power of the light beam is one and a half to two times more powerful than that of halogen bulbs. This is due to the fact that the light of these elements has insufficient penetrating power.
Note! To install xenon and halogen lamps, you should contact a service center for help, since this work requires the installation of additional equipment and changes to the software. Accordingly, the installation of such lighting is quite expensive.
Thus, each driver can choose the most suitable light bulb, taking into account his own financial capabilities and the conditions in which the car will be operated.
Replacement procedure
Replacing the low beam lamp on a Lada Largus is carried out in the following order:
- Work should begin by disconnecting the terminal from the battery.
- Then you need to remove the plug from the back of the headlight. To do this you need to turn it slightly.
- After this, you should disconnect the block from the contacts by pulling it by the body.
- Next, you need to remove the spring retainer from the grooves with your finger. After this, the bulb is easy to remove from the headlight, since nothing else holds it.
Advice! It is advisable to change the bulbs in two headlights at once to ensure that they glow equally, and also to avoid the second bulb burning out, which can happen at the most inopportune moment.
This completes the replacement of the low beam lamp in Largus. As we can see, this operation is carried out extremely simply.
Methods for connecting to the main electrical wiring of Lada Largus
Regarding the issue of electrical commutation, the more relevant discussion will be not how to connect the wires, but with what. Almost everyone has enough skills to connect a couple of conductors. Now you need to be able to connect them efficiently or reliably. We will also discuss with you the best way to insert into the existing electrical wiring and how to do it.
The easiest way, of course, is to make the connection using regular twisting. But this kind of method “is not comme il faut.” Contact will be lost sooner or later. In general, it cannot be called reliable. But this is really the simplest and enough to first test the switching made.
If you have soldering skills, tinning and soldering conductors will be a simple and reliable way. This kind of connection will never oxidize over time, and its strength will be comparable to the strength of the conductor itself. That's why soldering is good.
But it’s not soldering alone that can help you out in the matter of connecting rear lights to the Lada Largus. A cheap and practical way would be to use the most common screw terminal blocks. They cost pennies and are sold in almost any electrical goods store. To avoid cutting the main wiring, bend it at the connection point and thus clamp it with a screw contact.
Well, the most optimal would be to use special terminal blocks, known as clamp couplers. They are specifically designed to connect to live electrical wiring without twisting, soldering or cutting. Perhaps this method can be considered a priority. We will finally move on to the connection process itself.
Dimensions
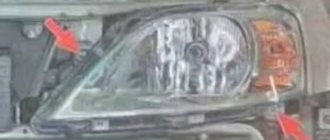
A special feature of this procedure is the preliminary dismantling of the headlight unit, under which the side light lamps are located. After this, it is necessary to disconnect the wires from the battery, which is done with extreme care.
Removing the front bumper will allow you to get to the cover that protects the dimensions. Since they come into contact with other light devices, it is advisable to carry out all procedures using sterile gloves. If any device has been touched, it must be wiped with a clean, lint-free cloth.