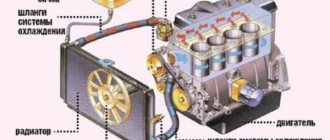
Welcome! Coolant - without it, cars would boil, because it plays the most basic role in the engine cooling system, namely, it flows through the pipes and cools them, and this liquid itself is cooled by the radiator and the fan that blows on it, as well as the radiator blows the air flow, this becomes especially noticeable when driving a car quickly, when the car practically does not heat up.
Note! In order to replace the coolant, you will need to stock up on: Firstly, an empty, preferably very wide container (It will be most convenient to use an ordinary basin, which is unnecessary for anyone, or if you are replacing it in a pit, then it will be possible also use a bucket, or something else where you will drain all the waste liquid), and you will also need to take with you a wrench somewhere “13” and “17” and find, as already mentioned, an inspection hole , because replacing the coolant in the inspection hole will be much more convenient than trying to drain it while the car is standing on the ground, although in this case it will be possible to jack it up, but keep in mind the fact that you will need to place bricks under the rear wheels, otherwise the car may simply fall off and fall to the ground, and by the way, if you lift the front of the car with jacks or with just one jack and put bars or boards under the other side (don’t ever put bricks under the car, there have been cases when they fell apart and the car fell to the floor), so make sure that the front part of your car is at the same level and make sure that the right part, for example, is not higher than the left, and the left is not higher than the right!
When should you change the coolant? In fact, it all depends on what kind of liquid you purchased in the store, respectively, if it is fake, then in this case you will have to replace it immediately, otherwise corrosion will begin to occur in parts of the car engine (More on this below in the “Note!” paragraph), but what should I do if I bought a car and the owner told me that he changed all the lubricants (Oil, antifreeze, etc.) in my purchased car, how can I check this, you ask?
It’s all very simple, in order to check whether it’s time to change the fluid or not, first open the expansion tank, which is closed with a lid (Open the tank only on a cold engine, otherwise if your system is depressurized, then the fluid may simply splash out sharply when the engine is heated and go jet, this will cause you burns), so after unscrewing the cap (Indicated by the arrow in the photo below), take a visual look at the color of the liquid you have in the tank, basically all liquids that cool the system have a certain color, that is, antifreeze can be blue , antifreeze red, etc.
Therefore, after you have looked into the tank, visually determine whether the fluid needs to be replaced or not, namely, it will need it if it changes its color to the color of rust, and also if an oil film appears on the surface (This can be very easily determined visually). .
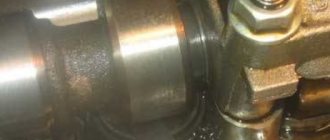
Note! Many people put off replacing this fluid, but the car is running hot, so what do they say, remember once and for all, most engine parts, for example, parts such as the crankshaft, camshaft, the cylinder block itself, etc. They are lubricated with coolant due to the fact that small holes are made in these parts so that this liquid gets into them and cools them from inside, and in the case when the coolant becomes unusable, it begins to gradually, so to speak, devour all these parts due to why premature corrosion occurs, which can ultimately lead you to a major engine overhaul, but it seemed like it was just some kind of coolant, and so many troubles can be caused by it, so when purchasing, be careful too, as at the moment, a lot of fakes are sold on the market! (For information on how to identify counterfeit coolant, see the interesting article entitled: “Detailed information about antifreeze and the so-called antifreeze that is poured into a car engine.”)
How to replace coolant on a VAZ 2110-VAZ 2112?
Note! Before we begin, we will give you a couple of tips so that you are prepared to face this situation, namely, many car owners constantly grab their heads when they pour liquid into the tank, after which some time passes, they open the hood and see that the liquid has dropped below the level (Now you will understand where this is all leading, read carefully), we even once observed such a situation, a young man of about 20 years old came to us, he wanted us to change his expansion tank for a new one and he told us that I had recently poured new fluid into the reservoir, after which he drove the car and it fell a little, we asked him, and when you checked the fluid, the engine of your car was cooled down (That is, the check was carried out on a cold engine), he answered us that no, the engine was hot, but when he looked at the marks that are located on the sides of the barrel, he saw that a small part of the liquid had disappeared, we explain why this happened!
The thing is that the cooling system pipes constantly change their shape, they either expand (If the engine is very hot) or narrow (If the engine is cold), so as a rule, the coolant level should only be checked on a cold engine, because on a hot one it really is the fluid may even be less than the minimum MIN mark, but this does not mean that you need to immediately run and pour new fluid into the tank, in this case you just need to wait until the engine cools down, thereby you will even see how the fluid becomes a little more in expansion tank and only after that you will need to add new fluid into it and continue driving! Draining: 1) At the very beginning of the operation, find a place where your car will stand level, or if this is not possible, then place the car so that the front of the car is higher than the rear, but not vice versa.
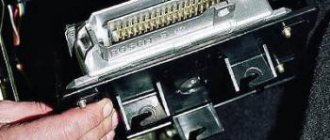
2) Then remove the “-” terminal from the battery, otherwise if liquid gets on the exposed wires, a short circuit may occur, which in turn will cause a malfunction of the wires on which the liquid gets. (For information on how to remove this terminal, see the article: “Replacing the battery on all VAZs,” point 1)
3) Next (This operation is only for injection machines), remove the ignition module so that it does not interfere with unscrewing the drain plug of the cylinder block. (For information on how to remove the module, see the article: “Replacing the ignition module”)
Note! The module needs to be removed only with the bracket, because if you remove only one module, then in this case the bracket of this module will block the way to the drain plug, so we remove everything together!
4) Next, to drain the coolant from the system a little faster, unscrew the cap that covers the cooling expansion tank.
5) Then, using a wrench or, best of all, a spanner, completely unscrew the plug that is located on the engine cylinder block, you got to it earlier when you removed the ignition model from the car to access it, so for a more detailed location of this plug, look at photo below, where a man points his finger at this traffic jam:
Note! Before you start unscrewing this plug, be sure to place an empty “10 liter” container under this plug, and after this plug is unscrewed, drain all the coolant from the cylinder block into this container!
6) Then, when all the liquid from the block has been drained, we recommend that you wipe the car engine with any rag, namely, wipe the places where the liquid got in when draining.
7) Now do not wrap this plug and go to the plug that is located on the radiator and in the same way unscrew it completely, and drain all the liquid remaining in the radiator into a container.
Note! Next to the radiator drain hole there are wires and the generator itself. If possible, try to protect these things somehow, for example, throw a rubber rag over them so that liquid does not get on them, otherwise they can easily fail!
 Next, screw all the unscrewed plugs back into place, because all the liquid from the system has been drained, so now we will move on to filling.
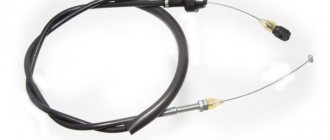
Filling: 1) First (This point applies only to the injector, but be sure to read the note if you have a carburetor), loosen the clamp and remove the fluid drainage hose from the throttle assembly, it is also called the throttle valve, and then put this in some convenient place hose (So that it does not fall) and pull the part with which it was connected to the throttle up to the very top and leave it like that.
Note! If we are talking about a carburetor engine, then in this case perform exactly the same operation but only with a slightly different hose, namely with the carburetor heating hose, it is indicated by the arrow below:
2) Then carefully start pouring coolant to the required level and watch whether this liquid flows from any hose, if it flows, immediately stop pouring the liquid (Put the canister on the floor) and put the hose in its place, and after putting it on, fill it liquid to the required level and tighten the plug.
Note! If you keep pouring liquid and pouring it, but it doesn’t come out of the hose, then stop pouring and grab this hose with your hand and then carefully lower it slightly, if the liquid poured as indicated by the arrow in the photo below, then in this case, put this hose in its place, tighten the clamp that secures it and continue to pour liquid into the tank to the required level!
3) And finally, if after replacement (no matter how long) you notice that your engine is heating up very much, and the stove is not heating at all (cold air is coming out), then in this case, remove the air lock from the system. (How to remove a plug on an injector, see the article: “Removing an air plug on a VAZ”)
Note! On the carburetor, the plug is removed in the same way as on the injector, so read the article to which there is a link if you have a carburetor, but just always remember that on the carburetor there is another hose, that is, a heating hose, and on the injector there is another hose that is connected to throttle fitting, in general, read it carefully and you will understand what we are talking about!
Important! 1. Be sure to change this fluid only on a cold engine, otherwise when the engine is hot, it sometimes heats up to very high temperatures of the order of 95-110 degrees and maybe even higher (The coolant temperature is shown on the instrument panel on a special sensor, some people still called the engine temperature sensor), so it cannot be replaced on a hot engine, because you can very easily get scalded by it when draining.
2. Also, be sure to take into account the fact that coolant is a very toxic substance, so if it gets on your skin or eyes, run immediately to the washbasin and rinse the area, otherwise this liquid will harm your body.
Note! By the way, do not take and under no circumstances leave an open bottle of this liquid at home, because the vapors of this liquid are also poisonous and can also harm your body!
3. And in conclusion, let’s note some factors, namely, replace this fluid only with gloves (You can do without them, but there is a possibility of drops of this fluid getting on the skin), and also do not under any circumstances drain the used fluid onto the ground, that’s all take care of the environment and, first of all, take care of the ecology of our country and something else, if you decide to add this liquid to the tank, for example, it runs out there, first of all, do not mix it with anything (Meaning exactly what is needed fill in liquid of the same brand and produced only from one manufacturer and this is mandatory) and secondly, after topping up, do not under any circumstances start the car with the expansion tank cap open, since it must be closed when starting!
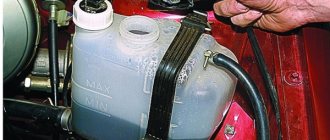
Location of expansion tank
A plastic reservoir for excess coolant is installed by the manufacturer in different places depending on the model of the “tenth” family:
- in cars of the VAZ 2110-12 series, the reservoir is located on the left side (in the direction of travel) between the pillar glass and the wall of the interior partition;
- in VAZ 2114-15 cars, the container is also located on the driver’s side, but is placed in front of the pillar glass.
The expansion tank is attached to the body elements with a clamp in the form of a flat rubber belt with a metal hook that hooks onto a protrusion on the side member. There are 3 hoses connected to the tank:
- A large diameter pipe leading from the thermostat is connected to the bottom.
- The upper tube of small diameter goes through the partition to the radiator of the cabin heater.
- The middle small tube connects the tank to the upper fitting of the main cooling radiator.
Each hose performs a separate function. The thick pipe serves to expand the coolant and fill the system while pouring antifreeze through the neck of the tank. Two thin tubes are designed to drain the steam-water mixture from the stove and the main radiator into the tank when heated to the maximum permissible antifreeze temperature of 95 ° C.
The expansion tank (item 1) is located at the highest point of the cooling system at the same level as the throttle valve
Replacing antifreeze on a VAZ 2112
Photo VAZ 2112
If you buy a car, put it in a cupboard and admire it, then you definitely won’t need to replace any working fluids. And since a normal car is constantly in use, it requires maintenance. One of the types of work that needs to be done is replacing antifreeze or antifreeze - in a word, coolant.
Cooling system design
This article provides instructions on how to replace antifreeze in a VAZ 2112 yourself. Here you will find some features that are important to pay attention to when replacing the coolant, a video on the replacement and a detailed description of the process itself.
Flushing the cooling system
Flushing the cooling system can be done with either special liquids or water.
Washing process:
- Pour fluid into the engine
- Start the engine and leave it running for 7-15 minutes
- Drain the water and repeat the procedure several times
Washing is considered complete when the drained water (or special liquid) is completely clean.
Flushing the system is not mandatory. However, if you plan to switch to another antifreeze or the old one has merged with sediment and scale, it is recommended.
WHY CHANGE ANTIFLEGE AND HOW OFTEN DO IT?
Let's start by answering the first question - do you need to change antifreeze and why change it? The answer is clear - it needs to be changed, since it, like everything else, has the excellent ability to lose its properties.
VAZ 2112 how to replace antifreeze
Plus, the loss of the quality of the liquid occurs not only from the expiration date, but also from the fact that it is in an engine that is subject to corrosion - that is, the antifreeze becomes brown or red.
How often is it necessary to replace antifreeze on a VAZ 2112? According to official data, this must be done every 2 years or every 45 thousand km. Some advise changing every year.
This is often not necessary. If the car is old and “leaks” every winter, then this can be done. But the VAZ 2112 is not a rare car, so once every two years will be enough. How else can you determine that antifreeze needs to be changed? This can be done by color.
Looking into the expansion tank, see what color the antifreeze has become. Pure antifreeze has a bright blue color. Black and red color is a clear indicator of the need for replacement.
Antifreeze should have the color as in the photo
Helpful advice
When replacing antifreeze on a VAZ-2110 car, it is worth inspecting the condition of the pipes and hoses that go to the radiator and expansion tank. Characteristic signs of wear are:
- Cracks.
- Cuts.
- Low elasticity.
If the pipe is cracked and hard to the touch, then it needs to be replaced. The clamps are also changed. They can be bought at any hardware store. The hoses themselves that go to the tank must be reinforced, as in the photo below.
Conventional rubber products quickly become unusable or fray. If there are cracks on the tank itself, we also replace it with a new one. It would be a good idea to check the thermostat as well.
If it is stuck in one position, it should be replaced. You can check this by boiling the element in a saucepan on the stove. Why does this work need to be done when replacing the coolant?
Because during any operation related to the cooling system, you will have to drain the antifreeze again. And this is an additional waste of time and effort.
ANTIFREEZE OR ANTIFREEZE?
The answer to this question is not clear-cut. If you do not take into account the car manufacturer, but look solely at the quality of the coolant, then antifreeze, of course, loses to antifreeze.
There are different types of antifreeze
Antifreeze has many additives that can make it very suitable for winter. Freezing and boiling temperatures can make a huge difference. Another point is that antifreeze is specially designed for VAZ cars. It is suitable for our climate and operating conditions. Another plus is that the price of antifreeze is much lower than that of antifreeze. Usually, owners of VAZ cars pour antifreeze and drive with a clear conscience.
Where is it located?
Owners of cars of this model are well aware of various problems associated with this device. Often the device requires replacement. Beginners do not always know where the temperature sensor is located on the VAZ-2110. In cars, this element can be installed in a variety of places.
So, in classic models the thermistor is located directly in the cylinder block. And in AvtoVAZ models of the tenth family you can find DTOZH in the thermostat. By the way, on the VAZ-2110 there is not one temperature sensor - there are two, but the second one does not perform any important tasks. It is connected only to the instrument panel bottom temperature indicator.
ESSENTIAL TOOL
What tool is needed to replace antifreeze in your VAZ 2112:
- Head 13 with ratchet or wrench
- Head or wrench 17
- Key for 10
- Container for draining antifreeze
- Watering can
Any basin that will fit under the car will do.
That's probably all you need. As you can see, no special costs are required.
Is there a difference in the antifreeze discharge processes in eight- and sixteen-valve engines
There is a difference, and that's important. The fact is that the “tens” engines have different designs. As for draining antifreeze, the VAZ-2110 8 valves are more profitable than a dozen with sixteen valves. The first refrigerant drain plug is located on the front of the cylinder block. To get to it, you don't have to drive the car into a hole or remove the guard. But on sixteen-valve power plants, the plug is located at the bottom and can even be closed by the starter, therefore, before draining the antifreeze from the VAZ-2110, you will need to take the car into a pit (overpass), remove both the protection and the starter. Let's take a closer look at this process for each of the engines.
REPLACEMENT OF ANTISEASE
Now let's move on directly to replacing the antifreeze with our own hands.
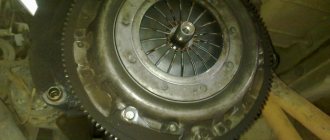
Advice! Before replacing antifreeze, remove the protection from the engine. Firstly, the liquid will drain more easily. Secondly, it will be easier for you to “catch” the stream with a basin.
Removing protection for VAZ 2112
Before draining the antifreeze, unscrew the negative terminal of the battery. This is done to prevent the wires from shorting, because liquid will get on them.
Draining antifreeze
Drain the coolant. The fluid is drained only from a cold engine. So:
- First you will need to use a 13 and 17 key to unscrew the ignition module with the bracket. You can, of course, try and unscrew the drain plug from the block without removing the bracket, but more effort and nerves will be spent.
Replacing antifreeze VAZ 2112
- Now we unscrew the drain plug of the VAZ 2112 cylinder block. This is done using a 13mm socket and a ratchet or other convenient wrench.
- After this, very little liquid will drain. Now unscrew the expansion tank cap to drain all the fluid from the block. You can do this in advance.
- Next, you need to unscrew the drain plug from the cooling radiator. You don't need any tools for this - it can be easily unscrewed by hand.
Radiator drain plug
- After all the liquid has drained from the block and radiator, you need to screw back the two plugs.
- Reinstall the ignition module with bracket.
This is where the drain ended.
Flushing the cooling system
Often, replacing antifreeze on a VAZ 2112 can be done without flushing the system. You don’t have to do it, in principle, but consider the option of washing.
Note. To flush the engine cooling system, you can use a special flushing liquid, or you can use ordinary distilled water.
Flushing the cooling system
So:
- To flush the engine, pour the required amount of distilled water or a specially prepared flushing solution with water into the engine.
- After this, start the engine and give it time to run. About 10 minutes.
- Then drain the water and repeat the procedure.
- You can rinse until the water becomes clear when drained. But considering that often washing is not done at all, two times will be enough.
Pouring antifreeze
After draining the antifreeze and flushing the cooling system, it is necessary to fill in new antifreeze. It will require about 8 liters.
It’s more convenient to pour antifreeze with a watering can
So:
- We insert a watering can into the hole in the expansion tank for convenience.
- We fill the antifreeze gradually so that the air leaves the system.
- To completely fill the system, squeeze the upper pipe coming out of the radiator.
- After filling the system, pour about half into the expansion tank.
Advice! Under no circumstances fill the expansion tank full! Antifreeze will simply pour out of there!
Eliminating airiness
If you do not perform some operations, the cooling system of your VAZ 2112 will be air-filled and will not work correctly. To eliminate this defect, do the following:
- Again, during pouring, squeeze the pipe so that air comes out.
- After filling, it is necessary to create pressure in the expansion tank. In simple terms, just blow into the expansion tank. Not just of course, but pressed against it so that air does not escape through the filler neck.
- In this primitive way, pressure can be created and air will leave the system.
- A sign that there is no air left in the system is the release of antifreeze, not air, from the return line.
- Also, after starting the engine, you need to “give” the engine good speed - this also helps.
These are some simple ways to get air out of the cooling system.
Engine starting
After all the operations performed, close the expansion tank cap, install the protection on the engine, put the negative terminal back on and start the engine. As the engine warms up, antifreeze should come out of the return line - this is a sign that the antifreeze has been replaced correctly. The engine must be warmed up until the radiator cooling fan turns on. After turning on the fan, place your hand against the heater radiator, next to the fan. The radiator will be warm if everything is done correctly.
The fan turns on - the temperature drops
If the radiator is cold, there may be two reasons for this - not all the air has left the system or a faulty thermostat. Also a good sign will be hot air from the heater in the cabin. One more thing - while warming up the engine, check the tightness of the entire cooling system. If leaks are detected, the pipes will need to be replaced.
Important – control the tightness of all connections
Replacement of antifreeze in VAZ 2112 has been completed. Bottom line - after you have checked everything and found no bad signs, you can safely close the hood and hit the road. Bon Voyage!
It is also necessary to fill out correctly
Now that you know how to combine antifreeze with a VAZ-2110, you can talk about how to properly fill with fresh coolant. This process is much simpler than the previous one, but there are some nuances.
The main task facing a car owner who is pouring refrigerant into the system is to prevent air bubbles from appearing in it. No, they are not dangerous for the engine, but they are extremely undesirable, especially in winter, when the “furnace” operation is required. Plugs create obstacles to the normal circulation of refrigerant and, in addition, reduce its volume in the system. It turns out that we poured 6-7 liters, but the “oven” does not heat up, since it needs to warm up. And the troubleshooting begins.
But you just need to disconnect the hose from the throttle body when you fill the antifreeze and pour it until the coolant drains out of it. After this, we place the hose in the union and continue to fill the liquid to the level. When this is achieved, without closing the expansion tank cap, we start the engine, wait until it warms up to operating temperature and “pump” the hoses that enter the cooling radiator, periodically squeezing them with your hands. Air, if it exists, will definitely come out. You will only need to replenish the liquid.
Everything merged
Removing refrigerant from the system is quite problematic, because it is a whole complex of channels, pipes and hoses. In general, with a normal routine replacement this is not necessary, but if you are, for example, going to replace antifreeze with antifreeze or vice versa, or flush the cooling system, you will have to try to force the fluid out of the engine as much as possible. But how to completely drain antifreeze? The VAZ-2110 is not such a complicated car for this. This can be done using a regular car compressor or, as a last resort, a pump.
Let's take a compressor, we will connect its hose through some kind of homemade adapter to one of the “nipples” on the expansion tank, after removing the hose from it and “drowning” it, we will begin to pump air into the system. Almost all the liquid remaining in the hoses, engine cooling jacket, and radiator tanks exits through the drain holes.