Preparatory operations
Changing the pump and roller is a prerequisite so that after a thousand kilometers you don’t have to disassemble everything again. But it’s up to you to decide for the pulley, the price is 150 rubles per pair. There were cars where a slightly bent pulley caused the belt to slip and gradually wear out, reducing its service life. On this car the belt was worn down in half.
Replacement interval
We recommend that you periodically check the condition of the belt to avoid annoying consequences and not have to look for someone to take it to a repair shop. Replace every 40,000 kilometers.
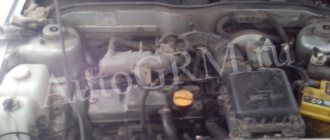
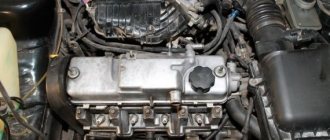
And here is the patient himself.
Everything we need.
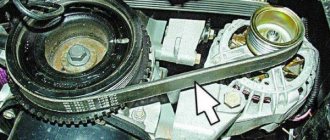
We unscrew the three ten bolts securing the protective timing cover and remove it.
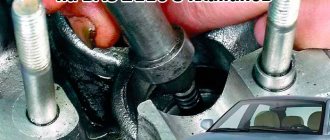
Next, loosen the nut thirteen that secure the generator and unscrew the tension bolt ten.
We take the generator to the engine and remove the belt.
Set the top dead center
Remove the engine protection and drain the antifreeze. We set the camshaft mark by turning the crankshaft clockwise. The ebb on the pulley should be opposite the bend of the protective cover fastening.
Unscrew the crankshaft pulley mounting bolt. We put the assistant in the cabin and force him to engage fifth gear and press the brake. And at this time we easily and naturally unscrew the bolt using a 19 meter head and a pipe of one and a half meters. It must be screwed properly, and some craftsmen lubricate it with sealants and then wait for kind words addressed to them.
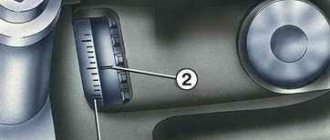
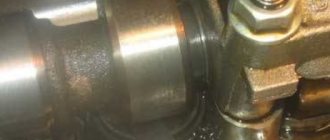
On the left side we see the crankshaft position sensor. We will need it to subsequently check the correct installation of the timing belt. We remove the crankshaft pulley and see that the marks match.
VESKO-TRANS.RU
Content
Replacing the timing belt on VAZ 2108, VAZ 2109, VAZ 21099
When should I replace the timing belt on a VAZ 2108-VAZ 21099? 1) According to the plant, every 60,000–75,000 thousand km.
The note! But to check the condition of the belt for serious defects, you need to do it every 15,000 thousand kilometers!
How to replace the timing belt on a VAZ 2108-VAZ 21099?
Conclusion: 1) First, unscrew both side bolts securing the cover.
2) Then unscrew the last remaining center bolt that secures the cover.
3) Now remove it from the seat by placing your hand on the cover.
4) Then remove the generator tape from all the rollers. (To remove the alternator belt, see this article ") 5) Then remove the front right wheel from the car. (see Removing the wheel)
The note! If your car is also equipped with additional wheels, then these must also be removed!
6) Then turn the crankshaft clockwise strictly for the central bolt securing the pulley.
Replacing the pump
Unscrew the nut on the tension roller 17 and remove it along with the belt. Then unscrew the camshaft pulley bolt and remove the last one.
Be careful not to lose the key.
We unscrew everything that secures the protective metal shield, namely one ten-point nut and a bolt securing the cover, three bolts securing the pump.
Remove the protective cover and pump. Antifreeze remaining in the block may leak out if you have not drained it. Carefully, it's sweet.
We clean all the parts from oil and belt residues, as well as the pump seat from the old gasket and sealant.
Lubricate the gasket of the new pump with sealant and put it in place. We install the metal protection and tighten all the bolts and nuts securing it.
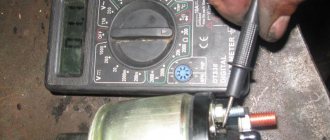
We tighten the pump bolts evenly in a circle, then check whether the pump is spinning.
Recently a client brought in an original pump, which turned out to have slightly larger petals and after installation it began to bite. I had to modify it with a grinder and take measurements several times. These are the spare parts we have.
We check if the key is lost on the camshaft and install the pulley. We tighten its bolt to seventeen.
What is required to replace the timing belt?
To replace the timing belt
, You will need:
New timing belt (can be purchased at any automotive store); a roller used to tension the belt (purchased there); standard set of tools. The process itself, even with no experience, takes literally several hours.
Operating procedure.
Using a wrench, you need to unscrew the bolts securing the casing covering the belt and remove it.
Using a wrench with a larger diameter, you need to loosen the belt tension and press the generator a little so that it allows you to remove the belt
. Having put the car on the handbrake, you need to lift (using a jack) the front right part of the car and remove the wheel. Then you need to set everything according to the labels.
We remove the crankshaft pulley. Using a “wrench” you need to unscrew the nut securing the tension roller.
Turn the pulley counterclockwise. A new belt is put on the crankshaft toothed pulley, and its other side is pulled over the pump pulley and tension roller (new, of course). The belt is put on the camshaft pulley (necessarily - last). Two screws are inserted and tightened into the holes of the roller. The belt itself is secured with a nut. Using a roller, the belt is tensioned to the desired level (the optimal option is when the front part of the belt can be rotated 90 degrees using two fingers).
All removed bolts and nuts are tightened. The alternator belt is put back into place. After completing all the work described above, the car must be started and then turned off. The belt cover is installed in place.
Still in the finishing stage.
It's time to change the timing belt on the VAZ 21093. The procedure is not complicated. It can be done without a hole and a jack, as they say - out of the blue. The alternator belt drive pulley must be removed. We put the car in gear and handbrake. The first step will most likely be to remove the engine fender liner and mudguard. It is necessary to remove the timing belt protective cover (attached with three bolts) - do not lose the bolt bushings when removing. Next, loosen the tension on the alternator belt. Turn the wheels all the way to the right. We take out the rubber plug from the inspection hatch of the gearbox and fix the flywheel, for example, with a large powerful screwdriver.
Fix the flywheel with a screwdriver.
As I understand it, there is no proprietary flywheel lock for our car. So here we do what we can. Someone makes a retainer from an old flywheel. Having locked the flywheel and using a long, strong wrench and extension, unscrew (counterclockwise) the bolt securing the generator pulley to the crankshaft. Removing this bolt is one of the difficult tasks. Personally, I couldn’t unscrew it without fixing the flywheel. For some reason, no one left the air impact wrench nearby on the street :). Remove the generator drive pulley and generator belt. Screw the bolt back in. It should look like in the photo.
The generator drive pulley has been removed.
To ease the effort to further rotate the timing mechanism, unscrew the spark plugs. By rotating the bolt on the crankshaft clockwise, check whether the marks (circled in yellow) match according to the instructions. Photo from the repair manual of the Za Rulem publishing house.
We check if the labels match.
Next, we do the following - without removing the timing belt, we mark with a marker, a felt-tip pen for writing on CDR disks, the relative position of the belt on the gears. Those. We put a mark in any convenient place on the gear and right there on the belt. I made two marks on the camshaft gear and one on the crankshaft gear. In total there are three marks on the gears and, accordingly, three marks on the belt. Using a special wrench, loosen the timing belt tension roller.
Key for timing pulley (new type roller).
Remove the timing belt. Next, we transfer the marks from the removed belt to the new belt that we will install. For this purpose it is convenient to use (for example) a clamp.
Mini clamps.
It turns out like this:
Transferring labels. The marks on the old and new belt are shown by arrows.
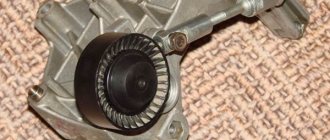
The roller is usually changed along with the belt. If there is no desire to improve something, then we take the latest miracle developed by engineers on a single-row bearing and with a plastic (consisting of two halves) running part and install it.
Roller from the Gates kit.
Side view of the video.
This is a completely workable and non-lethal scheme (with such a video). If you want to improve it, we buy an SKF type roller with a metal running part, a double-row bearing and old-style roller hardware (with a longer pin). A hairpin made from obvious rawhide (if sharpened on a lathe) will not work. There must be a certain hardness. For clarity, I specially stuck a nail onto a magnet. On the right is what is needed to install a roller of this type (old style). The pin from the new type of roller is shorter and will NOT fit for the old type of roller.
Everything has been purchased. Next year I will install it.
Let's continue. The new video is worth it. The marks have been transferred to the new belt. We put on a new belt, making sure that the marks on the new belt and gears match. If adjustment is necessary, rotate the crankshaft gear clockwise.
Next, we tighten the timing belt with a roller, rotating the roller with a special tension wrench counterclockwise. Periodically loosen and tighten the nut clamping the roller. Those. tension the belt with a roller, tighten the roller nut. We made two revolutions of the crankshaft. We checked the belt tension using two fingers. And so on until we achieve the approximate required tension.
We check the coincidence of the marks according to the instructions from the book.
Do not use too much force when tightening the roller nut! You'll strip the threads in the cylinder head. Yes, about birds. The final belt tension should be checked on a hot engine. And when it’s cold, at least it shouldn’t hit the protective casing.
We assemble everything in reverse order. The protective cover can be put on later, after finally making sure that the belt is tensioned.
The belt was purchased by Gates 5521XS (they seem to praise it).
Gates 5521XS belt.
Buy a belt from a trusted place and check the production date. It is better to take a “fresh” belt. The shelf life of a belt from the date of production is usually 5 - 6 years. It seems like week 43 of 2012.
After replacing the belt, it is possible that it will run away from or towards the engine. But for some reason the old one didn’t run away. It’s as if a specially trained person is sitting on the VAZ and hitting the roller pin with a hammer. There can be a lot of options here and this is a topic for a separate discussion.
Which refers to consumables whose condition must be monitored and changed regularly. The article is devoted to the timing belt of the VAZ 2109 car, what functions it performs, why it needs to be changed and how to do it correctly. The video shows an example of the replacement.
Installing a new timing belt
We check that all marks match.
We first place the belt on the crankshaft and pump. Then we tighten the right descending branch of the belt and put it on the camshaft pulley and tension roller. We check all the marks again and tighten the belt with a roller. The tension is considered sufficient if, with the force of two fingers, you can twist the longest branch of the belt by a maximum of 90 degrees. It’s easier to take the right branch of the belt with two fingers and twist it, if more than 90 is not very bad, but less is very bad. An overtightened belt will wear out quickly and will also reduce the life of the pump.
We place the bottom protective plastic cover. And on the crankshaft pulley we mark the twentieth tooth after skipping two teeth. We count counterclockwise.
This mark corresponds to the top dead center of the first cylinder. We put the pulley in place and the mark should be against the crankshaft position sensor. More precisely, against the small iron core of the sensor. Sometimes it gets into the gap between the teeth, this is considered acceptable. We tighten the pulley in the same way as we unscrewed it, with the help of a partner.
We turn the crankshaft two turns and check the marks; this is where our mark on the pulley comes in handy.
If everything is in trouble, we collect everything that we took apart. As they say in smart books, install the parts in the reverse order of removal. Don't forget to add antifreeze.
We start the car, accept congratulations from family and friends and head off to adventure.
How to set timing marks on a VAZ 2109
This article shows how to set timing marks on a VAZ 2109. Replacing the timing belt is one of the most important vehicle maintenance procedures. Because a broken belt leads to engine failure. Ultimately, this type of work does not require large material costs and the skills of a qualified specialist. It is very important to understand the processes occurring in a running engine in order to correctly orient the order of work to replace the timing belt.
How to set VAZ timing marks
The piston must be at top dead center at the moment of fuel compression. Accordingly, there is a mark on the crankshaft toothed pulley. When combined with the mark on the front engine cover, this position is fixed. When the piston is at top dead center. The valves of this cylinder in the block head must be completely closed.
This also corresponds to a certain position of the camshaft. Which is marked with a label. Markers must be placed on the first cylinder of the engine. That is, the piston of the first cylinder is at TDC. The valves are completely closed. It is also necessary to understand that the next position of the piston at which the fuel is compressed and the marks are located correctly.
Correspond to one revolution of the camshaft and two revolutions of the crankshaft. As a result, the crankshaft mark is twice aligned with the mark on the front engine cover. And its correct position corresponds to when the piston is at TDC at the moment of fuel compression. And the valves of the first cylinder are completely closed. If you understand all this, then the process of installing the belt itself will not cause any difficulties. Take any existing internal combustion engine. All these processes will remain unchanged. The only difference is in the design of the timing drive. Either it is a belt or chain or gears. All we have to do is understand the nuances characteristic of each type of engine.
Disassembling the timing belt
I would like to talk about the timing mechanism of the engine installed on the VAZ 2109 car. With a cylinder head having 8 valves. That is, each cylinder has one exhaust and one intake valve. Accordingly, the operation of these valves is ensured by one camshaft.
And so where to start disassembling the timing drive mechanism. On this car it will be more convenient to remove the front right wheel. Remove the protective cover at the bottom. We need this in order to gain access to the generator drive pulley. And the camshaft drive toothed pulley. Therefore, by removing the protective shield, we can unscrew the bolt securing the generator drive pulley. First you need to loosen the tension on the generator belt and remove the belt. Then remove the plastic protective cover on top. It is held on by three mounting bolts. We loosen the nut securing the tension roller, after which the belt can be easily removed from the toothed pulleys.
Replacing the roller
First of all, you need to replace the tension roller with a new one. Therefore, we install a spacer washer. The roller itself and tighten the roller with a fastening nut.
It is advisable to change the pump at the same time; it doesn’t cost much money. And it can cause a lot of harm if it fails.
Install the crankshaft according to the mark
Now you need to install the crankshaft correctly. To do this, scroll until the marks on the toothed pulley and the front engine cover align.
The piston is at top dead center. This position also corresponds to a mark on the flywheel. Which is combined with the central slot of the ignition setting scale. It is clearly visible through the inspection window in the flywheel housing housing.
Installing the camshaft according to the mark
The next step is to set the mark of the camshaft drive gear pulley. Aligning it with the protrusion on the timing belt guard. This camshaft position corresponds to the moment of fuel compression in the combustion chamber. And the valves in the cylinder are closed.
Belt installation
We install the timing belt as shown in the photo. Passing it through the pump and tension roller.
We install the generator drive pulley in its place. We tighten the belt using a tension roller. For this purpose, the roller has special holes.
After we tensioned the belt and fixed the tension roller. It is important to double check that the marks are in the correct position. To do this, rotate the crankshaft several times and align the marks. If they stood up correctly. Close the upper protective casing, install the lower casing and wheel. That's it, the engine can be started.
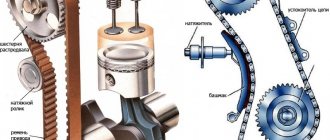
Functions of the timing belt
Thanks to the operation of the gas distribution mechanism, a group of valves opens and closes. As a result, an air-fuel mixture enters the cylinders and exhaust gases are removed. The timing belt synchronizes the operation of the shafts. In this way, the valves and pistons move synchronously, thereby eliminating their collision.
Timing belt layout
The belt drive is a rubber rim, on the inside of which there are teeth that prevent it from slipping on the gears. Manufacturers of the VAZ 2109 have set the service life of the timing belt at 50-60 thousand kilometers, but in reality it has to be changed after 35-45 kilometers.
The belt requires replacement if the following defects are detected:
- cracks, wrinkles on the inner and outer surfaces;
- wear, breakage of teeth;
- weak tension, causing the strap to slip;
- traces of working fluids on the surface;
- frayed side surfaces.
If any defects are found or the service life has expired, the product must be replaced.
Belt with signs of wear
When the belt breaks, the valves meet the pistons. As a result, they bend, pistons can deteriorate, and cylinder walls can be scratched, which will lead to expensive repairs to the cylinder head. That is why experienced car enthusiasts recommend doing a visual inspection of the rubber product after 15-20 thousand mileage and not allowing it to wear to a critical state when it can tear.