Preparatory operations
Changing the pump and roller is a prerequisite so that after a thousand kilometers you don’t have to disassemble everything again. But it’s up to you to decide for the pulley, the price is 150 rubles per pair. There were cars where a slightly bent pulley caused the belt to slip and gradually wear out, reducing its service life. On this car the belt was worn down in half.
Replacement interval
We recommend that you periodically check the condition of the belt to avoid annoying consequences and not have to look for someone to take it to a repair shop. Replace every 40,000 kilometers.
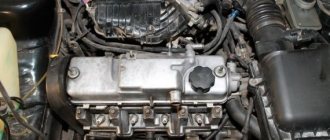
And here is the patient himself.
Everything we need.
We unscrew the three ten bolts securing the protective timing cover and remove it.
Next, loosen the nut thirteen that secure the generator and unscrew the tension bolt ten.
We take the generator to the engine and remove the belt.
Set the top dead center
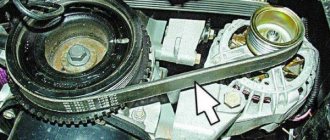
Remove the engine protection and drain the antifreeze. We set the camshaft mark by turning the crankshaft clockwise. The ebb on the pulley should be opposite the bend of the protective cover fastening.
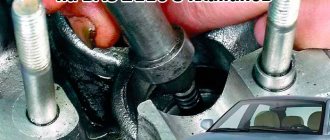
Unscrew the crankshaft pulley mounting bolt. We put the assistant in the cabin and force him to engage fifth gear and press the brake. And at this time we easily and naturally unscrew the bolt using a 19 meter head and a pipe of one and a half meters. It must be screwed properly, and some craftsmen lubricate it with sealants and then wait for kind words addressed to them.
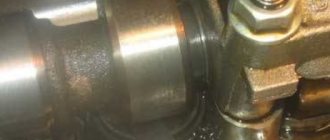
On the left side we see the crankshaft position sensor. We will need it to subsequently check the correct installation of the timing belt. We remove the crankshaft pulley and see that the marks match.
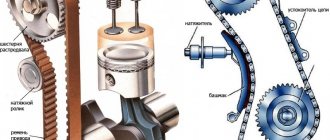
How to correctly set timing marks on a VAZ 2109
Everyone needs to know how to set the timing belt of a VAZ 2109, because no one is safe from a broken belt. You are incredibly lucky if you become the owner of a car with a 1.5-liter 8-valve engine. On them, if the belt breaks, the valves remain unharmed; on the rest, unfortunately, the cylinder head will have to be repaired.
How can you tell if your timing belt is broken? Quite simply, since the spark disappears, the engine does not start, and the crankshaft rotates faster than usual. Of course, you need to know how to set the VAZ 2109 timing belt correctly when replacing the belt. Now let's look at this case.
Replacing the pump
Unscrew the nut on the tension roller 17 and remove it along with the belt. Then unscrew the camshaft pulley bolt and remove the last one.
Be careful not to lose the key.
We unscrew everything that secures the protective metal shield, namely one ten-point nut and a bolt securing the cover, three bolts securing the pump.
Remove the protective cover and pump. Antifreeze remaining in the block may leak out if you have not drained it. Carefully, it's sweet.
We clean all the parts from oil and belt residues, as well as the pump seat from the old gasket and sealant.
Lubricate the gasket of the new pump with sealant and put it in place. We install the metal protection and tighten all the bolts and nuts securing it.
We tighten the pump bolts evenly in a circle, then check whether the pump is spinning.
Recently a client brought in an original pump, which turned out to have slightly larger petals and after installation it began to bite. I had to modify it with a grinder and take measurements several times. These are the spare parts we have.
We check if the key is lost on the camshaft and install the pulley. We tighten its bolt to seventeen.
How to properly check the rollers for serviceability?
Experienced car owners advise checking the serviceability of the rollers as follows:
- The first step is to remove the cover from the timing belt;
- Then start the engine;
- Observe the movement of the belt;
- You also need to listen, if you hear a whistle, grinding, squeaking, then most likely the rollers are faulty;
- Inspect the bearing bracket with the engine turned off;
- Check the belt for play; if there is any, this is a consequence of a malfunction of the roller or its incorrect setting;
- Check the roller for abrasion;
- Check to see if there is a grinding noise when the roller rotates (to do this, remove the belt and turn the roller several times).
- You can check the operation of the rollers by inspecting the belt itself. If bites are found on it, this indicates a malfunction of the tension rollers. In this case, they must be urgently replaced.
We recommend: Which racks are best to install on the Lada Priora
Experienced car owners advise resorting to the following trick:
If you hear a creaking sound when the belt is operating, do not immediately replace the rollers! You can apply WD-40 lubricant to the inside of the belt. If the creaking fails, then the problem was belt wear. As a result, only it can be replaced.
You should also do some preparatory work:
- prepare the necessary tools;
- purchase consumables.
To carry out technical work on replacing timing rollers, you will need the following tools and consumables:
- Set of car spanners;
- A set with a ratchet wrench, a set of replacement heads for it (needed when a modified timing system shield is installed);
- Automotive screwdriver set;
- New consumables;
- Lubricant mixture;
- Rags.
To ensure that the car owner does not receive any injuries, he must also comply with the necessary safety precautions. It's pretty simple! But following it will allow you to protect yourself from unwanted injuries.
Safety precautions when carrying out technical work on the timing system:
- It is necessary to wear double-layer gloves;
- Replace consumables only with the engine turned off;
- When removing the timing rollers, they should be held with your hand, otherwise they may jump off their seat and hit the car owner in the face;
- Carry out all work in a well-lit place;
- When changing timing system consumables, you should strictly follow the step-by-step instructions.
Compliance with all the points described above will allow all technical work to be completed within 1 - 1.5 hours.
How to install the rollers correctly in place?
Not only the operation of the timing belt, but the operation of the entire engine as a whole will depend on how correctly the rollers are installed.
In order to correctly install the timing rollers, you must follow the following instructions:
- The first step is to position the tension roller so that the technical holes for a special key are on the outside of the roller.
- The second step is to use a special key to adjust the position of the roller.
- Then install the timing belt on it.
- Then perform a couple of revolutions of the belt to make sure that the roller rotates smoothly on the bushing. During its operation, it should not make creaks, rattles, or metal friction should be felt.
- When tightening this part, it will be useful for inexperienced motorists to use the level from the repair kit. When tightening the bolts, place a level against the roller and, if necessary, adjust its position. It should be installed at 90 degrees. Otherwise, when the engine is running, it may damage its seat, which will require expensive repairs.
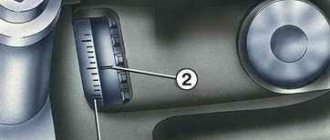
If you follow the instructions described above, you should take into account: for adjusting the tension rollers, there are special technical marks on the modified timing system plate. They should be used to adjust their position. The car comes with a standard panel from the factory, which does not have any technical data printed on it.
Installing a new timing belt
We check that all marks match.
We first place the belt on the crankshaft and pump. Then we tighten the right descending branch of the belt and put it on the camshaft pulley and tension roller. We check all the marks again and tighten the belt with a roller. The tension is considered sufficient if, with the force of two fingers, you can twist the longest branch of the belt by a maximum of 90 degrees. It’s easier to take the right branch of the belt with two fingers and twist it, if more than 90 is not very bad, but less is very bad. An overtightened belt will wear out quickly and will also reduce the life of the pump.
We place the bottom protective plastic cover. And on the crankshaft pulley we mark the twentieth tooth after skipping two teeth. We count counterclockwise.
This mark corresponds to the top dead center of the first cylinder. We put the pulley in place and the mark should be against the crankshaft position sensor. More precisely, against the small iron core of the sensor. Sometimes it gets into the gap between the teeth, this is considered acceptable. We tighten the pulley in the same way as we unscrewed it, with the help of a partner.
We turn the crankshaft two turns and check the marks; this is where our mark on the pulley comes in handy.
If everything is in trouble, we collect everything that we took apart. As they say in smart books, install the parts in the reverse order of removal. Don't forget to add antifreeze.
We start the car, accept congratulations from family and friends and head off to adventure.
When do you need to change timing rollers?
Most motorists cannot determine in time that the timing belt rollers need to be replaced. It's not the motorists' fault. After all, most of them are accustomed to the fact that the on-board computer informs the driver about the need to replace consumables. It processes data received from various sensors. If necessary, displays a corresponding notification on the dashboard.
In most foreign cars, it is the on-board computer systems that monitor the general condition of the engine. But in this case, the car owner will have to monitor the technical condition of the consumables. The VAZ 2109 does not provide any kind of on-board computer. Everything is the old fashioned way here!
Therefore, you should listen to experienced owners of a car of this model! They recommend replacing rollers when the following symptoms appear:
- When the engine starts, a whistle is heard, after which the smell of melted rubber may come from under the engine compartment shield.
- At high engine speeds, a sharp drop in speed may occur. In ordinary cars, this may indicate some kind of malfunction in the gearbox. However, in the VAZ 2109, this indicates an idle rotation of the rollers, during which the shaft rotation speed drops.
- While driving, a metal grinding sound is heard from under the hood. This happens because the rollers are jammed. As a rule, this happens when they are over-tensioned, or the spacer rings and washers are worn out. In this case, you will also have to replace the rollers, since if such parts are damaged, the roller itself is damaged. Therefore, you will have to replace them with a set. There is an important thing to consider here: additional timing roller parts are not sold separately. They can only be purchased complete with a set of rollers.
- Also something to consider! In the case of an installed modification shield, the motorist will have to spend a much more impressive amount than 3,500 - 8,000 rubles.
- If noise is heard when the engine is running, and when removing the protective casing, the owner sees that when the engine is running, the belt moves not only in a circle, but to the sides along with the roller, then an urgent replacement is necessary.
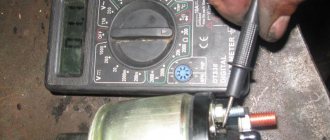
- If you hear a squeaking sound when starting the engine, then most likely the cause will be either excessive tension on the rollers or damage to their bearings. In this case, it is necessary to urgently remove and check. If during inspection it is discovered that the bearing moves with play, or lubricant is leaking from it, then it must be replaced. Fortunately, the cost of bearings varies from 145 rubles to 356 rubles.
- If, when inspecting the engine, oil smudges are found on the belt, it means either the bearing is leaking or the attachment rings have ruptured. As a result, lubricant from the roller bushings got onto the belt.
We recommend: The best engine cleaners
Don’t be lazy; in this case, it’s best to conduct a detailed inspection of the rollers, belt, shaft gear, and generator gear. It will take about 30 minutes and can save you up to 50,000 rubles. Since ignoring problems with the timing system can completely damage the engine.
The cost of restoration work on the model 2109 engine varies from 45,000 rubles to 78,000 rubles.
modified timing shield
regular timing belt
option of a modified timing system panel
There are also cases of installing a special double chain instead of a rubberized belt. As a rule, for the operation of this type of system, the installation of a turbine is necessary. Otherwise, it will not have enough power to rotate the chain. Since the chain requires 0.56 times more power to operate than a standard engine produces.
As you can see, the modified timing shield is slightly wider than the usual one. This change in design is due to the presence of an additional number of timing belt tension rollers. As a result, the size of the shield increases.
The modified shield is installed in the form of an overhead panel on the engine. In this case, all gears are removed. Their bushings are inserted into special grooves on the panel. Then the gears return to their place. The panel itself is fixed with 5-8 bolts, depending on the model.
To avoid serious problems and any malfunctions in the engine, you should replace the rollers on the VAZ 2109 in a timely manner. The manufacturer recommends updating these consumables at intervals of 40,000 - 50,000 kilometers.
The actual condition of the rollers must be checked every 19,500 kilometers.
Compliance with intervals:
- checks;
- replacements.
Allows you to extend:
- timing belt service life;
- the operation of the entire engine as a whole.
It is worth considering the following things that affect the wear of timing rollers:
- use of low-quality bearings;
- the car owner uses rollers from one manufacturer and bearings from another;
- use of low-quality lubricant for roller bushings;
- excessive tension on the rollers, as a result of which excessive pressure is exerted on them - this can lead to their breakage;
- use of parts made from low-quality materials.
Procedure
The car must be put on the brakes and engaged in fourth gear. The first step is to place a jack, lift the car and remove the front right wheel. This will provide access to the area required for maintenance. Then you should remove the boot cover from the timing drive mechanism. It is secured with three 10 mm socket bolts.
This gives access to the generator pulley. It also needs to be removed. This is not always easy, as the nut often rusts and gets stuck.
With the alternator pulley removed, access to the timing belt is available. After carrying out these operations, you should check the coincidence of the marks on the timing sprocket (the mark in the form of a bump) and the slot on the housing. If there is no match, then they must be combined. This ensures control of the engine's top dead center.
Now you can remove the old belt. After removing it, you need to set the timing marks on the gear on the crankshaft and on the car body. If it is inconvenient to turn the crankshaft, you can engage fourth gear and push the car forward a little.
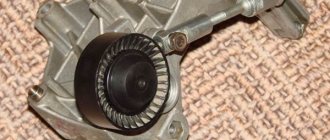
After completing this operation, you can install a new belt. There is a special roller for tensioning it. It is usually sold complete with a belt. If the old roller looks worn, it must be replaced with a new one.
Due to the presence of eccentricity, turning the roller ensures belt tension. The rollers of the new design have two holes on the plane; pins are inserted into them, and a lever is installed between them, with the help of which the tension roller is turned. The rollers on the VAZ-2109 carburetor have a 36 mm nut, due to which the roller was turned using a spanner.
The normal belt tension is determined manually. With light force, the plane of the belt can be rotated 90 degrees with two fingers. After tensioning, the roller is fixed with a 17 mm lock nut.
After the timing belt is properly tensioned, the alternator pulley is installed in place and the alternator pulley is fixed; the alternator belt should be carefully pulled onto it. After this, the timing belt protection and the right wheel are installed. Then the car starts and if all the symptoms that were on the old timing belt are absent, then the job is done successfully.
Replacing a timing belt is considered a rather difficult job, but quite accessible to an averagely qualified mechanic. In the end, it must be said that in order to prevent situations of rupture or unexpected wear of the belt right on the road, it should be replaced in a timely manner and preventive maintenance of the car should be carried out.