At the moment, VAZ 2110 cars are extremely popular. And although their production ended a very long time ago, these cars, even now, are distinguished by their good condition and durability. They are ideal for those motorists who are just starting to learn to drive. This is simply an ideal option for bad roads in the post-Soviet space. But even such durable cars can have breakdowns. Today we will tell you how to replace a bearing in a VAZ 2110.
Causes of failure
The main cause of bearing failure can be simple wear.
If you drive your car often enough, it can quickly break down. On average, the bearing life is 60 thousand kilometers. But this is under ideal conditions. If you have bad roads in your city, the resource will be significantly reduced. It will also decrease with an aggressive driving style. But there are other, uncontrollable factors. For example, temperature, suspension, tire profile and many other factors. In any case, if a problem occurs, you need to replace the bearing in the VAZ 2110.
Signs and causes of malfunctions
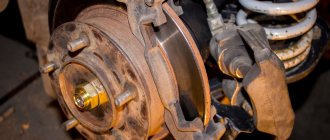
In the 2108 rear hub mechanism, it is the bearing that most often fails - this is the most vulnerable point. But sometimes more specific breakdowns occur - cracks on the metal surface of the hub, destruction of the threads for the wheel bolts. In the second case, you don’t have to completely change the hub, just cut a new thread. But this doesn’t always help; it turns out it’s easier to purchase and install a new one. Therefore, if when tightening the bolts they turn on the threads, you need to start repairs immediately, otherwise you may end up losing the wheel.
When the bearing wears out, extraneous sounds appear - a strong hum that increases with speed. There may be several reasons:
- Initially low quality of the product.
- Insufficient amount of lubricant inside the bearing.
- Incorrect installation.
- Exceeding the permissible resource.
In any case, the element must be replaced. After the hum reaches its maximum, vibration will begin to appear - and the stronger the wear, the greater the level it will be.
Bearing removal
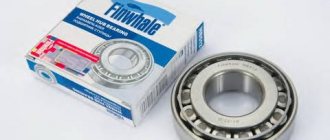
When you have purchased a new bearing and are preparing to replace it, you will first need to remove the product. It won’t be difficult to get it, but you will have to spend a little time.
- First you need to loosen the bolts that secure the wheel.
- After they are loosened, you will need to jack up the car. Without this, replacing the bearing will not be possible.
- When the car has been raised, you need to completely unscrew the bolts and nuts that secure the wheel. It needs to be removed. It is worth noting that this can only be done after lifting the car with a jack.
- On the wheel you can find a special decorative cap. It will also need to be removed.
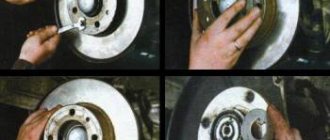
- Once you have removed the wheel and trim cap, you can see the drum. It is held in place with pins. These pins will need to be unscrewed. To do this, use a hexagon. There is no need to remove the drum, only the pins are unscrewed.
- Find the hub nut and unscrew it. Using a wrench extension, you need to remove the washer. Please note that this procedure will be much easier to do before lifting the car. If you do not have experience in replacing a VAZ 2110 bearing, then it is better to do just that.
- Next, using a removable device, you need to remove the hub. There shouldn't be any difficulties with this.
- Using the stop of the same puller, you will need to install the device on the axle.
- Find the hub piece and grab onto it. To do this, you need to use the paws of the removable device.
- After installation, be sure to check the quality of installation of the paws. If they hold steady, then you can tighten the threaded connection. This can be done with a key.
- After all these manipulations, you can finally remove the hub. It's not difficult to do. Behind the hub you will find the bearing outer race. It will contain balls and a separator.
- On the axle you will find a bearing ring.
- Attach the removable device. It will need to be attached to the back end. It is worth noting that here it will be much more difficult for the puller, so paws with sharper ends may be required. You can replace the presser feet, or use another removable device to make the job easier.
- Now you need to remove the inner ring. It is removed from the axle shaft using a removable device. Remove the ring only using a puller, this is much easier and safer.
- Only the hub remains. It is necessary to press out the old parts from it. For this you will need pliers. Use them to remove the locking element, after which you can remove the protective casing.
- To remove the casing you will need a vice. Using a vice, press the hub to knock the cover off. You need to knock the lid off very carefully so as not to damage anything.
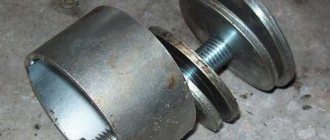
- Dismantling is almost complete. All that remains is to press out the outer race. To do this, you will first have to select a head of the desired diameter. You also need special attachments. With their help, the bearing will come out on the other side.
- Just clamp the resulting structure and twist it. It will be quite difficult, but eventually the bearing will be removed. After this, you need to move on to the bearing replacement part.
How to remove the hub
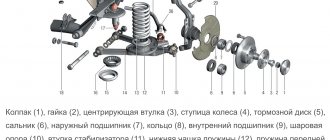
In order to dismantle the rear hub, you need to perform the following manipulations:
- Remove the brake drum by unscrewing the two guide pins. If the drum does not budge, you need to screw these guides into adjacent holes or carefully tap it from behind using a spacer.
- Completely unscrew the hub mounting nut, do not forget about the washer located under it.
- Using a three-legged puller, remove the hub. But you can use a simpler method - put the wheel on the reverse side and jerk it sharply.
- If the inner race of the bearing remains on the axle shaft, it must be removed using a two-legged puller.
That's all, now you can install the new rear hub assembly. But if you only need to replace the bearing, you need to remove the old one and replace it with a new one.
Installation and replacement
- First, install the new bearing you are going to install. Make sure that it has been positioned without any distortion, otherwise the bearing may be damaged.
- Next, clamp it in a vice and compress it to the end. You can use an old clip for replacement if it allows it.
- Once we have pressed the bearing in, it needs to be assembled and reinstalled. First you need to install the locking ring, then the protective casing. This is the bearing assembly.
- After replacing the bearing, install it. To do this, put the hub in place and tighten it. Please note that you need to lock the collar of the locknut.
- Install the drum completely, tighten it and install the wheel. Then we do everything the same as during dismantling, only in reverse order.
Three replacement options
Replacing the front wheel bearing of a VAZ 2110 is easy and simple
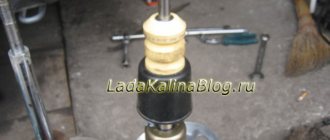
Subsequent actions can be performed according to one of 3 options. The first method involves replacing bearings using pullers, and it is not necessary to unscrew the steering knuckles of the machine. In the second case, you will have to dismantle the steering knuckles, and further work will be carried out on a workbench using a vice and pullers. If you choose the third option, you will have to completely remove the stand and change the bearings using a vice.
VAZ 2110 front wheel bearing removed using a puller
The advantage is that you do not have to touch the bolt that regulates the camber. The disadvantages include an inconvenient position when changing the bearing. In such a situation, it is problematic to carry out actions without a lift or inspection hole. In addition, in this position it is inconvenient to knock out the hubs and press in the bearings.
Front wheel bearing VAZ 2110
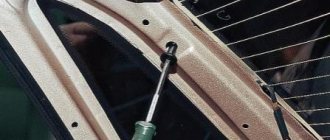
Using this method, the work of changing the bearing is carried out more conveniently and easily, but a problem arises in violations of the machine’s camber adjustment. Before unscrewing the steering knuckle mounting bolts from the strut (see Replacing struts on a VAZ 2110: how to do it right?), you need to put two marks.
During the assembly process, you need to take into account the coincidence of these two marks. It is unlikely that you will be able to achieve initial accuracy, but the errors will be minimal. This method is ideal for those who need not only to replace one wheel bearing, but also to repair the chassis, namely changing ball joints, steering ends and silent blocks of levers.
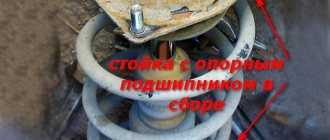
This is perhaps the most difficult method, since you have to remove the strut, unpress the steering tip, as well as the fastening nuts that secure the upper support to the base of the body. Change the bearings only after removing the strut from the car. This task is not easy, it will require more time, but this is an excellent method for those for whom the two previous methods did not work.