Fuel supply system design
The fuel supply system of the Lada Vesta car consists of 5 parts:
- Gas tank with filling pipe. The gasoline tank is made of compressed plastic and is attached to the bottom of the car with two metal clamps. The filler neck is located on the right side of the Vesta. The plug has 2 valve mechanisms. One ensures the release of excess pressure created in the tank due to thermal expansion. The other serves to intake air, which fills the container when the liquid level in the gas tank decreases.
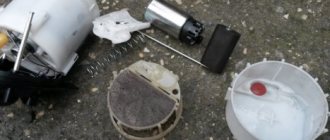
- Fuel module. Provides pumping of gasoline into the fuel rail. Consists of a fuel pump, bypass valve, gasoline level sensor and filter device.
- Injectors. Located on the ramp. Fuel is injected into the internal combustion chamber.
- Adsorber. The main component of the vapor recovery system. Located on the right side of the car, near the front fender. Equipped with a purge valve.
- Pipelines. Serve to transport fuel and gases between components of the fuel supply system.
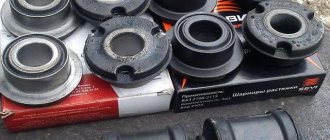
Where is the fuel filter on the Vesta? Photo source: https://www.drive2.ru/l/527598181760894565
Unlike the design of the unit installed on previous AvtoVAZ models, the Vesta fuel filter is not portable. According to the manufacturer, the cleaner's lifespan is sufficient for the entire life of the vehicle. Sometimes cases of low-quality gasoline are poured in, which forces owners to replace the mesh in the Vesta filter.
The process of replacing the fuel filter Lada Vesta
1. Before you start replacing the fuel filter, you need to relieve the pressure in the system. This is done simply - remove the fuel pump fuse and start the car. After 2-3 minutes it will stall on its own. After this, you can proceed to replacement.
Please note that before replacing the fuel filter, you must turn off the power to the car. To do this, it will be enough to remove the negative terminal from the battery.
2. Raise the rear seat and remove part of the sound insulation above the fuel pump inspection hatch.
3. Turn the hatch cover until it disengages.
4. Disconnect the connector from the fuel pump and remove the outlet hose. In order to do this, you need to press the plastic clips and pull it to the side.
5. Now you need to remove the fixing ring. This is done using a wooden block and a hammer. In some cases, it is possible to unscrew it by hand. But let’s assume that we were not very lucky and this turned out to be very long. We carefully place the block on top and, with light blows of a hammer counterclockwise, loosen the clamp. Then unscrew it completely and put it aside.
6. Now you need to remove the entire fuel pump module. We do this slightly at an angle so as not to damage the fuel level indicator float.
7. Now we need to remove the lower part of the pump, in which the coarse fuel filter is located. We disconnect it and put it aside. It is not necessary to change this part, just wash it with carburetor cleaner.
8. Now we need to disassemble the pump further. Disconnect the wire from the fuel pressure regulator.
9. Take out the spring filter and carefully pull out the fuel pressure regulator.
10. Disconnect the intake tube from the anti-tide chamber and, holding the clamps, pull out the fine filter along with the pump.
11. When it becomes possible to remove the pump, remove it. There is no need to disconnect the hose from it, since it is pressed on under heat and after removal may not provide the necessary sealing.
12. Install a new fuel filter and assemble everything in reverse order.
After installing the pump in place, do not forget to bleed the entire system. Just turn the ignition key a couple of times, but don't start the car. The third or fourth time, start the car.
That's all, now you can enjoy engine performance and fuel consumption.
Article number and cost of the original fuel filter
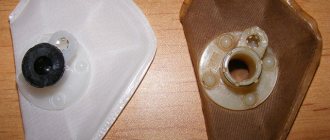
The original Vesta filter element does not have an article number. On the open market, a mesh that performs rough cleaning can be found at a price of 165 rubles. Produces consumables. Under its logo you can find repair kits for the Lada Vesta fuel pump costing 950 rubles. The kit includes coarse and fine filtration devices, a pulsator tube and a lid (assembled).
Replacing the fuel filter. Photo source: https://www.drive2.ru/l/527598181760894565
In an official car service, they do not change individual components, but install a new unit. The catalog number of the fuel pump is 21800113900900. The cost of a new original unit averages 6,000 rubles.
How the module is disassembled
- We disconnect the lower half along with the metal mesh to clean the fuel. Depending on its condition: wash it with gasoline (kerosene), replace it with a new one if damaged.
- Disconnect the regulator wire.
- Remove the spring filter.
- We remove the hose, hold the clamps, and take out the fine gasoline filter.
The subsequent list of work depends on the results of equipment diagnostics. In the absence of obvious mechanical damage and depressurization, we install a new filter element and assemble the structure in the reverse order. Replacement of the Lada Vesta 1.6 (1.8) fuel filter is completed. Subsequent scheduled maintenance after 150 - 180 thousand km.
When to change the fuel filter on Vesta
According to the manufacturer, the service life of the fine gasket is equal to the service life of the fuel pump. The fuel pump has a resource of 180 thousand kilometers. Photos on the Internet show dirty filter elements with more modest mileage figures.
On forums, car owners say that they change the fuel filter on their Vesta every 30-40 thousand km. The frequency of replacement is directly affected by the purity of the fuel used. When refueling at a suspicious gas station, the filter elements may become clogged within the first kilometers of driving.
Signs that replacement is needed
You can understand that the filtration device is clogged by some characteristic features of the machine’s behavior. These include:
- fuel pump noise;
- increased fuel consumption;
- reduction in engine power;
- car jerks when driving;
- floating idle speed;
- Difficulty starting the engine.
When the “Check Engine” light comes on and subsequent computer diagnostics, a clogged fuel filter displays error P0171.
Photo of the fuel filter on the Vesta. Photo source: https://www.drive2.ru/l/527598181760894565
These signs may also indicate other problems. But if the filter device was changed a long time ago, then you can start eliminating the problems by replacing it.
↑ Fuel filter location
A feature of the fuel system of such models as Lada Vesta and Xray, the price of which is exceptionally attractive, is its built-in design. What does it mean? First of all, the coarse and fine fuel filters in these models are built into their electric fuel pumps.
Moreover, these models have different types of electric pumps. If in the case of the Xray model they use a device identical to the one that can be found not only in Lada Largus, Granta or Kalina, but also in Renault Logan and Sandero, then the situation with Vesta is different.
The latest model has a different fuel pump. Its catalog number is 21800113900900. This, however, does not lead to a big difference in technical characteristics.
Self-replacement of the coarse fuel filtration device
The process of removing the gasoline pre-purification mesh on Vesta is more complicated than dismantling the filter on AvtoVAZ cars of other models. Difficulties arise from the fact that the unit is built into the fuel pump. A flathead screwdriver may be needed when working to remove the fuel pump.
Video demonstrating how to replace the fuel filtration element on a Lada Vesta:
How to remove
Step-by-step instructions on how to remove the Vesta fuel filter:
- Remove the back cushion of the sofa. The seat is secured with latches at the front and hooks at the back. Remove the interior soundproofing gasket to provide access to the pump cover.
- Rotate the cover protecting the fuel pump and remove it.
- Vacuum and wipe everything thoroughly so that dust and small debris do not get into the gas tank.
- Disconnect the fuel pump power terminal.
- Start the car and let it run until it stalls.
- Remove the terminal from the battery.
- Disconnect the fuel line.
- Turn the fuel pump retaining ring counterclockwise and remove it.
- Remove the element in the plastic case. You need to pull out the knot carefully, at a slight angle. Otherwise, the float sensor that determines the fuel level may be damaged.
- Carefully pull the lower part of the pump, where the Lada Vesta fuel filter is located, and remove it.
- Disconnect the drain pipe.
- Remove all the springs from the glass, marking which part was on which guide.
- Unclip the 3 latches and remove the fuel module.
- Pry up the spring holding the mesh and remove the coarse cleaning element.
Getting to the place where the fuel filter is located in the Vesta is quite difficult. You need to remove the components of the assembly very carefully, otherwise the process of replacing the mesh will result in the purchase of a new fuel pump.
How to install a new one
The fuel pump is assembled and installed in the reverse order. After completing the work, you need to bleed the fuel supply system. To do this, insert the ignition key into the lock and turn it a couple of times without starting the car. Then the car is started.
Self-installation of a removable fuel filter on Lada Vesta and X-Ray
Lada Vesta and X-Ray became landmark models for AvtoVAZ. It is not surprising that their design included solutions that had not previously been seen on AvtoVAZ vehicles. This also applies to the location of the fuel filter - in sedan and crossover it is located directly in the electric fuel pump module, which makes cleaning or replacing it difficult.
For this reason, some car owners independently modify the design, by analogy with previous models of the Russian company, by installing a removable fuel filter. It is worth noting that such a decision by the owners is not without reason. It’s no secret that the quality of the fuel that is filled at many domestic gas stations leaves much to be desired. Therefore, it is not uncommon for fuel pumps on cars to burn out precisely because the filters are clogged.
But installing a remote component will greatly facilitate its replacement. As it turns out, there are several options for such a modification, depending on the type of engine.
H4M engine from Renault-Nissan
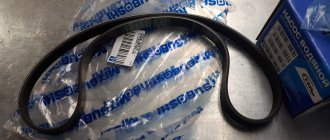
This method was tried by Drayvovite walla03. The design of the Lada XRAY implies the presence of a dummy under the hood of the car. Therefore, in its place you can put a VAZ filter, which costs about 200 rubles.
To independently install a removable fuel filter on the X-Ray, you need to turn off the engine, then unscrew the filter and remove the quick-release fuel pipes, and then put the purchased filter in place of the dummy.
Of course, it’s difficult to talk about the effect, but it definitely won’t get any worse. In addition, after completion of 15,000 km, the installed element was replaced. An inspection showed that there were contaminants inside, even with a standard filter in the gas tank.
As you can see, self-installation of a removable fuel filter on Lada Vesta and X-Ray generally pays off. In addition, the cost of such modifications is low, and it takes little time.
Removing elements of the fuel system of a Lada Vesta car
Fuel from the tank, which is located in the rear of the car in the area of the rear seats, is supplied through pipes and hoses to the engine fuel injection system using an electric fuel pump module.
A general picture of the fuel supply system is shown in Figure 1.
Removing the electric fuel pump module
We prepare the car for the job. Fold the rear seat cushion forward.
Remove cover 1, Figure 2, of the fuel pump hatch.
Disconnect block 3, Figure 3, of the rear wiring harness from the electric fuel pump module 2.
We start the engine and let it idle until it stops completely to relieve pressure in the fuel system, ensuring the removal of exhaust gases.
We press the spring clamps of the tip of tube 5 of the rear fuel pipeline and, moving along the axis of the fitting, disconnect the tube from MEBN 1.
Using wrench 67.7812-9709 to remove and install the MEBN clamping ring, turn the clamping ring 2 counterclockwise, remove the ring and MEBN.
Installation
Install the MEBN 1, Figure 3, into the fuel tank 4, install the pressure ring 2 and turn it clockwise.
Attach tube 5 of the rear fuel pipeline to the MEBN by moving along the axis of the fitting until the spring lock of the connector clicks. Check that the tube is securely fastened.
Connect block 3 of the rear wiring harness to the MEBN.
Install cover 1, Figure 2, of the fuel pump hatch.
Lower the rear seat cushion.
Connect the earth wire terminal to the battery.
Removing and installing the fuel tank
We place the car on the lift.
We bleed the fuel pressure as described above.
Turn off the ignition and disconnect the negative terminal of the battery.
Raise the car and drain as much fuel as possible from the fuel tank. When pumping fuel, take measures to prevent leakage.
Remove the right rear wheel.
Using a screwdriver with a Torx T20 bit, unscrew the three self-tapping screws 1, Figure 4, securing the filler neck 2 of the fuel tank to the body.
Raise the car to a comfortable height.
Using a 13 socket, unscrew nut 1, Figure 5, securing the filling pipe 2 of the fuel tank to the body.
Remove the ground wire terminal 3 from the mounting stud on the body under the rear right wheel arch.
We remove the additional muffler 1, Figure 6, exhaust system, article - “Removing the exhaust system.”
We move the muffler 5 of the main exhaust system to the left and secure it to the left arm 4 of the rear suspension.
Using a flat screwdriver, remove the holders 2 of the heat shield and the heat shield 3 of the fuel tank 6.
We press the spring clamps of the tube tips and, moving along the axis of the fitting, disconnect tube 1, Figure 7, rear steam line from tube 6 of the steam line and rear tube 2 of the fuel pipeline from tube 4 of the fuel pipeline.
Using a 13mm head, unscrew the four bolts 1, Figure 8, securing the fuel tank clamps 3.
Using a flat screwdriver, disconnect the holders 4 of the fuel tank clamps and remove the clamps 3.
We remove the fuel tank. Perform the operation with an assistant.
Installing the fuel tank
Install fuel tank 3, Figure 8. Perform this operation with an assistant.
Install the left and right mounting clamps 2 on the fuel tank 3 and secure them with holders 4.
Install bolts 1 securing the fuel tank clamps. The tightening torque of the fuel tank clamp bolts is 18 - 24 Nm (1.8 - 2.4 kgf.m).
Attach tube 1, Figure 7, of the rear steam line to tube 6 of the steam line by moving along the axis of the fitting until the spring lock of the tip clicks.
Connect the rear fuel pipe tube 2 to the fuel pipe tube 4 by moving along the axis of the fitting until the spring clamp of the tip clicks.
Check that the tubes are securely fastened.
Install heat shield 3, Figure 6, of the fuel tank and secure with holders 2 of the heat shield. Replace faulty holders.
Install additional muffler 1 for the exhaust gas system.
Secure with screws 1, Figure 4, self-tapping filler neck 2 of the fuel tank to the body.
Install the ground wire terminal 3 onto the stud securing the filler pipe to the body.
Tighten nut 1 securing the filler pipe 2 of the fuel tank. The tightening torque of the filler pipe fastening nut is 4 Nm (0.4 kgf.m).
Install the right rear wheel.
Connect block 3, Figure 3, of the rear wiring harness to MEBN 1.
Install cover 1, Figure 2, of the fuel pump hatch.
Lower the rear seat cushion.
Connect the earth wire terminal to the battery.
Removing the fuel line
We place the car on a lift and relieve the fuel pressure as described above.
Turn off the ignition and disconnect the negative terminal of the battery.
Removing the front fuel pipe
Remove the intake module screen.
We disconnect tubes 1 and 2, Figure 9, of the fuel pipeline from bracket 3 securing the fuel pipeline on intake module 4 (for engine 21129).
We press the spring clamps and disconnect the tip of the fuel tube 1 of the front fuel pipeline from tube 2 of the front fuel pipeline by moving along the axis of the fitting.
We remove the intake module, article - “Removing and installing the intake module of the Lada Vesta car.”
We press the spring clamps and, moving along the axis of the fitting, disconnect the tip of the front tube 1, Figure 10, of the fuel pipeline from the injector ramp 2.
Using a flat-head screwdriver, disconnect bracket 3 of the fastening and remove the front fuel pipe.
Removing the front fuel line tube
Remove the intake module screen.
We disconnect tubes 1, Figure 9, of the front fuel pipeline and the front 2 fuel pipeline from bracket 3 securing the fuel pipeline on the intake module 4 (for engine 21129).
We press the spring clamps and disconnect the tip of the front fuel pipe tube from the front fuel pipe tube by moving along the axis of the fitting.
We press the spring clamps and, moving along the axis of the fitting, disconnect the tip of tube 7, Figure 1, of the front fuel pipeline from tube 5 of the fuel pipeline.
Removing the fuel line tube
We press the spring clamps and, moving along the axis of the fitting, disconnect the tip of tube 7, Figure 1, of the front fuel pipeline from tube 5 of the fuel pipeline.
We raise the car on a lift to a height convenient for performing the work.
We press the spring clamps of the tube tip and disconnect tube 2, Figure 7, of the rear fuel pipeline from tube 4 of the fuel pipeline by moving along the axis of the fitting.
Disconnect the middle fuel pipe 4 from brackets 5 and remove it from the car.
Removing the rear fuel pipe
We press the spring clamps of the tip of the tube 5, Figure 2, of the rear fuel pipeline and, moving along the axis of the fitting, disconnect the tube from the MEBN fitting 1.
Raise the car on a lift to a convenient height.
We press the spring clamps of the tip of tube 2, Figure 7, of the rear fuel pipeline and, moving along the axis of the fitting, disconnect the fuel pipeline from tube 4, remove the rear fuel pipeline tube.
Installation
Install the fuel pipes on the vehicle in the reverse order of removal.
The tips of the fuel pipe tubes have green clamps.
When installing fuel pipeline pipes, attach the tips of the pipes to the fittings until the spring clip clicks. After installation, check that the tubes are securely fixed.
Connect block 3, Figure 3, of the rear wiring harness to MEBN 1.
Install cover 1, Figure 2, of the fuel pump hatch.
Lower the rear seat cushion.
Connect the earth wire terminal to the battery.
Removing the steam line tube for the fuel vapor recovery system
Steam pipes, Figure 1:
— front 11;
— from the adsorber to the adsorber purge valve 12;
— from the canister purge valve to the intake module 14.
We place the car in the workplace, apply the parking brake and turn off the ignition.
Remove the intake module screen (to remove the tube from the canister purge valve to the intake module).
We press the spring clamps of the tips of the corresponding steam pipe and, moving along the axis of the fitting, disconnect the tube from the fitting and remove the pipe from the car.
Removing the steam pipe
We press the spring clamps of the tip of the tube 11, Figure 1, of the front steam line and, moving along the axis of the fitting, disconnect the steam line from tube 6.
Raise the car to a comfortable height.
We press the spring clamps of the tip of tube 1, Figure 7, of the rear steam line and, moving along the axis of the fitting, disconnect the steam line from tube 6.
We disconnect the steam pipe from the mounting brackets 5 and remove it from the car.
Installation
Install the steam pipes on the vehicle in the reverse order of removal.
The tips of the steam pipes have yellow and black retainers.
When installing steam pipes, attach the tips of the pipes to the fittings until the spring lock clicks. After installation, check that the tubes are securely fixed.
Removing the canister purge valve
We prepare the car for work, turn off the ignition and disconnect the negative terminal of the battery.
Disconnect block 1, Figure 11, of the front wiring harness from valve 3 of the canister purge.
We press the spring clamps of the tip of the tube 2 of the steam line to the intake module and, moving along the axis of the fitting, disconnect the tube from the canister purge valve.
We press the spring clamps of the tip of the tube 4 of the steam line from the adsorber and, by moving along the axis of the fitting, disconnect the tube from the adsorber purge valve.
Remove the canister purge valve from the bracket on the car body.
Install the canister purge valve in the reverse order of removal.
When installing steam pipes, attach the tips of the pipes to the fittings of the canister purge valve until the spring clip clicks. After installation, check that the tubes are securely fixed.