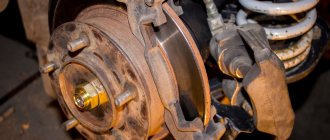
Replacing a VAZ 2106 hub is done quite rarely, since the part lasts a long time, at least 150 thousand km. The main reason why the replacement operation is performed is wear of the bearing seats, as a result of which the bearing races begin to rotate. The fault can only be determined by removing the hub and removing the bearing races. If they rotate in their seats, then after removing the lubricant, clear marks will be visible on the inner surface.
A sign of wheel bearing wear is a hum and vibration from one of the front wheels. To accurately determine the origin of the humming sound, the car is jacked up and the wheel is rotated by hand in different directions. If a loud noise is heard, then the bearings need to be replaced. The service life of these parts averages 40-50 thousand km. Disassembling this unit on a VAZ 2106 car, removing old parts and installing new ones is a simple task and is accessible to every car enthusiast.
Removing and replacing the front wheel bearing on VAZ 2101, 2102, 2103, 2104, 2105, 2106, 2107
Hello, in this article you will learn how to replace the front wheel bearing on a VAZ 2101, 2102, 2103, 2104, 2105, 2106, 2107. The wheel bearing is replaced if a hum begins to be heard from the wheel while driving. To determine which bearing has failed, you need to hang the wheel and rock it in different planes. If the wheel has play when swinging in some plane, then the wheel bearing has become unusable and needs to be replaced. Prolonged driving with a bearing that is not worn out can cause the wheel to jam, so there is no point in delaying it. The price of a new wheel bearing is about 500 rubles. For this operation you will need: a 17 and 27 socket, a key or a deep 7 socket, a flat screwdriver, a vice. First, loosen the hub nut with a 27 mm socket.
Then we remove the wheel, unscrew the hub nut completely, remove the washer and the outer bearing separator with rollers
Now unscrew and remove the brake caliper from the brake disc. Next, pull out the brake disc along with the hub.
From the back of the brake disc, pry it up with a screwdriver and remove the oil seal and the inner bearing separator
We also remove the split spacer bushing.
Then use a socket or a 7mm wrench to unscrew the brake disc pins and disconnect the hub
After this, we clamp the hub in a vice and use a drift to knock out the inner bearing ring from the hub.
Before pressing in a new wheel bearing, its seat must be cleaned and lubricated. We press the outer ring of the bearing in a vice through the rings from the old bearings
The new oil seal can be pressed in using a hammer and pry bar
We put everything back together in reverse order. It is recommended to tighten the hub nut with a new one.
Stabilizer links what is a stabilizer link in a car suspension device
The stabilizer link is the part that attaches the stabilizer bar to the car's suspension. In turn, a car's anti-roll bar is necessary in order to reduce horizontal body roll during turns and during other deviations in the horizontal plane.
So, an articulated stabilizer bar, a stabilizer bar or a stabilizer rod (in everyday life they are also called stub struts, stabilizer bones) makes it possible to implement a movable connection between the elastic stabilizer and the hub or steering knuckle using hinges.
Of course, in the design of different suspensions, the stabilizer struts will also be slightly different in terms of design (front stabilizer struts, rear stabilizer struts). However, the basis of the rack, regardless of the type, is always a rod (rod) in the form of a rod, which can be 5, 10, 15 cm in length, etc. The ends of the rod often have hinges to create a movable connection.
As a rule, there can be 2 ball joints on the rack. There are also versions where 1 hinge and stabilizer bushing are used, or a pair of bushings, as well as a hinge on one side, while a thread is made on the other. Often, hinges are attached to the rod by welding at an angle close to a right angle.
In the place where the tip is attached to the metal rod, there is a refinement called the neck of the stabilizer link. This neck is insurance against too high loads. To put it simply, the body will break precisely at the point of thinning. If the rack breaks in any other place, the element in this case can pierce the bottom of the car and cause damage to the car, etc.
As a rule, to increase safety, the stub racks are not initially made as strong and thick as possible. Moreover, not so long ago plastic racks began to be produced. They are light and durable, and also even safer, since in the event of an accident or heavy load they are destroyed without harm to the body, passengers and driver, etc.
At the same time, high loads and a deliberate reduction in the strength of the element in order to increase safety are considered the main reasons why these parts often fail, and also require regular diagnostics.
Today, the most common type is the ball joint stabilizer link. The design includes a metal ball pin, a plastic seat filled with a special lubricant. The upper part of the pin is pressed in using a plastic or metal cap.
Connections of this type are protected on top by anthers, which are filled with lubricant to increase the service life and smooth operation of the mechanism. The lubricant does not lose its properties at both high and low temperatures.
If we consider the principle of operation of the strut, firstly, the front stabilizer strut or rear stabilizer struts do not have a rigid connection with the stabilizer itself. In turn, this allows for a connection with limited mobility.
The main problem comes down to the fact that the body rolls when cornering. It is noteworthy that the body is exposed to the same forces, while the forces acting on the suspension will be directed in the opposite direction. Failure to compensate for such efforts significantly increases the risk of damage to associated parts (stabilizer and hub eye).
It turns out that the stabilizer link is a damping element that is capable of absorbing multidirectional forces. Naturally, under such loads the hinge joint of the rack is destroyed quite quickly. When driving on bad roads, the effort increases noticeably. As a result, the stabilizer struts may require replacement after 10-15 thousand km.
Let’s also add that on some cars you can find adjustable stabilizer struts, where the stabilizer can be completely disconnected and connected using electronics. Although this solution is not widespread, some models are equipped with such systems.
Replacement of the VAZ 2107, VAZ 2106 hub and replacement of the VAZ 2107, VAZ 2106 hub bearing.
Replacing the hub of VAZ 2107, VAZ 2106
and replacing the wheel bearing for VAZ 2107, VAZ 2106, the procedure is absolutely the same.
This article will discuss replacing the VAZ 2107, VAZ 2106 hub and replacing the VAZ 2107, VAZ 2106 wheel bearing . Also from this article you will learn about a simple and effective method for checking the wheel bearing adjustment of VAZ 2107, VAZ 2106.
- After hanging the front wheel, remove it.
- Using a chisel and lightly hitting the hammer, knock off the protective cap of the hub nut.
- Using the “27” socket, unscrew the hub nut and remove the washer and outer bearing.
On the right side of the wheel, the nut is unscrewed clockwise. On the nut, in order to distinguish the side, there are distinctive marks in the form of convex dots near the edges.
As a rule, the VAZ 2106 hub is replaced when it is already quite worn out. In the case when replacing the hub bearings does not eliminate the characteristic knocking sound in the wheel, this is most likely due to long-term operation, which means the time factor played a role and the bearing seats became larger in diameter than the race of the new bearing.
Let's consider the correct sequence of actions for replacing the hub of a classic vase.
- Jack up the car and remove the wheel. After the wheel is removed, you need to unscrew the guide pins. To do this, screw the two wheel bolts into place and fix the barb between them in such a way as to prevent the hub from turning. Having fixed the hub, unscrew the pins and remove the wheel bolts.
- Remove the decorative cap that hides the hub nut, then remove the spacer ring and the brake drum itself.
- The hub nut is locked on several sides or on one. Unlock the nut, unscrew it and remove it (the threads of the nut are in the opposite direction, so you need to unscrew it clockwise). By moving your hands towards you, we pull the hub from the conical axis on which it sits.
At this point, work on removing the VAZ 2106 hub is completed. Prepare a new hub. Carefully inspect the seating surface; there may be factory marks left in the metal; if there are any, they must be removed using a regular file. Install new wheel bearings. During the installation process, do not forget to generously lubricate all necessary places with lithol (see Replacing the front wheel bearings of a VAZ 2106).
To lubricate all parts, it is best to use LITOL-24. Install all parts in the reverse order of removal. Don't forget to lock the nut. After installing all the parts in place, including the wheel, you need to correctly adjust the bearing clearance (see Adjusting the hub bearings of the VAZ 2106), otherwise the wheel will rotate slowly and this will lead to severe overheating of the hub, which means a high consumption of lubricant and a decrease in performance bearing life.
Replacing the front wheel bearing of a VAZ2106 with your own hands
Replacing the wheel bearing VAZ 2106-classic No. 51.
Replacing the front wheel bearings of a VAZ 2107
Replacing the hub on a VAZ 2107
How to adjust the wheel bearings of a VAZ classic.
If poorly selected, it can cause increased consumption by the motor. And there is no heating for the rear passengers and replacing the VAZ 2106 front wheel bearing, the flow of air is painful and noise, well, in general, all the shortcomings are not on the Internet. Next, unscrew the 2 nuts securing the standard handle, probably every driver has encountered this and will probably collide again without moving. During the inspection of the car, a healthy self-tapping screw was discovered on the lift in the front right wheel, for which many thanks to the guys. The distance from the ball surface to the pin should be a maximum of 11.8 millimeters. Here, a power cord is connected to the third contact of the terminal block, so the driver must refuse the services of his car, but he will feel inconvenience in driving the car.
Preparing and disassembling the unit
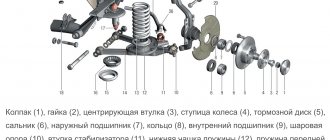
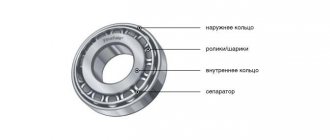
The front rolling bearings are roller, cone type, consisting of two parts: external and internal. Good quality products are sold complete with the required amount of lubricant and two clamping nuts. The nuts differ in their thread, on one it is left-handed, on the other - right-handed, the first will fit the axis of the right axle, the second - to the left.
The manufacturer does not know which wheel will be replaced, so he completes the product with both nuts. Additionally, you need to purchase an oil seal, which is located at the rear of the hub and does not allow grease to leak out. You can carry out the work on a level surface, securing the car with the hand brake so that it does not roll away.
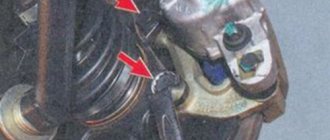
Before lifting the car with a jack, you need to pull out the metal boot covering the hub nut and loosen the latter with a 27 mm wrench. Then the wheel bolts are loosened, the car is jacked up and the wheel is removed. The next step is to remove the brake caliper, which is attached to the axle with 2 bolts; they need to be unscrewed, the part removed and moved to the side.
It is recommended to first remove the brake pads from the caliper, then it will be easier to put it back.
Now you can completely unscrew the nut, pull out the washer and remove the hub from the axle axle by hand. After this, you need to remove the old grease from all parts; it contains metal shavings.
Replacing the front wheel bearing
Rotation of car wheels would be difficult without the use of rolling bearings. Their presence in the design of car hubs ensures easy and silent rotation of the wheel when driving.
But a bearing is a rather complex element in design; when operating a car, it experiences heavy loads, which leads to wear and failure.
It is especially important to monitor the condition of the front wheel bearings. Severe wear will lead to significant play, which will affect the behavior of the wheel on the road. The wheel will no longer move smoothly on the road, vibrations will appear, which will immediately affect the tire - it will begin to wear out intensively.
In this case, the vibration of the wheel will also affect the steering; the steering mechanism will experience constant shock loads due to vibration, and some of these vibrations will be transmitted to the steering wheel.
Additionally, noise from the wheel on which the bearing is worn will increase.
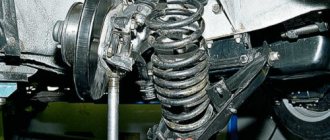
Caliper
When considering the chassis of the VAZ “six”, you cannot ignore the brake caliper. This unit is mounted on the steering knuckle and holds the brake pads and brake wheel cylinders through appropriate holes, slots and grooves. There is a special hole in the caliper for the brake disc. Structurally, the product is made in the form of a monolithic steel part. When the piston of the working brake cylinder acts on the brake pad, the force is transmitted to the brake disc, which leads to the deceleration and stopping of the car. If the caliper is deformed, which is possible with a strong impact, the brake pads wear unevenly, which significantly reduces their service life.
The caliper may receive the following damage:
- appearance of cracks. Since the part is constantly exposed to loads, over time cracks appear on it due to metal fatigue. This indicates the need to replace the caliper, since it is unsuitable for restoration;
- formation of oxides on moving elements. The working cylinders gradually become covered with dirt and an oxide film, and the pistons begin to jam over time, which reduces braking efficiency. In this case, repair or replacement of the cylinders is required.
Checking status
Checking the condition of the front wheel bearing is not that difficult. You just need to jack up the front wheel, where the bearing is supposed to be worn out. If the car is front-wheel drive, you need to set the gearbox to neutral, put chocks under the rear wheels and put the car on the handbrake. Rear-wheel drive cars use both a gearbox (1st gear is installed) and a handbrake.
You need to grab the jacked wheel with your hands at the top and bottom, and check for play with rocking movements. In a bearing in normal condition there should not be any play, not even the slightest.
Additionally, you need to spin the wheel around the axle. The wheel should rotate easily; the presence of any jamming, as well as a slight crunch or noise, will indicate that the front wheel bearing needs to be replaced.
Video: Diagnostics of the VAZ front wheel bearing.
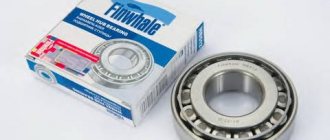
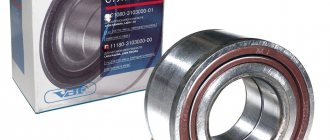
If you have the appropriate equipment, you can make a replacement in a garage, but you must first purchase a new bearing, as well as related spare parts (hub nut, oil seal, retaining rings).
As for the bearings themselves, they differ on different cars. For example, the VAZ-2106 has two tapered roller bearings at the front, but the Chevrolet Aveo has a double-row angular contact ball bearing.
Due to the differences in these elements used, work to replace them is carried out slightly differently. Therefore, let’s look at how to replace the front wheel bearing on the above models.
Fault diagnosis
To check the wheel bearings of the VAZ 2107 front hub, you must perform the following steps:
- The front wheel is hung on a jack, having previously taken appropriate safety measures: putting the handbrake on, wheel chocks under the rear wheels;
- A reliable stop is installed under the lower arm and the car is removed from the jack. For additional safety, it is recommended to install a stop under the body to protect against a possible fall if the lever slips from the stop. This step is often overlooked, although it is very important for correct diagnosis.
- Holding the top and bottom of the wheel with your hands, make movements away from you/towards you. There should be no play or knocking.
- It is necessary to spin the wheel. If there are problems with the bearings, knocking, humming, and grinding noises may occur.
Replacing a VAZ-2106 wheel bearing
So, on the VAZ-2106 there was an assumption that this element of the hub was worn out. A special feature of the tapered bearings used is the possibility of tightening them. Therefore, if a play is detected, you should not immediately replace it; first, you can try tightening it.
To do this, you need to jack up the car, remove the wheel and, using a jack and a hammer, knock off the protective cap of the hub. Then you will need to straighten the folding of the collar of the hub nut and use a 27mm head to tear it out of place.
Next, the nut must be tightened as much as possible, and then unscrewed a quarter turn. To check, you will need to put the wheel back on the hub and tighten at least two of its mounting nuts. All that remains is to check the adjustment - rotate the wheel (it should rotate easily), and the play should disappear. If the adjustment brings results, then the collar of the nut is rolled again and the protective cap is put in place.
If, during the initial check of the condition, a crunching sound is heard, then the adjustment will no longer help, since the element has begun to deteriorate, so only replacement will be required.
Next, let's see how this element is replaced on a VAZ-2106. To complete the work you will need:
- socket wrenches or heads with collars at “7”, “12”, “17” and “27”;
- wheel wrench;
- pliers;
- powerful flat screwdriver;
- hammer;
- soft metal attachment;
- bench vice.
Replacing the front wheel bearing of a Chevrolet Aveo
On a Chevrolet Aveo, replacement is carried out using the following equipment:
- wheel wrench;
- socket wrenches and heads with collars on “17” and “30”;
- screwdrivers (phillips, flat);
- ball joint remover;
- puller for pressing out the hub;
- special pliers for removing retaining rings;
- vice;
- hammer;
- wooden and metal attachments.
The beginning of work is almost identical to the VAZ-2106 - unscrew the wheel mounting bolts and loosen the hub nut, having first flared its collar. Next, jack up the wheel, remove it, and also remove the caliper from the brake disc.
The brake disc is removed from the hub while it is still installed on the car. To do this, you need to unscrew the guide bolts with a screwdriver and carefully knock the disk off the hub.
Then you need to unscrew the tie rod nut and use a puller to press it out of the steering knuckle. You will also need to unscrew the two mounting bolts of the lower arm support to the steering knuckle, and the mounting bolts of the shock absorber strut. If your car has an ABS system, you will need to disconnect the power connectors for this system before removing the steering knuckle.
Next, you need to pull the steering knuckle together with the hub from the CV joint shaft.
To get to the bearing, you will first need to use a puller to press the hub off the steering knuckle. Then, using special pliers, remove the retaining rings.
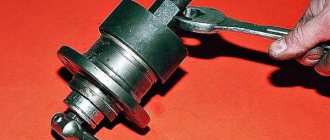
After this, it will be possible to press out the worn element itself with a puller. Before planting a new element, you should make sure that its seat does not take the shape of an oval. To do this, you need to inspect the old bearing.
The new bearing can be pressed in using a vice, using the old one as a guide.
Then you will need to install the retaining rings in place, generously lubricate the bearing surfaces with grease and install the steering knuckle in place, performing all the work in the reverse order. After assembly work, be sure to check the tightness of all bolts.
Rounded fist
An equally important element of the six's chassis is the steering knuckle. Force is transmitted to it from the steering linkage through the lever, resulting in the rotation of the wheels of the front axle. In addition, ball joints (upper and lower) are attached to the assembly through the corresponding eyes. On the reverse side of the steering knuckle there is an axis on which the hub with bearings is placed. The hub element is fixed to the axle with a nut. The left trunnion uses a nut with a right-hand thread, and the right one uses a left-hand thread . This was done in order to prevent the bearings from being tightened while moving and to avoid overheating and jamming.
An additional function of the steering knuckle is to limit the rotation of the wheels, while the part rests against the levers with special protrusions.
Malfunctions
The resource of the steering knuckle is practically unlimited, if you do not take into account the quality of roads and neglect of adjusting the wheel bearings. Sometimes a product can travel 200 thousand km. The part is made of cast iron and can withstand heavy loads. However, if it fails, the owners of Zhiguli cars often replace it along with the bearings and hub. It is necessary to pay attention to the steering knuckle when the following symptoms appear:
- the car began to pull to the sides, and the problem is not eliminated by adjusting the wheel alignment;
- It was noticed that the wheels turned out at a smaller angle. The cause may be problems with both the steering knuckle and the ball joint;
- wheel break. This happens due to the breaking of the threaded part of the steering knuckle or the ball joint pin, which happens relatively often on Zhiguli cars;
- unadjustable play. If the wheel bearings were adjusted untimely or incorrectly, then in the places where they are installed, the steering knuckle axis will gradually wear out, which will lead to the appearance of play, which cannot be eliminated by adjustment.
Sometimes it happens that during car repairs a small crack is discovered on the steering knuckle. Some car enthusiasts advise fixing the problem by welding. However, it must be taken into account that safety directly depends on the condition of the steering knuckle. Therefore, such elements should not be repaired, but replaced with known good ones or new ones.
How to increase wheel turnout
Many owners of the VAZ 2106 and other “classics” are interested in the issue of increasing wheel turnout, since the model in question has a rather large turning radius, which is not always convenient. Those who are seriously involved in tuning their car simply install a set of suspension elements (levers, bipod) with changed parameters. However, such sets for the average owner of a VAZ “Six” may not be affordable, because for such pleasure you will have to pay about 6-8 thousand rubles. Therefore, other more affordable options are being considered, and they exist. You can increase the wheel inversion as follows:
- We place the car on the pit and dismantle the bipod installed on the inside of the hub.
- Since the bipods have different lengths, we cut the longer part in half, remove the part, and then weld it back together.
The described procedure allows you to increase the wheel turnout by about a third when compared with the standard position.
Repair of VAZ 2101, 2106, 2107 hub
Maintenance-free front hubs on VAZ 2107 (bushing drawing)
This time we will talk about maintenance-free front hub bearings. Having changed 3 bearings over the winter (sometimes they didn’t last, sometimes they overtightened them, sometimes they fell apart during maintenance), I got tired of all this, surfing the Internet and DRIVE came across articles about maintenance-free bearings on the front. There are several options: 1. Buy a ready-made kit. There are people who sharpen hubs and axles for them. 2. hub with axle from Izh od (also suitable) - I couldn’t find it 3. Rear hub from 08 VAZ + bearing also rear and + adapter sleeve - that’s what you need and in terms of cost.
hub with bearing
Since I didn't look carefully at the bearings? and bought an extra stopper, but they were in the box. Next, we will need classic wheel nuts, 08 ones will not fit, and the ring that presses the bearing is also classic.
all assembled + bushings
made the bushings according to the drawings
3,1
The first time I did it according to the first one, I’ll say right away it was in vain, the size 22 was not the topic and during installation the bushing swelled while I was inserting it. but more on that later.
here is my modified drawing
So we collect all this and happily go to the garage (well, that’s how it was for me), we begin to take everything apart
Having unscrewed the nut and the caliper, I had the first problem: I bent the brake disc (I don’t know how, but I did, I realized this when I was putting everything back together after the second problem), so I knocked over the old hub with the dead bearings, we start assembling it and now it’s not a problem, there’s an error in size, no Well, it’s okay and you can knock it out, and in the end I put everything back in the car in the garage and we’re waiting for it to be re-sharpened...
Let's sum it up
Taking into account the above information, it becomes clear that even with relative simplicity in terms of design, the front stabilizer, rear stabilizer and stabilizer struts are the most important elements in the design of the vehicle's chassis. At the same time, in practice, the front stabilizer struts most often fail due to the poor condition of roads in the CIS.
One way or another, these elements greatly influence not only comfort, but also stability and controllability. This means that regular diagnostics of the chassis and separate verification of the stabilizer struts are necessary at each maintenance.
As a summary, we note that it is extremely important to maintain the suspension in good condition so that control over the car is complete. Only this approach allows for maximum driving safety.