Quite often, the front and rear wheel bearings of the Chevrolet Niva approach the wear limit, as evidenced by the appearance of a low hum from one of the wheels. The sound does not disappear when cornering and intensifies as the vehicle speed increases. If you notice this, you should immediately carry out a diagnosis, since if the wheel bearing seizes while driving, the consequences and costs can be very high.
The upcoming replacement of the Niva Chevrolet front wheel bearing is determined as follows:
• the front wheel of the car is suspended with a jack;
• rotate it by hand and check the play. Signs of bearing wear
:
1
.
Extraneous noise and metallic knocking. 2
.
Noticeable play is checked by rocking the wheel perpendicular to its axis. 3
.
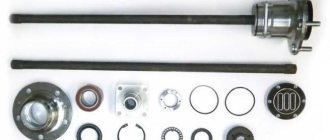
Vibration in the cabin when driving. Once you are convinced of the need to repair the bearings, you should select a hub bearing in the retail chain according to three main criteria (by default, single-row tapered roller bearings are installed - the new kit must include a wheel nut): 1
.
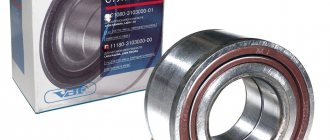
Chevrolet Niva front hub part number: 2007108 (catalog number - 2121-3103020-10, foreign equivalent - 32008). 2
.
Dimensions of the Chevrolet Niva front hub bearings: height – 19 mm, internal diameter – 40 mm, external diameter – 68 mm. 3
. Cost of a new product per hub.
Parts of satisfactory quality last about 20 thousand km, mileage with high-quality products exceeds 30 thousand km. The most popular products from the Volzhsky and Samara plants are labeled SPZ-GROUP. The average price of a wheel bearing is about 1000 rubles.
How to check the front wheel wheel bearing on a Chevy Niva
The failure of the unit is indicated by the appearance of a low hum from one of the wheels. The sound does not disappear when cornering and intensifies as the vehicle speed increases.
If you notice this, you should immediately carry out a diagnosis, since if the wheel bearing seizes while driving, the consequences and costs can be very high.
The upcoming replacement of the Niva Chevrolet front wheel bearing is determined as follows:
- the front wheel of the car is suspended with a jack;
- rotate it by hand and check the play.
Signs of bearing wear:
- Extraneous noise and metallic knocking.
- Noticeable play is checked by rocking the wheel perpendicular to its axis.
- Vibration in the cabin when driving.
Before carrying out repairs, for clarity, watch the video of checking the front hub of a Chevrolet Niva:
Video: “Checking the front wheel bearing”
Video: “Signs of a bearing failure”
What you need to know about signs of bearing wear
A broken car hub is usually a serious problem and should not be ignored.
Among other things, a worn hub heats up more when the car is braking, which negatively affects the performance of the car’s brakes. It happens that damage to the hub occurs gradually and, as a rule, this is indicated by an unpleasant sound, accompanied by vibration of the body or weak shocks.
The main reasons for hub failure are:
- careless driving on roads;
- multiple overloading of cars;
- driving on sandy soil or “mud baths”;
- frequent car slipping;
- aggressive driving style with sharp acceleration and braking.
These reasons can have a significant negative impact on the hub housing, outer or inner bearing ring. They are also sources of dirt, moisture and sand getting inside the bearing mechanism, which causes the journal to fail.
The following list of signs may indicate a failure of the wheel bearing on a Niva-Chevrolet car:
- the appearance of vibrations during movement, clearly felt on the steering wheel or the body as a whole (it is necessary to take measures to replace the bearing, since there is a possible risk of it jamming);
- spontaneous change in trajectory while driving (also possible due to incorrect wheel alignment adjustment);
- a specific sound penetrating inside the cabin (sometimes accompanied by a crunching sound caused by the displacement of the bearing rollers);
- uneven and intense wear of tires due to misalignment of the wheels due to a failed bearing.
- the appearance of extraneous sounds - a crunching sound that can be heard while moving from the passenger compartment. This sound is produced by balls that move in the broken walls of the bearing.
- vibration is a harbinger of bearing seizure. This is a very important sign, it is quite difficult not to notice it, since it is felt throughout the body and radiates into the steering wheel.
- The car pulls a little to the side. This may be caused by the need to perform a wheel alignment. But also the deviation from the course may be due to the fact that the bearing jams a little and it stops the wheel.
The appearance of even one of these signs requires immediate inspection and, if necessary, replacement of the Niva Chevrolet wheel bearing. This work is quite simple, so even a novice car enthusiast can do it.
There are two main signs that indicate replacement is necessary:
- There was a knock and play in the hub area
- There was a strong hum and grinding noise in the hub area
But in order to accurately understand the reason for the appearance of extraneous noise, you need to disassemble this mechanism and inspect it.
To make a replacement, carefully do the following:
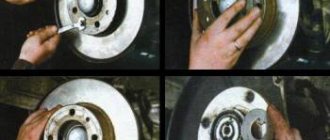
- If this is the front wheel, then the Niva Chevrolet front hub is removed. To do this, the car must be placed on a level surface and jacked up on the replacement side. Then disconnect the pads from the caliper. Unscrew the nut on the axle. We remove all spare parts from the wheel. Take a skein and disconnect the hub from the brake disc.
- We remove the bearing. To do this, remove the plate and oil seal from the inside. Take a cleat and a hammer and remove the inner bearing
- We install a new one. Replacing bearings must be changed on both sides at once, and it does not matter whether it is the rear or front wheels. In order not to damage the body, pressing must be carried out using a wooden plate and a pipe.
- Putting the unit back together. Reassembly must be done in reverse order.
Bearing wear manifests itself as the following symptoms:
- Vibration of the front wheels, which can be reflected in the steering wheel or felt in the cabin.
- Knocking or crackling sounds in the front of the car when driving;
- Heating of the front wheels in the axle area.
If such manifestations occur, you need to check the condition of the wheel bearings. To do this, jack up the car and rock the wheel in different directions. Play and knocking in the bearing area indicates the need for replacement and adjustment. The malfunction may also manifest itself in the form of noise when the wheel rotates.
1. The hubs get hot. It is important to understand that when braking, the kinetic energy of the car is converted into thermal energy. As a result, the brake discs and the hubs on which they are attached become very hot. Heating of the part during movement, and not during braking, indicates wear of the bearing or its incorrect adjustment.
The second option is typical for adjustable hubs. The adjusting nut must be tightened with a force of 2 kgf*m. If you tighten it further, the tapered bearings will be too tight.
Their rotation will be difficult. Prolonged operation of the machine in this condition leads to bearing failure and wheel jamming.
2. The adjusting nut is unscrewed while moving. Sometimes this happens literally after 20-50 kilometers. The phenomenon is observed in three cases: the master forgot to tighten the nut, there was a misalignment between the bearing races, or play appeared in the coupling of the CV joint with the hub.
How to change a wheel bearing on a Niva
The steps to replace the front bearing after removing the nut can be divided into 4 stages:
- Removing and disconnecting the steering knuckle and brake drum along with the hinges, from the strut and CV joint.
- Pressing out old parts.
- Pressing in new wheel bearings (two for each wheel).
- We put the unit back together and tighten the nut and adjust the gap.
For repairs, you will need a standard set of plumbing tools. We also recommend that you familiarize yourself with the structure of the node.
Required set of tools for work:
- A 30mm socket wrench to loosen the nut;
- Screwdriver to unscrew the brake caliper;
- Set of sockets and ratchet;
- Round nose pliers;
- Hammer;
- Mandrel or pipe for pressing;
- Puller with claws (if possible);
- Puller with claws;
- Jack and vice;
- Torque wrench to properly tighten the hub nut.
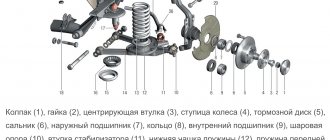
We place the car on a flat surface, engage first gear, remove the handbrake, and put chocks under the wheels. This completes the preparation. Also, before repairing, it is necessary to study the location of the elements of the car’s chassis according to the diagram: (pay attention to the steering knuckle - position 27, bearing - position 9).
Removing the front hub
The first stage begins with the following actions:
- Loosen the wheel and hub nuts. You need to carefully remove the decorative cap, then lift the replacement side and lower it onto the stops. We place wheel chocks under the rear wheels.
- We remove the front wheel using the well-known method, freeing it from the bolts. Next, you need to carefully remove the decorative cap.
- Unscrew the hub nut. To do this, you need to unlock it with a screwdriver. Remove the cone washer and unscrew the ABS sensor (if equipped).
- After that, the pads are removed and the caliper bolts are unscrewed, and the casing bolts are also unscrewed. The caliper itself, after being removed with wire, is attached to the upper arm.
Next, you need to remove the entire rotating mechanism from the CV joint splines along with the ball joints. To do this, several operations are performed:
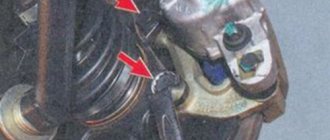
- Press out the steering rod ball pin using a puller, having first unscrewed the fasteners, as shown in the photo.
- Unscrew the pin bolt on the top ball. supports and pull it out of the socket.
- The lower ball joint must be disconnected from the lever by unscrewing 3 nuts.
- Once all the joints are disconnected, you can safely remove the entire assembly and begin replacing the wheel bearing.
Installation
When the turning work is completed, we begin assembling the unit. Everything is simpler here - no adjustment is required, and the locknut is tightened “from the heart.” There is no need to worry about over-tightening the hub; it is almost impossible.
- place the steering knuckle on a flat, hard surface;
- install the support washer and, using a head or steel pipe, carefully press the bearing into place;
- install the second support washer, then use the same tools to carefully hammer in the oil seal;
- repeat these works on the opposite side of the steering knuckle;
- put the steering knuckle on the hub and tighten the locknut to a torque of about 200 Nm or with moderate force;
- put on the wheel, rotate it and check the functionality of the bearing;
- We fasten the steering rack and ball joints.
Note: during installation, installing an oil seal is not necessary, because the Iveco bearing is a closed type, dust and dirt do not penetrate there. However, to increase the service life of the unit, it is recommended to install at least the cheapest oil seals.
We carry out similar work on the opposite side of the car. After the installation is completed, we go and enjoy - now replacement may be required no earlier than after 100 thousand kilometers, and maybe later. The manufacturer provides the same warranty provided that the installation was carried out correctly.
And finally, if you contact a turner, do not forget to take the drawings with you. They are presented below:
Pressing out and dismantling old bearings
The removed assembly and steering knuckle do not require further disassembly. The only thing you need to do is remove the old oil seal using a regular flathead screwdriver, holding the hub assembly in a vice. It is not recommended to use them in the future; new ones are installed, just like the bearing.
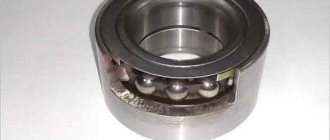
Inside the fist, there are two tapered angular contact roller bearings. They are installed at random and form a hub unit.
- To begin dismantling, it is enough to separate the brake disc mounts from the wheel turning mechanism.
- Don't forget to remove the seals.
- The small race of the inner bearing can be removed without any problems by hand.
- Next, at the same time, using the adapter, you need to knock out the outer roller bearing race from the pipe, as shown in the photo below.
- After separation, one ring with a separator remains on the hub, and the second remains inside the knuckle. The old clip is pulled off with a special puller equipped with grips.
- The second part of the part is knocked out of the trunnion through a spacer made of soft metal in the form of a rod or carefully with a screwdriver.
- The attachment is placed against the clip and light blows are applied, moving it in a circle.
- After this, the old grease should be carefully removed from the cavity.
Installing new bearings in the steering knuckle
It is important to know:
Manufacturers do not lubricate their bearings and rings very generously, so you will have to add the missing amount of grease yourself. Litol-24 in an amount of 40 g is suitable, apply lubricant to the separator and rollers before replacing the Niva front hub.
- We insert a new outer race of the inner and outer roller bearing into the prepared hole of the steering knuckle. We press the clips on both sides, in the same way as they were installed at the factory.
- Next, apply lubricant to the raceways and spread it in an even layer.
- We insert the inner race and close it with an oil seal. Lightly press the boot with a mandrel of the required size. We do the same on the other side, install the clip and boot.
- Now we insert the hub into the steering knuckle, namely into the holes of the installed roller bearings.
- The hub must be inserted smoothly and without distortion. In some cases, depending on the actual mounting diameters, pressing through a press will be required. In this case, a spacer was used.
- Replacement is complete. We install the assembled unit in the reverse order. Read about adjustments below.
If there is no hydraulic press or puller, replace it using a hammer and a mandrel (or using an old ring). This option is not recommended, but is demonstrated in the video for your reference.
- The outer race is inserted into the hub socket and driven without distortion through a wooden spacer.
- For its final landing, you can take a pipe of a suitable diameter or a mandrel.
- Then a separator is placed inside, and the assembly is assembled using the reverse algorithm.
Video: “Method of replacing a wheel bearing without a press”
The procedure for adjusting the bearing clearance:
- After assembling the unit, tighten the locknut to a torque of 19.5 N.*M (or 1.95 kgf.m), turning the hub itself to the sides.
- We loosen it back and tighten it to a torque of 6.8 N*M (or 0.68 kgf.m).
- We check the gap according to the diagram, the limits are from 0.02 to 0.08 mm.
- We lock the locknut by bending the edges.
It is important to know about the adjustments:
We recommend that you visually watch the adjustment process in the two videos presented below.
Video: “Adjusting wheel bearings”
Video: “Diagnostics of the gap in the hub assembly”
Let's sum it up
Taking into account the above information, it becomes clear that you can replace the wheel bearing of a Niva Chevrolet with your own hands in an ordinary garage. However, before starting work, you must have all the necessary tools, and also follow the instructions discussed above for dismantling and installing a new bearing. After replacement, it is also necessary to check the new bearings for extraneous sounds.
We also recommend reading the article about what signs of a CV joint failure indicate a malfunction. In this article, you will learn how to check the inner and outer CV joints, as well as what symptoms you should look for in order to independently determine the need to check the CV joint.
Finally, we note that when choosing wheel bearings for the Chevrolet Niva, it is necessary to separately take into account operating conditions and loads. If the car is actively used for off-road driving, it is necessary to purchase parts of the highest quality (both original and analogues from well-known world manufacturers).
What is a non-adjustable bearing and why is it installed on a Chevrolet Niva
The problem with standard wheel bearings is that they need to be constantly adjusted during vehicle operation. If this is not done in time, they will fail, creating a howl or hum when moving. You can save yourself from such problems by installing non-adjustable hubs or double-row bearings.
On sale you can find reinforced, non-adjustable hubs with double-row bearings. According to the manufacturer, this modernized unit has the following advantages:
- there is no need to adjust (the bearing tightening is precisely set during its production);
- no need for regular lubrication;
- eliminates rotation of bearings on the hub;
- eliminates wear of bearing seats on the steering knuckle and hub;
- a ball bearing reduces friction in the hub assembly;
- The service life of the hub is increased due to thickening
A good way to strengthen the suspension is to install non-adjustable double-row wheel roller bearings on the Niva instead of the standard ones. But there is one nuance - such products have a different outer diameter; there are 2 ways to solve this problem:
- 1) Boring the “native” fists for a double-row p/w;
- 2) Insert a set of spacers and fix both roller bearings, making them non-adjustable;
- 3) Buy and supply a ready-made kit.
For options 1 and 3, a SKF bearing marked SKF IVECO BTH-1024 C is suitable. For the second option, you need to purchase a special set of bushings, the installation of which is described in the video below.
Video: “How to make non-adjustable bearings from adjustable bearings”
Reworking the hub and installing a non-adjustable bearing
Such a hub, for an adjustable bearing, can be made from a standard part. It is necessary to bore the hole to the size of the bearing +50 microns (0.05 mm) for interference, and press it into the resulting mounting hole.
- According to the instructions provided, we dismantle the old parts.
- We grind the hub to the required diameter ourselves or order it from a turner in your city.
- We press in a new double-row ball bearing, for example SKF IVECO BTH-1024 C.
- Install the retaining ring.
- We install a spacer (washer) of about 3.5 mm and a seal (the size of the washer is determined using additional measurements).
- The process is complex, so it is recommended to watch it in video format.
Video: “Installing a non-adjustable bearing”
Video: “Installing reinforced bearings”
Video: “Replacing an IVECO bearing”
Now let’s look at the question of choosing a suitable bearing for replacement, both in the case of a conventional replacement and for conversion to a double-row reinforced one.
How to choose a replacement part and bearing number
Once you are convinced that the bearings need to be repaired, you should select a hub bearing in the retail chain based on three main criteria (by default, single-row tapered roller bearings are installed - the new kit must have a nut):
- Chevrolet Niva front hub part number: 2007108 (catalog number - 2121-3103020-10, bearing according to GOST - 2007108, foreign equivalent according to ISO - 32008).
- You need to buy two roller bearings in the kit.
- Dimensions of the Chevrolet Niva front hub bearings: height – 19 mm, internal diameter – 40 mm, external diameter – 68 mm.
- The cost of a new set of parts for the hub, including double-row bearings, as well as suitable manufacturers, are presented in the table below.
Table - Recommended manufacturers, numbers and articles of hub bearings
| N p/p | Manufacturer | Catalog number | Price for 2021, rub. | Additional Information | |
| Dimensions (mm) and parameters | Applicability | ||||
| Standard sets of two bearings | |||||
| 1 | Volzhsky standard, Russia | 2007108 | 200 | Inner diameter - 40 mm; Outer diameter - 68 mm; Width -19 mm; Weight - 0.278 kg; Number of rollers in the bearing - 21 pcs.; Roller dimensions - 7/11x19 mm; Dynamic load capacity - 40 kN; Static load capacity - 52 kN; The maximum rated speed is 7000 rpm. | Chevrolet NIVA trim levels L, LC, LE, GL, GLC. In that case Restyling 2021. |
| 2 | VPZ, Russia | 32008 | 200 | ||
| 3 | SKF, Sweden | 32008X/QSKF | 770 | ||
| 4 | KOYO, Japan | 32008JR | 880 | ||
| Double row bearings (for reinforcement) | |||||
| 1 | OPTIMAL, Germany | 681 923 | 2200 | Inner diameter - 40 mm; Outer diameter - 73 mm; Width - 55 mm; Number of raceways - 2 pcs.; Seal - Yes. | Likewise |
| 2 | RUVILLE, Germany | 4013 | 2480 | ||
| 3 | SKF, Sweden | BTH-1024 C VKBA 3551 | 2300 | ||
It is important to know:
Parts of satisfactory quality last about 20 thousand km, mileage with high-quality products exceeds 30 thousand km. The most popular products from the Volzhsky and Samara plants are labeled SPZ-GROUP. The average price of a wheel bearing is 1000 rubles.