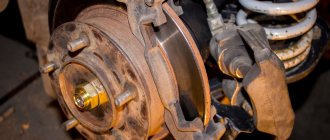
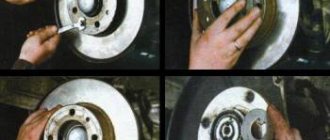
How to check the front wheel wheel bearing on a Chevy Niva
The failure of the unit is indicated by the appearance of a low hum from one of the wheels. The sound does not disappear when cornering and intensifies as the vehicle speed increases.
If you notice this, you should immediately carry out a diagnosis, since if the wheel bearing seizes while driving, the consequences and costs can be very high.
The upcoming replacement of the Niva Chevrolet front wheel bearing is determined as follows:
- the front wheel of the car is suspended with a jack;
- rotate it by hand and check the play.
Signs of bearing wear:
- Extraneous noise and metallic knocking.
- Noticeable play is checked by rocking the wheel perpendicular to its axis.
- Vibration in the cabin when driving.
Before carrying out repairs, for clarity, watch the video of checking the front hub of a Chevrolet Niva:
Video: “Checking the front wheel bearing”
Video: “Signs of a bearing failure”
Chevrolet Niva wheel bearings: signs of malfunctions and causes of failure
So, the hub allows the car wheel to rotate. The part itself is quite durable and rarely fails.
In turn, a bearing is installed inside the hub. This part is most susceptible to overload and periodically fails, requiring replacement.
In fact, wheel bearings on a Chevrolet Niva provide mechanical connection, alignment and free rotation of the vehicle's wheel hubs on the axle. The hub on a Chevrolet Niva, together with the bearing, retaining rings, nuts and other elements included in the hub assembly, bears the entire weight of the car.
It turns out that although the hub itself is quite wear-resistant, the wheel bearings, experiencing enormous loads, wear out faster. In turn, wear of a part depends on many factors:
- high mileage (70-80 thousand km);
- active operation of the vehicle in off-road conditions (driving the vehicle on bad roads);
- uneven pressing of the bearing during repair (part misalignment);
- loss of tightness (destruction of rubber or plastic casings, water and dirt entering the bearing lubrication);
As a rule, certain signs of malfunction indicate that Chevrolet Niva wheel bearings need to be replaced. However, the symptoms cannot be ignored.
If the hub allows the wheel to rotate, the bearing secures the entire structure to the suspension. Bearing failure can lead to undesirable consequences. When the first signs of breakdown appear, it is necessary to immediately begin repairing and replacing worn parts.
Main symptoms of malfunctions:
- while the car is moving, extraneous noises appear (crunching, humming, metallic knocking) - destruction of the bearing walls;
- While driving, the car begins to pull to the side, vibration appears in the cabin, noticeable on the steering wheel and along the body (wheel bearing wedging;
- the appearance of play in relation to the bearing axis (the wheels swing perpendicularly), indicating wear and other defects.
How to change a wheel bearing on a Niva
The steps to replace the front bearing after removing the nut can be divided into 4 stages:
- Removing and disconnecting the steering knuckle and brake drum along with the hinges, from the strut and CV joint.
- Pressing out old parts.
- Pressing in new wheel bearings (two for each wheel).
- We put the unit back together and tighten the nut and adjust the gap.
For repairs, you will need a standard set of plumbing tools. We also recommend that you familiarize yourself with the structure of the node.
Required set of tools for work:
- A 30mm socket wrench to loosen the nut;
- Screwdriver to unscrew the brake caliper;
- Set of sockets and ratchet;
- Round nose pliers;
- Hammer;
- Mandrel or pipe for pressing;
- Puller with claws (if possible);
- Puller with claws;
- Jack and vice;
- Torque wrench to properly tighten the hub nut.
We place the car on a flat surface, engage first gear, remove the handbrake, and put chocks under the wheels. This completes the preparation. Also, before repairing, it is necessary to study the location of the elements of the car’s chassis according to the diagram: (pay attention to the steering knuckle - position 27, bearing - position 9).
Removing the front hub
The first stage begins with the following actions:
- Loosen the wheel and hub nuts. You need to carefully remove the decorative cap, then lift the replacement side and lower it onto the stops. We place wheel chocks under the rear wheels.
- We remove the front wheel using the well-known method, freeing it from the bolts. Next, you need to carefully remove the decorative cap.
- Unscrew the hub nut. To do this, you need to unlock it with a screwdriver. Remove the cone washer and unscrew the ABS sensor (if equipped).
- After that, the pads are removed and the caliper bolts are unscrewed, and the casing bolts are also unscrewed. The caliper itself, after being removed with wire, is attached to the upper arm.
Next, you need to remove the entire rotating mechanism from the CV joint splines along with the ball joints. To do this, several operations are performed:
- Press out the steering rod ball pin using a puller, having first unscrewed the fasteners, as shown in the photo.
- Unscrew the pin bolt on the top ball. supports and pull it out of the socket.
- The lower ball joint must be disconnected from the lever by unscrewing 3 nuts.
- Once all the joints are disconnected, you can safely remove the entire assembly and begin replacing the wheel bearing.
How to change the wheel bearing of a Niva Chevrolet: replacing the front hub and rear hub bearings
Let us immediately note that the replacement process is not simple and requires certain knowledge and experience. Let's take a closer look at how to change the wheel bearing of a Chevrolet Niva on the front axle. To replace the front wheel bearings, the following tools are required:
- torque wrench, 30 hex head, minus flat head screwdriver;
- wrenches “17” and “19”;
- pullers, mandrel for pressing, press, hammer;
- penetrating lubrication, new bearing;
- wrench, chisel.
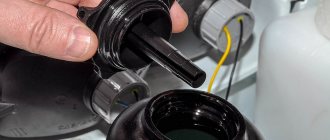
Pressing out and dismantling old bearings
The removed assembly and steering knuckle do not require further disassembly. The only thing you need to do is remove the old oil seal using a regular flathead screwdriver, holding the hub assembly in a vice. It is not recommended to use them in the future; new ones are installed, just like the bearing.
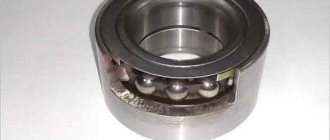
Inside the fist, there are two tapered angular contact roller bearings. They are installed at random and form a hub unit.
- To begin dismantling, it is enough to separate the brake disc mounts from the wheel turning mechanism.
- Don't forget to remove the seals.
- The small race of the inner bearing can be removed without any problems by hand.
- Next, at the same time, using the adapter, you need to knock out the outer roller bearing race from the pipe, as shown in the photo below.
- After separation, one ring with a separator remains on the hub, and the second remains inside the knuckle. The old clip is pulled off with a special puller equipped with grips.
- The second part of the part is knocked out of the trunnion through a spacer made of soft metal in the form of a rod or carefully with a screwdriver.
- The attachment is placed against the clip and light blows are applied, moving it in a circle.
- After this, the old grease should be carefully removed from the cavity.
Adjusting the wheel bearing
At this point, the process of replacing the wheel bearings on a Chevrolet Niva can be considered complete. After assembly, you should check the ease of rotation of the wheel.
To work, you will need an indicator and a torque wrench.
To prepare for adjusting the wheel bearing, you must perform the following operations:
- Secure the indicator by resting its leg on the hub near the adjusting nut.
- Place spanners on the studs and secure them with nuts.
- Rotate the hub and move it axially. (Screwed spanners are used as handles).
- Measure the amount of axial movement (clearance) of the hub, guided by the indicator readings.
- If the stroke exceeds 0.15 mm, adjust the play.
The adjustment is carried out as follows:
- Straighten the collar of the nut.
- Unscrew it with a spanner.
- Install a new nut and tighten with a force of 2 kgf*m.
- Loosen the nut and tighten again with a torque of 0.7 kgf*m.
- Loosen the tension by turning the key 20-25 degrees counterclockwise.
- Check hub play.
- Make sure that the indicator readings correspond to the norm (0.02-0.08 mm).
- Lock the nut by pressing its edge into the groove of the outer CV joint.
You can adjust the hub play without using a torque wrench. To do this you need:
- Tighten the nut tightly.
- Rotate the wheel a few turns.
- Check the play.
- If necessary, loosen or tighten the nut slightly.
- Continue until the free play of the hub is within 0.02-0.08 mm.
- Lock the nut collar.
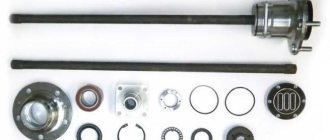
The design of the rear wheel mounting of the Chevrolet Niva is very different. However, they also use bearings that need periodic replacement. They are replaced either together with the axle shafts or separately. The second option is much cheaper, but requires good metalworking skills and a torch to heat the metal.
To work you will need:
- Jack, wheel wrench, chisel, hammer.
- Standard set of screwdrivers and wrenches.
- Axle puller.
- Gas (gasoline) burner or muffle furnace.
- Repair kit including bearing, oil seal and retaining ring.
- A pipe with a diameter of 40-45 mm, the length of which exceeds the size of the axle shaft.
Replacement of bearings is carried out as follows:
- Place the machine on a level surface.
- Place wheel chocks or bricks under the front wheels.
- Jack up the car.
- Remove the wheel.
- Place a support under the rear axle.
- Unscrew the brake drum mount.
- Dismantle the part.
- Unscrew the nuts holding the bearing.
- Load the rear axle by lowering it onto the stand.
- Pull out the axle shaft using a puller.
- Hang the brake mechanism on a wire.
- Knock down the retaining ring using a chisel, hammer and grinder.
- Crack the bearing races using a chisel.
- Remove rust and dirt from the seating surface.
- Put the new bearing in place.
- Heat the locking ring to 200-250 degrees (dark red color) and hammer it into the seat with a pipe
- Replace the oil seal.
Assembly is performed in the reverse order of disassembly. The bearing does not need adjustment.
A visual process of replacing a Niva Chevrolet axle bearing
Installing new bearings in the steering knuckle
It is important to know:
Manufacturers do not lubricate their bearings and rings very generously, so you will have to add the missing amount of grease yourself. Litol-24 in an amount of 40 g is suitable, apply lubricant to the separator and rollers before replacing the Niva front hub.
- We insert a new outer race of the inner and outer roller bearing into the prepared hole of the steering knuckle. We press the clips on both sides, in the same way as they were installed at the factory.
- Next, apply lubricant to the raceways and spread it in an even layer.
- We insert the inner race and close it with an oil seal. Lightly press the boot with a mandrel of the required size. We do the same on the other side, install the clip and boot.
- Now we insert the hub into the steering knuckle, namely into the holes of the installed roller bearings.
- The hub must be inserted smoothly and without distortion. In some cases, depending on the actual mounting diameters, pressing through a press will be required. In this case, a spacer was used.
- Replacement is complete. We install the assembled unit in the reverse order. Read about adjustments below.
If there is no hydraulic press or puller, replace it using a hammer and a mandrel (or using an old ring). This option is not recommended, but is demonstrated in the video for your reference.
- The outer race is inserted into the hub socket and driven without distortion through a wooden spacer.
- For its final landing, you can take a pipe of a suitable diameter or a mandrel.
- Then a separator is placed inside, and the assembly is assembled using the reverse algorithm.
Video: “Method of replacing a wheel bearing without a press”
The procedure for adjusting the bearing clearance:
- After assembling the unit, tighten the locknut to a torque of 19.5 N.*M (or 1.95 kgf.m), turning the hub itself to the sides.
- We loosen it back and tighten it to a torque of 6.8 N*M (or 0.68 kgf.m).
- We check the gap according to the diagram, the limits are from 0.02 to 0.08 mm.
- We lock the locknut by bending the edges.
It is important to know about the adjustments:
We recommend that you visually watch the adjustment process in the two videos presented below.
Video: “Adjusting wheel bearings”
Video: “Diagnostics of the gap in the hub assembly”
Features of replacing a Niva Chevrolet axle bearing with your own hands
Replacing the front wheel bearing of a VAZ Niva
Owners of the popular Chevrolet Niva all-terrain vehicle often use the car for its intended purpose - to overcome off-road conditions, mud, fords, and snow. As a result of such active use, suspension parts, transmissions, seals and bearings quickly fail.
The weak point of the design is the rear axle bearing, which may require replacement on a Chevrolet Niva after 30-40 thousand km. Despite the factory's recommendation to replace the entire axle shaft assembly, most car enthusiasts prefer to replace the oil seal and support ball bearing separately. A simple operation is several times cheaper than purchasing and installing the entire assembly. Let's look at the procedure for replacing the rear axle shaft on cars of the Niva family.
The front hub replacement algorithm consists of the following steps:
- Removing the steering knuckle, as well as the brake drum from the strut and CV joint.
- Press in two wheel bearings on each wheel.
- Reassemble the assembly and adjust the gap.
To perform work on replacing the front wheel bearing of a Chevrolet Niva, you must have a standard set of tools, namely:
- Pullers required for pressing.
- To loosen the nut, you cannot do without a powerful socket wrench.
The preparatory stage consists of placing the vehicle on a flat surface. After this, the car is removed from the handbrake, and special stops are placed under the wheels.
To perform repair work you will also need tools such as:
- a socket wrench with a long base;
- sockets and ratchets included;
- round nose pliers;
- hammer;
- pressing tool, namely a pipe or mandrel;
- puller equipped with special paws;
- jack for lifting and clevising for fixing the vehicle;
- a wrench for tightening the nut in a torque-type hub.
- loosen the hub nut (this must be done immediately before lifting the vehicle);
- Having previously unscrewed the bolts, remove the front wheel;
- then take out the pads and unscrew the caliper;
- remove the entire turning mechanism from the CV joint and begin replacement.
Such preparation will ensure quick and high-quality implementation of subsequent repair actions.
What is a non-adjustable bearing and why is it installed on a Chevrolet Niva
The problem with standard wheel bearings is that they need to be constantly adjusted during vehicle operation. If this is not done in time, they will fail, creating a howl or hum when moving. You can save yourself from such problems by installing non-adjustable hubs or double-row bearings.
On sale you can find reinforced, non-adjustable hubs with double-row bearings. According to the manufacturer, this modernized unit has the following advantages:
- there is no need to adjust (the bearing tightening is precisely set during its production);
- no need for regular lubrication;
- eliminates rotation of bearings on the hub;
- eliminates wear of bearing seats on the steering knuckle and hub;
- a ball bearing reduces friction in the hub assembly;
- The service life of the hub is increased due to thickening
A good way to strengthen the suspension is to install non-adjustable double-row wheel roller bearings on the Niva instead of the standard ones. But there is one nuance - such products have a different outer diameter; there are 2 ways to solve this problem:
- 1) Boring the “native” fists for a double-row p/w;
- 2) Insert a set of spacers and fix both roller bearings, making them non-adjustable;
- 3) Buy and supply a ready-made kit.
For options 1 and 3, a SKF bearing marked SKF IVECO BTH-1024 C is suitable. For the second option, you need to purchase a special set of bushings, the installation of which is described in the video below.
Video: “How to make non-adjustable bearings from adjustable bearings”
Reworking the hub and installing a non-adjustable bearing
Such a hub, for an adjustable bearing, can be made from a standard part. It is necessary to bore the hole to the size of the bearing +50 microns (0.05 mm) for interference, and press it into the resulting mounting hole.
- According to the instructions provided, we dismantle the old parts.
- We grind the hub to the required diameter ourselves or order it from a turner in your city.
- We press in a new double-row ball bearing, for example SKF IVECO BTH-1024 C.
- Install the retaining ring.
- We install a spacer (washer) of about 3.5 mm and a seal (the size of the washer is determined using additional measurements).
- The process is complex, so it is recommended to watch it in video format.
Video: “Installing a non-adjustable bearing”
Video: “Installing reinforced bearings”
Video: “Replacing an IVECO bearing”
Now let’s look at the question of choosing a suitable bearing for replacement, both in the case of a conventional replacement and for conversion to a double-row reinforced one.
Niva front wheel bearing
Niva is one of the famous cars of domestic origin. In fairness, it is worth noting that in the late 70s this model was awarded a gold medal and recognized as the best in its class. But no matter what the machine is, its trouble-free operation is largely due to the spare parts that are purchased for it. Therefore, it is important not to skimp on parts, especially if these are Niva bearings.
Types of bearings for Niva and their location in the structure
Depending on the model of this car brand and modification, different types of bearings can be used. Here, for example, is a list of bearings used for common Niva 2121 cars.
- Engine, clutch. A single row deep groove ball bearing is used.
- Water pump. Double-row radial ball bearing, with a roller replacing the inner rings in the design.
- Checkpoint. A single row deep groove ball bearing, either conventional or with a locking groove, can be used here. Also needle, roller radial, angular contact double-row.
- Transfer case - single-row radial ball, radial roller.
- Front axle. Single-row radial ball bearings are used, including those with a locking groove, and tapered roller bearings.
- Rear axle. Single row radial ball bearing, single row tapered roller bearing.
- The Niva wheel bearing is a single-row tapered roller bearing.
- Generator. Ball radial single row.
Bearings for Niva 4x4
Owners often complain that the standard Niva wheel bearing needs constant adjustment. Due to lack of time, many do not do this, and during operation of the machine, humming, howling and whistling sounds appear, which indicate that the bearings have failed. Some people completely replace the part with a similar one, and some replace standard bearings with double-row or non-adjustable ones.
Advantages of non-adjustable bearings:
- does not require regular lubrication and tightening during vehicle operation;
- do not rotate on the hub;
- durability;
- minimizing friction in the hub assembly;
- no wear on seats.
Installing double-row bearings instead of standard ones is more difficult. As a rule, an analogue of such a bearing is purchased, because the Niva double-row wheel bearing is not available for sale at all, and then the master grinds it to the required dimensions and installs it. And you forget about adjustments, hum, and noise for many years.
Niva Chevrolet and its weaknesses
This car model is quite heavy and is designed for off-road use. Therefore, it is not surprising that it is the bearings of the Niva Chevrolet that are recognized as the weak point of the car. There are bearings both in the rear of the suspension and in the front. Driving on bumpy roads wears them out greatly, which leads not only to increased wear of the tires, but also to loss of controllability of the car.
A faulty Niva front wheel bearing is quite easy to identify. Increased wheel play, knocking, grinding or humming noise appears when driving. If such violations occur, it is best to replace the spare part, especially since you can do this yourself, having familiar automotive tools at hand.
- Raise the car with a jack and unscrew the wheel.
- Remove the caliper and brake pads.
- Using a hammer, remove the brake discs from the hub and then remove the cone bushing.
- Bend the locking plate and unscrew it using a wrench.
- Then disconnect the steering knuckle. The easiest way is to dismantle it together with the hub and balls, and then separate them.
- Remove the inner bearing of the Niva hub with a precise blow to the back side with a hammer.
- Use a screwdriver or other flat tool to pry up the oil seal, and then remove the inner race, thereby opening the way to the hub bearing.
- Remove the old bearing and press a new one in its place using a pipe and wooden pads.
- Assemble the structure.
It is important that the Niva front hub is changed on both sides at the same time. Otherwise, the new part will quickly wear out. car front bearing , but if only one side is replaced, be prepared for a quick re-repair.
Similar articles
Replacing the rear bearing
The rear wheel bearing is responsible for the smooth rotation of the car's rear wheel. And it is precisely this, as it seems at first glance, insignificant detail that, if malfunctioning, can damage other components of the machine. Therefore, you should not delay replacing the spare part, but contact a car service, or change it yourself, following the instructions below.
How do you know if the rear bearing needs to be replaced?
Main signs of bearing failure:
- A humming sound when driving indicates that the rear bearings need to be replaced;
- Knock when driving on rough roads;
- Unpleasant sounds when a wheel hits a hole;
- Strong heating of the brake drum;
- unusual braking when turning the steering wheel.
For what reasons do bearings quickly fail?
- Poor condition of roads with potholes.
- Low quality bearings installed previously.
- Replacement of the rear bearing may be necessary after mounting the wheels if the bolts are tightened too much.
- Foreign substances that come from the road while driving, which have a negative effect on bearing lubrication - moisture, dirt, dust, etc.
How to choose a replacement part and bearing number
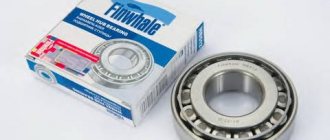
Once you are convinced that the bearings need to be repaired, you should select a hub bearing in the retail chain based on three main criteria (by default, single-row tapered roller bearings are installed - the new kit must have a nut):
- Chevrolet Niva front hub part number: 2007108 (catalog number - 2121-3103020-10, bearing according to GOST - 2007108, foreign equivalent according to ISO - 32008).
- You need to buy two roller bearings in the kit.
- Dimensions of the Chevrolet Niva front hub bearings: height – 19 mm, internal diameter – 40 mm, external diameter – 68 mm.
- The cost of a new set of parts for the hub, including double-row bearings, as well as suitable manufacturers, are presented in the table below.
Table - Recommended manufacturers, numbers and articles of hub bearings
| N p/p | Manufacturer | Catalog number | Price for 2021, rub. | Additional Information | |
| Dimensions (mm) and parameters | Applicability | ||||
| Standard sets of two bearings | |||||
| 1 | Volzhsky standard, Russia | 2007108 | 200 | Inner diameter - 40 mm; Outer diameter - 68 mm; Width -19 mm; Weight - 0.278 kg; Number of rollers in the bearing - 21 pcs.; Roller dimensions - 7/11x19 mm; Dynamic load capacity - 40 kN; Static load capacity - 52 kN; The maximum rated speed is 7000 rpm. | Chevrolet NIVA trim levels L, LC, LE, GL, GLC. In that case Restyling 2021. |
| 2 | VPZ, Russia | 32008 | 200 | ||
| 3 | SKF, Sweden | 32008X/QSKF | 770 | ||
| 4 | KOYO, Japan | 32008JR | 880 | ||
| Double row bearings (for reinforcement) | |||||
| 1 | OPTIMAL, Germany | 681 923 | 2200 | Inner diameter - 40 mm; Outer diameter - 73 mm; Width - 55 mm; Number of raceways - 2 pcs.; Seal - Yes. | Likewise |
| 2 | RUVILLE, Germany | 4013 | 2480 | ||
| 3 | SKF, Sweden | BTH-1024 C VKBA 3551 | 2300 | ||
It is important to know:
Parts of satisfactory quality last about 20 thousand km, mileage with high-quality products exceeds 30 thousand km. The most popular products from the Volzhsky and Samara plants are labeled SPZ-GROUP. The average price of a wheel bearing is 1000 rubles.
Which bearing to choose?
The best wheel bearings for the Chevrolet Niva and short Niva can be selected from the list below:
- FINWHALE - price 450 rubles;
- AVTOVAZ - price 350 rubles;
- KOYO - price 800 rubles;
Also good companies are SKF and SNR.
Adjustable bearings should not be confused with the new type of double row bearings. They are different in width, price and article number. The catalog number of the wheel bearing on Niva is 2121310302010 . This number is the adjustable bearing.
Unregulated
As a rule, the Niva has a standard adjustable hub, which requires periodic adjustment. But in order to get rid of this inconvenience, non-adjustable hubs for the Chevrolet Niva were developed, which have such positive qualities as:
- No maintenance required. They don't need to be adjusted
- The bearing in the device does not rotate
- It is filled with special lubricant from the factory, so there is no need to lubricate it.
- Due to the fact that the work occurs thanks to the ball bearing in the unit, friction is reduced
- There is no wear on the seat in the rotary cam
- Not adjustable as it is tightened from the factory
- No need to change the bearing
- Long service life which is equal to 100-120 thousand kilometers
Therefore, thanks to all the positive characteristics listed above, many car owners change the standard part to a non-adjustable one.
It is also worth noting that the non-adjustable part can be produced as a reinforced Niva Chevrolet hub, which solves the problem of wear of the oil seals on the steering knuckle. It is best to choose companies such as VolgaAvtoprom, IVECO, OmegaInterAuto.
The main disadvantage of this unit is its high price, but by installing this part you can forget about the problems that appear in the standard element. By installing a reinforced version of your SUV, the cross-country ability will increase and reliability will increase, and having a standard set of tools, you can make an independent replacement without any problems.
Replacing Chevrolet Niva front wheel bearings
Tools:
- Straight box spanner 13 mm
- Straight box spanner 17 mm
- Straight box spanner 19 mm
- Straight box spanner 27 mm
- Small hammer
- Chisel
- Beard
- Driver for 3/4 socket bit
- Knob attachment 13 mm
- Knob attachment 17 mm
- Knob attachment 19 mm
- Knob attachment 27 mm
- Rolling jack
Parts and consumables:
- Front wheel hub bearings 4pcs
- Litol-24 lubricant
- Kerosene
- Container for washing parts
Notes:
External signs of the need to remove bearings for troubleshooting are: - increased noise when the wheel rotates; — the impossibility of adjusting to achieve the nominal clearance in the bearings.
We carry out the work on an inspection ditch or overpass.
1. Raise the front of the car and remove the wheel.
Helpful advice:
It is more convenient to work on a lift
It is permissible to work on a vehicle jacked up on supports, subject to the necessary safety precautions.
2. Disconnect the caliper from the pad guide, as described here, and tie them with wire to the upper arm.
3. Unscrew the adjusting nut of the hub bearings, as described here.
4. Take out the conical bushing.
5. Using a chisel, unbend the edge of the locking plate of the nut for the front attachment of the lever to the steering knuckle.
6. Similarly, loosen the rear fastening nut.
7. Using a 19mm spanner, unscrew the nut for the rear mounting of the lever to the steering knuckle.
8. Unscrew the front fastening nut in the same way.
9. Remove the locking plate.
10. Having removed the lever from the bolts, move it away from the steering knuckle.
11. Disconnect the brake hose from the steering knuckle as described here.
12. Disconnect the fastening of the upper and lower ball joints from the arms.
13. From the splines of the front wheel drive outer joint housing, remove the steering knuckle assembly with ball joints, hub assembly and brake disc.
14. Disconnect the steering knuckle and the hub with the brake disc.
15. If it is difficult to separate the parts, clamp the steering knuckle in a vice and use a soft metal drift to knock out the hub.
16. Now you can remove the bolts securing the lever to the steering knuckle.
17. To separate the hub and brake disc, screw the nut onto the stud and knock out the stud.
18. Unscrew the nut and remove the stud.
19. Similarly, dismantle the other four studs.
20. Disconnect the hub and brake disc.
21. Use a chisel to knock down the dirt ring.
22. Using a 10mm wrench, unscrew the bolt securing the protective casing.
23. Remove the casing.
24. To dismantle the seals and hub bearings, clamp the steering knuckle in a vice. Use a screwdriver to pry off the seal.
25. Remove the oil seal.
26. Remove the ring.
27. Remove the inner ring of the outer bearing with the cage and rollers.
28. Similarly, remove the oil seal, ring and inner ring of the other (inner) bearing with a cage and rollers.
29. Using a punch, knock out the outer ring of the outer bearing.
30. Take out the ring.
40. Similarly, we knock out the outer ring of the inner bearing.
Warnings:
Inspect the raceways of the inner and outer rings of the bearings, as well as the running surfaces of the rollers. Pitting, visible wear of cages, rollers and rings, as well as cavities and chips on rollers and rings are not allowed.
Be sure to replace defective bearings together with the outer rings.
Replace the outer and inner bearings at the same time.
41. We carry out the assembly in the reverse order.
42. Before installing the bearings, clean the inner cavity of the steering knuckle from old grease.
43. Using a tool head of a suitable size or a piece of pipe, press in the outer rings of the bearings.
Helpful advice:
Use the outer rings of the corresponding replaced (old) bearings as mandrels. It is more convenient to press in the rings using a press.
Warning:
Insufficient pressing or distortion of the ring is not allowed. Check that the rings are securely seated in the hub body. The rings should not turn by hand.
44. Place 40 g of Litol-24 lubricant into the cavity of the steering knuckle and into the bearing separators.
Which ones are better to choose for Chevy Niva?
Front-wheel drive parts for Shnivy are produced by dozens of companies. Products differ in prices, quality, permissible loads and service life. The standard configuration of the SUV includes adjustable hub units, the tightening torque of which must be controlled after 2-3 thousand kilometers. For those who value reliability and are not ready for regular maintenance, manufacturers have introduced non-adjustable (maintenance-free) wheel hubs. They differ in the following indicators:
- The possibility of wear of the bearing seat in the steering knuckle is eliminated.
- The unit does not require lubrication or adjustment during its entire service life.
- The non-removable design of the bearings prevents them from turning.
- Increased service life of the unit.
- Reduced friction due to the use of ball bearings.
The non-adjustable hub has a reinforced cross-section, which prevents its deformation under the influence of shock loads. This is very important when regularly driving off-road or on broken asphalt roads.
Parts with catalog numbers 2123-3103014 and 21230-3103014 are produced by the following companies: IVECO, SKF, Leader, GM-Avtovaz, VolgaAvtoProm and other companies. The cost of the part depends on the manufacturer and design (adjustable and non-adjustable). The price of the products is 1000-6000 rubles. You can also find more expensive units that include brake discs.
The maximum mileage of unregulated IVECO hubs is 100-120 thousand kilometers. Adjustable ones last less and their durability depends on the frequency, correct maintenance, quality of lubricant and manufacturer.
Read news about the new Niva
- LADA Niva – Operating manual – Official LADA website
- Nissan X-Trail 2021: equipment, specifications, photos, videos
- UAZ-469 Military repair manual
- Repair and maintenance of Suzuki transmissions, gearboxes, transfer cases, axles in the South-East Administrative District
- UAZ "Bukhanka" 3741 - official dealer of UAZ cars in Arkhangelsk and the Arkhangelsk region
- Chemical reconnaissance vehicle UAZ 469РХ — dudakov_ru — LiveJournal
- Cons of Renault Duster Diesel according to Owner Reviews.
- Polishing with toothpaste - how to polish headlights, plastic, glass and wheels with your own hands
Purpose and design of a wheel bearing
Bearings serve a dual function. On the one hand, they provide support for an axis, shaft or other element of rotation. On the other hand, they convert sliding friction into rolling friction. The wheel bearing is designed to ensure uniform rotation of the wheel hub. This is the connecting link between the hub and the axle of the car. Note that these elements ensure rotation of not only the front, but also the rear wheels.
Any bearing has the same basic structure:
- Outer ring (outer race);
- Inner ring (inner race);
- Guide for rolling elements (cage);
- Conical, cylindrical or spherical elements).
Bearings of modern imported cars have a more complex structure. Typically, their inner race is part of the hub, and the design itself contains electronic sensors. They are characterized by an increased service life. Russian manufacturers have not yet reached such technology, so they use simpler devices. On Chevrolet Niva cars, as on previous generations of the VAZ SUV, a pair of tapered bearings are installed on each hub.
Simplifying a unit negatively affects its reliability. Moving elements are especially sensitive to sharp impacts that chassis parts receive when driving over uneven surfaces.