Wheel bearing failure is a common problem for car owners. Let's look at how to replace the rear wheel bearing of a VAZ 2114 and what tools are required for this. We will also look at the symptoms of part failure and how to carry out diagnostics to detect the problem.
Video that clearly demonstrates the replacement process:
Useful: How to replace the front wheel bearing on a VAZ 2114?
How to check the rear wheel bearing?
Diagnostics is similar to checking the front wheel bearing. You can do it yourself without going to a car service. There are several points by which failure is determined:
- When driving at a speed of about 50-60 km/h, noise with vibration will be heard, transferring to the car body, while the road surface will be smooth.
- Having raised one side of the car with a jack, we begin to rotate the wheel. If rotation is accompanied by extraneous sounds, this will also indicate a malfunction.
- After driving the car, touch the wheel disk at the hub. If it has a high temperature, then the part is failing.
Of course, it will not be possible to find out the critical wear of a part, but it will be possible to detect a malfunction. When a breakdown is diagnosed, it is strictly not recommended to continue driving the car; this may pose a threat to other road users.
Replacement of rear wheel bearings — Lada 2114, 1.6 l., 2007 on DRIVE2
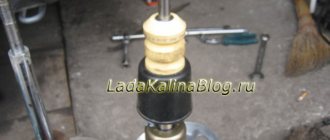
Good afternoon, readers of my blog! I planned to change the rear wheel bearings in the near future, but they decided to speed up the process, and the right one began to hum, no longer hinting, but directly indicating that it had come to an end. Well, what should I do? I went and bought some bearings and a presser for them, because I don’t have a press.
Extruder. Photo from the Internet, but I have the same bullet in a bullet. Although my threads are small, less than the height of the bearing, strange but true.
I won’t describe the whole process. I will only describe the nuances that I encountered. Although I read about them, it turned out as usual. So, comrades, don’t think maybe it will work, it won’t work at all!) And just like in Murzilka I reached the stage of removing the hub from the axle. I used my dad’s 3-legged puller. The hub went, but my joy was short-lived. Mine didn't work and the inner race of the bearing remained on the hub axle.
Full size
Here the infection shines.
Full size
The balls spilled out.
The question arose about what to use to remove it; there is no two-legged puller. But when buying bearings, I looked at it, but greed and maybe ruined it. It was repaired by my dad, since he was at home. I asked him to go get a puller, he did. I brought it, I see it’s exactly what I need, two-legged and with thin hooks on the paws, because there are grooves on the hub axle specifically for such cases. Just in case anyone doesn't know:
Full size
Marked with red rectangles
Although the grinder and chisel were available, he still did not use crude methods. Using a freshly purchased puller, everything worked out. So it's time to try out the extruder.
Full size
Here is the extractor. Pay attention to the carving. There is little of it and it is small!
Full size
Full size
To use more thread length, I placed the hub nut under the washer.
Full size
So here it is assembled.
That’s when the second jamb came out, the extractor nut was only enough for me to press out the bearing and that’s it, then the thread came off... Again the hand is on the face, damn it in Murzilka and on YouTube everything is simple. No guys, life is different. The Soviet department's silent block remover came to the rescue. Unfortunately, I didn’t take a photo of him, I was in a hurry, and my hands were a little dirty. For example, here is a photo from the internet, the carving is very similar:
This is the tool
www.drive2.ru
Necessary tool
Before starting work on replacing the rear wheel bearings on a VAZ 2114, we need to collect the necessary tools according to the list:
- Set of open-end wrenches;
- 30mm head and knob;
- Round nose pliers and pliers;
- Wheelbrace and jack;
- Hammer.
It is better to have a can of WD-40 or liquid wrench, as the parts are susceptible to corrosion and can be difficult to unscrew. If possible, you can purchase or find a special puller for the hub, which will make the work a little easier.
Helpful : How much do wheel bearings cost?
Step-by-step instructions for replacing the rear wheel bearing
And finally, having selected and purchased all the necessary tools and prepared for thorough work, you can begin replacing the rear wheel bearing on a VAZ 2114.
The detailed step-by-step instructions below will help with this:
- First of all, put the car in first gear on a flat, stable surface and place “shoes” under the front wheel.
- Next, remove the hub protective cap.
- Remove the nuts from the rear wheel bearing.
- Unscrew the bolts securing the wheel rim.
- Using a jack, we raise the car.
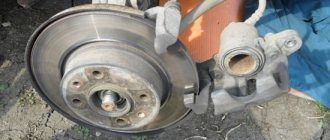
- We unscrew the wheel, guide pins and then unscrew the brake drum and its front cover. If there are any problems with this, then you should moisten the connecting places with WD40 liquid, this will greatly alleviate the situation.
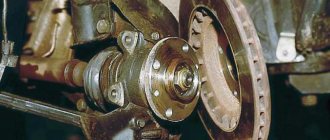
- We secure the hub puller and begin removing the bearing.
- After you have unscrewed the hub with the bearing, you should begin dismantling the internal parts.
- Using pliers, remove the retaining rings.
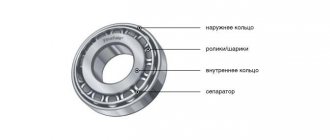
- There are two possible options for developing further actions to remove the bearing from the hub: The essence of the first option is that you knock the part out of its seat, and the second, quieter one, is to use a press to press out the bearing. For the most part, car enthusiasts prefer the first option, since it does not require the use of additional tools.
- After the faulty product has been removed, you should proceed to installing and securing a new working part. First of all, before fixing the new part, you need to lubricate the inside of the hub with oil. This is required for a better fit of the working bearing.
- It is not recommended to drive the bearing in; it must be pressed in. This can be done using an old vice and the outer ring of a faulty and already removed part. But first, you can manually insert a new part by about 3-5 mm. Do not forget to ensure that the part fits into the landing site smoothly.
- Now that the bearing is installed, you need to secure the retaining ring. This can be done using round nose pliers, having also lubricated them with oil beforehand.
- Next, with gentle blows of a hammer, install the hub in the right place.
- We perform the remaining assembly in reverse order. Accordingly, you need to put on the brake drum, then the wheel.
Symptoms of malfunction
The first symptom of a malfunction will be a noise heard from the rear of the car. This means that the mechanism runs out of lubricant and the metal parts begin to rub against each other. The next thing that will happen is that vibration will be added to the body, which will be caused by slight wear of the element. When a part is on the verge of failure, an unpleasant smell will be felt, as if the brake pads are stuck in the drum. It is better not to let this happen, as the wheel begins to jam and the bearing can fall apart at any moment.
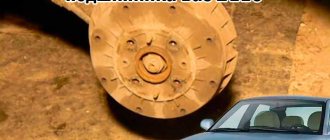
Replacing the rear wheel bearing
When starting to replace the rear wheel bearing of a VAZ 2114, place the car on a level surface and place supports under the wheels for safety. Then you can begin the replacement process:
- Remove the plug from the wheel that covers the hub nut. We unpin it using a core and a hammer.
- We loosen it using a wrench and a 30mm socket. First, you can spray a special agent on the threads that will corrode the rust. Also, the handle of the wrench can be extended using a piece of pipe, which will increase the leverage and provide a smooth load on the nut.
- Raise the car with a jack and remove the wheel.
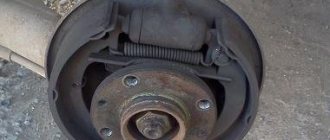
- Check that the car is not on the handbrake! Unscrew the drum mounts. The adjacent holes have threads. We screw the bolts in there, which will allow the part to be pressed out. You can also tap the drum in a circle using a hammer and a block if it is very difficult to remove.
- Unscrew the bearing nut completely.
- You can remove the hub using the drum and engine head bolts. We screw the drum on with the back side and pull it towards ourselves, so the hub will come out. You can try to knock it out with a hammer or squeeze it out using a pry bar.
- Now we need to pull out the wheel bearing itself. It is best to use a special puller for this. When you don’t have a puller, you can use a grinder to slightly saw down the old element and knock it down.
- Remove the retaining ring in the hub using pliers.
- Next we need to press out the old bearing; if there is no puller, we can try to knock it out. If you can’t remove it, then you can contact a service center that has a hydraulic press, and they will also install a new part for you.
- After installing the new bearing, do not forget to install the retaining ring. Now lubricate the installation site with oil and install the part in place.
Further assembly occurs in reverse order. Be sure to check the tightness of all bolts after installation. Also be sure to tighten the bearing nut.
How to check
Before you begin replacing the front or rear bearing of your hub, we recommend that you conduct a simple check of the functionality of this unit. This will allow you to accurately determine the culprit of the malfunction and verify the real need to replace the elements.
There are two verification methods, each of which has its own nuances.
| Verification method | What to do |
| After a long ride, touch the area of the wheel where the noise is coming from. | If the area is hot compared to the other side, the bearing needs to be replaced |
| Raise the car, unscrew the wheel bolts, lift the side you are checking. Rock the wheel with more force | If the sound is dull, have a second person apply the brake and repeat the procedure. If there is no noise, the bearing must be replaced |
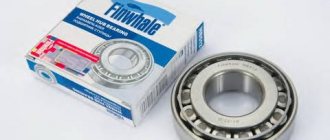
Price and article number of the rear wheel bearing for VAZ 2114
Many car enthusiasts, when choosing a new part, prefer original spare parts. They have a price above the market average, but differ in the quality of the product. In stores you should look for them exclusively by article numbers 2108-3104020 and 2108-3104020-02 .
It is under them that parts from the AvtoVAZ plant are produced. When the part numbers are not indicated or have a different meaning, it may be a Chinese counterfeit made to match the original packaging, also pay attention to this when purchasing!
The average cost of an original bearing is about 1,500 thousand rubles .
Criteria for selecting a quality part
When choosing bearings for the VAZ 2114, you need to pay attention to Russian-made parts. Very high-quality rear bearings for the VAZ 2114 are produced in the Samara and Vologda regions. The size of the rear hub bearing in this car is 60 by 30 by 37 mm.
It is worth carefully studying the part when purchasing, since there are a large number of materials on the markets - Chinese fakes. They are produced with lower quality and will last half as long as the original part. It is better to give preference to retail outlets with a good reputation and proven products.
Good analogues
You can also opt for analogues that have excellent reviews from car enthusiasts:
- Part number R172.04. The average price on the market is about 1,500 rubles .
- GKN-Spidan. Catalog number 26727. The cost is also about 1500 rubles .
- Search number H10 1206. The average price on the market is about 1200 rubles .
The quality of these brands is not inferior to the original and in some cases they last even a little longer than the original. Of course, the service life depends on driving style, so there is no exact data on the mileage of the bearings. Replacing a wheel bearing with your own hands is not a labor-intensive process that can be done without going to a car service center. The average price for such a procedure starts from 1000 rubles, which means that by doing car repairs yourself, you can save a third of your budget. You can extend the life of the bearing by not using the car in difficult conditions and on poor roads unnecessarily. This will help reduce the load on the chassis, which in turn will reduce wear.