What does P0133 mean?
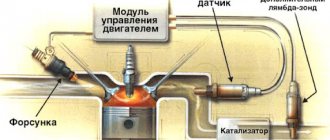
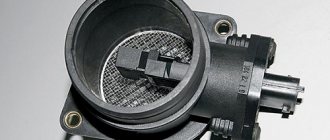
The Engine Control Module (ECM) uses an oxygen sensor to monitor the oxygen content of the vehicle's exhaust gases. The ECM uses the signal received from the oxygen sensor to regulate the fuel/air mixture ratio of the engine. The air-fuel ratio is controlled by the ECM to regulate fuel consumption and reduce emissions of harmful substances from the vehicle's exhaust gases. The oxygen sensor sends a voltage reading to the ECM, thereby reporting the ratio of air and fuel in the engine mixture.
When the amount of oxygen in the exhaust gas changes, the output voltage of the oxygen sensor changes. The output voltage of the oxygen sensor should change instantly, since when you press the gas pedal, the ratio of air and fuel in the mixture supplied to the engine cylinders immediately changes.
When P0133 appears, the engine control module (ECM) has detected that the oxygen sensor output voltage is not changing quickly enough to correct the air-fuel ratio, indicating that the sensor is responding too slowly.
Under what conditions is it diagnosed?
Every car owner needs to know under what conditions a P0133 error is likely to occur.
- A significant period of time for a signal about a change from an enriched heat-air mixture to a lean one emanating from the sensor is 1.75 seconds.
- Increasing the engine coolant temperature to 75⁰С.
- Reducing the switching frequency of the control oxygen sensor to the minimum permissible specified value.
- The temperature of the neutralizer, calculated by the controller, is from 400 to 900 ⁰С.
- Reduce engine load by up to 90%.
- The engine speed range is from 1400 to 3500 rpm.
- Exceeding the level of oxygen in the exhaust gases, recorded by the electronic control unit.
In order to correctly diagnose error P0133, you must perform the following steps:
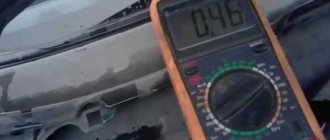
- using a multimeter, measure the output voltage of the oxygen sensor;
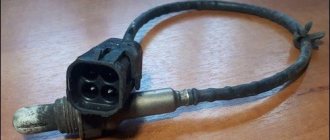
- visually determine the integrity and absence of oil particles on the wiring connected to the oxygen sensor;
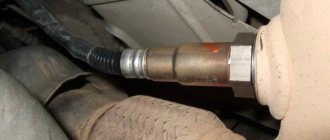
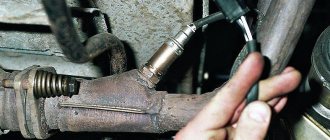
- carefully remove the sensor and carefully inspect it for signs of overheating, the presence of soot and oil deposits;
- Check the seal quality of vacuum hoses and air intakes.
Causes of error P0133
- Oxygen sensor malfunction
- Intake manifold leakage
- Air intake system leakage
- Short circuit or break in electrical wires related to the oxygen sensor
- Accumulation of soot or carbon deposits on the oxygen sensor, causing the hole used by the sensor to sense the oxygen content of the exhaust gas to become clogged
- Mass air flow sensor dirty
- Incorrect fuel pressure
Causes of malfunction
So, we list the possible causes of error P0133 and the corresponding options for eliminating them:
Lambda probe signal graph
- Depressurization of the intake or exhaust manifold (sometimes both at the same time). Check the tightness of these components. In particular, the intake manifold should not suck in air.
- Problems with the fuel system . Here it is necessary to check the correct operation of the injectors, the performance of the fuel pump, and the fuel vapor recovery system.
- Malfunction of the control circuits or the lambda probe itself . Examine the wiring for damage, and also “ring” it. If possible, replace the sensor with a known working one to check the original one (in many cars the first and second oxygen sensors are interchangeable, for example, on the Lada Priora, so you can try simply swapping them).
Also, when checking, it is recommended to check the “mass” of the oxygen sensor. This is usually done using a so-called “control” or hand-held electrical tester. To do this, one of its contacts is connected to the “+” of the battery, and the second to the output contact directly on the sensor. If grounding is normal, the “control” lamp or tester indicator should light up. Otherwise, look for an open circuit.
How does a mechanic diagnose a P0133 code?
When diagnosing this error, the mechanic will do the following:
- Visually inspect the electrical wires related to the oxygen sensor for oil contamination and damage.
- Measure the oxygen sensor output voltage using a diagnostic scanner or multimeter
- Visually inspect the oxygen sensor for clogging and excessive soot or carbon accumulation
- Check air intake and vacuum hoses for wear and damage
Carrying out diagnostics
To determine the true cause that led to the appearance of error code P0133, it is necessary to carry out diagnostic measures.
This is done by performing the following procedures:
- Using a multimeter in voltage measurement mode, the parameters of the oxygen sensor at its output are checked.
- The sensor wiring is visually checked for integrity. It is imperative to check whether there are any oil particles or other contaminants on the wires connected to it.
- Visually assess the condition of the sensor housing by removing it from its seat. There should be no traces of overheating, soot, or oil deposits on it.
- Check vacuum hoses and air intakes for leaks and quality of connections.
This is interesting: Idle speed sensor: check, replacement, where it is located
Having detected certain malfunctions, before resetting the error, you will first need to get rid of the very cause of P0133 when reading the ECU with a diagnostic scanner.
Freeze Frame Data
The first step in diagnosis should be to record the freeze frame data associated with P0133. This will show you the operating conditions present when the ECU stored the error.
Wiring Inspection
Once you have the freeze frame data, you should do a simple visual inspection of the oxygen sensor wiring. Look for any frayed, broken or melted wires.
Check the connector for moisture or corrosion. Unfortunately, the oxygen sensor wiring cannot be repaired (unless it is the heater circuit). Therefore, if you find damaged wiring, the sensor will need to be replaced.
Checking for exhaust leaks
Next, start the engine and listen for any exhaust leaks in front of the sensor. Smaller leaks around the exhaust manifold may be more obvious on a cold engine due to thermal expansion. This may also be accompanied by a visual inspection of the exhaust system.
In some rare cases, there are leaks that cannot be heard or seen, but can be detected using a smoke generator installed in the exhaust pipe.
Watch the video on how to make a smoke generator with your own hands:
This shows very small leaks in porous welds that can cause codes related to the oxygen sensor. If leaks are found, repair and clear error codes.
Oxygen sensor test
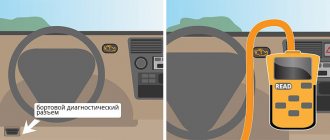
Once you have checked that the wiring is intact and there are no exhaust leaks, you will need to access the ECU data stream using an OBD2 scanner.
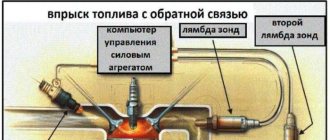
Here you can monitor the voltage coming from the oxygen sensor to the ECU. The voltage should constantly switch between 0 and 1 volt. If the engine is a "V" engine, you can compare bank 1 to bank 2 to see if one shifts faster than the other.
Check the voltage at 2000 rpm, close the throttle quickly, then open it. When the choke closes you should see a voltage close to 0 volts and when it opens again you should see close to 1 volt. All this must happen very quickly, in less than 100 milliseconds.
Again, if you have a dual-cylinder engine, you can compare the two sides to see if one responds more slowly than the other. If the sensor fails the test, replace it.
These tests can also be performed using a digital multimeter. To do this, you will need to find a wiring diagram to determine the purpose of the wires. Also, using the diagram, find and make sure that the sensor has a reliable ground.
Car self-diagnosis
- First you need to sit in the driver's seat and hold down the odometer button on the speedometer.
- Then insert the key into the ignition and set it to the first position.
- After turning the key, you must release the pressed button. This will cause the needles on the speedometer, tachometer and other gauges to move quickly.
- Then you need to press the odometer key again and release it. An inscription with the firmware version will appear on the device.
- After the third press of the odometer button, the VAZ 2114 error codes will start to light up on the display.
How to reset errors yourself
After self-diagnosis of errors and elimination of their causes on a carburetor or injection engine, a malfunction message may remain on the standard panel. If the problem has been deleted, this means that the code combination remains in memory. We'll look at the description of the faults below, and now we'll tell you how to remove the code from memory. To remove it after testing the device, when VAZ 2114 errors appear, the codes themselves must be written down. After this, the daily mileage reset button is pressed again, this will clear the fault from the control unit’s memory.
Resetting the "Check Engine" error
It often happens that the instrument panel 2114 8 or 16 valves displays a check error - engine malfunction, the orange icon is on. Self-diagnosis does not always allow you to accurately check and determine how to fix such a problem. To fix the problem and find a solution, you should perform more detailed diagnostics of the car using a computer and additional equipment. Perhaps, during diagnostics, an unknown error indicates a malfunction in the microprocessor, on-board network or sensors. After the problem is fixed, the receipt may remain.
The "Check Engine" indicator indicates a problem with the engine.
How to reset the fault code:
- First, turn on the ignition; you do not need to start the car engine.
- Then open the hood. Use a wrench to loosen the bolt on the negative terminal of the battery.
- Wait about one minute, after which the battery terminal must be replaced.
- Close the hood and turn off the ignition.
- After that, turn it on again and start the car engine. If the check remains, it should go out on its own after some time. If the instructions given did not work and the solution did not help, then you need to look for the cause of the problem and fix it.
How to avoid P0133?
Keeping your exhaust system in good working order is essential for the oxygen sensor to function properly. Keeping your engine in good mechanical condition is also very important, as excess fuel or oil entering the exhaust stream can contaminate the oxygen sensors.
Sources
- https://DriverTip.ru/repair/chto-oznachaet-oshibka-r0133-kak-ispravit.html
- https://etlib.ru/blog/583-oshibka-p0133—prichiny-i-ih-ustranenie
- https://elm3.ru/diagnostika/oshibka-p0133
- https://voditelauto.ru/%D0%BE%D1%88%D0%B8%D0%B1%D0%BA%D0%B0-p0133/
- https://www.drive2.ru/l/535173541998362770/
[collapse]
Symptoms of malfunction
The main driver symptom of P0133 is the MIL (Malfunction Indicator Light). It is also called Check engine or simply “check light”.
They can also appear as:
- The “Check engine” warning light on the control panel will light up (the code will be stored in the ECM memory as a malfunction).
- Reduced engine power.
- Increased fuel consumption.
- The engine attempts to stall when decelerating.
- Engine jerking during acceleration and after deceleration.
- Other related diagnostic trouble codes may be present.
[stextbox error is not considered serious, the car will be able to start and continue driving. But prolonged neglect can lead to catalyst failure and other consequences.
Troubleshooting
Having figured out how the error is formed, what provokes it and on what cars it can occur, you need to answer the main question. It concerns how exactly to get rid of the error.
Experts give several recommendations in this regard.
- Using diagnostic equipment in the form of a scanner, check the ECU in deep diagnostic mode. This will open all errors that are in memory. If there are other errors than the one in question, they should be corrected by identifying the causes and then reset. After this, another diagnosis is carried out. It is possible that 0133 was the result of other malfunctions.
- If we are talking about the obvious presence of error P0133 and the reset did not give anything, then you will have to check the condition of the oxygen sensor and the associated components.
- First of all, it is recommended to check the current condition of the catalyst. Make sure there is no internal or external damage. If the integrity of the catalyst is compromised, a new one will need to be installed.
- Using diagnostic equipment, measure the voltage of the signal that comes from the oxygen sensor. This can be done with a regular multimeter set to voltage test mode. When the ignition is turned on, the reading should ideally be around 450 mV. If the ignition is turned off, wait for a reading of approximately 150 mV on the device. If they are different, the sensor needs to be replaced.
- A voltage of less than 150 mV when the engine is turned off supports the theory that the lambda probe is faulty. There is only one solution: replacing it.
- If the voltage is less than 150 mV under the same conditions, there are breaks in the wiring. You need to find them, carry out repairs, or better yet, replace the damaged wiring.
- When the car is equipped with gas equipment, to eliminate the error that appears, you will need to perform the correct settings and select the most suitable mixture. Quite often, it is because of problems with the gas rail that the error in question appears.
- Fuel injectors in the car should be cleaned and washed with special products. Their contamination negatively affects the air-fuel mixture, affects the behavior of the oxygen sensor, and the operation of the latter is ultimately disrupted. This entails the appearance of a corresponding error with code 0133.
- Be sure to check the exhaust system corrugation. Its integrity may be compromised. If the corrugation is burnt out, error P0133 will almost certainly appear until the fault is completely eliminated.
This is interesting: What to do if the battery light on the instrument panel is on
To summarize, we can say the following. The appearance of error 0133 indicates that there are problems with the oxygen sensor. Its performance is impaired, the device reacts more slowly, which is why the ECU perceives this as an error in the engine’s operation.
The problem is quite common, but not critical. The main trouble is the change in dynamics and the increase in fuel consumption.
Diagnosing a malfunction is not difficult, nor is it difficult to fix it yourself. But sometimes the help of more qualified specialists may be required.