The VAZ “six” is considered the standard of reliability and simplicity of the Soviet automobile industry. She has “raised” more than one generation of car enthusiasts. With its simplicity and pliability, it won the hearts of many car owners. Until now, the “sixes” travel along the roads of cities and villages. To stand out from the crowd of cars, owners think about tuning, which transforms the external and internal appearance of the car. You can change the appearance of the VAZ 2106 interior with your own hands.
- Torpedo tuning
Torpedo dismantling - Tuning options for the VAZ 2106 torpedo
Video: do-it-yourself reupholstery of a VAZ 2106 torpedo
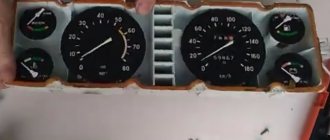
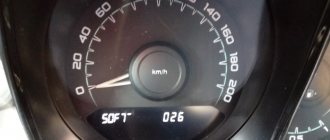
- Replacing instrument panel scales and arrows
- Seat reupholstery
Replacing seat fastenings
- Installing a radio
Video: installing speakers and Shumka
- Installing a steering wheel from another VAZ model
Tuning the interior of the VAZ 2106
All car owners know that tuning the interior means giving it a new look, improving functionality and safety. With its help you can create an individual and unique style.
The wooden interior makes you feel like you're driving a luxury car.
Interior tuning consists of several stages:
- torpedo tuning;
- instrument panel tuning;
- beard tuning;
- replacement or reupholstery of seats;
- installation of a radio;
- steering wheel tuning;
- tuning the gear knob.
Let's look at each of these points in more detail.
Torpedo tuning
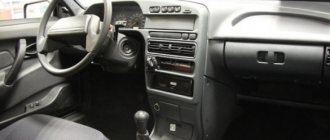
The top front panel of a car is called a torpedo. It is a solid metal structure covered with polymer foam and film. It contains an instrument panel, glove compartment, interior heater, air duct deflectors, and a clock.
The front panel is an important element of the interior, which can be tuned in different ways: replace the dashboard completely with a new one, paint it with liquid rubber, cover the smooth surface of the dashboard with leather, film or flock. Before starting tuning work, you need to remove the panel.
More about tuning the VAZ 2106 instrument panel: https://bumper.guru/klassicheskie-modeli-vaz/elektrooborudovanie/panel-priborov/panel-priborov-vaz-2106.html
Torpedo dismantling
Removing the console occurs as follows:
- After unscrewing the four fastening screws, we remove the storage shelf.
Removing the torpedo begins with removing the glove compartment - Remove the radio panel. To do this, unscrew the screws at the very bottom on both sides, then unscrew the top right screw securing the panel. Carefully, prying it with a screwdriver, remove the bar with additional controls from the radio panel. Under this bar there are two more screws, which also need to be unscrewed and, holding the mounting bar, remove the radio panel.
We remove the mass from the battery, remove the instrument panel shelf, then dismantle the panel intended for the radio, take out the instrument cluster; There are protective pads on the windshield pillars; they interfere with removing the dashboard, so we remove them - We dismantle the left and right decorative trims of the windshield pillars.
- We disconnect the decorative linings of the steering column, which are secured with five self-tapping screws.
- Next, remove the instrument cluster panel. To do this, use a screwdriver to hook the panel at the fastening points and pull it out a little. Disconnect the cable from the speedometer. We mark the bundles of wires so that they do not get tangled during installation, and disconnect them. Remove the instrument panel.
We remove the glove compartment housing and disconnect the two power supply wires for the lighting, pry up the heater fan switch with a screwdriver, the knobs that you use to regulate the degree of ventilation and temperature also need to be pryed off and removed, we dismantle the clock, we dismantle the air ducts-deflectors, the instrument panel is additionally screwed in with four screws that need to be unscrewed , the panel is mounted on top with four nuts, unscrew it, if the steering wheel is in the way, it can also be removed, remove the instrument panel itself - We raise the torpedo up and towards ourselves. Now you can get it out of the car.
To perform high-quality tuning of the torpedo, it must be removed and taken out of the cabin.
More information about glass on the VAZ 2106: https://bumper.guru/klassicheskie-modeli-vaz/stekla/lobovoe-steklo-vaz-2106.html
Tuning options for the VAZ 2106 torpedo
There are several options for tuning a torpedo:
- You can replace the standard torpedo with a new one from domestic or imported cars. It is installed entirely with devices. Since the parts in the “classic” are interchangeable, panels from the VAZ 2105, VAZ 2107 are suitable for the “six” ;
- cover the torpedo with liquid rubber. This option is labor-intensive, and such a coating is short-lived and will begin to crack over time. It will need to be updated periodically. The big advantage of this method is its low cost;
- reupholstering the dashboard with vinyl film, flock, automotive leather or leatherette. This method of improvement is the most effective, but scrupulous and time-consuming. To carry out the work, it is necessary to dismantle the torpedo and take measurements from it. It is best to make a pattern from non-woven fabric. Using the pattern, cut out the component parts. Sew all the pattern pieces together with strong threads. It is advisable to work carefully so that folds do not form on the material, which will spoil the appearance. Then treat the surface of the console with hot glue and pull on the cover. And, using a hair dryer, glue the cover.
The leather-covered torpedo looks impressive
Video: do-it-yourself reupholstery of a VAZ 2106 torpedo
Change your appearance
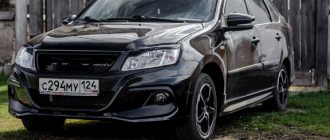
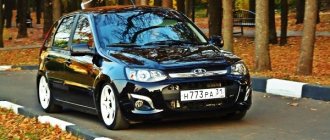
Body painting
This is a type of tuning that will instantly completely transform your car. Painting the VAZ 2106 in mother-of-pearl color looks especially impressive. You can choose shades similar to it. This procedure alone can turn your old man into a newfangled handsome man!
In addition to painting, the body is decorated with numerous stickers. Pictures on the body give the appearance of the car a fashionable retro touch and a special style. But not everyone likes this type of “decoration”.
Headlights
These are the eyes of the car. If you want to give your six a beautiful look, you can’t do without modifying them. Tuning headlights for a VAZ 2106 is the main element of external tuning. Often it is the headlights that are remembered first in a car's design. It’s not for nothing that BMW pays so much attention to them. And although our beloved six is as different from BMW as China, this design element can still be significantly improved.
If you want to change something with a minimal investment of money and time, you can get by with cheap overlays and reflectors. Replace conventional light bulbs with halogen ones. There are many colors of light available in the market.
If you still have money and time, then you can install advanced headlight models. To do this, you will have to modify the body configuration and make changes to the fastening system.
Radiator grille
Another spectacular way to transform the “face” of your car is by tuning the radiator grille of the VAZ 2106. With its help you can add character. Your six can become sweet and beautiful, or it can acquire brutal, masculine features. There are many different models on the market with modified shapes and colors.
Alloy wheels
For a VAZ 2106 car, tuning it yourself is very easy. Sometimes all you need to do is simply install alloy wheels to completely transform the appearance of a classic. There is no point in making big changes to the appearance of the car if it will have classic iron wheels. Molding can add more style and improve dynamic performance. Casting is lighter than iron, so the wheel load on the suspension is reduced. Such disks cool faster. Thanks to the integrated ventilation holes, the brake system components can be better cooled.
If you use low-profile tires, you can install wheels with a larger diameter. This will improve the maneuverability of the Zhiguli. In addition to casting, there are also forged and light alloy models.
Muffler
The standard version can be easily replaced with a direct-flow muffler, which has two outlet pipes with a beautiful chrome design. It would seem like a small thing. But it’s in the details that real beauty lies! Moreover, this modification alone increases engine power by 15 percent. And the noise of the exhaust system will be significantly reduced.
Body kits (skirts, VAZ 2106 bumpers, spoilers)
The original bumpers and other body kits don’t look very good on the six. If you put a five-star bumper on a VAZ 2106, tuning will be inexpensive. He looks much nicer. And the traffic police won’t have any questions.
But if you want to give your car a daring racing look, you will have to fork out for a more expensive VAZ 2106 bumper tuning: buy sports models. But remember that problems may arise during a technical inspection.
Hood
On the standard hood of the VAZ 2106 there are two holes that are designed to supply air to the heater fan. In stores you can find different types of air intake designs for the 2106. Tuning the hood with this design element will add a touch of completeness to the design of your six.
Spoilers
The main purpose of a spoiler is to change the direction of air flow, making the car more stable at high speed. Thanks to the spoiler, the car is pressed against the road, which increases friction and therefore improves dynamic characteristics. But most VAZ 2106 owners love this product for another reason - it looks very beautiful.
There are hundreds of different modifications, having different shapes and materials of manufacture. The most beautiful and durable ones are made of aluminum. The cheapest ones are made of plastic. The most common are rear spoilers. But there are other models designed for front and side installation.
Beard tuning
The center of the car interior is the console, which is called the beard. It acts as a continuation of the torpedo and attracts the attention of all passengers.
When tuning, you can place in your beard:
- watch;
- radio;
- pocket for small items;
- armrest;
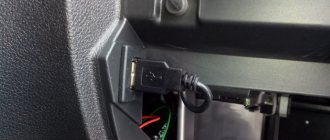
- USB sockets;
- switches;
- backlight
Typically, the beard for “classics” is made from plywood, fiberglass, or from spare parts from foreign cars.
If you make a beard with your own hands, then in the process of creating it you can bring your wildest ideas to life (author: valek40: https://www.drive2.ru/l/288230376152741460/)
Beard drawings can be found on the Internet or taken measurements from an old console. For the pattern, thick cardboard is used, which holds its shape well. The template is transferred to plywood and, after carefully checking the dimensions, cut out along the contour. Next, the parts are connected with self-tapping screws. The finished frame is covered with leatherette or other material in the color of the upholstery. The material is secured with a furniture stapler and glue.
With a newly installed beard, the car’s interior becomes unique, its functionality improves, and space for storing small items is organized (author: valek40: https://www.drive2.ru/l/288230376152741460/)
Dashboard
A “six” car, the tuning of which can be done on your own, can be transformed beyond recognition. For example, if you purchase a new dashboard.
However, why spend money, and a lot of it, when you can create such a panel yourself, which will be much more economical and more fun?
To change the appearance of the panel, you can decorate it with some other devices. For example, an LED strip would look good. And then the fantasy kicks in. To purchase various components, you can go to a store or order some exclusive items online.
You can completely replace the VAZ-2106 panel with a new one by carefully and carefully dismantling the old one. In this case, it is necessary to ensure that the mechanisms that are attached to it are not damaged. You can just add lighting to the panel. Some experts, in order for the light to be diffused rather than directional, recommend dripping transparent glue onto the diodes. Then the light will be more subdued and soft.
Radio tape recorder
No upgrade of the “six” is complete without installing a speaker system or at least a simple radio. A standard place for a radio receiver in the beard of a small-sized “six”. It should be trimmed to standard 1DIN. This can be done with a metal file. Then sand the edges with sandpaper.
Installing a radio
The radio tape recorder is attached to the beard using a metal case. Radio installation steps:
- Having bent all the tabs, use special spatulas to remove the radio from the case.
- The metal base is inserted into the prepared hole.
- We fix it using special tongues.
You can bend all the tabs or selectively - Then carefully insert the radio unit itself, which should snap into place.
Cables are included to connect the player. The most commonly used are:
- black - “earth”;
- red and yellow (often wound together) - ignition “+”;
- blue - power for the active antenna;
- white - front left (FL) speaker;
- gray - front right (FR) speaker;
- green - rear left (RL) speaker;
- purple - right rear (RR) speaker.
You can connect the radio to the ignition switch to the free INT terminal. Then it will only work when the engine is running and the ignition is on. This connection scheme will protect forgetful car owners from completely draining the battery.
If you twist the red and yellow wires together, the radio will no longer depend on the ignition. You can listen to music with the ignition off too.
The standard connection diagram is usually glued to the cassette player
Typically, a connection manual comes with the audio system. Following the instructions and color scheme, installing audio equipment in the “classic” will not be difficult.
Speaker installation
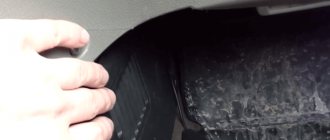
A good place to place the speakers would be the front door panels. If you choose the right size speakers, they will fit here very well. To install, perform the following steps:
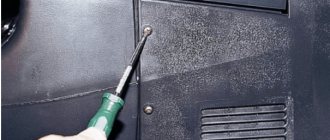
- Remove the trim from the doors.
- On the casing we cut a hole for the speaker. A hole of the required size can be made using a template. To do this, trace the speaker on paper. You need to work carefully so as not to miss the size.
- We attach the column and screw it to the casing using the fastening that comes with the kit.
- We carefully lay the wires in the cavity of the doors so that they do not sag or fall out.
- We install the casing in place.
Don't forget to buy new fasteners for the door trim. Often, when removing the casing, the fasteners break.
To give a finished look, the door cards are covered with leatherette, and a protective grille is installed on the speaker.
Additional speakers are placed on the dashboard or on the side pillars of the windshield.
For better sound distribution, high-frequency speakers are installed at the head level of the driver and passenger
If the car owner changes the entire beard, creating it himself to his own size, then he can place a 2DIN radio in it. A player with a large screen will add charm to the appearance of the car.
If the car has a 2DIN radio, then you can connect the rear view camera to it
Some craftsmen insert speakers instead of air ducts. But from personal experience I know that the standard “six” torpedo does not have side window blowing. In humid and cold weather, windows fog up and freeze. If you remove the air ducts for the windshield, the airflow will worsen even more. Therefore, I do not recommend this installation of speakers.
Video: installing speakers and Shumka
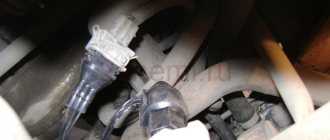
Antenna installation
The “six” did not have a standard antenna installed, but a place for it was provided on models before 1996. Adherents of original spare parts can find their original antenna on the car market. It is attached to the front fender of the car.
To do this, you will need to make a hole in the wing, install the antenna, tighten the bolts and connect the wires to the radio and ground. This installation method is quite complicated and not every car owner will decide to make holes in the body.
The “native” antenna of the VAZ 2106 works well only in the city
The ease of installation is distinguished by the interior active antenna, which is attached to the windshield. It is not exposed to precipitation, does not require additional care, and does not interfere with aerodynamics when the car is moving. When purchasing an interior antenna, please note that the kit should include instructions, fasteners and stencils to simplify installation. There are two ways to install a radio antenna inside the cabin:
- The housing is attached to the glass behind the rear view mirror, and the whiskers are glued in opposite directions at the top of the glass.
- The antenna body is secured to the top of the windshield on the passenger side, and the poles are glued along the edges of the glass at right angles to each other.
The antenna installed in the upper corner of the windshield does not interfere with the view
Find out how to disassemble the rear view mirror on a VAZ 2106: https://bumper.guru/klassicheskie-modeli-vaz/kuzov/zerkala-na-vaz-2106.html
Steering wheel tuning
A comfortable and beautiful steering wheel contributes to comfortable driving. To achieve this, in the “six” you need to update the steering wheel in the following ways:
- install a steering wheel from another VAZ model;
- replace with sports one;
- retighten the steering wheel.
Installing a steering wheel from another VAZ model
The simplicity of the Zhiguli allows you to replace the steering wheel with a steering wheel from other VAZ models. Many car owners believe that it is not worth the work and effort that needs to be put in.
The steering shaft of the chisel is thinner than the classic one, and not by much, that is, it is not very easy to make an adapter for the hub. Plus the steering wheel is higher, normally it won’t engage the turn signal bump stop. In a word, you need to suffer a lot to install it properly. As for me, it’s not worth it, if you really want a normal steering wheel, then you need to go and buy it, the choice is very rich right now, but you need to look at them carefully, there are so many leftists that it’s just terrible.
Kot_01
https://autolada.ru/viewtopic.php?t=26289
In the “six” you can put the steering wheel from the “bigger brothers”
Replacing with a sports steering wheel
A sports steering wheel will give the car a beautiful and aggressive look. You just need to know that the “six” is not intended for sudden maneuvers. The sports steering wheel has a smaller diameter and is more difficult to make turns with, so you need to get used to it.
A sports steering wheel will add drive when driving (author: Ivan ZFS42 Zakharov: https://www.drive2.ru/l/473130024988311897/)
Steering wheel reupholstery
In an auto store you can find braiding on the steering wheel for re-upholstering with your own hands. Such kits include the braid itself made of genuine leather, strong threads for sewing and a special needle.
A leather-wrapped VAZ 2106 steering wheel will add solidity to the car (author: Bogdan 777-ZT Weight: https://www.drive2.ru/l/5762853/)
Video: dismantling the steering wheel
Getting rid of noise and vibration
If you are planning to do interior tuning for a VAZ 2106 with your own hands, photo examples of which are presented below, then get ready to carry out a whole range of activities. You need to start with noise and vibration insulation, which will immediately improve the comfort of the car. When planning to replace seats, which will require welding work, insulation of the interior should be carried out after welding is completed.
Experienced craftsmen recommend treating the metal elements of the body part with anti-corrosion agents so that in the future you do not have to dismantle the soundproofing layer to remove rust. Today on the car market there are a lot of materials with which you can create good noise protection. To fix them, it is recommended to choose high-quality glue. To reduce the level of noise entering the cabin from the wheels, you can lay a carpet on the floor, carefully adjusted to size.