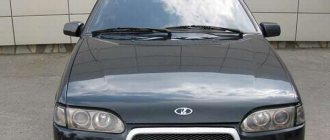
Lada 2110 Tinka › Logbook › Replacing the windshield and rear glass of a VAZ 2110
We glue glass when replacing it, losing the tightness of the adhesive seam, or straightening a damaged body.
Cutting and gluing all glass is done in the same way, so we will consider in detail only the operation of replacing the rear window. We remove the rear pillar linings in the cabin (see the article - “How to remove the roof lining of a VAZ-2110 car”).
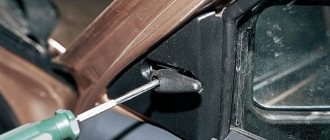
We pry it with a screwdriver and remove three pistons securing the two corner panels to the side posts.
Inside, use a Phillips screwdriver to unscrew two plastic nuts securing each panel to the rear pillars.
Remove the corner panels.
Disconnect the wires from the glass heating element.
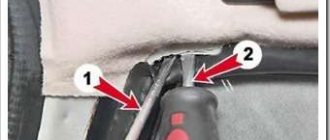
Removing the glass trim
Remove the trunk lid.
Remove the trunk seal.
To cut glass, you need to make a hole in the glue seam to pass the string through it.
To do this, we pierce the adhesive seam with steel wire...
...or make a cut with a string in the lower corner of the glass.
We pass a string through the hole and attach holders to its ends.
Having sawed the adhesive seam around the entire perimeter with a string, we remove the glass.
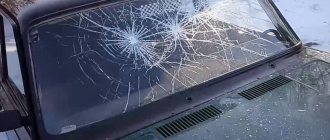
When subjected to a strong impact, the tempered rear window shatters into small fragments (for example, as a result of an accident).
In this case, before gluing in the new glass, you need to clean the opening from fragments and cut off the old adhesive seam with the remaining glass.
We cut off the old glue seam with a sharp knife, leaving a layer 1-2 mm thick.
To glue glass, you need a kit that includes a tube with glue, a degreaser and a primer (primer), as well as a “gun” for squeezing the glue out of the tube.
We degrease the edge of the glass at the place where the glue is applied and the window opening along the entire perimeter
Removal
1. Remove the rear door trim.
2. Remove the window regulator.
Note. When performing the following work, do not use the screwdriver as a lever.
4. We slide a slotted screwdriver with a wide blade under the decorative trim (the trim is attached to one spring clip located on its inner side in the center). By turning the screwdriver around its axis, remove the trim from the door.
5. Remove the upper rubber glass seal.
6. Using two slotted screwdrivers, remove the inner lower glass seal, starting from the rear end. Using a screwdriver with a thin blade, press the bottom edge of the seal and remove it from engagement with the door panel. At the same time, use a screwdriver with a wide blade to lift the seal, preventing it from catching.
7. Remove the glass through the opening between the outer and inner panels of the door.
Note. If it is necessary to completely disassemble the door, then, lightly pressing on the outer seal with one hand, remove the lower edge of the seal from engagement with the inner panel of the door with the other hand and remove the seal.
What you need to prepare
First, you need to purchase a windshield that fits the size. It is selected for VAZ according to article number 21105206016. You can find original or similar ones in stores. If you are looking for a reference glass to replace, then just know its article number - the store will select a suitable option for you. You can buy one of the models:
- 4503AGSBL – (XYG) with a stripe at the top, cost – about 3 thousand rubles;
- 4503AGNBL10 – (BOR) Overtinted with a darkened stripe for 5 thousand;
- 4503AGS - (BOR) Overtinted without a stripe, but also with UV protection - priced at 3 thousand;
- 2110-5206016 – AGS (BSZ) – classic, transparent for 5 thousand.
If none of the listed glasses are in the store’s assortment, then select the appropriate one according to the standard dimensions: 1428 × 862 × 5 mm. According to them, it is not difficult to make it to order in specialized workshops. In this case, you can choose the degree of tint and width of the stripe individually.
In addition to a new windshield, you will need:
- gluing kit;
- linings (seals);
- string with two handles for dismantling;
- White Spirit;
- activator and primer.
You will also need to have a tool for removing old glue, fine-grit sandpaper. It's good to have your own set of suction cups on hand for installing optics, they will make your job easier.
In one hour, if you have the appropriate skills and tools, you can replace the rear window on a VAZ 2110 car. Otherwise, you should contact professionals who know how to correctly and effectively change the rear window and windshield.
Do-it-yourself glass replacement.
Before you begin directly replacing the glass, you need to prepare all the necessary tools and materials. You will need: a new rear window, glue, new rubber for the glass, string to cut out the old glass, tools to hold the glass, tools to clean the opening, solvent, tape. In addition, it is recommended to carry out all work in a well-lit room with a partner. This will ensure high-quality and prompt replacement of glass.
— When everything is prepared, you need to proceed to the immediate removal of the old glass. To do this, you need to cut the glue between the glass and the opening using a special tool.
“Then you can remove the old rubber and clean the surface of any glue residue.
— It is very important to completely clean off all remaining adhesive and old rubber so that the new rear window can be easily installed.
— To ensure the durability and strength of the rear window, you need to carefully and responsibly approach the preparatory work.
— Using sandpaper, remove all traces of rust and old glue from the surface. In addition, you need to degrease the surface using a special solution.
— When all the preparatory work is completed, we begin processing the new rear window. To do this, you need to secure it with a special holder and put a new rubber seal on it.
— You also need to prepare the tape for quick use.
— It is recommended to apply a special primer before inserting the glass. This will ensure durability and avoid rust.
— Now you can apply special glue to the surface of the glass, as well as into the mounting holes for reliable fixation. Then you can put the glass in place.
— When the glass is installed in its place, for proper fixation you need to use tape and cover the joints with it.
— It is recommended to keep the glass in this form for a day, and then remove all remnants of the tape.
— It is also recommended not to use an intensive car wash, so as not to damage the new installed glass.
Types of damage
The structure of the windshield is triplex - an impact-resistant material in which there are two layers of glass and a thin film in the middle. This allows the spare part not to crumble upon impact.
Masters divide damage into two types:
- Chips. Only the top layer was damaged. No immediate replacement is needed.
- Cracks. In this case, supply new material as quickly as possible. The film holds the fragments, but not as firmly as before, and in case of potholes, which are not uncommon on our roads, they will fly apart. This will lead to an accident.
If you can’t change it soon, you can resort to several tricks:
- Make perpendicular cuts along the edges of the “web”.
- Drill holes with a diameter of 5 mm along the edges of the crack.
- “Brew” the damage.
All measures will give a temporary effect, and the spare part will still need to be replaced.
DIY replacement
Replacing the rear window on a VAZ 2110
Even if you trust professionals, it is useful to know how to make a replacement in order to eliminate possible defects when accepting the work performed. In addition, the saying “if you want to do it well, do it yourself” is still relevant. And it’s always nice to look at work done yourself, especially if it’s done well.
The first part of the work
To replace the rear window we will need:
- Directly new rear window.
- Adhesive composition.
- A string for cutting out old glass (if the glass is left in the opening and is also not included with glue)
- New rubber seal for the perimeter of the glass.
- A tool that holds the glass (usually these are two kind of suction cups connected by a handle; two such holders are needed).
- Tool for cleaning the opening - knife, sandpaper.
- Scotch.
- Degreasing solvent (may be included with adhesive).
- A warm and well-lit place to work.
- Assistant (you can do it alone, but it will be quite inconvenient and will take much more time).
Note. The best glue is a two-component one (the so-called “prime” is applied before applying the glue itself) and with sufficient components. It is useful to have a solvent and a special string (with handles) for cutting out old glass, if necessary.
Replacing the rear glass of a VAZ 2110
Next you need to remove the old glass. If it is badly broken or missing altogether, then there is no problem, but if replacing the glass is due to only a crack, then you will have to work. Here we need a steel string to cut through the glue between the opening and the glass, as well as an assistant, because It is necessary to work with the string both inside the car and outside. So let's get started:
- Disconnect the rear window heating contacts (if there is one).
- Remove the old rubber seal from the glass.
- Between the glass and the opening, piercing the old glue, we stretch a steel string. Then we attach the handles to it.
- With the help of an assistant, using the string as a knife, we cut through the entire perimeter of the glass. You must act carefully so as not to damage the paintwork of the body, otherwise you will also have to carry out body repairs.
- We remove the old glass. This can be conveniently done using a special tool for holding glass.
Note. If trim elements on the inside of the rear window interfere with the use of the string, then they must be removed so as not to damage them (for example, the third brake light, if installed on the rear window or close to it). It is better to carry out an inspection before starting work.
The first part of the work has been completed, now it is necessary to prepare the opening for gluing in the new rear window. These works must be approached with the utmost care, because... this will directly affect the final result and durability.
Preparing the perimeter of the opening
After dismantling the old VAZ 2110 windshield and before installing a new transparent shield, it is recommended to prepare a seat.
First of all, the preparation of the opening is carried out by removing the old dried glue. If rust is present, it also needs to be removed and the cleaned area primed.
Reference! Cleaning must be done as carefully as possible so as not to damage the paint of the vehicle. And when removing old glue, you should not completely clean the opening. It is recommended to leave a slight layer in order to better adhere the fresh substance to the mounting parts.
The thin adhesive layer is degreased along with the edge of the new glass. The degreaser should dry a little, after which the activator is applied. This substance promotes better bonding of elements.
Replacement features
During the first 3-4 hours of drying the glue, before its polymerization has yet occurred, you should absolutely not move the car or open or close the doors. Full strength of the adhesive layer occurs only 5-6 days after installation.
All work on installing the windshield must be carried out in a closed workshop or garage. If dirt or dust gets into the adhesive joint, it will negatively affect its tightness.
Windshield replacement is carried out at temperatures of 15° C and above. At a lower temperature, the glue will harden more slowly and less efficiently.
When purchasing materials and equipment needed for work, you must remember: their cost is not the main thing. The main thing is high-quality components and strict adherence to installation technology, which guarantees long and trouble-free operation of the windshield.
What is this?
By rear window, motorists and service station technicians understand a transparent shield that is installed in the rear of the car’s cabin, above the trunk lid. The product protects rear seat passengers from dust, dirt, and cold air currents. The shield provides good illumination in the cabin.
Most often you have to replace the front windshield. But the rear product can also fail. There are many reasons for this:
- The appearance of a crack due to poor quality.
- The presence of chips and scratches as a result of careless use.
- Breakdown due to hail, falling tree.
- Destruction by vandals.
You may need to purchase rear auto glass for a VAZ 2110 in the following cases:
- Damage to the old product.
- Presence of a manufacturing defect.
- The desire to install a structure with tinting and heating.
How to choose material
Finding a quality product at a low price is an art. There are several simple rules that will help distinguish an original product from a fake:
- Clear markings. A vague name, type, or manufacturer should raise doubts about the quality.
- Smooth surface. Small cracks, chips, and bumps are not the norm. Carefully inspect the consumable: if you find a defect, ask for another one.
- Reflection. It should be clear, even, and not blurry.
The manufacturer installs a spare part on the VAZ 2110 with dimensions of 1400×662 mm. Dimensions are similar for the 2111 model and VAZ 2112.
Auto glass of the wrong size will lead to rapid breakage. Take your choice more seriously!
The modern market is rich in a variety of goods. You can find a lobovushka for 1000 rubles, or for 3000. It all depends on the quality and the reputation of the company.
Installing a new windshield
Before gluing and installation, it is necessary to prepare the surface by cleaning it from traces of glue and other unnecessary residues.
- The layer of old glue is not completely cut off. I recommend leaving a small even layer on the frame to improve grip.
- Carefully clean all glass joints from glue crumbs, dust, sand, etc.
- Treat the frame opening with an activator.
- The new windshield of the VAZ 2110 must be carefully cleaned of dust, then everything should be properly degreased.
- Take the windshield and place it upside down, then put on the molding; if it does not fit tightly, secure it using tape.
- Now turn the glass over and walk along the edge on which the activator will be applied - white spirit.
- Using a swab soaked in primer, mark a strip where the adhesive will be applied along the entire length of the molding.
- All the same actions must be done in relation to the opening of the glass frame, after which leave the surface to dry for 10-15 minutes.
- We begin installing the windshield of the VAZ 2110. Load the heated glue into the gun, then slowly, carefully apply the glue to the surface approximately 1 cm thick.
Important! If you do not have special suction cups that are used to pick up glass, then it is better to apply glue not to the glass, but to the frame itself. Practice all subsequent steps to install the windshield on the first try.
Reasons for contacting the service center
VAZ 2110 windshield replacement is a leisurely and labor-intensive process that requires precision and accuracy.
Therefore, if the driver is not confident in his abilities, he can always turn to specialized service stations for help, and here’s why:
- services are provided by qualified specialists with many years of experience;
- work is performed using professional and modern equipment;
- manipulations are carried out quickly;
- provide a quality guarantee;
- Many service stations determine acceptable pricing for the services provided.
Do not operate a vehicle with a cracked windshield. Replacing the windshield of a VAZ 2110 should be carried out as soon as possible. Moreover, the procedure can be performed independently if it is not possible to contact technical service.
Removing old glass
Replacing the windshield of a VAZ 2110 with your own hands is carried out by dismantling the old one.
Completing this process will require the following equipment:
Glue-in kit New front glass
String with two handles
Primer and activator
White Spirit
Tools for removing and installing glass are prepared. Now you need to prepare the glass for cutting.
- Remove the wipers and frill.
- Remove the plugs and fasteners.
- There are 2 nuts on each edge of the ventilation grille under the hood, unscrew them.
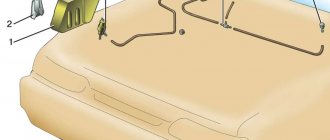
- Start removing the rubber gasket through the engine compartment. After this, unscrew the screws connecting the sound insulation and the windshield seal.
- Pull out the seal together with the lock, which is located in the center.
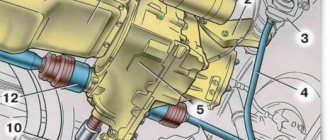
- Under the frill there is a washer hose and a clamp. Cut them in an inconspicuous but easily accessible place. In the future, an adapter will be installed in place of the cut.
- Once the seal is not holding anything in place, remove it.
- Take out the decorative part – the molding.
Nothing else interferes with removing the windshield of a VAZ 2110. You can start dismantling it. Replacing a 2110 windshield is done better with someone's help.
One person is in the cabin, the second is outside. Push the end of the string inside the cabin, the second remains outside.
The person in the cabin must hold the string at an angle towards the cut. The one on the outside begins sawing, leading the wire around the perimeter of the windshield, bringing the end slightly up.
At the end of the process, the glass must be carefully removed.
If the windshield is damaged and requires replacement, then this procedure must be carried out in accordance with the algorithm, which includes dismantling, preparatory work and installation of a new product. It is better to replace the windshield yourself with two people. In this case, one person should be outside the car, and the second should sit inside and “accept” the glass when it comes to installation, or push it out when dismantling work is required.
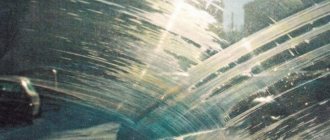
The windshield is considered one of the most unprotected elements of a car.
In this way, you can increase the accuracy of each procedure and eliminate damage to the paintwork, as well as damage to the new windshield due to negligence. Before its installation, it is mandatory to carry out preparatory work. In this case, you should adhere to the following algorithm:
- Remove old and heavily dried adhesive that was previously used to hold the old windshield in place.
- If necessary, remove rust that has formed under the layer of old glue. To do this, it is better to use sandpaper or other available materials.
- Apply a primer to the area that has been cleaned to bare metal and intended for installation of new glass. This procedure should be given special attention; moreover, experts recommend not completely removing the old glue, but leaving a thin layer. In the future, it will help the new composition to better adhere to the surface.
- Degrease the prepared surface.
- Treat the edge of the new glass, and after the white spirit has completely dried, apply the activator. This will ensure that your new windshield will adhere more effectively in the future.
Before applying the adhesive composition, it must be warmed up. This procedure will make the glue softer and make it easier to handle. After the new glass has been installed, it is forbidden to move the vehicle until the glue has completely dried; moreover, for 2-3 hours it is forbidden to open or close the doors, as well as the hood and trunk.
Do not forget that the adhesive joint will reach maximum strength only 5–6 days after completion of installation work. It is noteworthy that it is recommended to perform the windshield replacement procedure at a temperature of +15 degrees and above. Otherwise, the glue will take much longer to harden.
To make the replacement process more convenient, it is recommended to open the hood slightly and also lower the front door windows. During installation, you need to place the bottom part of the glass on the frame and carefully lower it onto the surface that has been treated with adhesive.
Materials and tools
In order for the procedure for replacing a damaged windshield to be successful and as quickly as possible, you need to prepare certain tools and materials in advance. For dismantling and installation you will need:
- The adhesive composition, which must be selected depending on the characteristics of the windshield, as well as the mounting surface. The best solution would be to use two-component types of glue, since they are specialized and are characterized by an affordable cost.
- New windshield. Before installing it, you need to make sure that the glass is the perfect size. Inconsistencies are likely to result in reduced bonding effectiveness, regardless of the adhesive used.
- The string needed to cut off an old windshield. It is its use that allows you to avoid damage to the car body during dismantling work. You need to choose a string depending on the size and individual characteristics of the glass. Consulting with experts on this issue is the best solution. For ease of use, the string is equipped with special handles that allow you to tighten the cutting edge and effectively cut old glue.
- Suckers. It is almost impossible to carry out the work without special suction cups. They make it possible to reliably hold the windshield at all stages of work. Thanks to this, the risk of accidental falls and the appearance of scratches and chips due to impacts caused by negligence is almost completely eliminated.
- Activator. Its use allows you to increase the adhesive properties several times. Thanks to this, in the future it will be possible to apply a primer or adhesive composition much more efficiently to the surface treated with the activator.
- White Spirit. It plays the role of a solvent, with which you can effectively degrease the surface of the glass, as well as the places where it will be installed. The use of white spirit requires some experience, since such a solvent can cause significant harm to the health of a person who inadvertently inhaled its vapors or allowed it to come into contact with the skin or eyes.
Choosing a film for darkening
Do-it-yourself tinting of a VAZ 2110 begins with purchasing a tinting film on the market or in a store. The darkening process itself will involve gluing this film to the inside of the glass. When purchasing a film for tinting, it is advisable to use GOST or the corresponding regulatory document, which will indicate the permissible light transmittance of the darkening material.
If you choose wisely, you will not have any problems with seeing the highway or with road inspectors, since this will be legal tinting on the windows. Some people also tint the windshield, which is not allowed. Any tint impairs visibility, while auto glass manufacturers are struggling to increase its transparency by cleaning the melt from iron impurities.
When choosing a film, you should pay attention to its base. Recently, silicone films have been gaining popularity, which can be repeatedly pasted and removed without any damage. Removable tinting can be recommended to lovers of radically black glasses, including many VAZ 2110 owners.
Silicone-based films are easily removed from glass and remain intact and unharmed. You can crumple them, throw them in the trunk, and then rinse them in water and stick them on again.
If you decide to darken the windows of your “ten” within the permitted transparency, then it makes no sense to buy silicone films. They are more expensive than usual, but in this case you won’t have to remove them, and therefore the main advantage of removable films remains unclaimed. Hence the conclusion: why pay more?