Wheel bearing failure is a common problem for car owners. Let's look at how to replace the rear wheel bearing of a VAZ 2114 and what tools are required for this. We will also look at the symptoms of part failure and how to carry out diagnostics to detect the problem.
Video that clearly demonstrates the replacement process:
Useful: How to replace the front wheel bearing on a VAZ 2114?
How to check the rear wheel bearing?
Diagnostics is similar to checking the front wheel bearing. You can do it yourself without going to a car service. There are several points by which failure is determined:
- When driving at a speed of about 50-60 km/h, noise with vibration will be heard, transferring to the car body, while the road surface will be smooth.
- Having raised one side of the car with a jack, we begin to rotate the wheel. If rotation is accompanied by extraneous sounds, this will also indicate a malfunction.
- After driving the car, touch the wheel disk at the hub. If it has a high temperature, then the part is failing.
Of course, it will not be possible to find out the critical wear of a part, but it will be possible to detect a malfunction. When a breakdown is diagnosed, it is strictly not recommended to continue driving the car; this may pose a threat to other road users.
How can you tell if a bearing is broken?
As practice shows and manufacturers claim, replacement must be carried out every 100,000 km. car mileage, but this can be influenced by many circumstances. For example, weather conditions, damage, road quality.
The first sign of a rear wheel bearing failure will be noise or hum in the wheels, which will turn into vibration. A grinding noise or increased play in the chassis may also indicate a malfunction.
To prevent replacement of the rear wheel bearing, diagnostics are required approximately every 2000 km. mileage And so, to check the bearing, you need to rotate the chassis “in weight” and if there are strange sounds or braking of the wheel, the bearing should be replaced. It is also worth checking the wheel play by manually moving it along the axis, but even if there is no noticeable play, this does not mean that the bearing is intact and in working order.
It is recommended to follow the first verification rule. But to be completely sure of a breakdown, you will need to unscrew the bolts and see how the brake disc rotates. If the VAZ 2114 bearing is in working condition, then nothing interferes or makes noise when rotating.
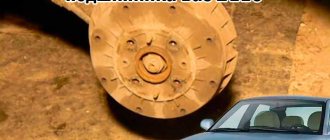
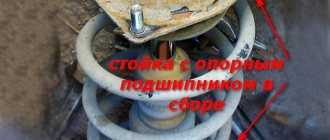
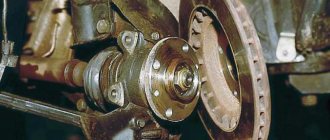
Rear hub device for VAZ 2114
Before replacing a broken part, it is advisable to familiarize yourself with how the rear hub in a VAZ 2114 car works.
Rear hub device for VAZ 2114
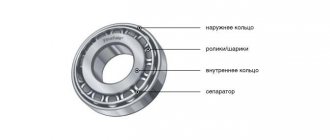
So:
- Rear axle shaft;
- Dirt ring;
- Retaining ring;
- Wheel bearing;
- Rear hub;
- Washer;
- Hub nut;
- Pad;
- Protective cap.
Necessary tool
Before starting work on replacing the rear wheel bearings on a VAZ 2114, we need to collect the necessary tools according to the list:
- Set of open-end wrenches;
- 30mm head and knob;
- Round nose pliers and pliers;
- Wheelbrace and jack;
- Hammer.
It is better to have a can of WD-40 or liquid wrench, as the parts are susceptible to corrosion and can be difficult to unscrew. If possible, you can purchase or find a special puller for the hub, which will make the work a little easier.
Helpful : How much do wheel bearings cost?
Recommendations and features for replacing the rear bearing
- Purchase spare parts for VAZ only in trusted stores, if possible, order from the manufacturer.
- Replace both sides at once; they wear out evenly.
- After replacement, it is recommended to check the VAZ 2114 clutch bearing.
- For an option for installing a part without the use of an impact tool and without a puller, read the link.
- To remove the inner race from the axle shaft without a puller, use a sharp chisel, or make a notch on the ring with a grinder and split it.
- Watch the video of replacing a bearing on a VAZ 2114, this will speed up the repair process.
Replacement of VAZ rear bearing
How to replace the rear wheel bearing of a VAZ 2114
Replacing the rear wheel bearing on a VAZ-2114 is quite difficult, but you can do it yourself. So, a motorist needs to know the design features of the car, as well as have some experience in suspension repair, but even a novice car enthusiast will be able to understand the process by reading this material. The article will tell you about all the features of the operation, and also show step by step how the procedure is done.
Symptoms of malfunction
The first symptom of a malfunction will be a noise heard from the rear of the car. This means that the mechanism runs out of lubricant and the metal parts begin to rub against each other. The next thing that will happen is that vibration will be added to the body, which will be caused by slight wear of the element. When a part is on the verge of failure, an unpleasant smell will be felt, as if the brake pads are stuck in the drum. It is better not to let this happen, as the wheel begins to jam and the bearing can fall apart at any moment.
Replacement instructions
Replacing the rear wheel bearing on a VAZ 2114 is carried out as follows:
- Loosen the wheel bolts and wheel locknut before jacking up the vehicle.
- Raise the car using a jack. Tighten the hub nut completely and remove the wheel. Unscrew the mounting bolts on the drum.
- Remove the drum. If it is rusty, pre-treat the joint with WD-40. If after this the drum still does not budge, use long pins. Screw them into the holes and tighten them one by one until the part moves out of place. You can gently help with a hammer by tapping it on the back side.
- Unbend the stopper and unscrew the locknut. If it is tight, use a wrench extension.
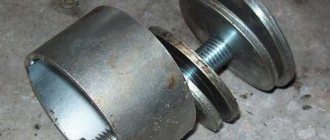
- Using a universal puller, press the hub.
- The inner race remains on the shaft, and the outer part of the bearing remains in the housing. If you want to replace the pads at the same time, you need to remove the axle mounts.
- Now it's time to demonstrate the entire mechanism.
- As a rule, the rear part of the axle is attached to the brake shield. To dismantle you will have to use a hammer.
- Remove the wheel bearing race using a universal puller. If the brake system does not need to be changed, this operation can be performed directly on the vehicle's axle shaft.
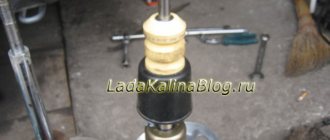
- We place the hub on bricks or bars, as shown in the photo. Use a hammer to knock out the old rear wheel bearing.
- Be sure to remove dirt and wash the hub in gasoline. Clean the axle shaft in the same way. Use thick lubricant to treat the seating surface. Place the new bearing in the hub bore. Mounting chamfers will help avoid distortions.
- Press the bearing with your hand and press it in about 3 millimeters. Place the old bearing on top.
- Using the side of the hammer, carefully hammer the part inward. If the process is difficult, you can cool the bearing in the freezer and warm up the hub.
- Once the rear hub bearing is in place, you can install the circlip. For this purpose, round nose pliers are used. Don't forget to lubricate the axle first.
- Carefully attach the assembled mechanism to the trunnion. Be careful to avoid distortions. Then place a washer on the threads and screw on the hub locknut.
- Using a nut, press the hub onto the axle. Tightening torque: 220 N*M. Place the drum, secure it and screw the chassis.
As you can see, replacing a bearing is a rather complicated and time-consuming task. You need to have a special tool. Sometimes it’s easier to ask a car service for help.
Replacing the rear wheel bearing
When starting to replace the rear wheel bearing of a VAZ 2114, place the car on a level surface and place supports under the wheels for safety. Then you can begin the replacement process:
- Remove the plug from the wheel that covers the hub nut. We unpin it using a core and a hammer.
- We loosen it using a wrench and a 30mm socket. First, you can spray a special agent on the threads that will corrode the rust. Also, the handle of the wrench can be extended using a piece of pipe, which will increase the leverage and provide a smooth load on the nut.
- Raise the car with a jack and remove the wheel.
- Check that the car is not on the handbrake! Unscrew the drum mounts. The adjacent holes have threads. We screw the bolts in there, which will allow the part to be pressed out. You can also tap the drum in a circle using a hammer and a block if it is very difficult to remove.
- Unscrew the bearing nut completely.
- You can remove the hub using the drum and engine head bolts. We screw the drum on with the back side and pull it towards ourselves, so the hub will come out. You can try to knock it out with a hammer or squeeze it out using a pry bar.
- Now we need to pull out the wheel bearing itself. It is best to use a special puller for this. When you don’t have a puller, you can use a grinder to slightly saw down the old element and knock it down.
- Remove the retaining ring in the hub using pliers.
- Next we need to press out the old bearing; if there is no puller, we can try to knock it out. If you can’t remove it, then you can contact a service center that has a hydraulic press, and they will also install a new part for you.
- After installing the new bearing, do not forget to install the retaining ring. Now lubricate the installation site with oil and install the part in place.
Further assembly occurs in reverse order. Be sure to check the tightness of all bolts after installation. Also be sure to tighten the bearing nut.
How to check
Before you begin replacing the front or rear bearing of your hub, we recommend that you conduct a simple check of the functionality of this unit. This will allow you to accurately determine the culprit of the malfunction and verify the real need to replace the elements.
There are two verification methods, each of which has its own nuances.
Verification method
What to do
After a long ride, touch the area of the wheel where the noise is coming from.
Price and article number of the rear wheel bearing for VAZ 2114
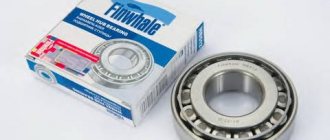
Many car enthusiasts, when choosing a new part, prefer original spare parts. They have a price above the market average, but differ in the quality of the product. In stores you should look for them exclusively by article numbers 2108-3104020 and 2108-3104020-02 .
It is under them that parts from the AvtoVAZ plant are produced. When the part numbers are not indicated or have a different meaning, it may be a Chinese counterfeit made to match the original packaging, also pay attention to this when purchasing!
The average cost of an original bearing is about 1,500 thousand rubles .
Instructions for replacing the rear wheel bearing on a VAZ 2114 with your own hands
The rear wheel bearing on the VAZ 2114 (2110, 2111, 2112, 2115), as stated by the manufacturer, is changed every 100,000 km. This is due to external influences on the bearing: impact axial and radial loads, dirt, moisture, damage to rolling elements, raceways.
Replacing the rear wheel bearing of a VAZ 2114 is not a difficult type of repair that even a novice motorist can handle with his own hands. The wheel bearing assembly of the “fourteenth” is not complicated in design, so removing and installing a new bearing will not be difficult.
The article examines in detail the issue of replacing and diagnosing the rear wheel bearing, as well as providing tips and recommendations for repairs, and talks about the features of choosing a new product.
Good analogues
You can also opt for analogues that have excellent reviews from car enthusiasts:
- Part number R172.04. The average price on the market is about 1,500 rubles .
- GKN-Spidan. Catalog number 26727. The cost is also about 1500 rubles .
- Search number H10 1206. The average price on the market is about 1200 rubles .
The quality of these brands is not inferior to the original and in some cases they last even a little longer than the original. Of course, the service life depends on driving style, so there is no exact data on the mileage of the bearings. Replacing a wheel bearing with your own hands is not a labor-intensive process that can be done without going to a car service center. The average price for such a procedure starts from 1000 rubles, which means that by doing car repairs yourself, you can save a third of your budget. You can extend the life of the bearing by not using the car in difficult conditions and on poor roads unnecessarily. This will help reduce the load on the chassis, which in turn will reduce wear.
Replacing the rear wheel hub bearing on a VAZ 2108, 2109, 21099 and their modifications
A failed rear wheel wheel bearing indicates a problem with a constant, often ear-piercing howl. It comes from the rear and does not go away when driving in neutral. As bearing wear increases, this sound may become increasingly louder. The rear wheel bearing needs to be replaced.
This work can be done most quickly using special devices (pullers). If they are not there, then to achieve the goal, you should use available materials. Let's consider replacing the bearing with this particular slope.
Checking the rear wheel bearing
We hang the wheel on the bearing of which there are suspicions. We rotate it by hand. A wheel with a working bearing rotates almost silently. A faulty bearing reveals itself by noise and a sound “as if balls are rolling in the bearing.” The degree of noise and rolling depends on the degree of wear of the wheel bearing itself. For comparison, you can hang a wheel with a working bearing and listen to the sound it makes.
Required Tools
— An extended 30mm head with a long wrench, or a curved box wrench of a similar diameter (or a similar socket wrench, etc.)
To loosen the wheel hub nut.
— Thin chisel, center punch
To bend back the jammed edge of the hub nut.
— Three-legged puller (optional)
To remove the hub from the wheel axle.
— Two-legged puller, or a special semicircular one (optional)
To remove the inner bearing race from the wheel axle.
— Puller – pliers
To remove and install the retaining ring
— Puller for pressing the bearing out of the hub/pressing the bearing into the hub (optional)
— Open-end or any other key for 12 (11, 8, 7, depending on the type of pin)
For unscrewing the guide pins securing the brake drum.
— Key for 13 (14)
To loosen the parking brake adjusting nut.
- Hammer
We purchase a bearing with a nut.
Rear wheel bearing for VAZ 2108, 2109, 21099 cars with nut
Preparatory work
It is best to carry out work in a pit (inspection ditch), it is more convenient. But if there is no hole, you can do without it.
— We fix the car by placing it on a level surface, in first gear, placing wheel chocks under the wheels.
— Under the bottom of the car, loosen the handbrake tightening nut.
If the car is not installed in a pit (inspection ditch), then to perform this operation you will have to jack up one of the wheels, put a safety stop under the car and lie down to get to this very nut.
The procedure for replacing the rear wheel hub bearing on VAZ 2108, 2109, 21099 vehicles and their modifications
— Remove the protective cap on the wheel hub
— Removing the dent on the side of the hub nut
Using a thin chisel or core and hammer, straighten the jammed edge. For greater clarity, the wheel in the image has already been removed.
Wrinkled edge of wheel hub nut
- Loosen the hub nut
To do this, use a 30 mm socket with a long wrench (or a special wrench) to unscrew the nut. You may have to apply considerable force and extend the handle of the wrench with a metal pipe, as it may become stuck or rust over time. Also, to prevent the wheel from turning, an assistant inside the car can press the brake pedal.
Loosen the rear wheel hub nut
— Remove the wheel
Loosen the rear wheel mounting bolts, jack it up, place a safety stop, unscrew the bolts, and remove the wheel.
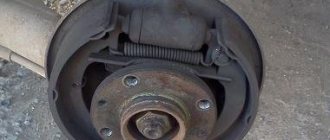
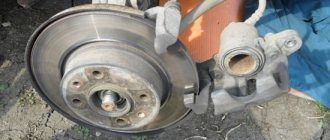
- Remove the brake drum
Using a 12 wrench (11, 10, 8, 7 - the pin size may be different), unscrew the two guide pins securing the brake drum. If they don’t want to turn away, lightly tap them with a hammer.
Unscrew the two wheel disc guide pins on the brake drum
Since we have already loosened the parking brake, the brake drum should come off without much difficulty. We rotate it left and right with our hands and at the same time pull it towards ourselves. If it goes badly, tap the drum in a circle from behind with a rubber mallet. This should help.
Brake drum removed
— Finally unscrew the hub nut
Remove it and the washer underneath it.
— Remove the rear wheel hub with bearing
We install a three-legged puller on the hub and rotate its nut to pull the hub off the wheel axle.
Removing the rear wheel hub of VAZ 2108, 2109, 21099 cars using a puller
If you don’t have a puller, take the wheel, turn it over with its back side facing you and fasten it to the hub with wheel bolts. We do not tighten the bolts all the way, but several turns (it is advisable, of course, to use elongated bolts, but if they are not available, you can use regular ones). We will use the wheel as a reverse impact hammer. With a sharp movement we move it towards ourselves. If it was not possible to remove the hub from the axle one time, we perform this operation several times.
— Remove the inner race of the bearing from the wheel axle
You can use a two-legged or semicircular puller, or you can simply place a large chisel on the back of the ring and hit it with a hammer. The ring will move along the axis, then you can pry it off with a mounting spatula or a large screwdriver and finally remove it. If after working with a chisel there are nicks left on the axle, we clean them with a fine file.
Removing the rear wheel bearing inner race
— Remove the retaining ring securing the bearing in the hub
We use puller pliers for this. If it is not there, remove the retaining ring with a screwdriver.
Removing the bearing retaining ring in the hub using a puller
— Remove the bearing from the hub
Using a special puller, squeeze it out of the hub body. If there is no puller, knock it out with a piece of pipe of suitable diameter. The diameter of the pipe must be equal to the diameter of the inner ring of the bearing. We strike at him.
Knocking out the old bearing from the hub
— Clean and lightly lubricate the inside of the hub
— Press the new bearing into the hub
We do this using a puller or a vice, or simply hammer it in there using a wooden spacer and hitting it in a circle with a hammer. At the final stage of this driving, you can use the old bearing as a spacer.
Driving a new bearing into the hub
— Install the retaining ring in the groove on the hub
You can use a pliers puller for this, or just a screwdriver.
Rear wheel bearing retaining ring
— Install the hub with the inserted bearing on the axle
With effort we move it as far along the axis as possible with our hands. If it does not move, you can use a mandrel to tap the INNER ring of the bearing inserted into the hub.
Fitting the hub onto the rear wheel axle
— We put on the washer and hub nut.
Install the washer and hub nut
— By tightening the nut, press the hub until it stops on the axle.
Tighten the hub nut