Upper support of the front strut for viburnum - features of choice
As practice shows in most cases, the upper support assembly is replaced.
There are three models of “supports” on sale, which you should pay attention to when purchasing. The photo below shows original sets of supports from three companies: SEVI. SS20 (SS20), ASOMI (ASOMI). The cost of products varies from 2000 rubles. up to 4000 rub. depending on the configuration. Watch the spare parts review video:
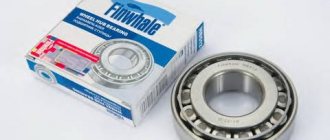
If you do change the support bearing individually by installing it in the old support, then you should buy from trusted manufacturers, a summary table of which and photographs are presented below. Catalog number (article) - 1118-2902840.
Video 2
In order to replace at least one of the elements that is part of the Kalina front strut, you need to remove the entire assembly from its seat.
To do this, open the hood and use a 22 wrench to rip off the upper support nut, while holding the shock absorber rod with a 9 wrench. There is no need to unscrew the nut completely yet.
We also use a wheel wrench to remove the wheel nuts and only then lift the car with a jack. Immediately you need to place a stop for belaying.
Now you can safely unscrew the wheel nuts and remove the wheel. The brake hose is attached to the strut, so it needs to be released from the mount so that it does not interfere when we remove the strut. Now we will need WD-40; we need to treat all the bolts and nuts that will have to be unscrewed. The main thing is to spray on the lower nuts and bolts of the shock absorber that secure the assembly to the steering knuckle.
We remove the steering tip nut and hit the eyelet into which the ball pin of the tip is inserted with strong blows, while inserting a pry bar between the steering tip and its mount on the rack.
If you have a special puller, you can press out the finger using it. Unscrew the two self-locking nuts securing the shock absorber to the swing arm. To do this, we use keys 17 and 19.
It is better to use similar heads and knobs.
After removing the nuts, it happens that the bolts do not come out. They have to be knocked out. You must first knock them out through a wooden block so as not to spoil the thread, and then, using a punch with a smaller diameter, knock out the bolt when it is already sunk into the steering knuckle.
Replacing the support bearing without removing the strut — logbook Lada Kalina Cross Saucepan 2015 on DRIVE2
Good day. I want to tell you about how to change the support bearing without removing the strut, and, accordingly, without then adjusting the wheel alignment angles. Since May, when the hero Volgograd visited the city, I noticed that clicks were heard when turning the steering wheel, ringing in the spring.
From time to time the knocking disappeared, but as soon as we stood in a traffic jam, and we have a great many of them, the knocking appeared again. And for the last month it was constantly present. For a long time I wanted to change this bearing, but something stopped me, either the price of 2600 rubles for work from the officials, or the lack of spring ties, or desire. And finally I have matured.
Yesterday I bought zip ties at Rakita, costing 790 rubles. As they promised me, they are very good. There were some for 400, but the seller did not advise taking them. In fact, having arrived today from Tolyatti, I decided to replace the unfortunate bearing at all costs. Having taken everything that seemed to me necessary, I went to the parking lot.
If it doesn’t work out, I’ll just leave the car there until the problems are resolved. To the point:
note
He jacked it up, rolled it out, took off the wheel, threw it under the threshold, putting boards on it.
Oh yes, I first loosened the strut nut.
Well, as soon as I loosened it, I first realized that I didn’t have the key for 22 in Cross’s emergency suitcase. Therefore, we had to go to the house, about 200 meters, to get what we needed from the six. I took an armful of keys, just in case.
I unscrewed the stabilizer bar bolt so that the strut could go down. According to the recommendations of the YouTube Internet, I placed a second jack under the ball and raised the rack. Here, as they say on the Internet, you need to throw on the spring ties and compress them a little.
But... Either my ties were of the wrong system, or Cross’s springs, in short, nothing worked. The threaded part of the tie rested against the glass and refused to compress the spring. No matter how much I twist them, it doesn’t work and that’s it.
Sometimes it gets stuck, sometimes there isn’t enough movement.
Zoom
Something like this.
I started to think. I thought for a long time)) about 5 minutes.
And I realized that the rack can be unscrewed and lowered down, and then the spring can be compressed. So I did. Everything turned out fine. As it turns out, a second jack is not needed here. I removed the amplifier, the strut support and the bearing itself. There is access, no difficulties.
Zoom
Disassembled. After tightening the springs, I naturally unscrewed the strut nut.
Zoom
This is what the bearing turned out to be.
Zoom
I installed the same one, only new. It's just ready for installation.
I looked inside the glass, and there, under the amplifier, there was rust.
Zoom
You can see the paint peeling off and I'm laughing.
I think it’s bullshit, I’ll fill it with Movil and that’s it. I turned the whole trunk over, there is no Moville, and there is not a single rag to wipe off the dirt.
I called my youngest son to come get the keys to the six and bring Movil and rags from there. And since he is not very big, we only allow him to cross the road at the pedestrian crossing, and he is a little to the side.
That's why I wait a long time. Having nothing else to do, I cleaned everything that caught my eye with a metal brush))
Zoom
The rack support is in excellent condition.
Finally he came and brought everything. I wiped all the contact areas with a rag and filled it with Movil.
Start assembly. Everything is much simpler here.
Important
I put a rubber band on the spring, some kind of piece of iron on top, a bearing in it, a support and amplifier on top, then a washer and a nut. Collected.
Unscrew the ties by adjusting the spring. I asked my son to lift the jack (this is where it came in handy) while he guided the pins into the holes. I got it right away, without difficulty. Once again I sprayed everything with anticorrosion agent. Screw on the nuts and tighten. Don’t forget to fasten the stabilizer link after tightening the bolt. The wheel is in place. That's all.
Zoom
I'm delaying.
Zoom
All is ready.
Well, since there was such a booze, I decided to protect the left side from rust.
To do this, I simply jacked up the front side, the left one. I unscrewed 3 nuts of the strut, pressed the wheel with my foot and spilled Movil between the amplifier and the glass. Tightened it up. I filled the nuts too.
Zoom
Left-hand side.
If I change the bearing there, I'll do everything more carefully. Well, that's all it seems. The collapse should not go away. Saved money. 500 bearing and 790 couplers, but couplers are a long-term investment)) Good luck to everyone. If you have any questions, I will answer.P.C. I just went to work. There are no clicks, no movement. The steering wheel is straight.
I'm proud that I overcame laziness and finally did everything))))
Price tag: 1,290 ₽ Mileage: 24460 km
Source: https://www.drive2.com/l/479000317569007896/
Replacing the support bearing for a viburnum (VAZ 1118, 1119, 1117)
Replacing and installing support bearings on Kalina begins with checking the condition of the remaining elements of the module: lower cup, power buffer, bump stop, corrugation, shock absorber springs. They will need to be replaced if necessary. How to correctly install the support bearing on Kalina and change it is described in order below.
- Before assembling the front jay, make sure that the ends of the shock absorber spring rest against the special tabs at the lower and upper cups.
- We place a rubber gasket on the top cup, with a new “support” on top of it, and orient the product upwards with the markings.
- On top of the p/sh we install the upper part of the support (cover).
- Now we attach the shock absorber rod nut, which we tighten until it stops.
- Unclench the shock absorber spring ties. We tighten the rod nut with a torque wrench to the torque indicated in the table at the end of the article.
- We install the assembled module back, first attach it to the body glass. We carry out the assembly in the reverse order: we screw the steering tip to the lever, fasten the stand with two bolts to the steering knuckle, and mount the wheel at the end. This completes the replacement.
How to identify a malfunction
Are you bothered by some strange sounds in the chassis? Can you clearly hear its knocking while driving? This means that you urgently need to assess the condition of the suspension, since it is possible that you had to deal with:
- bearing damage;
- damage to the gasket.
There can be many reasons for the failure of support bearings, and they are the same for the vast majority of cars, including the Lada Kalina. First of all, we are talking about problems such as:
- Wear of the element (as a rule, the service life of support bearings on the Lada Kalina is designed for 50,000 - 100,000 km).
- Getting dirt and dust inside, which is very important for most of our regions where there are practically no roads.
- Damage due to excessive load on the shock absorber.
- Failure due to damage to the shock absorber itself.
Determining whether a support bearing is damaged is quite simple. To do this, you need to open the hood of the car, remove the “glass” and slightly rock the front of the car. A characteristic sound and vibration will indicate that you urgently need to replace 1 or 2 front support bearings. Of course, it’s better not to let things go wrong and install new components at least once every 50,000 – 70,000 kilometers (depending on the intensity of use of your Kalina). If a knock does appear, you should under no circumstances ignore it, since a new strut will cost you 4 to 10 times more than replacing a bearing, the average price of which is 300 rubles. The cost of work at a service station will also cost no less than 500 rubles. If you make the replacement yourself and in a timely manner, you can save a lot of money, especially since there is nothing complicated in the procedure. Next, we’ll talk about how to change the support bearing on a Lada Kalina car without contacting specialists.
How to change a support bearing without a camber on a Lada Kalina
Replacing the support bearing on Kalina without removing the strut is impossible, or will not be correct, but replacing the part without further camber is still possible. In this case, the technology for removing the rack will change:
- After removing the wheel, unscrew the hub lock nut.
- Disconnect the steering knuckle from the ball joint and steering rods.
- Then we remove the steering knuckle from the CV joint with the strut and shock absorber spring, this way you will not break the camber bolts.
How to check a support bearing
The easiest way to check the performance of a support bearing is with the help of an assistant. You need to remove the plastic cover from the strut cup, there you will see the bearing mounting nut. You need to put your hand on the support and ask an assistant to rock the car. As soon as the car starts to rock, you will immediately feel the bearing working.
If you hear a knocking or squeaking sound in the support, it is most likely faulty and needs to be replaced.
New Lada: Tires and wheels for Lada Granta
DIY front strut diagnostics
Checking a suspicious node is quite simple. When the car is stationary, one hand is placed on the shock absorber rod with a nut protruding from the suspension glass, and the other hand is used to intensively rock the body. It is better to carry out even such an operation together, since the efforts are quite significant.
Your hand on the top cup of the rod will easily feel extraneous sounds and vibrations that should not be present in serviceable parts.
If an assistant turns the steering wheel from side to side, and your hands, while on the strut cup or spring coil, feel a knocking, grinding (crunching) sound, then things are bad with the bearings.
If the shock absorber rod of a particular car is not connected to the inner race, then it will be difficult to check the part in this way.
You will only have to focus on the sounds when driving and the results of partial disassembly of the suspension.
How to remove the support bearing on a viburnum - step by step guide
Replacing the Kalina front strut supports begins preparing the car. Place the car on a flat surface, if there is a lift or pit available. Engage first gear and release the parking brake. Dismantling sequence in order:
- We unscrew the wheel bolts, then raise the car with a jack or a lift as in our case.
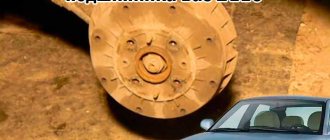
- We gain access to the brake disc, but you don’t need to remove it, nor do you need to unscrew the hub locknut.
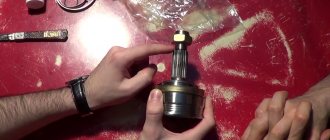
- Let's move on to the swing arm and tie rod. First, remove the cotter pin from the fastener. Next, unscrew the nut itself.
- After this, use a tip remover to press it out of the hole in the lever or, as a last resort, use a hammer. We install the device, tighten the thread and remove the tip.
- Now disconnect the brake hose and speed sensor wire from the front strut.
- Next, we find two bolts securing the strut to the steering knuckle and lubricate them with penetrating lubricant.
- To unscrew the nuts, we use a 17 socket wrench, as well as a head with a ratchet.
- The bolts will have to be knocked out; use a wooden guide to avoid damaging the threads.
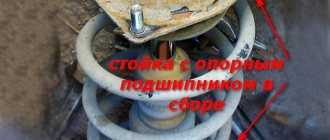
- The lower part of the module is freed, let's move on to the upper part. Unscrew the three fastenings of the front pillar to the body glass.
- When unscrewing the last nut, hold the stand, or place a support under it, for example, a removed wheel. After this, remove the module with the support and shock absorber assembly.
- We install two ties on the springs of the removed suspension module. As shown in the photo, we compress the shock absorber spring evenly on both sides.
Note:
In garages and car repair shops, special machines are used to compress shock absorber springs; when using them, the replacement process is faster.
- We continue to compress the shock absorber until the upper support is freed from the spring tension, and only then unscrew the rod nut. We use the key at 19.
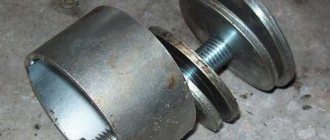
Attention:
The photo on the right shows the SS20 shock absorber mounts, the design is different from the standard mounts, as in the photo on the left. The essence of replacing and repairing the Kalina support bearing of different designs does not differ.
- Now we remove the upper part of the support (cup), under which the “support” is located. We remove the old part and proceed to replacement.
Instructions for installing new springs, struts, support bearings and the supports themselves
First of all, we put the bump stop and boot on the new rack:
Then we tighten the new springs to the required moment and put them on the rack. It is important that the lowestmost coil falls exactly into the recess on the rack, so to speak, in its home place:
When the spring is sufficiently compressed, we proceed to the supports and bearings. We take the new support, turn it over and insert the support bearing. Typically, the bearing is marked “TOP”, meaning that this side should be inserted into the support:
We put a cup on top of the support bearing, as shown in the picture:
And on top of this pancake we put an elastic band:
Now we carefully place this entire structure onto the stand rod and tighten the nut, keeping the rod from turning. It is important that the upper turn, upon final installation, lies exactly along the circle of the elastic so that there are no distortions. As a result, the entire SS20 front suspension module looks like this:
Then we remove the coupler, also checking that the spring is evenly seated at the bottom and top, and you can start replacing. If you are installing spacers, then on them, as well as on the supports, there is an arrow that should be directed in the direction of travel of the car. We put it on the support studs and install the module on the car:
We also insert the stand back to the top of the glass and immediately tighten the nuts. Well, then you will have to sweat a little to get the steering knuckle into the place where the rack is attached. To do this, I pressed the brake disc with my foot with great force, pointing it down, and tried to combine the whole thing with my hand. It didn’t work out right away, but after 10 minutes of effort everything worked out and the rack was installed on the car.
With the second side we perform the same operations and with it everything turns out much faster, since our hands are already full!
So far, no word about impressions of the new suspension, I will write a more detailed article about this tomorrow.
Signs of front strut malfunction
- The appearance of knocking noises when driving over uneven surfaces in the area of the pillar. This happens when the thrust bearing has become disintegrated and is not performing its function properly. This also happens if the coil spring bursts.
- When hitting an obstacle, the car sways for some time due to the fact that the shock absorber itself does not dampen the vibrations.
- During a visual inspection, if you see that the strut is wet on a dry road, this means that the front shock absorber has lost its tightness.
Oil leaks out of it.
New Lada: Description of the VAZ-21116 engine design for Lada Granta
Replacement with removal of steering arms
- First, the car is placed on a flat surface, and wheel chocks are placed under the rear wheels. The gearshift lever is set to the “first stage” position, the handbrake lever is raised up. Now remove the protective cap located on the hub nut and loosen the nut. There are times when unlocking can be complicated by over-tightening the nut, in which case you will need a drill and an appropriately sized drill bit. Then you need to use a 30mm socket and a long lever to rip off and loosen the nut, but do not unscrew the end. To make the operation easier, you can ask your partner to depress the brake pedal. There are times when the nut cannot be unscrewed because the wheels begin to rotate along with the nut.
- After this, loosen the wheel bolts and raise the car using a jack. Place a sturdy stump or stack of bricks under the threshold to prevent the car from accidentally tipping over, and lower the car onto the support.
- Unscrew the bolts and remove the wheel. Unscrew the nut mounted on the steering end. Then, using a special puller, press out the steering pin, although many manuals allow pressing out using a hammer and pry bar.
- After this, the rack is removed by unscrewing three fastening nuts on top and one long bolt on the bottom.
Table of bearing sizes 8112n and technical characteristics
Characteristics Unit of measurement Value according to GOST (TU)
| Inner diameter of the tight ring, d | mm | 60 |
| Outer diameter of the tight ring, d1 | mm | 85 |
| Free ring inner diameter, D1 | mm | 62 |
| External diameter of free ring, D | mm | 80 |
| Installation height | mm | 17 |
| Dynamic load capacity | kH | 41,5 |
| Static load capacity | kH | 95,0 |
| Nominal speed | rpm | 3600 |
| Axial clearance | mm | — |
| Steel type | — | SHH-15 |
| Hardness of steel and rollers | H.R.C. | 61-65 |
| Contact angle | hail | — |
| Torque | kN*M | 220 |
| Ring roughness | Ra | 0.32 |
| Number of balls | PC. | 24 |
| Ball diameter | mm | 8,731 |
| Mounting chamfer radius, r | mm | 1,5 |
| Weight | G. | 295 |
Table of recommended manufacturers
No. Manufacturer Manufacturer's article Price 2021, rubles Equipment Features Retaining rings Protective cap
| 1 | VBF Russia Analogue | 1118-2902840-01 | 700 | — Clip made of hardened steel; — Manufactured according to GOST; — Increased service life; — High-quality lubricant. | — | — |
| 2 | NPP "System Technologies" Russia Analogue | SS10113/11180-2902840-00 | 900 | — Silence; — Vibration damping; — Work at low temperatures; — Protection from dirt and dust. | — | — |
| 3 | AvtoVAZ Russia Original | 1118-2902840 | 750 | — Original product; — 1 year warranty; - Durability. | — | — |
Advice:
When installing ss20 support bearings on a viburnum, it is recommended to install new “Vibration and Noise Insulators” for springs made of synthetic rubber; they soften the load on the suspension and shock absorbers so that a crack does not appear on the Kalina strut support, and this also prevents other malfunctions.
It is important to know:
Inside the plastic housing of the support bearing from VBF there is a single-row thrust ball bearing, marked according to GOST - 8112Н, according to ISO (51112).