03/24/2021 10,071 VAZ 2106
Author: Ivan Baranov
Replacing the camshaft on a VAZ 2106 may be required for various reasons, but before moving on to this process you need to have an idea of the purpose of this unit. The camshaft is the main timing link and participates in the combustion process of the combustible mixture.
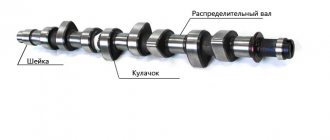
The camshaft is located at the top of the cylinder head. It is connected to a pulley or toothed sprocket of the crankshaft via a belt or chain drive.
VAZ 2106 car near a pond [Hide]
Replacing the camshaft along with the housing on a VAZ 2101-2107
After purchasing my Kopeyka, I began to slowly repair it and the first thing I did was check the engine, since it rattled terribly. The previous owner said that the valve had burned out, but after removing the valve cover it turned out that the reason was somewhat more serious. This is what I saw after removing the valve covers:
As you can see, the camshaft housing was broken and a piece was lying in the head on top. Moreover, nearby in the same pile lay another rocker with a spring. It is not surprising that the previous owner of the VAZ 2101 thought that the valve had burned out, since the symptoms were similar - one cylinder was not working. Below I will tell you in more detail about the repair of a VAZ 2101-2107 with similar problems.
Replacing the camshaft with a pencil case on a VAZ 2101-2107 with your own hands
So, the first thing I did was go and buy another camshaft from a guy. Of course, I didn’t count on a new one, but as it turned out, it was in vain. This guy took out a camshaft wrapped in paper from the times of the USSR. And along with it he gave away a set of rockers. For this purchase I gave him 750 rubles. Although in the store these new parts cost at least 2,000 rubles.
First of all, we remove the valve cover by unscrewing all its fastening nuts with a 10mm wrench, after which we get this picture:
Now you need to use a flat screwdriver to bend the washer under the camshaft star mounting nut:
And unscrew the nut with a 17mm wrench, as shown in the photo below:
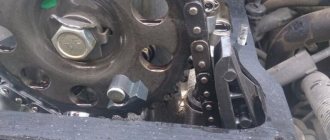
Now unscrew the timing chain tensioner bolt, which is located on the front right side:
Once the chain is loosened, you can gently tap on the inside of the sprocket to make it pop off:
Next, you can begin to unscrew the nuts securing the camshaft cover on the VAZ 2101-2107, as shown in the photo below:
And then you can remove the housing along with the engine camshaft by simply grasping it and pulling upward with a certain force:
The final result of the work can be seen in the picture below:
Now we take new rockers and install them in place of the old ones. This is necessary, since the old ones already have wear and tear and adjusting the valves will be quite problematic, and you may not be able to get rid of the knocking at all. Rockers are quite easy to change. You need to lift it all the way up and it can be removed without problems:
It is also advisable to replace the springs, since they cost pennies, only 3 rubles apiece. New rockers are installed without any sequence. If you install old ones, then they need to be installed in the same order in which they stood.
Then we take the new camshaft assembly 2101-2107 and install it on the cylinder head, after which we tighten the nuts with a torque wrench:
They should be tightened in a strictly defined sequence, as shown in the diagram:
A force of 18 to 21 Nm is required. Do not exceed the specified value range as this may damage the threads. After installation, we put the sprocket and chain back on and be sure to adjust the valves on the VAZ 2101-07
Replacing the camshaft VAZ 2106
The maximum engine power and the shape of the power curve depend on the camshaft more than the rest of the engine.
Installation
As a rule, camshaft manufacturers indicate the intake valve volume of the fourth cylinder TDC. On our camshaft this figure is 2.3 mm. That is, at top dead center, when we have everything set, the fourth valve on the intake cylinder should be open by 2.3 mm. We will use a micrometer to measure. A completely ordinary, Soviet micrometer. We do not recommend using calipers.
We remove the standard roller. Need a new one. Its two cams should be pointing down. We place it, fasten all the tightening in order. All. Next, scroll the camshaft counterclockwise. Until the patch at the bottom begins to spin freely, a gap should appear.
Before doing this you should have adjusted the valves. 0.22 – inlet, 0.33 – exhaust.
So, we turned the camshaft back. Now you need to adjust the gaps. In this matter you will need a partner; without him it will be very difficult to do this. Arm yourself with a micrometer and set the gap to the patch. According to the micrometer measurements shown, you need to set it to 2.3mm. To change the clearance, you need to turn the camshaft clockwise until it reaches zero.
After this you need to install the split gear. People often ask how to install it and what to do with it. So, first you need to make a cut at the mark location, on the moving and fixed parts. Next you need to put on the belt - we get perfectly set gaps.
However, you may encounter the fact that the belt does not fit with the gear. If we pull the belt, the mark will go away. Loosen the bolts and fastenings - it will move. You can tighten the belt and position it as needed. Retighten the bolts.
Removal, replacement, installation of camshaft
Directory
Tags
Removing, replacing, installing anti-roll bar
Removing, replacing, installing timing belt
Removing, replacing, installing rear suspension shock absorber spring
Inspection, checking the steering
Removal, replacement, installation of the crankshaft and its bearings
Symptoms: gas distribution phases are shifted, the engine does not start well, the engine often stalls, valves knock.
Possible cause: Damaged camshaft.
Tools: torque wrench, wrench set, chisel, screwdriver set.
1. Remove the negative cable terminal from the battery terminal.
3. Set the camshaft to the position that corresponds to the end of the compression stroke in the fourth cylinder.
4. Bend the tab of the lock washer on the bolt securing the camshaft sprocket pulley using a chisel.
5. Engage first gear in the gearbox. After this, using a 17mm socket wrench, unscrew the bolt securing the camshaft sprocket-pulley, and then remove the first one from the hole along with the washers.
6. Remove the timing chain tensioner.
7. Remove the camshaft sprocket-pulley along with the timing chain. To avoid the chain jumping, tie it with a wire to the sprocket pulley and then place it in the engine cylinder head.
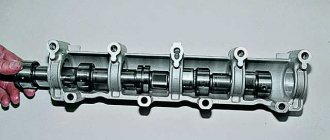
8. Evenly unscrew the nine nuts securing the camshaft bearing housing (use a 13mm socket wrench).
9. Remove the bearing housing along with the camshaft from the studs in the cylinder head.
10. Using a 10mm socket or socket wrench, unscrew the two bolts securing the thrust flange to the bearing housing, and then remove this flange from the groove made in the front camshaft support journal.
11. Remove the camshaft from the bearing housing.
12. Lift the valve lever and release it from engagement with the spring, then remove the lever from the adjusting bolt.
13. Remove the lever spring. Similarly, remove the remaining levers and springs.
14. Inspect the working surfaces of the cams and journals of the camshaft and bearing housing, as well as valve levers. If the camshaft cams are worn by more than 0.5 millimeters, and there are nicks, burrs, and scratches on them, then the shaft must be replaced. In addition, the presence of cracks on the surfaces of the bearing housing, as well as nicks, burrs, scratches, grooves and scratches on the working surfaces of the bearings under the journals is not allowed. There should be no mechanical damage on the working surfaces of the valve levers.
15. Replace damaged parts.
16. Before installing the camshaft into the bearing housing, apply engine oil to the working surfaces of the cams and shaft journals.
17. Mount the camshaft into the bearing housing, and then secure it with a thrust flange. The camshaft must be oriented so that its pin is positioned against the top hole on the thrust flange.
Camshaft installation
The shaft installation process occurs in the reverse order using the same tools as for its removal. Additionally, you will need a torque wrench that can be used to control the tightening force. The work is carried out as follows:
- Before installing the part into the body, lubricate the support journals, bearings and cams with clean engine oil.
To ensure that the camshaft is evenly pressed against the cylinder head, tightening should be performed in several stages.
Video: installing the camshaft on classic Zhiguli cars
Installation by marks
Upon completion of the replacement, it is necessary to align the camshaft and crankshaft to the marks. Only after such a procedure will the ignition timing be correct and engine operation stable. An additional tool you will need is a wrench to rotate the crankshaft, and the work itself consists of the following steps:
- We put the RV sprocket in place and tighten it, but not completely.
- We tighten the chain. To do this, unscrew the tensioner nut, turn the crankshaft a little, and then tighten the nut back.
- We turn the crankshaft with a wrench until the mark on the pulley is positioned opposite the length of the mark on the timing cover.
When reinstalling the valve cover, I always pay attention to the condition of the gasket, even if it has recently been changed. There should be no tears, strong pressing or other damage. In addition, the seal should not be “oak”, but elastic. If the condition of the gasket leaves much to be desired, I always replace it with a new one, thereby eliminating possible oil leakage in the future.
Adjustment of valves
It is recommended to adjust the valves on the “classic” every 30 thousand km. mileage or after engine repair. Tools you need to prepare:
- open-end wrench for 13 and 17;
- probe 0.15 mm.
The work is carried out on a cooled engine after removing the valve covers and tensioning the chain:
- We combine the crankshaft and camshaft marks with the marks, which corresponds to the top dead center of the fourth cylinder.
- We check the clearance of valves 6 and 8. To do this, insert a feeler gauge between the cam PB and the rocker. If it fits in without effort, the gap needs to be made smaller. If it fits tight, then more.
Table: procedure for adjusting cylinder head valves on a “classic”
| Crankshaft rotation angle, o | Camshaft rotation angle, o | Cylinder numbers | Adjustable valve numbers |
| 0 | 0 | 4 and 3 | 8 and 6 |
| 180 | 90 | 2 and 4 | 4 and 7 |
| 360 | 180 | 1 and 2 | 1 and 3 |
| 540 | 270 | 3 and 1 | 5 and 2 |
Video: adjusting valves on a VAZ 2101–07
Some car enthusiasts use a narrow feeler gauge from the kit to set valve clearances. I would not recommend using it for the procedure in question, since if the valve lever is skewed, and the rockers can be skewed even with normal springs and good condition of the valve, a narrow feeler gauge will not allow for precise adjustment. And it’s more convenient to set the gap with a wide feeler gauge.
Replacing the camshaft on a VAZ 2106 does not require the owner to have high qualifications or special tools. Repairs can be carried out in a garage with a regular car set of keys and screwdrivers. If you follow the step-by-step instructions, the procedure will take about 2-3 hours, after which the gas distribution mechanism of your car will work clearly and smoothly.
The maximum engine power and the shape of the power curve depend on the camshaft more than the rest of the engine.
Installation
As a rule, camshaft manufacturers indicate the intake valve volume of the fourth cylinder TDC. On our camshaft this figure is 2.3 mm. That is, at top dead center, when we have everything set, the fourth valve on the intake cylinder should be open by 2.3 mm. We will use a micrometer to measure. A completely ordinary, Soviet micrometer. We do not recommend using calipers.
We remove the standard roller. Need a new one. Its two cams should be pointing down. We place it, fasten all the tightening in order. All. Next, scroll the camshaft counterclockwise. Until the patch at the bottom begins to spin freely, a gap should appear.
Before doing this you should have adjusted the valves. 0.22 – inlet, 0.33 – exhaust.
So, we turned the camshaft back. Now you need to adjust the gaps. In this matter you will need a partner; without him it will be very difficult to do this. Arm yourself with a micrometer and set the gap to the patch. According to the micrometer measurements shown, you need to set it to 2.3mm. To change the clearance, you need to turn the camshaft clockwise until it reaches zero.
After this you need to install the split gear. People often ask how to install it and what to do with it. So, first you need to make a cut at the mark location, on the moving and fixed parts. Next you need to put on the belt - we get perfectly set gaps.
However, you may encounter the fact that the belt does not fit with the gear. If we pull the belt, the mark will go away. Loosen the bolts and fastenings - it will move. You can tighten the belt and position it as needed. Retighten the bolts.
When setting up the engine, you can also loosen the bolts and turn the camshaft clockwise no more than 4 degrees. As a result, the intake valves will open and close slightly earlier. This setting is optimal for low-end engines. If you need to emphasize the top, turn the camshaft back not 4 degrees.
Let's start the engine. It will most likely work unevenly. Listen to mechanical knocks. In the video the engine is working correctly. No extraneous sounds - excellent performance of the 8-valve sample!
Installing the camshaft in this case does not require new springs. The camshaft is installed on standard systems. However, thrust bearings are used to lift the valves. There is no need to grind the saddles - this can lead to loss of performance. This installation procedure is suitable for all cases, including 16-valve engines.
If you are doing this kind of work for the first or second time, we strongly recommend checking all the gaps, marks and everything else several times. In the future, it will be more difficult to calibrate the motor.
How to remove
To carry out repair work, prepare a standard set of tools. The work order is as follows:
First of all, we need to remove the cylinder head cover. After removing it, wipe the oil off the surface of the camshaft bearing housing.
Next, set the piston of the fourth cylinder to the position of the end of the compression stroke by turning the crankshaft by the crankshaft pulley nut as it rotates and aligning the mark on the sprocket with the mark on the bearing housing cover.
Flare the lock washer and unscrew the bolt securing the camshaft drive sprocket. Remove the bolt and washers.
To prevent the drive chain from shifting relative to the sprocket teeth, fix them relative to each other with ordinary wire and move them to the side so that they do not interfere with our work.
Now you can remove the camshaft bearing housing itself. To do this, unscrew all the nuts securing it. Then remove the housing from the head studs.
Actually, now you can remove the camshaft from the housing by unscrewing the two bolts securing it. Remove and set aside. Check it for wear and other mechanical damage and, if necessary, replace it with a new one.
The final step of our repair is removing the valve levers and their springs. They are easy to remove; you just need to move the legs of the pressure spring to the side and remove the lever, then remove the spring itself.
Replacement
1. Remove the cylinder head valve cover. see How to remove the cylinder head on a VAZ 2109. Replacing the cylinder head gasket with your own hands
2. Set the camshaft to the end of the compression stroke of the 4th cylinder.
3. Using a “13” wrench, release the chain tensioner, then resting the assembly against the tensioner shoe, squeeze the tensioner rod tightly, then secure it using the chain tensioner nut. If something doesn't work, then remove the tensioner completely.
4. Take a flathead screwdriver and carefully bend the lock washer on the camshaft sprocket bolt.
5. Engage fourth gear, this will fix the camshaft and save you from turning it.
6. Next, take the key to “17″ and unscrew the sprocket mounting bolt.
7. Remove the camshaft mounting bolt along with washers, sprocket and chain. It is best to fasten the chain to the sprocket using thread; this will save you from the chain jumping on the sprocket teeth, which is extremely undesirable.
8. Using a “13” wrench, unscrew the 9 camshaft “bed” nuts.
9. Now dismantle the camshaft along with the “bed” by removing it from the studs.
10. Unscrew the two mounting bolts of the thrust flange using a “10” wrench, then remove the flange itself.
11. Lift the cam to release it from spring pressure, then remove it.
12. Now you can remove the camshaft from the “bed”.
13. Remove the cam spring.
Adjustment
On a VAZ 2106 car, it is recommended to adjust the valves every 10-15 thousand km. mileage The optimal value has been selected, because all this time the engine will operate stably. When the gap changes, minor “defects” will begin to appear: valve knocking with a sharp increase in speed, a decrease in throttle response and engine power.
The problems go so far as to cause the engine to stall at high speeds at operating temperature. It is also necessary to adjust the valves after carrying out work related to repairing or replacing the camshaft. In this case, adjustment is inevitable, since the 2 camshafts may differ from each other. To work you will need the following tools:
open-end wrench 17 with good leverage;
special key 38 for turning the crankshaft;
flat probe 0.15 mm thick.
If you look closely at the case in which the dipstick is stored, you will see several numbers indicating the sequence of valve adjustment. Pay attention to the temperature: 20 °C is optimal for setting. But if before this the VAZ camshaft was replaced, and the weather is warm, then you don’t have to look at the temperature.
So, first remove the cylinder head cover. Please note that the valves should be counted from the front edge of the internal combustion engine. After this, put the piston of the 4th cylinder in the upper position using a 38 key. Valves “6” and “8” are closed, therefore, the gap between the lever and the cam will be the largest. Place the dipstick and check the gap. The optimal one is one in which the probe can be moved with some effort. If the gap is smaller or larger, the dipstick does not move or passes freely, then proceed with adjustment.
To do this, you need to work with two 17mm wrenches: with one you loosen the lock nut, and with the second you turn the bolt to adjust. Moreover, you should not make many turns with the adjusting bolt; you need to slowly move the feeler gauge while unscrewing or tightening it, so as not to miss the permissible gap value. Afterwards, the locknut must be tightened and once again make sure that the gap is correct. If necessary, the valve is re-adjusted. Valve adjustment procedure:
4th and 3rd; 2nd and 4th; 1st and 2nd; 3rd and 1st; 8th and 6th; 4th and 7th; 1st and 3rd; 5th and 2nd.
The crankshaft rotates 180°, which corresponds to a quarter turn of the camshaft. To control the position, it is necessary to use the marks on the crankshaft pulley, as well as on the camshaft. As a last resort, simply remove the distributor cover and perform control using the slider.
So, the first sign that there is a problem with the camshaft is that when you start a cold engine, a characteristic dull knock is heard for a few seconds until the oil gets to the bearings. Naturally, by ear, without experience, you will not be able to determine what is knocking. The frequency of the camshaft knock is two times less than the frequency of the crankshaft knock. As long as it's not fatal.
But, when the knocking of the camshaft continues even when starting a warm engine, then consider that you have heard the “second call”, it’s time to call a mechanic. Experts say that in this case you are guaranteed to travel about 50 thousand km. But everything is so relative. That is, it’s not worth the risk. You can diagnose the engine.
No matter who tells you, you will make the decision yourself. If you are able to repair, replace, or install the camshaft yourself, this is one option. If not, then contact “garage”, but proven craftsmen.
Agree that it is easier and cheaper to “squash” engine disease at the beginning than to deal with a bunch of problems later. It may happen that the valve clearances need to be adjusted.
That is, the decision to repair should be made after a complete diagnosis of the cylinder head and a specialist’s verdict.
Tuning
In general, the process of replacing and adjusting the camshaft for a person who has never looked into the engine presents significant difficulties. Of course, for a certain amount of money at a normal service station they will install a camshaft for you and set the chain tension and adjust the valve clearances. It's up to you to decide who should do it. From my own experience I can say that if you have special... literature on internal combustion engines and the necessary tools, you can do everything yourself. An experienced comrade can also provide significant help, but I didn’t have that.
Separately, I want to say about the tools. A high-quality tool is already half the battle, and if you plan to service the car yourself, then you can’t do it without a good tool. During their work, experienced mechanics have already developed a reflex for tightening nuts and bolts to the required torque, without a special torque wrench. I myself have repeatedly observed the work of such a mechanic. Afterwards, I checked the tightening torques of the cylinder head (cylinder head) and was very surprised; the tightening torques were almost the same and the difference in values was comparable to the error of my torque wrench. But for us, as people with no experience working on engines, a torque wrench is simply necessary. You can get by with a simple one because... In a VAZ engine there are no very precise values for the tightening torques of bolts and nuts. In modern engines, the tightening torques are so precise that the engine is very often assembled without any gaskets at all, and there are no oil leaks. Any normal car maintenance manual contains torque values for all parts of the car, starting with the wheel bolts.
In general, the procedure for replacing a standard camshaft with a tuning one is practically no different from a regular replacement during repair, for example.
After installing a new camshaft, I would recommend immediately setting the camshaft to zero. The concept “to zero” means installing the camshaft using a split gear at zero overlap, i.e. when the piston of the first cylinder is at top dead center (TDC) so that the valves of the first cylinder are opened equally. It is most convenient to look at the valve plates - they will also be at the same level.
And only then, based on the results of the sea trials, make the necessary adjustments with the split gear. But, as a rule, for most camshafts, the “zero” position is optimal or close to it.
More details mat. part of the car can be studied in the service manual or special. literature. From my own experience, I can say that you can install a new camshaft, carburetor, contactless ignition system, set the ignition timing, and adjust the valve clearances yourself, although it will take more time than at a service station or garage technicians. It also means a lot to me that I did it myself. And the behavior of the car on the road is your reward for properly tuning and repairing the car.
Replacing the camshaft on a VAZ 2106 may be required for various reasons, but before moving on to this process you need to have an idea of the purpose of this unit. The camshaft is the main timing link and participates in the combustion process of the combustible mixture.
The camshaft is located at the top of the cylinder head. It is connected to a pulley or toothed sprocket of the crankshaft via a belt or chain drive.
VAZ 2106 car near a pond
Instructions for checking and replacing the camshaft of the VAZ 2107
One of the key parts of an internal combustion engine is the camshaft. Over time, wear appears on it and on the support bearings and the motor requires qualified intervention. The VAZ 2107 camshaft can be replaced independently. To do this, you will need a set of metalworking tools and knowledge about the features of setting up the gas distribution mechanism.
Functions and design of the camshaft
The VAZ 2107 camshaft (injector and carburetor) synchronizes the operation of the intake and exhaust valves with the position of the pistons in the engine cylinders. It opens the exhaust valves to release exhaust gases and the intake valves to fill the combustion chambers with an air-fuel mixture. The “seven” uses an engine layout with an overhead camshaft. This reduces the cost of construction and makes the maintenance process easier. The VAZ 2107 camshaft is connected to the engine crankshaft via a chain driven by a sprocket. As the camshaft rotates, the cams located on it press on the rocker and open (close) the valves at the right moment. The camshaft bearing journals rotate in the bearings of the “bed” installed in the engine head. Lubricant from the oil pump is supplied to them through the oil channels, so the condition of the camshaft affects the pressure in the engine lubrication system.
Camshaft faults
The main reason for checking the condition of the VAZ 2107 camshaft is the appearance of a characteristic knocking sound in the head while the engine is running. There may be several reasons:
- wear of camshaft cams;
- wear of camshaft support bearings or bed journals;
- deformation of the part as a result of overheating;
- the appearance of a crack on the support of the part;
- camshaft fracture;
- lack of oil or low pressure in the engine lubrication system;
- clogged oil channels
- low quality oil.
If the camshaft wears out or cracks, the part must be replaced with a new one. But first, it’s worth localizing the problem by removing the camshaft and inspecting its condition.
Signs of Camshaft Wear
The operation of the camshaft is associated with constant exposure to high loads, as a result of which the part gradually wears out and requires replacement. The need for repair arises when characteristic symptoms appear:
- knocking when the engine is running under load;
- reduction in power indicators.
There are a number of reasons why the RV fails:
- natural wear and tear;
- low-quality motor oil;
- low oil pressure in the lubrication system;
- insufficient oil level or so-called oil starvation;
- engine operation at high temperatures, which leads to deterioration of the lubricant properties;
- mechanical damage (wear or broken chain).
The main malfunctions that impair the performance of the camshaft are scuffing on the working surfaces (journals and cams) and deterioration of the limiter.
Over time, the camshaft's cams and journals wear out.
Knock
It is quite problematic to determine from the sounds coming from the engine compartment that the problem is related specifically to the camshaft, but it is still possible. The knocking sound of the engine resembles the dull blows of a hammer, which become more frequent as the engine speed increases. However, the best way to diagnose a shaft is to dismantle, disassemble and troubleshoot it. During inspection, the shaft should not move in the housing relative to the axis, otherwise a dull sound will be produced when hitting the limiter.
Video: reasons for the longitudinal play of the VAZ camshaft
Power reduction
The drop in power on classic Zhiguli cars is a phenomenon caused by wear of the camshaft and rockers. With proper engine operation (timely oil changes, monitoring its level and pressure), the problem only appears over long vehicle runs. When the cams wear out, the required phase width and valve lift at the intake are no longer ensured.
When the shaft and rockers wear out, the motor power may decrease several times
Deformation
The RV can become deformed under extreme heat, which is caused by problems in the cooling and lubrication systems. At first, the problem may manifest itself as a knocking sound. Therefore, if there is a suspicion of this breakdown, for example, the motor has overheated, then it is recommended to diagnose the shaft in order to avoid more serious troubles with the engine timing belt.
How to remove the camshaft of a VAZ 2107
Replacing the VAZ 2107 camshaft begins with its dismantling. To do this you need to do the following:
- place the car on a level surface;
- wait until the engine cools down;
- clean the engine head cover from dirt;
- remove the air filter, disconnect the cable, tip and rod of the throttle valve drive, remove
- fuel hose from the bracket (on a car with a carburetor engine);
- disconnect the air supply hose, vacuum hose and remove the fuel filter from the bracket (on a car with an injection engine);
- Using a 10mm wrench, unscrew the nuts securing the cylinder head cover;
- remove the washers from the cylinder head cover;
- release the wiring harness, crankcase exhaust and power steering hoses, and the headlight hydraulic adjustment tube from the bracket mounting;
- remove the cylinder head cover from the studs;
- remove the gasket;
- set the camshaft position so that it corresponds to the end of the compression stroke in the fourth cylinder;
- Use a chisel to bend the petal of the camshaft sprocket lock washer;
- engage first gear to prevent crankshaft rotation;
- Using a 17mm wrench, unscrew the camshaft sprocket mounting bolt;
- remove the bolt together with the lock washer;
- Using a 10mm wrench, unscrew the two nuts securing the chain tensioner;
- remove the tensioner;
- tie the chain to the camshaft sprocket with wire so that it does not jump off;
- remove the sprocket and chain, move it forward;
- Using a 13mm wrench, unscrew the nuts securing the camshaft bearing housing (this must be done evenly so that the housing does not “lead”);
- remove the bed along with the camshaft from the studs;
- use a 10 mm wrench to unscrew the two nuts securing the thrust flange;
- remove the flange from the groove in the front journal of the camshaft;
- pull the camshaft out of the bed (bearing housing).
The most important malfunctions and replacement of the camshaft on the VAZ 2106
In the VAZ 2106 car engine, the camshaft plays a key role, which drives the valves. Thanks to it, timely intake of the air-fuel mixture into the combustion chambers and release of gases from them occurs, and according to the operating cycle. The shaft is located in the upper part of the engine, under the cylinder head cover (cylinder head). There is a sprocket on the camshaft with which it is connected to the crankshaft. One revolution of the crankshaft corresponds to two revolutions of the camshaft. The main malfunctions of the camshaft are risks and scratches on the journals, deflection relative to the axis of rotation, increased wear, and multiple scuffs. If the camshaft journals are worn excessively, the oil pressure in the system decreases. But this option is also possible if the seats for the camshaft bearings are destroyed. And if you can install new journals for a small amount, then in the case of seats you will have to replace the cylinder head. Tuning is often performed, which requires the installation of a new, lighter camshaft on the VAZ 2106.
Removing and installing the camshaft
Removal is most often necessary either during a major overhaul or for replacement in cases of failure. To carry out the work, the following tools are required:
- heads for 10, 13 and 17;
- handle with ratchet;
- knob;
- extension cord with cardan;
- socket wrench 13;
- device for mounting and dismantling the VAZ camshaft.
First, the valve cover is removed, which is bolted to the cylinder head and has a rubber gasket. Try not to damage it, otherwise oil may leak in the future. After this, the timing chain tensioner is unscrewed. It is located on the right side of the engine when viewed from the interior. The camshaft gear is turned by the head to 17.
For convenience, place the car in gear and place wheel chocks under the rear wheel. Move the gear to the side; if necessary, you can pry it off with a convenient tool. Now all the nuts that secure the camshaft housing must be unscrewed. To make the job easier, use a wrench first.
All threaded connections are tightened with a strong torque, so sometimes it turns out to be difficult to dismantle. Then, slightly rocking the camshaft housing, pull upward with force. And after unscrewing the two nuts in the front of the pencil case, you can easily hit the back of the shaft with a wooden mallet to finally remove it from its seat. The camshaft is installed in the reverse order.
If you are making repairs due to excessive shaft wear, replace the rockers. They can be removed quite easily, you just need to pull them up. But if the condition of the elements is good, then you should not waste time on them: just carefully inspect each one and put it back in its original place. Moreover, do the installation in the same sequence in which you removed it.
How to adjust valves on a VAZ 2106?
On a VAZ 2106 car, it is recommended to adjust the valves every 10-15 thousand km. mileage The optimal value has been selected, because all this time the engine will operate stably. When the gap changes, minor “defects” will begin to appear: valve knocking with a sharp increase in speed, a decrease in throttle response and engine power.
The problems go so far as to cause the engine to stall at high speeds at operating temperature. It is also necessary to adjust the valves after carrying out work related to repairing or replacing the camshaft. In this case, adjustment is inevitable, since the 2 camshafts may differ from each other. To work you will need the following tools:
- a set of keys;
- open-end wrench 17 with good leverage;
- special key 38 for turning the crankshaft;
- flat probe 0.15 mm thick.
If you look closely at the case in which the dipstick is stored, you will see several numbers indicating the sequence of valve adjustment. Pay attention to the temperature: 20 °C is optimal for setting. But if before this the VAZ camshaft was replaced, and the weather is warm, then you don’t have to look at the temperature.
So, first remove the cylinder head cover. Please note that the valves should be counted from the front edge of the internal combustion engine. After this, put the piston of the 4th cylinder in the upper position using a 38 key. Valves “6” and “8” are closed, therefore, the gap between the lever and the cam will be the largest. Place the dipstick and check the gap. The optimal one is one in which the probe can be moved with some effort. If the gap is smaller or larger, the dipstick does not move or passes freely, then proceed with adjustment.
To do this, you need to work with two 17mm wrenches: with one you loosen the lock nut, and with the second you turn the bolt to adjust. Moreover, you should not make many turns with the adjusting bolt; you need to slowly move the feeler gauge while unscrewing or tightening it, so as not to miss the permissible gap value. Afterwards, the locknut must be tightened and once again make sure that the gap is correct. If necessary, the valve is re-adjusted. Valve adjustment procedure:
- 4th and 3rd;
- 2nd and 4th;
- 1st and 2nd;
- 3rd and 1st;
- 8th and 6th;
- 4th and 7th;
- 1st and 3rd;
- 5th and 2nd.
The crankshaft rotates 180°, which corresponds to a quarter turn of the camshaft. To control the position, it is necessary to use the marks on the crankshaft pulley, as well as on the camshaft. As a last resort, simply remove the distributor cover and perform control using the slider.
Please note that one revolution of the crankshaft is half a revolution of the distributor axis. After the adjustment is completed, assembly is performed. If the rubber gasket is damaged, it should be replaced with a new one.
Installation of camshaft VAZ 2107
The cylinder head camshaft is installed in the reverse order of removal. Before installing the part into the housing, it is necessary to lubricate the support journals with engine oil. When assembling, you should pay attention to two important points:
- correspondence of the marks on the camshaft and on the sprockets of its drive;
- tightening torque of the camshaft housing nuts.
First, you need to properly tighten the camshaft nuts. The nominal tightening torque of the nuts is 2.2 kgf•m. You cannot immediately tighten the fastening to such a torque. The VAZ 2107 camshaft is tightened in three to four stages so that the body is pressed evenly, without distortions. The nuts should be tightened from the center to the edges, in accordance with the “tightening chart” (see figure).
When the camshaft is installed, it is necessary to set its position relative to the crankshaft. There are marks on the camshaft bed, the front engine cover and the crankshaft and camshaft sprockets that should be followed. Even if the drive chain has been securely attached to the sprocket, when installing the camshaft, make sure that its position matches the position of the engine crankshaft. To correctly set the marks on the VAZ 2107 camshaft, you must perform the following steps:
- make sure that the mark on the crankshaft pulley is located opposite the long mark on the front engine cover (this corresponds to the top dead center of the fourth cylinder);
- install the sprocket on the camshaft and make sure that the mark on it matches the mark on the “bed”;
- put the chain on the sprockets without disturbing the position of the shafts;
- make sure that when the chain is tensioned, the marks match;
- tighten the camshaft sprocket bolt;
- turn the crankshaft two turns with the wrench;
- check the alignment of the marks on the camshaft and crankshaft;
- if necessary, change the position of the chain on the camshaft sprocket;
- Tighten the camshaft sprocket bolt and secure the lock washer.
After this, all that remains is to adjust the chain tension using the tensioner and complete the assembly by installing the cylinder head cover and other parts.
Setting the valve timing according to marks on the VAZ 2101-VAZ 2107
Do you know what valve timing is? In the article we will get acquainted with the concept and try to explain and clearly demonstrate the correct installation of phases according to the labels.
The note! You will need the following tools: a screwdriver, three 8 x 10 and 13 wrenches, a special wrench to turn the crankshaft pulley (if you don't have one, use a 36 socket).
Summary:
Removal
1) Remove the air filter housing. (read more in the article: Replacing the air filter housing)
2) Then cover the carburetor neck with a clean cloth to prevent dirt from entering during operation.
3) Now remove the crankcase exhaust hose from the fitting located on the carburetor.
4) Then loosen the choke cable screw.
5) Then loosen the choke cable sheath bolt.
6) After unscrewing both bolts, disconnect the cable from the carburetor by pulling it by hand.
7) Then unscrew the bolts securing the cylinder head surface.
 Using a screwdriver, lift up and remove the lock washer securing the intermediate collar.
9) Next, remove the intermediate lever.
10) Carefully remove the cover from the block head.
The note! If the gasket remains on the cover or on the head itself, remove it and replace it with a new one. A worn gasket will lead to oil leakage in the future!
11) Turn the crankshaft pulley nut with a special wrench until the camshaft sprocket mark matches the mark on the body, as shown in the photo below (the process is described in more detail in the article: Setting the piston to the TDC position, here I will find three ways to turn the crankshaft ).
The note! The crankshaft sprocket mark must line up with the long mark on the camshaft cover.!
Main! If you get the following situation: one of the shortcuts responded and the other did not, follow these steps:
1. First bend the retaining washer of the bolt that is attached to the camshaft sprocket.
2. Engage first gear and unscrew the camshaft sprocket bolt.
3. Remove the sprocket and chain and hold it in your hands.
4. Remove the chain from the sprocket and move it in the desired direction, making sure both marks are aligned as shown in paragraph 11.