- December 10, 2019
- Cars
- Vladimir Skvortsov
The favorite car of fishermen and hunters is the Niva. And the reason for this attitude is the opportunity with its help to get to remote and rarely visited places. What allows you to achieve such results? There is a lock on the Niva. How it helps and in what ways will be discussed below.
About the transmission
First of all, a few words about the structure of the Niva. It has permanent all-wheel drive. What does it mean? It's simple - torque is simultaneously transmitted to four wheels. This is one of the fundamental differences between the Niva and other cars. They supply torque to only one of the axles (front or rear).
All-wheel drive is implemented through the use of a transfer case. The torque, having passed through the gearbox, goes to the transfer case, and from it to the front and rear axles. This design makes it possible to create a locking center differential on the Niva, which, together with all-wheel drive, provides it with increased cross-country ability. Here it is necessary to say a few words about the differential. Largely thanks to him, the excellent off-road characteristics of the Niva are realized.
DIY self-block installation instructions
To install a self-locking differential on a Niva, it is not necessary to contact a car service center. It is quite possible to do this with your own hands, provided that the person has a good understanding of the structure of the car. The type of differential and its installation location are not particularly important.
First you need to decide on the place where the work will be done; it should be spacious enough. Using several jacks, you will need to lift the Niva, dismantle the wheels, then drain the engine oil from the gearbox housing into some container and remove the drive axle drive. To do this, just use a spanner to unscrew all the nuts securing the front cover to the gearbox housing, remove the cover and gasket.
Now it is necessary to reliably and efficiently carry out the operation of dismantling the axle shafts, which is very difficult to do without a special puller. The metal is clamped on rotary slots, which requires a lot of effort, which not every person has enough. Dismantling the axle shafts is carried out as follows:
- Unscrew all the bolt nuts on the axle bearing mounting plate.
- The brake mechanism is fixed. This can be done using bolts or wire. If the mechanism is not secured, the brake lines may come off.
- The axle shaft itself is removed. With sufficient skill, this can be done by hand, but it is better with the help of a puller.
Then you need to change the bearings. This will require a hydraulic press. It will help ensure that the holder fits onto the shaft, and with fairly high accuracy. To replace you need:
- Unscrew the hub bearing nut and remove the bushing. Unscrew the nut securing the lever to the steering knuckle.
- Remove the locking plate and unscrew the lever from the steering knuckle.
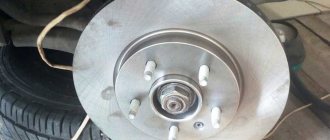
- Having disconnected all the fasteners, separate the knuckle and the hub with the brake disc. Remove the bearing by first holding the steering knuckle in a vice. During assembly, the bearing is put on using a press.
After the clearances in the main gear are adjusted using special washers of variable thickness, you can begin assembling the unit. Adjusting the gaps is quite difficult, and you will need special equipment, but to ensure accuracy you can use a steelyard. To work with it, wind one end of a 1 m long cord around the flange and secure the other end to the scales. By pulling the device in the winding, you will need to record the turning moment.
To ensure proper operation of the gearbox, the parts are usually sealed before the halves are assembled. In its absence, malfunctions may occur during operation, as well as failure of certain spare parts. After applying the sealant, you need to wait a while for it to harden. Then new oil should be poured into the gear housing. All sealing joints that were damaged during dismantling, as well as those that show signs of oil leakage, must be completely replaced with new ones. Now you can start assembling all the mechanisms in reverse order.
The feasibility of such an action as differential locking on a Niva depends on why the driver needs it. If you need to move through difficult areas, you will need it. If a car enthusiast intends to drive on a normal asphalt road, then installing a self-locking differential on the Niva is hardly worth it. Which self-block to choose and where to place it depends on the driver’s preferences.
Understanding the differential
This device allows the car to move freely in a given direction. When turning, the left and right wheels of the car travel different paths. And if they are rigidly connected, then one will slip and the other will slow down. In addition, in this case, the load on the axle increases sharply, which will result in its breakdown or excessive wear of the rubber.
The differential allows you to cope with this problem. On conventional cars it is located on the axle between the wheels, allowing them to rotate independently of each other. The differential distributes the torque received by it between the wheels, and not in equal proportions, but depending on the driving conditions of each - one more, one less.
The same applies to axles in general (front and rear). Their movement, for example when turning, also differs. To distribute forces, a so-called center differential is used. Thanks to it, depending on driving conditions, the torque transmitted to the front and rear axles will differ.
Replacing the cuff
If the lip seal has become unusable, it only needs to be replaced, since the element is non-repairable (rubber ages over time and cannot be restored). To replace the oil seal, you need to know the size of the element:
- outer diameter 68 mm;
- internal diameter 35.8 mm;
- height 12 mm.
To carry out repairs, you will need to prepare the following list of tools:
- key to 13;
- 24mm head and knob;
- hexagon 12;
- powerful slotted screwdriver;
- hammer;
- dynamometer and torque wrench;
- container for draining oil.
The process of replacing the shank oil seal is carried out with the rear axle hanging and is carried out as follows:
- Unscrew the rear axle housing plug and drain the lubricant into a prepared container.
- We unscrew the fastening bolts of the rear cardan to the RZM flange, move the shaft to the side and secure it with wire to the longitudinal link of the bridge.
- Using a dynamometer, we determine the moment of resistance to gear rotation by turning the flange nut clockwise.
- To hold the flange, insert the cardan bolts into the holes and screw the nuts onto them.
- We place a mounting spatula or screwdriver between the bolts and unscrew the nut with a socket and wrench.
- Remove the nut and washer from the shank.
- We dismantle the flange itself by hitting it with a hammer through a wooden adapter.
- To remove the oil seal, hook it with a screwdriver and remove it.
- We apply Litol-24 to the working edge of the new cuff, after which we mount the part into the crankcase using a suitable attachment.
- We put the flange and washer in place and tighten the nut with a torque wrench with a torque of 117–255 N*m (12–26 kgf*m), using a dynamometer to control the moment of resistance of the bearings to turning the drive gear. If during the initial measurement of the moment of resistance the value was at least 6 kgf*cm, then when re-tightening it is necessary to increase it by 1-2 kgf*cm. If initially the value was 6 kgf*cm, then we achieve a torque of 6-9 kgf*cm. At the same time, the tightening torque should not exceed 12-26 kgf*m. If, while tightening the nut, the moment of resistance exceeds 9 kgf*cm, the spacer sleeve on the bevel gear will need to be replaced.
- After the adjustment work, we install all the elements in the reverse order.
Features of differential operation
The moment is distributed in such a way that it is transferred to where the load is less. This can be confirmed by the usual picture - the car has three wheels on the asphalt, and one on the ice. She fails to move. The friction force of rubber on ice is much less than that of rubber on asphalt, which means that the load on a wheel standing on ice is less than on others.
And the differential transmits all the torque towards the minimum load. As a result, one wheel rotates at breakneck speed, while the rest stand still and the car does not move. The situation is approximately the same when a car cannot climb a mountain on an icy road. In this case, one wheel caught on ice spins, but the car stops.
Work that no one needs is being done. The wheel “grinds” the road surface (ice). Getting rid of such useless work is blocking both on the Niva and on any other car adapted to difficult roads. But usually the devices described are not available on all machines.
What are the types of blocking?
Usually there are two types - inter-wheel and inter-axle. The first ones block the operation of the differential installed between the wheels on one axis. The purpose of the interaxle blocking is to ensure the distribution of forces between the axles.
The Niva has three differentials, a center differential and two cross-axle differentials. But they are fundamentally different. If the inter-axle differentials are free, there are no additional devices on them, then the inter-axle differential has a forced lock. It greatly facilitates the movement of the vehicle in off-road conditions, partially giving it the capabilities of an all-terrain vehicle.
How does the differential lock work on the Niva, the principle of operation
When driving on a normal road, torque is distributed relatively evenly between all wheels. But off-road, in the mud, this is not enough. A simple situation - the car has skidded, for example the left rear wheel. Then all the torque will go there, and the car will not be able to drive. In such a situation, no all-wheel drive will help.
But there is a way out. You need to turn on the center lock. How does such a device work on Niva? The transfer case has a special clutch. When the lock is activated, it connects the shafts that transmit torque to the axles. Let's just say that the force produced by the engine is forcibly divided equally between them. Thus, the entire moment does not go to the slipping wheel, but part of it goes to the front axle (in our example).
Now the four-wheel drive starts working. When the locking is on, the front axle is forced to receive half the torque produced by the engine. Thanks to this, the car starts to move. As soon as it starts moving, the slipping of the rear wheel will stop, and torque will flow to all the others. Then the Niva will safely overcome the difficult section.
It should be noted that the Lada 4x4 car is not the only owner of the described device. A similar differential lock works both on the Chevrolet Niva and on other SUV models, however, it can be implemented in different ways. But nevertheless it performs similar tasks.
When to use blocking
Under normal road conditions, you don’t need to turn on anything on the Niva. But on a country road or before a steep climb, the driver should think about safety nets. We have already found out how blocking works on Niva. So you should resort to its help if obstacles arise while driving, and this must be done in advance, before the car gets stuck.
If there is a difficult section ahead, it is best to turn on the blocking in advance, especially since it does not take much time. You just need to remember that using the lock unnecessarily does not contribute to the safety of the car and leads to excessive consumption of gasoline and tire wear.
Chevrolet Niva
FIRST REDUCED
Everything is much simpler here. A low gear is needed only if the car lacks traction - in loose sand, thick mud, on a steep slope or with a heavy trailer on the hook.
If the torque is limited by the traction of the wheels with the ground, excessive traction is harmful. Slipping will only make the situation worse. You can get underway in such conditions only by limiting the gas supply, that is, the amount of torque. Downshifting in such conditions can often complicate the situation.
When the resistance forces are greater than the adhesion, movement is simply impossible. Then you will have to clear the ruts or remove the snow from under the car.
So if your four-wheel drive is slipping on four wheels in the snow, take a shovel or look for a tractor. If it slips in two, turning on the lock will help. Switching to a lower gear is justified if there is not enough traction, that is, the engine is not able to turn the wheels.
How to enable blocking
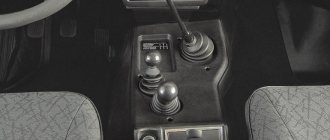
It's quite easy to do. On the Lada 4x4 car there are three levers to the right of the driver, we are interested in the smallest one. When the driver moves it back, the lock on the Niva 2121 works; as soon as the driver moves the handle forward, the mode will turn off. It is best to carry out all manipulations while the vehicle is stationary.
Experienced drivers know that the lock does not always turn on (off) the first time. The fact is that the shafts may not be in the right position or they may “bite” if additional force is applied to the coupling (for example, the car has stopped while turning). Then you need to drive forward or backward a little, align the wheels and try again. As a rule, in this case everything turns on.
On the Chevrolet Niva, this procedure is performed differently. There are not two levers to control the transfer case modes, but one. The one we need is located closer to the driver. Although the locks on the Niva-Chevrolet, as well as on the Lada 4x4, work in the same way, they are activated differently. On a Chevrolet, to do this, the transfer case mode control lever must be moved with the clutch depressed while the car is stationary to the left (towards you). To disable the blocking, go in the opposite direction.
Transfer case control
These include:
- Switching the transfer case should only be done when the car is not moving.
- You can also engage the differential while the vehicle is moving.
- You can switch to a lower gear while the car is moving.
- To ensure long-term and uninterrupted operation of the differential, it is necessary to periodically turn it on, especially in winter. This should be done once every 7 days.
In the interior of the Niva Chevrolet there are two levers between the front seats
. Using one of them you can change gears in the gearbox, and using the other you can control the transfer case.
The transfer case is based on a gearbox consisting of two stages
. The control lever comes out of it into the cabin. He can move forward or backward. At the same time, it switches on/off downshift. If the lever is moved left or right, it can turn the differential lock on/off.
Gear shift and transfer case diagram
The main component of the transfer case is the reduction gear
. If the control lever is in the rear position, then the number of transfer cases decreases and is 1.2. When the lever is in the forward position, the gear ratio increases. It will already be 2.1. When the lever is in the neutral position, the gear ratio is 0.
The differential is an integral part of the all-wheel drive mechanism in any car. It is recommended to use it only when the car is moving off-road.
The lower part of the lever is inserted into a groove on the rod, and fixation occurs using a figured spring. The other end of the rod, in turn, is connected to a fork, which moves the shift clutch. The rigidity of this connection is ensured by the bolt. The rod at the outlet of the transfer case is sealed with an oil seal, and dirt and dust are protected with a rubber corrugation. The entire switching drive is fixed in the set position by a spring-loaded ball that fits into special grooves in the rod.
Among domestic car enthusiasts, the Chevrolet Niva is a fairly popular SUV that appeals not only to fans of extreme driving, but also to fans of measured driving outside the city. Many people know that one of the features of a car of this brand is the presence of a transfer case in it.
It should be immediately noted that you can engage both the lock and the transmission at the same time using the Chevrolet lever that changes gears. So, the lever shifts to the right, and then immediately up to engage a lower gear. To switch back to higher, the lever should simply be moved back.
Using a Niva Chevrolet transfer case, in addition to the above, neutral gear is also engaged, while the car will remain reliably in one place. The lock can be engaged at any time - in normal gear, in low gear - just switch the Chevrolet lever to the left.
The differential lock on the Niva is a faithful assistant to the driver
All-wheel drive does not always provide off-road capability. Often this is not enough. When, as on the Niva, the locking works in conjunction with all-wheel drive, we can say that the car is at least close to all-terrain vehicles. And with such a car it is quite possible, if not to conquer the muddy roads, then to move quite safely along country and abandoned roads.
But do not forget that differential locking is a mode for difficult driving conditions. But there is no need to be afraid of him. We must remember that blocking allows the Niva to drive where others will not even try to do so. But you shouldn’t turn it on unnecessarily in the city. This is fraught with excessive gasoline consumption, tire wear, and ultimately, car breakdown.
Possible faults
- Fatigue wear, incorrect adjustment of differential drive bearings.
- Incomplete gear engagement, difficult or complete absence of differential locking due to wear of couplings and splines, breakage or jamming, as well as violation of the working clearance of the axle gears in the differential box.
- Due to the increased imbalance of the transfer case center differential, significant vibration is observed that is transmitted to the floor of the body. It manifests itself especially clearly in steady state driving conditions (80-90 km/h).
Operating rules
Any unit in a vehicle requires proper use and scheduled periodic maintenance.
Basic recommendations for using a differential include:
- compliance with regulated maintenance;
- off-season maintenance of mechanisms, visual inspection, adjustments;
- If smudges or oil leaks are detected on the mechanism, the need to replace the seals is determined based on a visual inspection and troubleshooting of the total amount of leakage.

