Replacement
The work must be carried out using the necessary tools. There are two options for replacing the wheel bearing - with subsequent wheel geometry and without its need. The replacement is similar for all VAZ cars (front-wheel drive).
Tool you will need:
- Ratchet with head "7", "10", "13", "17", "19" or E30;
- A key for unscrewing the CV joint or a head at “30”;
- Powerful flat head screwdriver;
- Gas torch or wheel bearing puller;
- Hammer;
- Steering wheel end puller (may not be needed);
Replacement with subsequent wheel geometry
- You need to start by unscrewing the CV joint nut; the car should be installed on a horizontal plane with the steering wheel turned slightly to the side. Using a wrench, unscrew the grenade nut counterclockwise.
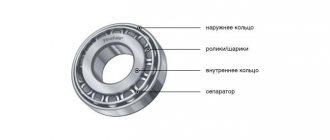
CV joint is a Constant Velocity Joint (not to be confused with lubrication). Colloquially it is called a "grenade". It got its name because of the presence of a large number of balls inside and its appearance similar to a combat grenade. There is also CV joint grease -3 and 4, used to lubricate this joint.
- We jack up the car and secure it so that it does not roll or fall off the jack. Remove the wheel;
- Separate the brake pads using a flat screwdriver;
- We unscrew the caliper from the steering knuckle and hang it by the wire (under no circumstances hang the caliper by the brake hose).
- We dismantle the brake disc by unscrewing the guides.
- Unscrew the two bolts securing the strut to the steering knuckle.
- Unscrew the bolts securing the ball joint.
- We remove the steering knuckle from the car.
- We take out the retaining rings on both sides of the fist.
- Next we need to knock out the old bearing; for this you can use a punch of the required diameter or use a puller.
- Then, once the bearing is removed, a new one must be installed. Pre-install one retaining ring and press in a new one on the opposite side.
- If you have a puller, then carefully press in the new bearing, avoiding distortion.
- If you don’t have a puller, you first need to put the new bearing in the freezer for a couple of hours.
According to the laws of physics from the school curriculum, cold bodies contract, and hot bodies expand. Therefore, a cold bearing will have a smaller diameter than a hot one, making installation easier.
- Next, use a torch to heat the steering knuckle and carefully lower the bearing into it, tapping a little. IMPORTANT, avoid distortion; the bearing should run smoothly without snagging.
You can use an old bearing as a mandrel.
- After the bearing is pressed in, install the second retaining ring and assemble everything in the reverse order.
Replacement without wheel geometry
In order to carry out a replacement without the need for wheel geometry, it is necessary to completely dismantle the steering knuckle assembly with the strut.
- Without removing the wheels from the car, we need to loosen the CV joint nut (grenade) to “30”. To do this, unscrew the grenade nut counterclockwise with a wrench.
- We tuck the car, which is fixed, so that it does not roll or fall off the jack. We remove the wheel.
- Separate the brake pads using a flat-head screwdriver.
- We unscrew the caliper from the steering knuckle and hang it by the wire (do not hang the caliper by the brake hose).
- Remove the brake disc by unscrewing the two guide wheels.
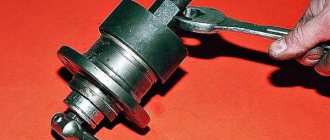
- We unscrew the steering tip mount and remove it from the strut bipod using a puller.
- Unscrew the two ball mounting bolts.
- Unscrew the three bolts securing the strut support to the side member.
- We remove the strut along with the steering knuckle from the car.
The next step is to remove the bearing from the knuckle and install a new one.
- We remove the retaining rings on both sides from the steering knuckle.
- Next, you need to knock out the old bearing; for this you can use a punch with a diameter smaller than the diameter of the bearing or use a puller.
- After the old bearing is removed, a new one must be installed. Pre-install one retaining ring and press in a new bearing on the opposite side. To do this, if you have a puller, carefully press the bearing into place, avoiding distortion. If you don’t have a puller, then you first need to put the new bearing in the freezer for a couple of hours (so that its diameter decreases slightly).
- Next, use a torch to heat the steering knuckle and carefully lower the bearing into it, tapping a little. IMPORTANT: avoid distortion; the bearing must run smoothly without snagging.
An old unnecessary bearing can be used as a mandrel for installing a new one.
- After the bearing is pressed in, install the second retaining ring and assemble everything in the reverse order.
The wheel bearing replacement process is complete.
Detailed instructions for replacing the product
To begin work, you will need to place the car on a flat surface.
Loosen the wheel bolts. Place chocks under both sides of the wheels. If they are unavailable, you can use ordinary bricks.
Raise the car on a jack.
For insurance, place a stop under the side member, using the spare wheel.
Engage forward gear.
Unscrew the bolts and remove the wheel. Next, unscrew the hub nut.
It is necessary to unscrew the nuts on both sides of the brake caliper.
Use a screwdriver to push the brake pads apart.
Using wrench No. 17, unscrew the rear bolts.
Remove the caliper and move it to the side. We tie it with wire for convenience.
The hub nut has been removed. Remove the brake disc.
In order to remove the hub we will use a puller.
Unscrew the nuts securing the casing and dismantle it.
Wheel bearing replacement video
The front wheel bearing on the Priora VAZ 2170, as on other VAZ cars, often fails, especially when the mileage exceeds 80,000 km. First there is noise from the wheel, which can increase during acceleration.
Vibration also often occurs, wheel play increases, and in some cases the noise turns into a grinding sound - all these signs mean that the front wheel bearing of the Lada Priora requires immediate replacement. If you delay repairs, the consequences can lead to wheel jamming, which leads to unsafe situations on the road.
This article will tell in detail about the principles of replacing wheel ball bearings (hereinafter referred to as SP) on cars of the VAZ family, in particular on the Lada Priora. The instructions are accompanied by many photos and videos. The material also provides information on how to choose a front wheel bearing for a Priora by number, size, price, and manufacturer.
After reading the article, you will understand that replacing the front wheel bearing is done with your own hands without special skills, experience, or special tools, and the price for repair work of this type in a car repair shop is very high.
Bearings for cars of the Russian automobile industry
The domestic auto industry, which produces passenger cars, still uses old types of bearings in production - single-row roller bearings. Only AvtoVAZ switched to two-row closed hub type HUB-1. HUB-1 means there are no flanges on the body for mounting to the hub. Therefore, owners of Russian car brands have a question about which wheel bearings are better. The most common vehicles on Russian roads today are VAZ 2110, GAZelle, and UAZ Hunter. Of course, you can purchase original parts, but they are often twice as expensive as similar ones from other factories. Let's look at the example of these particular brands of companies that produce the necessary parts.
How to diagnose the front wheel bearing on a Priora and the causes of failure
At the beginning of the article, signs of a malfunction were already mentioned, if they occur in the VAZ 2170, it is necessary to check the hub assembly. To diagnose a breakdown, it is enough to do several operations:
- Raise the car with a jack;
- Check the play of the suspended wheel with your hands;
- Rotate the wheel and listen for noise;
- Watch several videos on the principle of diagnosing the front wheel bearing of a Priora.
Faulty wheel bearing:
An example of the operation of a failed wheel bearing:
How to check the ball bearing of a wheel hub:
Wheel bearing diagnostics:
vazoved
I drive a LADA VESTA CROSS, Moscow
Then there will simply be no one to pay the fines! This is a Korean tablet video recorder 15 in 1 for Android..
I forgot about fines and Yandex Navigator.
There is FULL HD shooting, radar detector and GPS with 32 satellites. I got it at a reasonable price for such great functionality: HERE
Why does the front wheel bearing of a VAZ 2170 (Priora) fail:
- Expiration of service life;
- Incorrect operation of the suspension, aggressive driving style, road quality;
- Poor quality ball bearing (defect, counterfeit, manufacturing defect);
- Depressurization (dust, moisture, dirt);
- Malfunction of adjacent components (brake disc imbalance, etc.);
- Road accidents, collisions with deep potholes in the asphalt or holes.
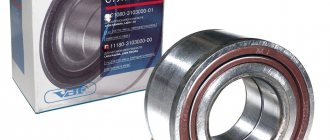
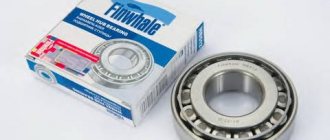
What front wheel bearing is in Priora: dimensions, number, prices, characteristics
Before you begin the repair, you need to know which front wheel bearing is on the Priora, as well as which one is better in terms of price, reviews, quality, and manufacturer. The designers at the manufacturing plant included in the design an angular contact double-row sealed ball bearing with lubricant inside (LITOL-24).
According to reviews and statements from VAZ owners, the best option would be original products from VBF or foreign manufacturers: SKF, SNR, SWAG, FAG.
The dimensions of the front wheel bearing, as well as the catalog numbers of recommended manufacturers, are presented in the tables in a similar article on replacing the wheel bearing in a Lada Granta car; look for detailed information there.
Is it worth buying the original?
It is often advised to buy original bearings. An original is a part selected by a car manufacturer for sale on markets. These are the parts that are delivered to conveyors. When buying an original bearing, you will be absolutely sure that it will suit you. But there are several questions that need to be addressed here.
The original or a fake?
The original bearings are all the same and if you examine it carefully you will find the engraving. It is located on the edge of the upper or lower part. It should contain several information:
- manufacturer (logo);
- Country of Origin;
- designation digital or alphanumeric details, sizes;
- Additional information is possible;
- The kit must include a hub nut (usually disposable), there may be pins or bolts, seals.
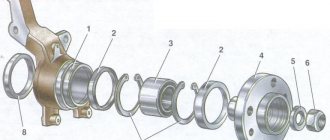
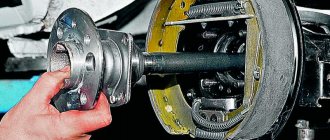
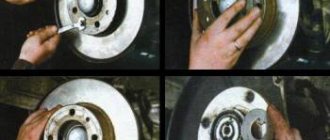
Replacing the front wheel hub bearing
There are two ways to replace a bearing. The first is by removing the steering knuckle assembly, the second is without removing it from the car. The work is shown on the right wheel bearing. The left wheel hub bearing is replaced in the same way. We remove the wheel.
Using a screwdriver, remove the protective cap from the hub. We install the wheel and tighten the two bolts that secure it. We lower the car onto its wheels.
Use a bevel to straighten the dented collar of the hub bearing nut in two places. Apply the parking brake, engage first gear and place shoes under the wheels.
Use a 30mm socket to loosen the hub bearing nut. The nut is tightened with a large torque, so the head and driver must be strong enough to transmit the necessary force. We hang up the front part of the car (namely both front wheels, because otherwise the anti-roll bar interferes with dismantling, pushing the suspension elements up). We remove the wheel. Unscrew the hub bearing nut completely...
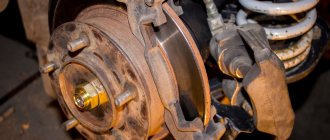
...and remove the puck. Remove the front wheel brake disc (see “Removing the front wheel brake disc”). Disconnect the right wheel drive from the hub (see “Removing the front wheel drives”). In order not to disturb the wheel alignment angles, you can replace the bearing without removing the steering knuckle. To do this, connect the ball joint to the knuckle...
...and compress the hub by striking it through a soft metal drift. You can also compress the hub using the front wheel brake disc.
We pass M12 × 1.25 mm bolts about 130 mm long through two diametrically opposite holes in the disk and screw them into the holes of the hub to a depth equal to its thickness. By sharply hitting the bolt heads with a disk, we compress the hub. Then use a cup puller to press the bearing out of the knuckle, as shown below. If it was not possible to remove the hub in this way, remove the steering knuckle. To do this, unscrew the nuts of the bolts securing the shock absorber strut to the steering knuckle, remove the bolts (see “Removing the shock absorber strut and disassembling it”) and remove the steering knuckle.
We install the steering knuckle on the jaws of the vice and press the hub out of the knuckle through a mandrel or head of a suitable diameter, applying force to the end of the hub.
We remove the hub from the fist. In this case, the outer part of the inner ring of the bearing remains on the hub.
Remove the mud ring from the hub.
We insert a blunt chisel between the ends of the inner ring of the bearing and the hub and, striking the chisel with a hammer, move the inner ring.
Use a puller to compress the inner ring of the bearing.
Using circlip pliers, remove the circlip.
Use a cup puller to press the bearing out of the steering knuckle...
...and take it out with the puller.
Remove the bearing from the puller. Clean and lubricate the inner surface of the steering knuckle. Using a needle file, we clean out the nicks from the chisel on the hub. We press the new bearing into the steering knuckle, applying force to the outer ring of the bearing. We install a retaining ring in the groove of the steering knuckle socket. When pressing the hub, we use the puller washer to rest on the inner ring of the bearing. We carry out further assembly in the reverse order, tighten the bearing nut to the prescribed torque (see “Appendices”) and be sure to lock it by jamming the collar. If the bearing was replaced with the steering knuckle removed, then it is necessary to check and adjust the wheel alignment angles at a service station.
The front wheel bearing on the Priora VAZ 2170, as on other VAZ cars, often fails, especially when the mileage exceeds 80,000 km. First there is noise from the wheel, which can increase during acceleration.
Vibration also often occurs, wheel play increases, and in some cases the noise turns into a grinding sound - all these signs mean that the front wheel bearing of the Lada Priora requires immediate replacement. If you delay repairs, the consequences can lead to wheel jamming, which leads to unsafe situations on the road.
This article will tell in detail about the principles of replacing wheel ball bearings (hereinafter referred to as SP) on cars of the VAZ family, in particular on the Lada Priora. The instructions are accompanied by many photos and videos. The material also provides information on how to choose a front wheel bearing for a Priora by number, size, price, and manufacturer.
After reading the article, you will understand that replacing the front wheel bearing is done with your own hands without special skills, experience, or special tools, and the price for repair work of this type in a car repair shop is very high.
External manifestations of a malfunction and its initial diagnosis
You can draw a conclusion about a malfunction based on extraneous noise, knocking, dry crunching sounds that appear in the rear of the car, vibration felt in the cabin while driving, or the vehicle pulling to the side while driving.
This conclusion can be confirmed or refuted by performing simple diagnostic operations:
- Place the car on a flat horizontal surface;
- Try to swing the wheel from left to right and vice versa with both hands. If the ZSP is faulty, clicks will be heard and a clearly noticeable play will appear;
- Place the wheel on a jack and spin it as quickly as possible. A clearly audible crunch indicates a breakdown.
There is another option that is only suitable for front-wheel drive cars (our case). The car is hung on a lift, started, then. The transmission starts. The rear wheels accelerate. The appearance of vibration and noise confirms the need to replace the bearing.
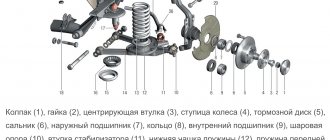
Rear bearing replacement technology
We draw the attention of the car owner to the futility and even harmfulness of trying to eliminate such a malfunction by tightening the hub nut. The backlash, however, does not disappear. On the contrary, accelerated bearing wear is observed.
The algorithm for performing the work is as follows
- Place the car on a two-post lift. If impossible, on a viewing hole, followed by fixation against unauthorized displacement.
- Release the rear wheel brake.
- Remove the protective cap from the disk.
- Straighten the collar that secures the hub nut from unauthorized loosening.
- Loosen and remove the nut.
- Loosen the mounting bolts and remove them. Then fully lower the parking brake handle and remove the rear wheel.
- Using a chisel, remove the wheel bearing protective cap.
- The hub nuts are unscrewed.
- The brake drum is removed.
Please note that after performing this operation you must not press the brake pedal. Otherwise, the pistons from the wheel cylinder may extend completely.
- From the outside of the drum, using a special puller, the retaining ring securing the bearing to be replaced is removed.
- The faulty ZSP is pressed out (using a cup puller) from the seat located in the drum.
Another option is possible. The bearing is knocked out using a mandrel of the required diameter (for ease of work, it is recommended to first place a pair of identical blocks of wood under the drum.
Before proceeding with the installation of a new spare parts assembly, it is recommended to first clean all working and seating surfaces from dirt and old grease, and visually verify their serviceability (if defects are identified, replace the faulty elements). Then re-lubricate.
- The new bearing is inserted into the brake drum seat.
- Using a puller, it is pressed in until it stops. If necessary, the outer race of the dismantled old bearing can be used as a mandrel.
When pressing a purchased new product, it is allowed to apply force exclusively to the end part of its outer casing. Mechanical impact on the inner race is prohibited (the bearing will fail).
By resting the cup of the puller used on the opposite side of the drum, it is necessary to check (when working on a car with ABC) that the master ring of the speed sensor installed in the rear wheel is not damaged.
- A retaining ring is inserted into the groove on the drum.
- The actual condition of the axle is checked.
If damage is detected to the seating surface at the bearing installation site (optionally, threads for the nut), the hub axis must be replaced.
To do this, unscrew the 4 screws that secure it to the beam flange (rear suspension), dismantle the old part and install a new axle.
- The brake drum is mounted on a trunnion (the recommended tightening torque is 80 Nm). Use a torque wrench.
- The hub bearing nut must be tightened to a torque of 175 Nm.
After completion of the work, it is recommended to check the functionality of the assembled unit. If necessary, adjust the parking brake of the Lada Largus.
Then the wheel is installed. The brake pedal is pressed several times. Then you should check the brake fluid level (add if necessary).
Check the functionality of the brake system.
Similar articles
Replacing the support bearing "Lada-Priors"
Replacing the support bearing of a Lada-Priora. External manifestations of a faulty support bearing are not always clearly interpreted even by experienced car owners. A knock appears in the front area.. 03.23.2019
How to replace the front wheel bearing
How to replace the front wheel bearing? The hub is a very important element of the chassis of any car. In order for it to rotate freely on the axis, a bearing built into it is used. 03/28/2019
How to replace the rear wheel bearing of a Lada Granta
How to replace the rear wheel bearing of a Lada Granta? Front-wheel drive models of this line require periodic replacement of the rear wheel bearing in the same way as cars with rear-wheel drive. As ... 04/01/2019
How to replace a rear bearing
How to replace the rear bearing? Replacing the rear wheel bearing is an operation known to every motorist, regardless of the type of drive of his vehicle. External manifestations of a malfunction.. 04/01/2019
Bearings by numbers and sizes for domestic cars
Bearings for domestic passenger cars Installation location bearing Bearing number Bearing type Size, mm Number of VAZ 2103, VAZ 2105, VAZ 2106, VAZ 2107 .. 05/09/2019 Popular Articles
How to determine bearing size?
How to determine bearing size? Sometimes the customer has the following problem. It is necessary to replace one of the bearings in the element with their multi-row installation. That is, bearings are necessary.. 04/08/2014
How to replace a bearing in an Indesit washing machine
How to replace a bearing in an Indesit washing machine? Most often, the owner of a washing machine from a given manufacturer learns about a problem with the bearings only after they are completely out of service. 03/24/2019
How to replace a bearing in a Zanussi washing machine
How to replace a bearing in a Zanussi washing machine? Changing the drum bearing in this washing machine yourself is quite difficult, since it will require complete disassembly. However, if there is... 03/24/2019
How to replace a bearing in an LG washing machine
How to replace a bearing in an LG washing machine? Any equipment, even one as reliable as LG, periodically breaks down. One of the possible malfunctions is bearing failure. External manifestations.. 03/28/2019 Contents
While driving, an unpleasant cracking noise may be heard in the area of the front or rear wheel. It usually disappears when turning. This behavior of the chassis indicates that the wheel bearing requires replacement. A malfunction occurs in almost every car that has already experienced a lot of mileage. The condition of the front or rear wheel bearing is also affected by driving style. The replacement is quite simple, but the driver will have to remove the strut and then take the Priora to a wheel alignment.
Don't want extra costs? Then read how to replace a wheel bearing without dismantling the strut and subsequent “camber” .
How to diagnose the front wheel bearing on a Priora and the causes of failure
At the beginning of the article, signs of a malfunction were already mentioned, if they occur in the VAZ 2170, it is necessary to check the hub assembly. To diagnose a breakdown, it is enough to do several operations:
- Raise the car with a jack;
- Check the play of the suspended wheel with your hands;
- Rotate the wheel and listen for noise;
- Watch several videos on the principle of diagnosing the front wheel bearing of a Priora.
Faulty wheel bearing:
An example of the operation of a failed wheel bearing:
How to check the ball bearing of a wheel hub:
Wheel bearing diagnostics:
vazoved
I drive a LADA VESTA CROSS, Moscow
Then there will simply be no one to pay the fines! This is a Korean tablet video recorder 15 in 1 for Android..
I forgot about fines and Yandex Navigator.
There is FULL HD shooting, radar detector and GPS with 32 satellites. I got it at a reasonable price for such great functionality: HERE
Why does the front wheel bearing of a VAZ 2170 (Priora) fail:
- Expiration of service life;
- Incorrect operation of the suspension, aggressive driving style, road quality;
- Poor quality ball bearing (defect, counterfeit, manufacturing defect);
- Depressurization (dust, moisture, dirt);
- Malfunction of adjacent components (brake disc imbalance, etc.);
- Road accidents, collisions with deep potholes in the asphalt or holes.
What front wheel bearing is in Priora: dimensions, number, prices, characteristics
Before you begin the repair, you need to know which front wheel bearing is on the Priora, as well as which one is better in terms of price, reviews, quality, and manufacturer. The designers at the manufacturing plant included in the design an angular contact double-row sealed ball bearing with lubricant inside (LITOL-24).
According to reviews and statements from VAZ owners, the best option would be original products from VBF or foreign manufacturers: SKF, SNR, SWAG, FAG.
The dimensions of the front wheel bearing, as well as the catalog numbers of recommended manufacturers, are presented in the tables in a similar article on replacing the wheel bearing in a Lada Granta car; look for detailed information there.
Which bearing is better to buy?
There are two types of bearings installed on the Lada Priora car - roller and ball, and car owners always find it difficult to choose, they don’t know which rear wheel bearing to buy is better. It is better to choose it not by its type, but by its manufacturer - products from well-known brands are of the highest quality, and therefore you should give preference to them. Wheel bearings from the following companies are well proven and tested:
The wheel bearing for the Lada Priora is universal, as it is also suitable for the VAZ-2108-15 and Lada Kalina models.