The oil seal on the VAZ 2107 is a rubber reinforced cuff that provides sealing and sealing of engine parts and prevents the leakage of oil and other liquids.
The oil seal also protects the car's mechanisms from dirt, unwanted impurities and dust. Replacing the oil seal on a VAZ 2107 is most often carried out every 3 years. The need for a new reinforced cuff may arise earlier. It is very important to carry out maintenance of the mechanisms on time, while maintaining the required temperature conditions. In addition, the high quality of the oil seal and its timely replacement help to avoid serious damage, protecting the car owner from expensive repair work.
"MP Credo" offers its customers oil seals for the VAZ 2107 at a price that does not harm quality. Specially trained employees, a modern production line and proven raw materials allow our company to process orders of any complexity and volume on time.
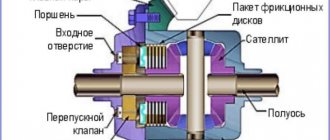
The principle of operation of a car axle shaft
An axle shaft is a part of the car's chassis, which is designed to transmit torque from the differential to the drive wheel of the car. The number of axle shafts is determined by the number of driving wheels of the vehicle. So, for example, if a car has two drive wheels, then there will be only two axle shafts. SUVs, on the other hand, have axle shafts on all drive wheels of the vehicle.
The operating principle of the axle shaft is as follows. The torque from the gearbox goes to the driveshaft, which transmits it to the vehicle's axle gearbox. The gearbox, in turn, distributes this moment along the axle shafts of the car. These elements are secured in the wheel hubs using special locking nuts.
It's even easier in a front-wheel drive car. The axle shaft of such a car is called the drive shaft, which is connected to the gearbox and transmits torque to the angular velocity joints.
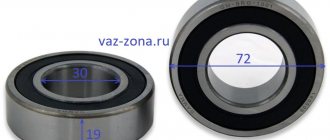
Axle shaft seal VAZ 2106 size
Greetings to all readers on the RtiIvaz.ru blog. The page shows photographs of crankshaft oil seals as a set for the gearbox of a family of classic rear-wheel drive cars, as well as gearboxes of front-wheel drive eights and a dozen VAZs. The cuff of the rear gearbox, also called the rear axle, is installed in rear-wheel drive “Classic” cars.
In fact, there are many of them different in shape, size, and purpose. Some hold oil, antifreeze or antifreeze, others hold air, water pressure, all are designed to protect car parts from dirt, dust and other factors.
For example, the crankshaft seal and the camshaft keep oil from flowing between the joints of the camshaft journal and the seat of the engine block. The same role is played by the cuffs of the gearbox, gearbox, and axle shaft. The hub is protected from dirty water and dust from leaking antifreeze or antifreeze into the pump.
You can list the role of the purpose of car oil seals, I will only say one thing without them in our age of mechanical engineering. Someday they may disappear in a car, but this is already on the verge of fantasy when the car becomes something like a flying saucer “UFO”. In the meantime, we will think about these photo seals and where to use them.
Let's look at a photo of crankshaft cuffs for VAZ 2108 car engines; 2109; 2113; 2114; 2115; 2110; 2111; 2112; 2170; 1118 and 1111 "Oka".
The set includes three seals, two small and one large. Of the small ones, one goes to the front camshaft cover, the other small one goes to the front crankshaft of VAZ 2108 cars; 2109; 2113; 2114; 2115; 2112; 2115; 2170; 1118 and 1111 "Oka". The large rear one is located in the engine crankshaft on the clutch side.
- 2108-1005034 size: 28x42x7 2 pieces (front small ones numbered 2 and 3).
- 2108-1005160 size: 80x100x10 1 piece (large rear one under number 1).
Replacement of the rear axle shaft, bearing and oil seal of VAZ 2107
The "seven" axle shafts are used to drive the rear wheels of the car. In general, these parts of various rear-wheel drive cars are similar and the replacement procedure will not be much different. In addition, along with replacing the axle shaft, its bearing and oil seal are usually replaced, so this procedure will be described for three parts at the same time.
Replacement of this element may be required in the following cases:
- The part is too deformed or bent. In this case, it cannot be repaired, since the alignment is already damaged and it is impossible to restore it.
- The axle flange was seriously damaged. This can be expressed in its deformation or broken threads. This happens when driving on unbalanced wheels or when the wheel bolts are tightened too tightly.
- The special bushing, or as it is also called, the locking bushing, no longer copes with its locking duties. The entire axle shaft must be replaced.
- The splines of the part have undergone severe wear. If they are very worn, then the axle shaft must be replaced.
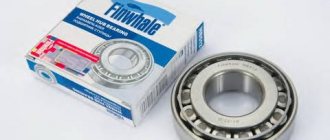
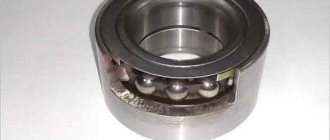
- The last thing to be diagnosed is the axle bearing itself. If it is too worn out, then replacing it can be limited, however, if its seat has been worn out, then the entire axle shaft is replaced.
In what cases may it be necessary to replace a VAZ axle bearing?
- The bearing has suffered severe mechanical damage and is no longer suitable for use in the chassis.
- There was a need to replace the rear axle axle shaft. Along with it, the bearing must also be replaced.
The signal for repair is usually the appearance of noise when driving in the rear of the car. As the speed increases, the noise level also increases.
The frequency of replacement is not clearly regulated, since the axle shaft is a part with a fairly long service life, which depends on the operating conditions of the vehicle. That is why the part needs to be replaced at the first sign of a malfunction.
Preparatory activities
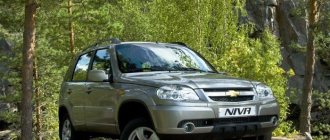
Before proceeding with the replacement, the owner of a Niva Chevrolet car needs to prepare a number of tools. In the process you will need:
- box and socket wrenches in a set;
- flat screwdriver;
- wheel wrench;
- hammer;
- jack;
- additional wooden support;
- a piece of pipe equal to the diameter of the gland.
Be sure to wear work gloves - they will not only keep your hands clean, but also protect your fingers from injury.
The stand will need to be such that after removing the wheel and dismantling the shock absorber, the rear axle remains at approximately the same height. Otherwise, you risk losing too much transmission oil.
The procedure for removing and installing the oil seal and rear axle bearing
- The car is placed on a flat surface and immobilized. To do this, use wheel chocks or other methods to stop the wheels from involuntary rotation. Remove the wheel bolts and lift the wheel using a jack.
- Remove the wheel and unscrew the guides mounted on the brake drum. After this, remove the drum itself. To do this, you can use guides that are screwed into the other two holes until the part comes out completely, or simply knock down the drum using a soft impact tool. Another option involves accelerating the drum in first gear and stopping abruptly - this will help the stuck element to easily move out of its place.
- Insert the long head through the special holes in the flange and unscrew the fastening bolts. Unscrewing and tightening is done only crosswise. Now pull out the axle shaft by hand and remove it. If this causes any difficulties, you can screw the wheel back onto two bolts and, swinging, pull the axle shaft out of the bridge.
- The new bearing and oil seal are mounted on the new axle shaft. The bearing is installed using a special puller. If you don't have one, you can use a soft frame and slowly press the bearing onto the new axle shaft with hammer blows. Try to do this very carefully so as not to disturb the alignment, and if possible, it is best to contact a car service center that has specialized equipment.
- Install the new axle shaft in the reverse order of disassembly. Similar actions are performed for the other side of the car.
Removing and replacing the axle shaft seal of the rear axle Niva Chevrolet
Sometimes, it may be necessary to replace the rear axle axle oil seal on a Chevrolet Niva. Such work may be required at any time. Unfortunately, this model has its own problems. Rear axle oil seal leakage is one of these problems. In itself, such a replacement is not difficult. This does not require any special skills. Even a novice driver can cope with such work. Timely replacement will avoid problems with the differential and other axle parts. Therefore, repairs should not be put on the back burner. For greater safety, you should regularly monitor the condition of this element of the car.
Replacing the rear axle axle seal on a Chevrolet Niva
occurs when there is visible transmission fluid leaking from the axle. To do this, after parking, pay attention to the condition of the car’s drums. If there are problems with the seals, small leaks will be noticeable on the wheels. If it is not brake fluid, then most likely the problem is in the oil seal and should be replaced. A transmission fluid leak will cause serious problems with axle components.
Replacing the oil seal
To carry out the work you will need a regular set of tools. The only special tool you will need is a puller for the axle shaft, but if you don’t have one, you can do without it.
Before carrying out work, ensure that the machine is as motionless as possible. To do this, wheel chocks are installed under the front wheels. First gear is engaged. The work is carried out in the following order:
- The wheel fastening becomes loose. The car is raised on a jack. The wheel is completely removed. Supports are placed under the thresholds in case of problems with the jack; ordinary blocks or several wheels folded in a stack will do;
- Before removing the brake drum, make sure the wheel is completely released. In this case, the handbrake lever must be lowered, the wheel rotates freely;
- The decorative cap is removed. To do this, disconnect it by prying up the fasteners with a screwdriver;
- The gap between the flange and the drum is moistened with penetrating lubricant (liquid wrench, WD-40);
- The brake drum is secured with two screws, they must be unscrewed. For this you will need a key “12”;
- Gently tap the drum with a hammer so you can move it relative to the axle shaft;
- In some cases, the drum can be removed quite easily. But sometimes you have to shoot him down. To do this, it is necessary to strike the rim of the drum with a hammer from the back side. Just do this through a block, otherwise you can damage the drum;
- The screws holding the axle shaft and the drum casing are unscrewed;
- The bridge rises slightly;
- The shock absorber bracket should be removed from the axle bearing plate;
- The axle shaft is removed; for this you will need a special puller. If it is not there, then you can do without it. To do this, put the wheel on the axle shaft. Screw on 3 nuts, but so that there is free space between them. We press the wheel against the axle and pull it harder towards us. After several passes, seasoned with strong words, the axle shaft should move. All that remains is to extract it;
- Now you can change the oil seal. Remove it using a screwdriver. Just pry the oil seal in a convenient place and pull it out;
- To install, the new oil seal is pressed back in, and the removed part is used as a mandrel.
We recommend: Replacing the radiator of the VAZ 2109 stove
Reassembly is in progress. All dismantled parts are installed in place.
Useful tips
Many drivers combine oil seal replacement and transmission oil change. If you decide to do the same, then it makes sense to find out what type of lubricant is used in your case. It is not recommended to mix different types of oils. This will lead to performance problems. If it is necessary to change the type of lubricant, it is recommended to first flush the system.
When removing the axle shaft, oil will begin to flow out. Therefore, it is better to drain it in advance. If you do not want to change the lubricant, then you need to take measures against its leakage. To do this, simply raise the side of the car from which you are changing the oil seal higher. This way you will avoid lubricant leakage. But, in any case, there is a risk of lubricant leakage. Be sure to add a new portion of oil after all work has been completed.
When reinstalling the brake drum, pay attention to its condition. Often there is a development along the shoulder. It should be removed using a regular file. This simple action will significantly improve braking.
In some cases, oil seal wear can be caused by a bent axle shaft. In this case, knocking noises will be heard when moving, and the oil seal will be worn out on only one side. In many cases, you can even visually determine the damage. Such a defect can only be corrected in a workshop on a special stand. If this is not possible, then you will have to buy a new part.
The rear axle on this model is quite weak. Problems with it arise quite often. That is why, replacing the rear axle axle seal on a Chevrolet Niva is familiar to almost all owners of this car. This work is not difficult. If you have even average repair skills, you will only need half an hour on one side. The most important thing is to do the work carefully. It is especially important to ensure that dirt does not get inside the bridge. Even the smallest particle of sand can cause problems with the operation of this part of the machine.
How to change the front axle shaft of a UAZ
In principle, there is nothing complicated here either. In the same way, you need to lift the car and remove the wheel. Unlike the rear wheels, there is no brake drum here, but there is a special caliper that will in every possible way prevent the axle shaft from coming out. There is no need to disconnect the hose from it. You just need to hang it on other suspension parts and continue working. Then the brake disc mounts are unscrewed and it is removed.
After this, the flange mount is unscrewed and a special lock washer is straightened. It is removed and the nut under it is unscrewed, under which there is also such a washer. It is also removed and the last nut is unscrewed. Lastly, pull out the spacer and release the axle shaft from being fixed by the hub.
Unscrew further 4 nuts, then lightly tap on the special steering rod arm. However, it is not necessary to remove the traction. The last large cylindrical nut remains, which can be unscrewed using a special wrench. After the last nut, take out the special king pin. Then the oil seal on the ball is unscrewed and the special steering knuckle is removed.
The old ball axle shaft is pulled out, and a new part is inserted in its place, after which assembly is also carried out in the reverse order.
This completes the replacement of the axle shaft. As you can see, this is not a complicated procedure and can be done independently if you have a garage and a good set of tools.
What are axle shafts, why are they needed and how are they designed?
In rear-wheel drive cars, which the “seven” actually belongs to, the rear wheels are driving. It is they, rotating, that make the car move. The torque is transmitted to them from the gearbox through the drive (cardan) shaft, gearbox and axle shafts. There are only two axle shafts: one for each rear wheel. Their role is to transmit torque from the corresponding gear of the gearbox to the wheel rim.
Axle shaft design
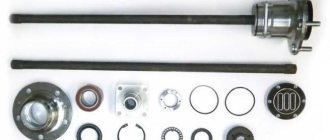
The axle shaft is an all-metal shaft made of steel. At one end there is a flange for attaching the wheel disk, and at the other there are splines for engagement with the gearbox gear. If we consider the axle shaft assembly, then in addition to the shaft, its design also includes:
- oil deflector;
- sealing gasket;
- oil seal (cuff);
- bearing.
Each of the axle shafts is installed in the corresponding (left or right) rear axle housing. An oil deflector with a gasket and an oil seal are used to prevent lubricant from leaking out of the casing. The bearing is designed to ensure uniform rotation of the axle shaft and distribute shock loads coming from the wheel to the rear axle of the vehicle.
Malfunctions of VAZ 2107 axle shafts, their causes and symptoms
The main failures of axle shafts include:
- shaft deformation;
- fracture;
- wear or cutting of splines;
- Damage to the wheel rim mounting threads.
Deformation
The axle shaft, although made of high-strength steel, can become deformed under high loads. Such a malfunction is often a consequence of gearbox jamming, bearing problems, or the corresponding wheel falling into a deep pothole. A sign of deformation of the axle shaft is strong vibration of the wheel rim, sometimes accompanied by a hum, knocking, or crackling noise.
Fracture
The result of a wheel hitting a pothole or a strong impact on a bump can be a fracture of the axle shaft. In this case, the car loses control because one of the drive wheels stops rotating. If the axle shaft is broken, the gears of the gearbox may also fail, so if such a malfunction occurs, it must be checked.
Worn or cut splines
Natural wear of the axle shaft splines may appear after 200–300 thousand kilometers. More often they are cut off, which occurs when one of the wheels jams and the gearbox malfunctions. Also, the splines are cut off due to wear of the axle gear teeth that mesh with them.