The direct and main purpose of these small parts is to reliably seal the metal parts and connections of the gearbox housing and other parts of the vehicle system to prevent transmission oil from leaking. Oil seals are made of durable polyurethane alloy using special compounds, since they are constantly in an aggressive environment. Oil is constantly present inside the parts, which negatively affects the condition of the part over a long period of time. Externally, these parts can be damaged as a result of mechanical stress due to breakdown or under the influence of an aggressive natural environment. The average resource or lifespan of units largely depends on operating conditions.
The manufacturer does not provide a specific guarantee for these parts; accordingly, it does not limit their service life; planned replacement is not required at certain mileages. However, in most cases, under normal operating conditions, the service life of the parts is sufficient for runs of up to 200 thousand kilometers. When used in harsh natural conditions, reliability decreases accordingly, and with it the service life of up to 100 thousand kilometers.
These parts are located at the junction of the transmission with the clutch in the case of the primary shaft, and the secondary one is located directly inside at the junction of the flange and the gearbox housing. Sealing of pipes and hoses, as well as metal parts, is achieved by tightly connecting two parts directly to the seals, which is a circle with several layers of polyurethane material. It is precisely because of the unsatisfactory condition of these small parts that transmission fluid often leaks outside the box. Therefore, responsible owners, when the first signs of malfunction appear, replace the part with a new one. Due to their simple design and the absence of any moving parts, these units cannot be repaired; they are simply replaced with new ones. However, their failure can cause major consequences in the form of failure of the entire gearbox as a result of oil “starvation”. Therefore, preventing the condition of oil seals is one of the important procedures in the daily maintenance of the VAZ 2107.
Replacing the cuff of the secondary shaft of the VAZ-2107 gearbox
We replace the secondary shaft oil seal if the oil level in the gearbox constantly drops, or if the rear part of the gearbox becomes oily.
We carry out the work on an inspection ditch or a lift.
We disconnect the cardan drive from the gearbox (see Replacing the cardan drive) and move it back.
For ease of operation, use a 13mm head to unscrew the two nuts securing the cross member to the body and lower the back of the box until it stops.
Using two 19mm wrenches, unscrew the three nuts securing the elastic coupling to the flange.
To make it easier to remove and install the clutch, you can put a special clamp on it or wrap it with tape (see Features of repairing a five-speed gearbox).
. remove the elastic coupling
Remove the centering ring seal
Use a puller to remove the retaining ring from the secondary shaft.
Using the bolt in the elastic coupling flange as a lock, use a 30mm wrench to unscrew the nut securing it a few turns to move the centering ring.
Using two screwdrivers, remove the centering ring of the elastic coupling
Unscrew the nut and remove the spring washer.
. Use a puller to tighten the flange of the elastic coupling.
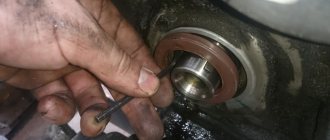
Using a screwdriver, remove the cuff of the secondary shaft. Before installation, lubricate the cuff with a thin layer of any lubricant.
We press the new cuff through a piece of pipe of a suitable diameter or through the old cuff. Install the removed parts in reverse order
When installing a new cuff, you can slightly underpress it, avoiding distortion (if necessary, placing spacers under it up to 1 mm thick) so that the edge of the cuff works along the unworn part of the shaft. In case of significant damage, replace the shafts and cuffs
Work plan
To remove and replace a damaged cuff, we suggest using step-by-step instructions:
1. Take a 10mm wrench and remove the clutch housing protective shield. To do this, unscrew the two bolts that are fixed on the back of the oil seal holder.
2. Having gained access to the back cover, clean it of any adhering dirt. Replacing the sealing element could also be done on the engine - in this case there would be no need to change the gasket and restore the tightness at the junction of the oil sump. But since this creates a risk of damage or distortion of the sealing collar, press-fitting should be carried out under more convenient conditions.
3. To remove the rear cuff mounting cover, remove the six bolts securing the engine end and the two bolts that hold the oil pan to the holder. As in the previous case, a “10” socket head is suitable for this.
4. The oil seal mounting unit is installed on the sealing gasket, so it often “sticks” to the surface of the cylinder block. In order not to damage the part made of fragile duralumin, it is pryed off from the side of specially cast protrusions and, carefully swaying from side to side, is removed from the engine.
5. The lid is placed on wooden stands. Using a suitable punch, the oil seal is knocked out of the socket through a special cutout in the holder. Don't be afraid to damage the worn sealing element - you still have to throw it away.
6. Wash the holder thoroughly to remove any dirt. Pay attention to the seat of the cuff - by polishing it to a shine, you will simplify the pressing of the new part and reduce the risk of its damage.
Something else useful for you:
7. Before installing the new oil seal, lubricate it with engine oil. This will reduce the friction of the rubber on the metal, which will prevent the cuff from bending and damaging the race when pressed. If desired, a layer of lubricant is also applied to the seat in the lid - this will only be beneficial.
8. Carefully install the new sealing element into the socket. Make sure that the top plane is strictly parallel to the top edge of the holder. Remember that misalignment of the part during installation will lead to jamming. Removing a stuck cuff without damaging the clip will not be easy.
9. Using a suitable tool, put the oil seal in place. Use the old seal as a mandrel (if it was removed without damage). As a last resort, you can press in the oil seal using a hammer and a wooden block, tapping the surface of the part in a circle. The installed seal must be flush with the top surface of the seat.
10. After unscrewing the edge of the cuff from the side of the cutout for dismantling, make sure that the garter spring is not damaged during installation.
11. Before replacing the rear cover, thoroughly wipe the surface of the crankshaft flange. In addition, be sure to clean the junction of the holder and the cylinder block from traces of sealant and remnants of the old gasket.
12. To prevent the oil seal from turning up during installation, lubricate its edge and seat on the crankshaft with engine oil. This will prevent the working part of the cuff from being abraded in the first seconds after starting the engine.
13. Carefully inspect the removed gasket. If it is damaged during disassembly or is strongly compressed, replace the sealing element.
14. Lubricate the gasket on both sides with sealant and glue it to the cylinder block. Also, apply a thin layer of liquid sealant to the cork (rubber) seal of the powertrain oil pan.
15. Replace the bolts that secure the clutch housing protective cover.
16. Gently pressing the working edge of the oil seal with your fingers, install it on the flange. After the flat of the cover touches the cylinder block, the area where the oil seal meets the crankshaft can be carefully adjusted using a screwdriver with a thin flat blade.
17. Hand-tighten the six bolts securing the rear engine cover to the block and tighten them crosswise with the required force. Using the remaining two bolts, tighten the oil pan to the oil seal holder.
18. Be careful with the tightening torque so as not to damage the threads in the duralumin cover.
Reinstall the clutch housing protective shield and tighten it to the cover with nuts. This completes the work of replacing the rear oil seal of the VAZ 2101-2107. All that remains to be done is to reinstall the clutch, gearbox and driveshaft. Be sure to center the clutch disc using a special tool, otherwise the transmission input shaft will not fit into the crankshaft bearing.
Gearbox seal VAZ 2107 - description and purpose
An oil seal is a special seal in a vehicle that is necessary to seal gaps and cracks. For example, in a gearbox, the oil seal plays a vital role - it is fixed at the junction between the moving and stationary mechanisms, preventing oil from leaking out of the gearbox.
The oil seals in the VAZ 2107 gearbox are not made of rubber, as most drivers believe. In fact, this product is constantly in the transmission oil, and to keep production to a minimum, manufacturers make oil seals from CSP and NBR composite materials. At the same time, the gasket feels equally “good” at any temperature - from -45 to +130 degrees Celsius.
Box seal dimensions
The gearbox itself on the “seven” is designed for many years of service. However, the service life of the device directly depends on how often (and in a timely manner) the driver changes the seals. Indeed, during the operation of the machine, it is the oil seals and sealing joints that are the first to fail (tear, wear out, squeeze out). Therefore, timely replacement of the oil seal will help prevent expensive repairs of other gearbox mechanisms.
The meaning of the primary and secondary shaft oil seals
The direct and main purpose of these small parts is to reliably seal the metal parts and connections of the gearbox housing and other parts of the vehicle system to prevent transmission oil from leaking. Oil seals are made of durable polyurethane alloy using special compounds, since they are constantly in an aggressive environment. Oil is constantly present inside the parts, which negatively affects the condition of the part over a long period of time. Externally, these parts can be damaged as a result of mechanical stress due to breakdown or under the influence of an aggressive natural environment. The average resource or lifespan of units largely depends on operating conditions.
The manufacturer does not provide a specific guarantee for these parts; accordingly, it does not limit their service life; planned replacement is not required at certain mileages. However, in most cases, under normal operating conditions, the service life of the parts is sufficient for runs of up to 200 thousand kilometers. When used in harsh natural conditions, reliability decreases accordingly, and with it the service life of up to 100 thousand kilometers.
These parts are located at the junction of the transmission with the clutch in the case of the primary shaft, and the secondary one is located directly inside at the junction of the flange and the gearbox housing. Sealing of pipes and hoses, as well as metal parts, is achieved by tightly connecting two parts directly to the seals, which is a circle with several layers of polyurethane material. It is precisely because of the unsatisfactory condition of these small parts that transmission fluid often leaks outside the box. Therefore, responsible owners, when the first signs of malfunction appear, replace the part with a new one. Due to their simple design and the absence of any moving parts, these units cannot be repaired; they are simply replaced with new ones. However, their failure can cause major consequences in the form of failure of the entire gearbox as a result of oil “starvation”. Therefore, preventing the condition of oil seals is one of the important procedures in the daily maintenance of the VAZ 2107.
Signs of oil seal destruction
The seals are located directly on the shafts inside the box, so their wear can be visually determined only when disassembling the gearbox. However, any driver can quickly detect oil seal damage by eye, because there are obvious symptoms:
- Transmission oil leaks under the car.
- Constantly low oil level in the box.
- Problems with shifting gears while driving.
- Crunching and grinding in the gearbox when changing gears.
There are plenty of options. If there is an oil leak at the junction of the clutch bell and the engine, then it could be either the engine crankshaft rear oil seal or the gearbox input shaft oil seal. If there is a leak at the junction of the clutch bell and the gearbox body, the gasket is kaput. If it is wet at the rear end of the box - the gasket or oil seal of the secondary shaft
Electrician
https://www.vaz04.ru/forum/10–4458–1
It would seem how the performance of such a complex unit as a gearbox can depend on a small part. However, loss of tightness for the box is fraught with big problems, because even minor losses of transmission oil will immediately affect the lubrication of moving elements.
It is recommended to change the oil seals in the VAZ 2107 box every 60 - 80 thousand kilometers. The replacement is associated with an oil change, so it will be convenient for the driver to perform these works at the same time. Before this period, it is necessary to change the oil seal only when there are clear signs of its destruction.
Input shaft oil seal
The input shaft oil seal is located directly on part of the input shaft and is in contact with the clutch housing. Therefore, to replace this product, you will need to remove the casing.
To work you will need to prepare:
- nut heads;
- hammer;
- puller;
- flat screwdriver;
- knife (they are most convenient for removing the old gasket);
- new oil seal;
- transmission oil;
- new input shaft seal.
The procedure for replacing the seal can be carried out either on the removed box or directly on the car. However, it is easier and faster to change the product on a dismantled gearbox:
- Disconnect the gear shift fork from the box.
- Remove the release bearing by clamping it with a puller.
- Unscrew the six nuts securing the clutch housing.
- Remove the casing from the box.
- Use the tip of a knife or screwdriver to pry up the old oil seal on the input shaft and remove it.
- It is good to clean the landing area so that there are no traces of the seal, spraying or oil leaks.
- Install a new oil seal, having previously lubricated it with transmission oil.
- Next, assemble the box in reverse order.
Video: replacement instructions
Replacing the secondary shaft oil seal of a VAZ 2107 gearbox
The need to replace the secondary shaft oil seal in the gearbox of a VAZ 2107 car arises when oil leakage is detected from the gearbox. The presence of oil drops on the gearbox housing is not allowed, but oil sweating is acceptable, which is not a sign of oil seal damage. To perform the work of replacing the oil seal in the gearbox, you will need a three-jaw puller and fixing glue.
Removing the gearbox seal of a VAZ 2107
1. We install the VAZ 2107 car on an inspection hole or overpass (see “Preparation of the VAZ 2107 car for maintenance and repair”). 2. On VAZ 2107 cars with an injection system, remove the heat shield (see “Drivetrain - removal and installation”). 3. Disconnect the driveshaft from the rear axle gearbox and unscrew the two bolts securing the intermediate support of the driveshaft to the cross member (see “Driveshaft - removal and installation”). 4. Disconnect the elastic coupling of the cardan drive from the flange on the secondary shaft of the gearbox (see “Drivetrain - disassembly and assembly”) and move the cardan drive back. 5. Using pliers, remove the thrust ring.
6. Secure the elastic coupling flange from turning by inserting bolt A into its hole. Using a 30 mm wrench, unscrew the flange fastening nut and move the centering ring B of the elastic coupling along the shaft.
7. After tightening the nut a few turns, use two slotted screwdrivers to pry up the centering ring and remove it from the secondary shaft of the gearbox.
8. Unscrew the nut.
9. Remove the bolt from the flange hole. 10. Place the screw of the three-jaw puller against the end of the secondary shaft and press the flange off the shaft.
11. Remove the flange along with the washer.
12. Using sliding pliers, remove the damaged oil seal from the gearbox.
Installing the VAZ 2107 gearbox oil seal
Attention
Before installing the oil seal, check the condition of the inner cylindrical surface of the flange in contact with the oil seal.
There may be signs of corrosion and wear that should be removed by polishing. Before installation, lubricate the surfaces of the new oil seal with a thin layer of grease. 1. Press in the oil seal with a mandrel of suitable diameter.
For clarity, we show the following operation on a gearbox removed from a VAZ 2107 car. 2. Use a hammer to press the flange onto the shaft. Having installed the washer, apply fixing glue to the threaded surface of the shaft (according to the instructions for use) and tighten the nut.
Replacing the rear crankshaft oil seal of a VAZ 2101-2107 with your own hands
We know that it is time to replace the rear crankshaft oil seal by the leakage of engine oil from the gap between the clutch housing and the protective shield. Loss of tightness of the sealing lip threatens engine contamination and the need to replenish the lubricant level. Once on the flywheel, engine oil splashes to the sides and coats both the inner surface of the clutch housing and the driven disc lining. A strong leak can cause it to slip, which is why the transmission begins to “slip.” At the same time, the dynamic characteristics of the car are reduced - it picks up speed worse and stops pulling uphill. There is no pleasure in driving a car, and in addition, there is a risk of wear on the clutch and gearbox parts.
The cause of damage to the working edge of the oil seal can be either natural wear or manufacturing defects, or other factors - engine overheating, the use of low-quality oil, or initially careless installation. At the same time, leaks through the crankshaft sealing elements are also possible due to increased crankcase gas pressure, so you should check the engine ventilation system and the cleanliness of the breather.
When starting to replace the crankshaft rear oil seal, disconnect the driveshaft, remove the gearbox, clutch and flywheel. For this reason, it is better to perform the work in a pit or overpass. Read this article for details of disassembling and replacing the front crankshaft oil seal.
How to replace the gearbox seal on a VAZ 2107 yourself
The gearbox on the VAZ 2107 is distinguished by its complex design. If it needs to be repaired, it is worth using the services of appropriate specialists. During diagnostic work, replacement of gearbox spare parts is often required.
The classic VAZ 2107 model is equipped with a manual transmission, which can have 4 or 5 steps, and there is a transfer case. Its resource depends on how often the owner of the vehicle changes its components. In particular, these are seals.
Purpose of oil seals
The main mechanisms in a gearbox are shafts. They are equipped with oil seals, which are necessary to seal the gearbox gaps. Thanks to this, the fuel and lubricant does not leak out of the box. The existing differential seal provides the necessary protection of this mechanism from dirt.
What material are the seals made of? This element is made of composite materials XSP and NBR. Their distinctive feature is that they tolerate temperature loads well, therefore, their minimum output is noted during long-term operation of vehicles.
Diagnostics of VAZ 2107 gearbox seals
The transmission system needs to be checked if there are leaks of transmission oil under the car, noise, or grinding noise from the gearbox. The leak may be between the gearbox and the transfer case. Also, if the sealing elements are worn out, difficulties may occur when changing speeds. In most cases, the need to replace the gearbox seal occurs after 60,000 km.
The gearbox shaft seal must also be checked. If this component of the box has become unusable, liquid leaks are noted. Wear of the shank oil seal may be due to natural wear or mechanical damage. High-quality products will not lose their properties even after 70,000 km.
Replacement of VAZ 2107 gearbox seals
The gearbox is rightfully considered one of the most complex components in the design of any car. At the same time, the operation of flanges, shafts, gears and bearings largely depends on the performance of such a small element as an oil seal.
Box seal dimensions
The gearbox itself on the “seven” is designed for many years of service. However, the service life of the device directly depends on how often (and in a timely manner) the driver changes the seals. Indeed, during the operation of the machine, it is the oil seals and sealing joints that are the first to fail (tear, wear out, squeeze out). Therefore, timely replacement of the oil seal will help prevent expensive repairs of other gearbox mechanisms.
For proper replacement, you need to know the dimensions of the VAZ 2107 gearbox seals:
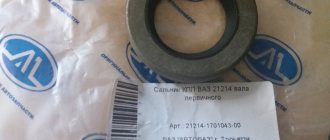
- The input shaft seals have a weight of 0.020 kg and dimensions of 28.0x47.0x8.0 mm.
- The secondary shaft seals weigh a little more - 0.028 kg and have the following dimensions - 55x55x10 mm.