On Chevrolet Niva SUVs, all-wheel drive of the rear wheels is implemented by using a rear axle in the transmission design. Axle shafts are installed in it, which drive the wheels through splined joints.
To ensure fixation and smooth axial rotation, support single or double row bearings are installed in the drive design.
Device
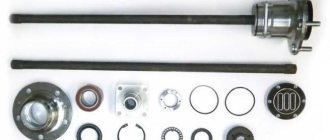
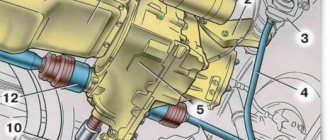
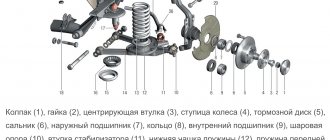
Structurally, the rear axle axle shafts are identical and interchangeable. In Figure 1 you can see that the axle shaft number 22 engages internally through the splined hole of the semi-axial gear; a single row ball bearing 8 is pressed onto the outer part of the shaft.
The axle bearing on a Chevrolet Niva is pressed into the beam seating belt from the inside by a self-clamping reversible oil seal 11, and from the outside by a rubber ring.
conclusions
As you can see, taking into account the above, you can replace the rear axle oil seal on a Chevrolet Niva yourself . If difficulties arise with this, you can always contact specialists at the service station.
With all due respect to the domestic automobile industry, even its brightest representatives, one of which is the Niva 2121, suffer from “childhood sores” that accompany the car throughout its entire service life. One of these “illnesses” is a leaking front axle oil seal. We will talk about its replacement below.
Basic parameters of factory parts for repair
Main technical indicators of the unit: diameter and length of the axle, number and length of the spline belt, type of bearings and sealing seals. These indicators are determined by the design features of the system and the calculated traction forces under comparable operating conditions at the time of design and production.
Often, under the influence of large loads, deformation of the axle shafts occurs, premature wear and jamming of the support ball bearings occurs, deformation and fatigue wear of the sealing seals, followed by leakage of transmission oil from the axle.
Factories producing spare parts for the domestic automotive industry are constantly striving to improve manufactured vehicle components and assemblies. They regularly offer consumers a newer, more reliable, more modern product.
Let's consider the technical parameters of the drive elements of the rear axle of an SUV.
Half shaft
Main characteristics:
- Catalog number: 21230-2403069-00, 21230240306900, 2123-2403069.
- Length: 760 mm.
- Diameter for oil seal: 35 mm
- Weight: 8.4 kg.
- Manufacturer: AvtoVAZ
- Average market prices: 6900 rubles.
Existing analogues:
- axle shaft, standard size for VAZ 2121 Chevrolet Niva, average price 3,400 rubles;
- Russian, the average price is 3900 rubles.
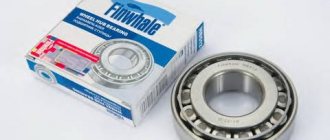
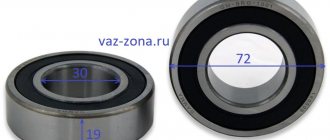
Rolling ball bearings
- Catalog number: 2121-2403080. Designation - GPZ - V76-180508AK2US9.
- Manufacturing index: 180508, 62208-2RS
- Manufacturer: AVTOVAZ
- Average market prices: 400 rubles;
- Inner diameter - 40 mm;
- Outer diameter - 80 mm;
- Width - 23 mm;
- Weight - 440g;
- Rated rotation speed - 5600 rpm.
Foreign bearing manufacturers - NSK, SKF, SNR. Average price from 600 rubles.
Oil seals
- Catalog number: 21100-2301034-00-0 - left and 21100-2301035-00-0 - right.
- Overall dimensions: 35x57x9 mm.
- Manufacturer: AVTOVAZ.
- Average market prices: 45-60 rubles.
Existing alternatives:
- CV joint drive oil seal 2110.08 “RT” universal, manufacturer RUZINOTEHNIKA;
- axle drive seal VAZ-2110-2112, 2123 right/left (35x57x9), manufacturer General Motors.
It is also worth noting the German manufacturer Corteco. This company produces a wide range of oil seals for the VAZ-2123.
Ready-made repair kits
On the spare parts market you can also purchase a ready-made repair kit for servicing the rear axle shafts of the VAZ-2123.
The repair kit for the rear axle shaft of the VAZ 2123 Chevy Niva from ESPRA consists of bearing 2121-2403080, sealing oil seal 2110-2301034 and locking ring 2123-2403084. The average price of such a set is 690 - 890 rubles.
Interesting! Some Niva owners prefer to purchase ready-made kits from one manufacturer, considering this to be a kind of guarantee of the compatibility of the parts being replaced.
Which to choose?
This part is not very expensive. The oil seal catalog number is 2123-1802120-30. In online stores you can find parts at prices starting from 50 rubles.
Important: given the low cost of the oil seal and the high complexity of replacement, a new part must be installed every time the gearbox is disassembled. This is cheaper than disassembling the assembly again to replace the seal.
According to reviews from Chevy Niva owners, products from General Motors, ROSTECO and some other manufacturers have decent quality. They are distinguished by a higher price (from 150 rubles) and reliable wear-resistant material of the cuffs.
Enhanced modifications
Why are reinforced collapsible axle shafts of the unloaded type better than standard ones:
- The double-row bearing from the Priora front hub can withstand much greater loads and is more durable.
- Alloy steel that has undergone special heat treatment is used in the manufacture of the shaft, due to this it has more torsional strength (steel 35KhGSA and heat treatment hardness 55-56). Manufacturers of reinforced axle shafts are able to increase the torsion limit using stronger materials from the required standard 250 to 350 kg.
- The design of the unit with 24 splines reduces the likelihood of failure of the most dangerous part of the connection;
- Removable hub design;
- Self-locking hub nut;
- Does not require mandatory reinforcement of the rear axle;
- Does not exceed the weight of a standard axle shaft;
- Allows the use of larger diameter wheels;
- This part is completely interchangeable with the standard factory modification.
Optimal procedure
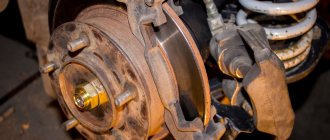
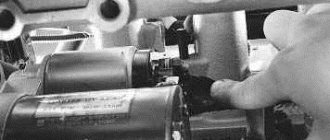
Replacing the rear axle oil seal on a Niva 2121 requires jacking up the car or lifting it using a lift. After this you need to remove the wheels. Despite the fact that there is no visible connection at this stage, the drums also need to be dismantled.
Important: hitting the drum is unacceptable, even if it has dried up and cannot be removed after a slight impact.
Apply a block to its innermost edge and hit it to avoid breaking the part. Make sure that the bolts securing the part to the axle shaft are unscrewed and only then begin to remove.
Replacing the drive, oil seal and bearing
The need to replace the axle shaft and its components may be caused by increased extraneous noise in the rear axle, wear of both the spline joint, and fatigue failure of the support bearings.
Deformation of the sealing gland also often occurs. As a result, the transmission oil level decreases, which can lead to failure of the entire system. Regular inspection and diagnostics of the rear axle will help you avoid complex, expensive repairs in the future.
To replace rear drive parts, you will need the following tools and materials:
- box and socket wrenches in a set;
- flat screwdriver;
- wheel wrench;
- hammer;
- Bulgarian;
- blowtorch or gas torch;
- chisel;
- bench vise;
- jack;
- additional wooden support;
- a mandrel equal to the diameter of the axle shaft seal;
- reverse hammer.
The process of disassembling and replacing the axle shaft:
- Place the car on a lift or on an overpass. Work should be carried out with the handbrake turned off.
- Remove the rear wheels by unscrewing the mounting nuts. Replacement
- The rear brake drum is attached to the hub with 2 bolts. To remove, use a 12mm wrench and a hammer (preferably with a plastic striking part) to tap the casing around the perimeter.
- After removal, it is necessary to clean its inner surface with a metal brush and remove the outer shoulder using a grinding wheel and a grinder. This will provide you with faster and easier assembly of the brake mechanism in reverse order.
- To avoid having to reassemble the rear brake mechanism, tie it together with a binding wire or rope to the rear spring.
- Unscrew the 4 mounting nuts from the support bearing plate bolts.
- To prevent the rear axle from lowering, support it with a block of timber or fix it on a jack. Place a wide container on the floor to collect leaking transmission oil.
- Remove the shock absorber bracket.
- Using sharp movements, pull the axle shaft out of its seat using a reverse hammer.
Oil seal replacement process:
- Remove the rubber plug from the bridge flange.
- Using pliers with a slotted screwdriver, carefully remove the old seal. Be careful not to leave marks on the oil seal seat mirror in the rear axle housing. Otherwise, the transmission will regularly leak through risks in the metal.
- Before installing a new oil seal, its outer seat must be lightly lubricated with WD-40 or axle oil. For pressing, use an old oil seal or a mandrel of suitable diameter and a hammer. When installing, ensure that the seal housing is aligned evenly and coaxially with respect to the axis.
Reasons for accelerated wear
The oil seal is a rubber lining that works when the car is moving. Accelerated wear of a part is observed when :
- adding aggressive additives to transmission oil;
- improper tightening of the nut that secures the cardan flange - with play or increased friction, the process of oil seal wear accelerates;
- clogged gearbox breather - air pressure leads to oil entering the cuff, which provokes the cracking of the internal stiffener.
- using an insufficient amount of lubricant of poor quality - this leads to overheating of the gearbox;
- chemical reagents from the road getting into the oil seal rubber.
in the form of a piece of a retaining ring, a splinter of a gear tooth, or sand gets into the space between the shaft and the oil seal
Installing a New Seal
After removing the axle shaft, the metal shield where the brake pads are attached will remain hanging on the copper pipe with the fluid, so it should be fixed by inserting the 2 upper bolts back into the holes. Then follow the instructions:
- Remove the thick rubber gasket from the rear axle flange.
- Pull out the old oil seal by prying it with a screwdriver or pliers. Clean the seat and wipe with a rag.
- Lightly lubricate the new seal with transmission oil and insert it into the socket of the Niva rear axle as evenly as possible.
- Using a round pipe adapter, press the oil seal into the socket with light blows of a hammer. You can use an old seal as an additional attachment.
At the end of the procedure, you must thoroughly wipe all parts free of oil - the brake cylinder, pads, drum and metal shield. Before reassembling, it would be a good idea to check the axle bearing for wear and grease. Wear is indicated by difficulty turning, binding, or slight noise. If you discover a malfunction, take the axle shaft to the nearest car service center; you will not be able to replace the bearing without special equipment.
To check the grease inside the bearing, you need to pry the plastic covering the rollers with an awl and remove it. Then add thick Litol-type lubricant inside and put the plastic in place, and then begin assembly.
At the end, it is important to check the oil level in the rear axle gearbox of the Chevrolet Niva. The test is carried out on a fully assembled car, standing on a level area. The filler plug is unscrewed from the gearbox housing, after which the oil level is determined visually or using a thin wooden stick. If there is a shortage, you need to insert a hose of a suitable diameter into the filler neck with a watering can at the end, where the lubricant is poured. It is more convenient to top up with an assistant: you control the level, and the assistant gradually adds oil.
Search
14.3 Removing the axle shaft and replacing the oil seal
We send and remove the rear wheel. Remove the rear brake pads (see "Replacing the rear brake pads" )
Using a "14" socket with an extension through one of the two large holes in the axle flange, loosen the four bolts securing the plate axle and brake shield to the rear axle beam flange.
Remove the bolts along with spring washers.
Hold the brake shield so that it does not hang on the brake cylinder tube and lower it slightly.
. and use a Phillips screwdriver to remove the two screws that secure the brake shield to the axle (on the back of the shield).
If these screws cannot be removed, see Method Two. remove the axle shaft (bottom).
To prevent the brake shield from hanging on the brake line, we pass an M8 bolt through one of its top mounting holes and insert it into the corresponding hole on the beam flange.
Rotate the axle plate.
. We screw two bolts M 12×1.25 with a length of two threaded parts of more than 80 mm into the diametrically located holes of the wheel mounting in accordance with the complete program in the brake shield next to the holes on the beam flange.
Replacing Chevrolet Niva on axle shafts, replaceable pads (rear)
After.
Turn the bolts one by one.
Replacing the cuff on the rear axle gearbox of a VAZ 2107.
. Press and remove the shaft axle.
It is possible to dismantle the axle shaft using the wheel as a shock absorber. Screw two bolts 100-150 mm long into the hub holes, passing them through the wheel holes.
. and, holding the wheel, pulls and pulls the shaft axis.
If it is not possible to remove the two screws that secure the brake shield to the axle plate, then the axle must be removed along with the brake shield. To do this, disconnect the brake pipe from the rear wheel cylinder (see Replacing the rear wheel cylinder ) and attach the rear end of the parking brake cable branch to the brake flap (see “Adjusting and removing parking brake system components” ) Use the wheel as a shock absorber.
. we move and remove the axle shaft along with the brake shield.
Look: Izh-2126 has half the length of different lengths (shorter on the right).
Lubricate the gland with a spatula.
Using the appropriate section of the pipe, press the new seal.
In case of deformation of the axle shaft, wear of its grooves and, of course, wear of the bearing, we replace the axle shaft with a new one with a bearing and a retaining ring (it is not recommended to replace a bearing with a different retaining ring).
Source
Post Views: 10