On Chevrolet Niva SUVs, all-wheel drive of the rear wheels is implemented by using a rear axle in the transmission design. Axle shafts are installed in it, which drive the wheels through splined joints.
To ensure fixation and smooth axial rotation, support single or double row bearings are installed in the drive design.
Device
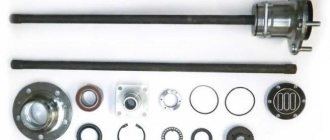
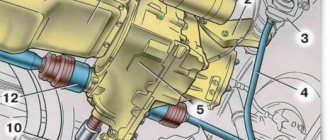
Structurally, the rear axle axle shafts are identical and interchangeable. In Figure 1 you can see that the axle shaft number 22 engages internally through the splined hole of the semi-axial gear; a single row ball bearing 8 is pressed onto the outer part of the shaft.
The axle bearing on a Chevrolet Niva is pressed into the beam seating belt from the inside by a self-clamping reversible oil seal 11, and from the outside by a rubber ring.
Useful video
Detailed video instructions for replacing the rear axle gear seal of a Niva Chevrolet:
The rear axle gear oil seal on a Chevrolet Niva requires replacement if it is found to have an oil leak. Before changing, you should check how the gearbox breather itself works, since if there is excessive pressure in it, oil will be driven through the working oil seal. You should also check how much oil is leaking, just move the breather cap itself in different directions. In addition, check how much oil is in the rear axle; if it is not enough, then add it. The plug that closes the fill hole must be crimped.
Basic parameters of factory parts for repair
Main technical indicators of the unit: diameter and length of the axle, number and length of the spline belt, type of bearings and sealing seals. These indicators are determined by the design features of the system and the calculated traction forces under comparable operating conditions at the time of design and production.
Often, under the influence of large loads, deformation of the axle shafts occurs, premature wear and jamming of the support ball bearings occurs, deformation and fatigue wear of the sealing seals, followed by leakage of transmission oil from the axle.
Factories producing spare parts for the domestic automotive industry are constantly striving to improve manufactured vehicle components and assemblies. They regularly offer consumers a newer, more reliable, more modern product.
Let's consider the technical parameters of the drive elements of the rear axle of an SUV.
Half shaft
Main characteristics:
- Catalog number: 21230-2403069-00, 21230240306900, 2123-2403069.
- Length: 760 mm.
- Diameter for oil seal: 35 mm
- Weight: 8.4 kg.
- Manufacturer: AvtoVAZ
- Average market prices: 6900 rubles.
Existing analogues:
- axle shaft, standard size for VAZ 2121 Chevrolet Niva, average price 3,400 rubles;
- Russian, the average price is 3900 rubles.
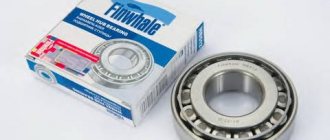
Rolling ball bearings
- Catalog number: 2121-2403080. Designation - GPZ - V76-180508AK2US9.
- Manufacturing index: 180508, 62208-2RS
- Manufacturer: AVTOVAZ
- Average market prices: 400 rubles;
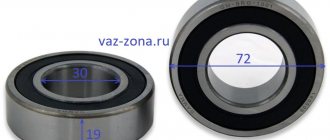
- Inner diameter - 40 mm;
- Outer diameter - 80 mm;
- Width - 23 mm;
- Weight - 440g;
- Rated rotation speed - 5600 rpm.
Foreign bearing manufacturers - NSK, SKF, SNR. Average price from 600 rubles.
Oil seals
- Catalog number: 21100-2301034-00-0 - left and 21100-2301035-00-0 - right.
- Overall dimensions: 35x57x9 mm.
- Manufacturer: AVTOVAZ.
- Average market prices: 45-60 rubles.
Existing alternatives:
- CV joint drive oil seal 2110.08 “RT” universal, manufacturer RUZINOTEHNIKA;
- axle drive seal VAZ-2110-2112, 2123 right/left (35x57x9), manufacturer General Motors.
It is also worth noting the German manufacturer Corteco. This company produces a wide range of oil seals for the VAZ-2123.
Ready-made repair kits
On the spare parts market you can also purchase a ready-made repair kit for servicing the rear axle shafts of the VAZ-2123.
The repair kit for the rear axle shaft of the VAZ 2123 Chevy Niva from ESPRA consists of bearing 2121-2403080, sealing oil seal 2110-2301034 and locking ring 2123-2403084. The average price of such a set is 690 - 890 rubles.
Interesting! Some Niva owners prefer to purchase ready-made kits from one manufacturer, considering this to be a kind of guarantee of the compatibility of the parts being replaced.
Replacing the rear axle axle seal on a Chevrolet Niva. A little easier than it seems
Sometimes, it may be necessary to replace the rear axle axle oil seal on a Chevrolet Niva. Such work may be required at any time. Unfortunately, this model has its own problems. Rear axle oil seal leakage is one of these problems. In itself, such a replacement is not difficult. This does not require any special skills. Even a novice driver can cope with such work. Timely replacement will avoid problems with the differential and other axle parts. Therefore, repairs should not be put on the back burner. For greater safety, you should regularly monitor the condition of this element of the car. Replacement of the rear axle axle seal on a Chevrolet Niva is carried out when transmission fluid is visible leaking from the axle. To do this, after parking, pay attention to the condition of the car’s drums. If there are problems with the seals, small leaks will be noticeable on the wheels. If it is not brake fluid, then most likely the problem is in the oil seal and should be replaced. A transmission fluid leak will cause serious problems with axle components.
Content
- Replacing the oil seal
- Useful tips
- Conclusion
Replacing the oil seal
To carry out the work you will need a regular set of tools. The only special tool you will need is a puller for the axle shaft, but if you don’t have one, you can do without it.
Before carrying out work, ensure that the machine is as motionless as possible. To do this, wheel chocks are installed under the front wheels. First gear is engaged. The work is carried out in the following order:
- The wheel fastening becomes loose. The car is raised on a jack. The wheel is completely removed. Supports are placed under the thresholds in case of problems with the jack; ordinary blocks or several wheels folded in a stack will do;
Useful tips
Many drivers combine oil seal replacement and transmission oil change. If you decide to do the same, then it makes sense to find out what type of lubricant is used in your case. It is not recommended to mix different types of oils. This will lead to performance problems. If it is necessary to change the type of lubricant, it is recommended to first flush the system.
When removing the axle shaft, oil will begin to flow out. Therefore, it is better to drain it in advance. If you do not want to change the lubricant, then you need to take measures against its leakage. To do this, simply raise the side of the car from which you are changing the oil seal higher. This way you will avoid lubricant leakage. But, in any case, there is a risk of lubricant leakage. Be sure to add a new portion of oil after all work has been completed.
When reinstalling the brake drum, pay attention to its condition. Often there is a development along the shoulder. It should be removed using a regular file. This simple action will significantly improve braking.
In some cases, oil seal wear can be caused by a bent axle shaft. In this case, knocking noises will be heard when moving, and the oil seal will be worn out on only one side. In many cases, you can even visually determine the damage. Such a defect can only be corrected in a workshop on a special stand. If this is not possible, then you will have to buy a new part.
Conclusion
The rear axle on this model is quite weak. Problems with it arise quite often. That is why, replacing the rear axle axle seal on a Chevrolet Niva is familiar to almost all owners of this car. This work is not difficult. If you have even average repair skills, you will only need half an hour on one side. The most important thing is to do the work carefully. It is especially important to ensure that dirt does not get inside the bridge. Even the smallest particle of sand can cause problems with the operation of this part of the machine.
Enhanced modifications
Why are reinforced collapsible axle shafts of the unloaded type better than standard ones:
- The double-row bearing from the Priora front hub can withstand much greater loads and is more durable.
- Alloy steel that has undergone special heat treatment is used in the manufacture of the shaft, due to this it has more torsional strength (steel 35KhGSA and heat treatment hardness 55-56). Manufacturers of reinforced axle shafts are able to increase the torsion limit using stronger materials from the required standard 250 to 350 kg.
- The design of the unit with 24 splines reduces the likelihood of failure of the most dangerous part of the connection;
- Removable hub design;
- Self-locking hub nut;
- Does not require mandatory reinforcement of the rear axle;
- Does not exceed the weight of a standard axle shaft;
- Allows the use of larger diameter wheels;
- This part is completely interchangeable with the standard factory modification.
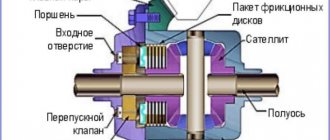
Automatic differential lock V-AX-BL-2234 9900 RUR
Automatic 100% locking Block in the NIVA axle 22 slots 34mm
Blocka ™ is a 100% differential lock for Niva and Chevrolet Niva, the activation mechanism of which is simple and reliable, which is a common feature of the Lockwright (Locka) family of locks.
Peculiarities
The lock is equipped with a satellite axle of our production, which is manufactured in strict accordance with the dimensions of the holes in the differential housing of VAZ LADA 4×4 and Chevrolet Niva cars
Thanks to this, the pinion axis is securely fixed in the differential housing and does not cause wear of the spacer couplings, which ensures correct operation of the Blokkit and increases its service life.
Equipment
The Niva Blokkatm differential lock kit includes:
- Semi-axial coupling - 2 pcs.
- Distance ring - 2 pcs.
- Spacer coupling - 2 pcs.
- Pins - 4 pcs.
- Small springs - 4 pcs.
- Large springs - 4 pcs.
- Axle of satellites produced by IZH-TECHNO - 1 pc. (*equipped with axle from June 2021)
Applicability
The lock is intended for VAZ Niva 2121, Niva 21213, 2123, 21214M cars, as well as Chevrolet Niva. Can be installed in front and rear axles.
Can be installed in front and rear axles. We recommend installing it in the front axle only when using the car for sports purposes.
How to choose Blokka TM for your car:
If your car:
- Niva 2121, Niva 21213 until 2004 - neither the gearbox nor the differential box was changed - you can safely buy a Block TM with 22 splines with a mounting diameter of the axle coupling of 34 mm.
- Niva 21213, 2123,21213M - year of manufacture from 2004 to this day - we suggest you purchase a Blokka TM for the rear axle with 22 splines, the landing diameter of the axle coupling is 36 mm.
- TM block with 24 splines - can be installed in the rear axle (original axle shafts, unloaded axle shafts) or front axle (if there were internal drives with 22 splines, they must be replaced with 24 splines).
If you can’t decide which Blokka TM you need, we recommend purchasing a Blokka TM with 22 splines, the landing diameter of the semi-axial coupling is 36 mm. If during installation it turns out that your differential housing has a landing diameter of the ring gear of 34 mm, then you need to purchase 2101-2403018-10 Differential Housing 2101 from VAZ OJSC (the differential box bearing is marked 6-7707U).
If you want to switch to components from VAZ 2123, then purchase - 2123-2303018-00 Differential housing 2123 from VAZ OJSC and two differential box bearings marked 2007807.
Source: https://4x4max.ru/transmission/4250/24167
Replacing the drive, oil seal and bearing
The need to replace the axle shaft and its components may be caused by increased extraneous noise in the rear axle, wear of both the spline joint, and fatigue failure of the support bearings.
Deformation of the sealing gland also often occurs. As a result, the transmission oil level decreases, which can lead to failure of the entire system. Regular inspection and diagnostics of the rear axle will help you avoid complex, expensive repairs in the future.
To replace rear drive parts, you will need the following tools and materials:
- box and socket wrenches in a set;
- flat screwdriver;
- wheel wrench;
- hammer;
- Bulgarian;
- blowtorch or gas torch;
- chisel;
- bench vise;
- jack;
- additional wooden support;
- a mandrel equal to the diameter of the axle shaft seal;
- reverse hammer.
The process of disassembling and replacing the axle shaft:
- Place the car on a lift or on an overpass. Work should be carried out with the handbrake turned off.
- Remove the rear wheels by unscrewing the mounting nuts. Replacement
- The rear brake drum is attached to the hub with 2 bolts. To remove, use a 12mm wrench and a hammer (preferably with a plastic striking part) to tap the casing around the perimeter.
- After removal, it is necessary to clean its inner surface with a metal brush and remove the outer shoulder using a grinding wheel and a grinder. This will provide you with faster and easier assembly of the brake mechanism in reverse order.
- To avoid having to reassemble the rear brake mechanism, tie it together with a binding wire or rope to the rear spring.
- Unscrew the 4 mounting nuts from the support bearing plate bolts.
- To prevent the rear axle from lowering, support it with a block of timber or fix it on a jack. Place a wide container on the floor to collect leaking transmission oil.
- Remove the shock absorber bracket.
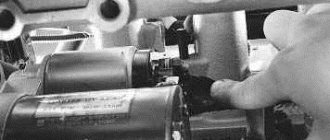
- Using sharp movements, pull the axle shaft out of its seat using a reverse hammer.
Oil seal replacement process:
- Remove the rubber plug from the bridge flange.
- Using pliers with a slotted screwdriver, carefully remove the old seal. Be careful not to leave marks on the oil seal seat mirror in the rear axle housing. Otherwise, the transmission will regularly leak through risks in the metal.
- Before installing a new oil seal, its outer seat must be lightly lubricated with WD-40 or axle oil. For pressing, use an old oil seal or a mandrel of suitable diameter and a hammer. When installing, ensure that the seal housing is aligned evenly and coaxially with respect to the axis.
Installing a New Seal
After removing the axle shaft, the metal shield where the brake pads are attached will remain hanging on the copper pipe with the fluid, so it should be fixed by inserting the 2 upper bolts back into the holes. Then follow the instructions:
- Remove the thick rubber gasket from the rear axle flange.
- Pull out the old oil seal by prying it with a screwdriver or pliers. Clean the seat and wipe with a rag.
- Lightly lubricate the new seal with transmission oil and insert it into the socket of the Niva rear axle as evenly as possible.
- Using a round pipe adapter, press the oil seal into the socket with light blows of a hammer. You can use an old seal as an additional attachment.
At the end of the procedure, you must thoroughly wipe all parts free of oil - the brake cylinder, pads, drum and metal shield. Before reassembling, it would be a good idea to check the axle bearing for wear and grease. Wear is indicated by difficulty turning, binding, or slight noise. If you discover a malfunction, take the axle shaft to the nearest car service center; you will not be able to replace the bearing without special equipment.
To check the grease inside the bearing, you need to pry the plastic covering the rollers with an awl and remove it. Then add thick Litol-type lubricant inside and put the plastic in place, and then begin assembly.
At the end, it is important to check the oil level in the rear axle gearbox of the Chevrolet Niva. The test is carried out on a fully assembled car, standing on a level area. The filler plug is unscrewed from the gearbox housing, after which the oil level is determined visually or using a thin wooden stick.
Read news about the new Niva
- Dismantling and assembling the gearbox Niva 2121, Niva 2131
- Replacing the drive gear oil seal of the front axle VAZ 2121 Niva 2131
- Removal and installation of transfer case seals Niva 2121, Niva 2131
- Niva Chevrolet front hub repair
- Niva car steering gear
- Best mud and all-season tires: ranking for 2021
- Heater taps VAZ 21214 - buy in Balashikha at a bargain price
- Chevrolet Niva temperature sensor: where is it located, replacement
Also interesting: Suspension lift in the field yourself
Reasons for accelerated wear
The service life of the part is greatly reduced in the following cases:
- The gearbox breather is clogged. Under air pressure, oil is squeezed out through the cuff, breaking the internal stiffener.
- The universal joint flange nut is not tightened correctly. Backlash or increased friction leads to rapid wear of the oil seal.
- The transmission oil contains aggressive additives.
- The rubber of the cuff was exposed to chemicals from the road surface.
- The gearbox overheats due to poor quality or lack of lubrication.
The oil seal can also be damaged if a hard object gets between it and the shaft. It could be a splintered gear tooth, a piece of a retaining ring, or simply sand that accidentally got into the oil.
Preparatory activities
Before proceeding with the replacement, the owner of a Niva Chevrolet car needs to prepare a number of tools. In the process you will need:
- box and socket wrenches in a set;
- flat screwdriver;
- wheel wrench;
- hammer;
- jack;
- additional wooden support;
- a piece of pipe equal to the diameter of the gland.
Be sure to wear work gloves - they will not only keep your hands clean, but also protect your fingers from injury.
The stand will need to be such that after removing the wheel and dismantling the shock absorber, the rear axle remains at approximately the same height. Otherwise, you risk losing too much transmission oil.
This is interesting: Replacing the Chevrolet Niva water pump