Pull up the handbrake
But if you really know how to tighten the handbrake on a Lada Granta standard, this procedure will not take you much time and effort. The only thing that is required for its implementation is a jack or an inspection hole, because access to adjustable components and assemblies occurs from below and you will have to work under the car. To tighten (adjust) the handbrake you will need 3 tools:
- two open-end wrenches for 13, one of them is preferably a socket one;
- one key head for 8;
- a faithful assistant (although in desperate situations you can get by alone).
The process of directly adjusting the manual braking system of a Lada Granta car is carried out in nine main stages:
- We lower the handbrake lever inside the car.
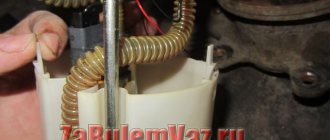
- We climb under the car, unscrew the rubber cushions (brackets) from the resonator, and remove the muffler from its attachment to the body.
- We remove the protective screen of the parking brake adjustment mechanism. To do this, use a socket wrench to unscrew the 4 nuts from the fastening bolts.
- We remove the protective screen or move it to the side behind the muffler - in this case, the necessary space for work is also quite enough. In this case, the muffler can be pulled back with something, for example, by pushing a block of wood under it.
- We take two 13mm wrenches - the first one is to slightly loosen the locknut, holding the adjusting nut. Then vice versa - hold it, and secondly turn (also loosening) the adjusting nut.
- Actually, we adjust the hand brake as follows: tighten the handbrake cable, for which we tighten the adjusting nut (move the key clockwise).
- Next, you should check the travel of the handbrake lever - this is why you need a partner, or you will have to do it yourself. The lock nut can be tightened when the handbrake stroke is 2-4 clicks (see above).
- Then we test the operation of the parking brake mechanism as a whole. To do this, lift the rear wheels and check how freely they rotate when the handbrake is lowered and how completely they lock when fully raised (in this case they should not rotate at all!).
- If the handbrake is working properly, tighten the locknut and replace the protective screen and muffler. The handbrake adjustment is complete!
As the mileage and life of the vehicle increases, the handbrake becomes less and less adjustable. It happens that even after adjustment, the manual braking system does not work properly and does not “hold” the car. This indicates that the wear on the brake pads is too high or the cable stretch is irreversible.
Procedure
Pulling the handbrake on a VAZ 2114. diagram and video
As practice shows, repairing the parking brake comes down to replacing the handbrake cable, but in most cases, the operation of the unit can be restored with the help of a tensioner. If you follow clear instructions, then no problems with adjustment should arise.
Tools
To adjust the handbrake, you need to prepare the following tools:
- flat screwdriver;
- a set of keys, including a cylinder key;
- wrench with nozzle 18;
- wheel chock or other wheel supports;
- jack;
- work gloves.
Minimum required set of tools
To adjust the cable, it is advisable to use a telescopic jack to raise the car to a greater height. But if this is not the case, then a different type of jack will do, for example, a rack and pinion jack. After all the tools are prepared, you can begin to work.
Instructions
There are several requirements that must be met before making adjustments. First of all, the brake system must be fully operational and free of air. The driver must also make sure that all holders, cables and the lever itself are in good condition. Now you can get started. Below are step-by-step instructions that allow you to make adjustments in the shortest possible period of time.
Adjusting the Grant's handbrake
Adjusting the parking brake of a VAZ 2190 is no more difficult than on a classic or “chisels”. Let's look at the step-by-step principle, starting with inventory.
Necessary tool for tightening the handbrake
What you will need for work:
- Inspection pit, overpass, lift;
- Keys: open-end and ratchet with long head 13;
- Socket wrench or ratchet with a 10mm head;
- Possibly WD-40.
It is better to do all the work with a partner, who will check how far the lever rises from the inside of the car. Otherwise, after each tightening of the cables, you will have to climb into the cabin yourself.
The lift will make it much easier to adjust the parking brake.
Parking brake adjustment principle
So, the car is on a pit/lift, the tool is in your hands - the handbrake is loose. What to do?
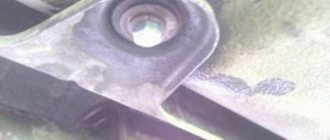
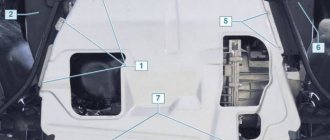
Step 1: find a resonator under the bottom. We remove its mount, located closer to the front of the car. Then, using a socket wrench or a ratchet with a 10mm socket, unscrew the 4 bolts securing the heat shield.
If the bolts are rusty, you can pour WD-40 on them and try to unscrew them. If the studs still don’t work and break, you need to be prepared to replace them. Otherwise, the screen cannot be put back.
This way we get the opportunity to move the screen forward without removing it. Underneath there is access to the parking brake adjustment mechanism.
Step 2: slide the screen forward to access cable adjustment.
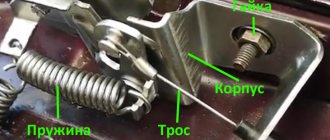
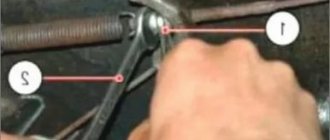
Remove the cushion mount 1, unscrew the bolts 2. Move the screen 3.
Step 3: holding the adjusting nut (open-end wrench size 13), loosen the lock nut (head size 13).
Step 4: Rotate the adjusting nut clockwise to tighten the cables. Periodically check from the inside how the handbrake is holding.
We do not remove the locknut! Just weaken it.
As soon as the parking brake lever reaches 3-4 clicks, tighten the locknut.
1-lock nut. 2-adjusting nut. For convenience, you can loosen the locknut and rotate them both clockwise with a long head of 13.
Step 5: return the heat shield to its place, fix the fastening screws and the rubber suspension of the resonator.
Checking work:
- the rear axle is suspended, the parking brake is removed - the rear wheels rotate freely;
- the rear axle is suspended, the brake lever is raised (to maximum tension - 3-4 clicks) - the rear wheels do not rotate even with force.
Removing elements of the parking brake system
We replace the parking brake cables when they are broken, pulled out, or stuck inside the sheaths, when adjusting the parking brake fails to keep the car stationary on a slope - up to 23% inclusive.
We remove the parking brake lever to replace it or to replace the lever rod. The cables should be replaced simultaneously - left and right. We carry out the work on an inspection ditch or overpass. We show the replacement of the left cable. The right cable is removed in the same way, but it is not necessary to remove the fuel tank heat shield. We unscrew the locknut and the adjusting nut from the parking brake lever rod (see “Adjusting the parking brake”). Remove the cable equalizer from the parking brake lever rod.
We take out the front ends of the cables from the equalizer and remove it.
Remove the end of the left cable sheath from the bracket. Disconnect the rear end of the left cable from the parking brake drive lever (see “Replacing the rear wheel brake pads”).
We remove the cable tip from the hole in the brake shield.
Using a 10mm wrench, unscrew the nut... ...and remove the bracket securing the cable sheath to the rear suspension beam.
We remove the cable sheath from the holder on the rear suspension beam mounting bracket.
Using a screwdriver, bend the cable mounting bracket on the body... ...and remove the cable from the bracket. Remove the heat shield of the fuel tank (see “Removing the fuel tank”).
Remove the cable from the holder on the body.
We remove the left parking brake cable from behind the protective screen of the fuel lines. We install the cables in the following order. We mount one of the cables in the reverse order and insert its front end into the cable equalizer.
We insert the parking brake lever rod into the hole in the equalizer and tighten the adjusting nut several turns. To install another cable, we recommend making a device from a metal tube about 300 mm long and a hole with a diameter of 15–16 mm. At one end of the tube we drill a hole and cut a thread in it for a screw (M4–M6).
Device for installing cable. We secure the cable in the holders on the body and the rear suspension beam mounting bracket.
We put the tube on the rear end of the cable and fix the cable sheath on the end with a screw.
Using a rod (you can use a wrench from a set of socket heads) we press on the tip of the cable, compressing its spring. In this case, the front end of the cable will come out of the sheath and can be inserted into the equalizer. We carry out further installation of the cable in the reverse order. After replacing the cables, we adjust the parking brake. To remove the parking brake lever, unscrew the locknut and the adjusting nut from the parking brake lever rod (see “Adjusting the parking brake”). Remove the cable equalizer from the parking brake lever rod (see above). Inside the car...
... use a Phillips screwdriver to unscrew the three screws...
...and remove the parking brake lever trim.
Disconnect the wiring harness from the parking brake warning switch.
Use a Phillips screwdriver to unscrew the self-tapping screw...
...and remove the switch.
Using a 13mm socket, unscrew the two bolts securing the parking brake lever bracket to the floor tunnel.
Remove the parking brake warning switch bracket.
Remove the parking brake lever with bracket and rod assembly, pulling the rod through the rubber sealing boot.
Use a screwdriver to pry up the fixing bracket of the thrust axis... ...and remove it.
Remove the axle and rod from the parking brake lever. Install the parking brake lever in reverse order. Adjusting the parking brake (see “Adjusting the parking brake”)
A necessary tool for tightening the handbrake.
- Two keys for 13. It is advisable that one of them be a socket.
- Head 8.
- A partner, but you can do without him. The truth is it’s more difficult without him.
The principle of adjusting the handbrake
- Fully lower the handbrake lever in the cabin.
- Place the car on a pit or lift it on a lift. Some car owners manage to adjust the handbrake “from the curb” - but this is inconvenient and dangerous.
- Find the resonator from the bottom of the car and remove it from the rubber brackets.
- Using a ratchet, unscrew the 4 bolts securing the protection of the handbrake adjustment mechanism (protective screen).
- Next, you can either remove the protective screen, but it seems to me that it is easier to move it forward behind the muffler, which will free up space that is enough for free work.
- Loosen the first nut with a 13mm wrench.
- By tightening the adjusting nut, tighten the handbrake cable that comes out of the passenger compartment.
- Ask a partner to check the stroke of the lever handle, or check it yourself.
- As soon as the handbrake moves 3-4 clicks, tighten the lock nut.
- Before the final stage of work, it is necessary to check the functionality of the brake mechanism. To do this, hang the rear wheels and watch how they rotate with the hand brake off. They also check how the wheels grip when the handbrake is raised.
- Next, return the protective screen to its place, screw it onto the seats and put rubber fasteners on the resonator.
How to change it yourself
Let's look at the process of replacing the handbrake cable on a car with rear drum brakes using the Daewoo Matiz as an example.
- Remove the center console.
- Loosen the left and right cable loop locknuts.
- Remove the thrust bracket, and then remove the cable from the grooves of the bracket.
- Next, you need to remove the cable from the roller groove. For convenience, you can sacrifice the integrity of the floor carpet - cut it at the location of the roller mechanism. It is also advisable to unscrew the handbrake lever bracket from the body.
- The roller has a movable connection on a sleeve, which is fixed with a stopper. To release the cable, the stopper will need to be removed.
The peculiarity of the Daewoo Matiz parking brake is that the contours of the cable pass above the niche of the fuel tank. To access the brackets, it is enough to lower the tank by about 15-20 cm and move it slightly towards the rear of the car. When lowering this way, there is no need to disconnect the power supply connector for the fuel section elements or disconnect the hoses.
- Unscrew the fuel tank mounting bolts, first placing a stop under the tank.
- Unscrew the 4 handbrake cable brackets.
- Pull the cable out of the technological hole in the body, keeping the sealing plug intact.
- Remove the rear wheels.
- Remove the boots and unscrew the hub nuts on both sides. After this, remove the drums, holding the wheel bearings with your thumb.
For most cars, this advice is irrelevant, since the wheel bearing is not connected to the drum in any way. For more information on how to remove a stuck drum, read the article “How to make it easier to replace brake drums.”
- Remove the handbrake cable from the brackets.
- Pull out the bracket securing the cable housing at the entrance to the brake shield.
- Release the cable ends from engagement with the brake shoe manual drive lever.
- Pull out the old parking brake cable.
Installing a new cable
- Guide the middle part of the cable into the car interior.
- Lay the handbrake cable along the bottom of the car, securely fixing it in the mounting brackets.
- Insert the cable into the brake shield and install a locking stopper in the special groove.
- Hook the end of the cable into the notch on the brake shoe manual drive lever.
- Install the sealing collar of the technological hole.
- Screw on the fuel tank.
- Install the brake drums.
- Fix the middle part of the parking brake cable in the groove of the roller and assemble the adjusting mechanism and parking brake lever in the reverse order of removal.
Using the adjusting nut, tighten the handbrake cable. Since we have examined the process of adjusting the hand brake mechanism and selecting the degree of cable tension in detail, we will not repeat it.
We recommend watching a video of replacing the handbrake cable on a Daewoo Matiz, VAZ 2110, Opel Astra F, as well as a Ford Focus, which is equipped with rear disc brakes. The videos will help you understand how to replace the handbrake cable on typical types of parking brake designs.
General questions about the parking brake on Grant
Let's look at a few basic questions about VAZ 2190 brakes.
Operating principle of the Granta handbrake
When raising the handbrake lever in the passenger compartment:
- the drive brake cable is tensioned;
- through the equalizer he pulls the cables going to the rear brake pads;
- The pads are pressed against the brake drums through expansion bars, stopping the wheel from moving;
- When the tension is loosened (removed from the handbrake), the tension of the cables also weakens, and the wheels move freely.
Lever 1 pulls cables 3 through cable 2. Those, through levers 4 and strips 5, push the brake pads apart.
Why is it necessary to tighten the parking brake?
If the cable tension is loosened, there is a danger of the vehicle rolling away.
The Granta mechanical handbrake has a conventional device without self-adjustment. The same instructions apply to Lada Kalina, Priora.
This means that as the rear pads wear out, the original parking brake setting will lose effectiveness.
Types of construction
Replacing the parking brake cable does not require major intervention in the rear drum or disc brakes. You don't even need to remove the rear brake pads to replace them. The nature of the work primarily depends on whether your car has rear disc or drum brakes, so we will consider the replacement process on both design options.
On most cars, the new handbrake cable is attached to an adjustment mechanism in the passenger compartment, while in some designs the replacement is made entirely from under the bottom of the car.
Reasons for replacement
- Break. Most often, the cause of a break is poor fasteners, as a result of which the cable hangs from under the bottom and can be torn out. A less common reason is fixation in brackets without a protective sleeve. In the latter case, vibration and the movement of the cable when the handbrake is raised lead to rubbing of the insulation and the cable itself on the metal bracket. If the cause of the break is not eliminated, the new parking brake cable will soon suffer the same fate.
- Souring. Moisture and dirt can get inside the rubber ring. If in this case you rarely or not use the handbrake at all, corrosion will block the cable inside the insulation (sometimes this happens with only one circuit).
- The handbrake doesn't hold, but the adjustment range is no longer enough to restore the system's functionality. This happens if you frequently apply the handbrake while driving or leave the car for a long time with the handbrake activated, even if the car is not parked on a slope.
The cable rarely stretches, so if you decide to replace it due to poor operation of the handbrake, first of all we recommend that you familiarize yourself with the process of adjusting the parking brake.
How to deal with stuck-on elements
Unscrewing stuck nuts and removing soured drums is the main problem when replacing the parking brake cable yourself. How can you reduce the number of broken bolts and twisted threaded connections?
- Thoroughly clean bolts, nuts, studs with a wire brush to remove corrosion and dirt.
- Before unscrewing, apply several blows to the bolt head and nut. If access to the element allows, blows should be applied perpendicular to the axis of twist. Under no circumstances should you hit exposed threads!
- After tapping, fill the fasteners with penetrating lubricant. If you don't have liquid wrenches like WD-40 on hand, you can use brake fluid. By tapping the bolts and nuts and creating microcracks in the areas where they stick, you loosen the joint and open up access for the lubricant to penetrate inside. Penetrating lubricants need at least 20-30 minutes to work, but if you are not in a hurry to replace, then it is better to leave the wetted parts for 40-60 minutes before attempting to unscrew.
- Unscrew the bolts in several stages. Even if the bolt gives in, alternate unscrewing with tightening and using liquid wrenches.
Checking the operation of the hand brake
There are two ways to find out if the parking brake system on the Lada Granta is in order. They work separately: if at least one type of test shows something wrong, the handbrake needs adjustment. So:
- Stop the car on an uphill or downhill slope of about 23-25 degrees, then put the handbrake in the raised position and turn off all gears. The car must stand still and not roll down. If this happens, the handbrake is working properly and you are in no danger. Otherwise, the handbrake on your car needs adjustment.
- The travel of the hand braking system lever is checked. If the ratchet mechanism clicks 2-4 times before being completely moved to the parking position, there is no need to worry, the handbrake is working properly.
There are only two reasons why the handbrake on a Lada Granta may malfunction and fail:
- brake pad wear;
- stretching the cable.
This is not least due to the fact that the manual braking system on a budget liftback from the giant of the Russian automotive industry is designed quite simply and consists of only three components:
- the handbrake control lever itself, equipped with a rod and a pair of nuts - one lock nut and one adjusting nut;
- cable equalizer and spacers with a brake pad drive lever;
- the right and left cables of the pad drive mechanism on both rear wheels - on the right and left, respectively.
How to tighten up
So, your handbrake is not holding. Therefore, you need to either change or tighten its cable. Anyone can cope with this without much difficulty. A sign of correct adjustment is the fact that the number of clicks of the free movement of the lever is approximately 5.
Adjusting the handbrake cable is similar everywhere and depends little on the characteristics of the car model; simply by loosening the cable, the gap is set between the linings - the rear brake pads, the brakes (if the handbrake does not hold one wheel) of the car.
To tighten the handbrake cable, follow these rules:
- Raise the car on a support or roll it into a viewing hole.
- Raise the parking brake handle 2-3 clicks.
- In the drum, loosen the locknut that secures the cable tension.
- Tighten the cable by rotating the adjusting nut.
- When adjusted correctly, a pulled handbrake should provide braking, which can be verified by trying to turn the car's disk.
At the end of the adjustment, you need to put the car on the ground and check the handbrake in action; if everything is done correctly, the car is well fixed in place, it is impossible to move it even for several men. Otherwise, the mechanism must be re-tightened.
The principle of operation of the handbrake on Grant
Why does it need to be tightened frequently?
This is the peculiarity of the mechanism, which is why you often have to tighten the handbrake. Plus low-quality spare parts from the beginning, and a design that has not changed since the time of Tsar Pea!
In foreign cars (not all of course), the rear brake mechanism (drum or disc) has self-tensioning springs, which are tightened depending on the wear of the pads.
How a properly configured handbrake should work
The handbrake movement in a Lada Granta car should be no more than 6 clicks from the moment it is raised. It is possible to increase the handbrake stroke to 8 clicks, but it is not recommended.
Ideally, of course, 3-4 clicks. With this setting of the handbrake, you will have a reserve of movement when the cable weakens and the wheels begin to grip later.
If you experience a situation where the handbrake is “pulled out” to its fullest extent, but the wheels do not grab, then the following reasons are possible:
- rear brake pads are worn out;
- the handbrake cable is broken or stretched/
How to change it yourself
Let's look at the process of replacing the handbrake cable on a car with rear drum brakes using the Daewoo Matiz as an example.
- Remove the center console.
- Loosen the left and right cable loop locknuts.
- Remove the thrust bracket, and then remove the cable from the grooves of the bracket.
- Next, you need to remove the cable from the roller groove. For convenience, you can sacrifice the integrity of the floor carpet - cut it at the location of the roller mechanism. It is also advisable to unscrew the handbrake lever bracket from the body.
- The roller has a movable connection on a sleeve, which is fixed with a stopper. To release the cable, the stopper will need to be removed.
The peculiarity of the Daewoo Matiz parking brake is that the contours of the cable pass above the niche of the fuel tank. To access the brackets, it is enough to lower the tank by about 15-20 cm and move it slightly towards the rear of the car. When lowering this way, there is no need to disconnect the power supply connector for the fuel section elements or disconnect the hoses.
- Unscrew the fuel tank mounting bolts, first placing a stop under the tank.
- Unscrew the 4 handbrake cable brackets.
- Pull the cable out of the technological hole in the body, keeping the sealing plug intact.
- Remove the rear wheels.
- Remove the boots and unscrew the hub nuts on both sides. After this, remove the drums, holding the wheel bearings with your thumb.
For most cars, this advice is irrelevant, since the wheel bearing is not connected to the drum in any way. For more information on how to remove a stuck drum, read the article “How to make it easier to replace brake drums.”
- Remove the handbrake cable from the brackets.
- Pull out the bracket securing the cable housing at the entrance to the brake shield.
- Release the cable ends from engagement with the brake shoe manual drive lever.
- Pull out the old parking brake cable.
Installing a new cable
- Guide the middle part of the cable into the car interior.
- Lay the handbrake cable along the bottom of the car, securely fixing it in the mounting brackets.
- Insert the cable into the brake shield and install a locking stopper in the special groove.
- Hook the end of the cable into the notch on the brake shoe manual drive lever.
- Install the sealing collar of the technological hole.
- Screw on the fuel tank.
- Install the brake drums.
- Fix the middle part of the parking brake cable in the groove of the roller and assemble the adjusting mechanism and parking brake lever in the reverse order of removal.
Using the adjusting nut, tighten the handbrake cable. Since we have examined the process of adjusting the hand brake mechanism and selecting the degree of cable tension in detail, we will not repeat it.
We recommend watching a video of replacing the handbrake cable on a Daewoo Matiz, VAZ 2110, Opel Astra F, as well as a Ford Focus, which is equipped with rear disc brakes. The videos will help you understand how to replace the handbrake cable on typical types of parking brake designs.
Important points
- It is best to use two people to disconnect the tip from the brake pads. One person should carefully press the brake rocker with a large screwdriver (or a thin pry bar), the second at this moment will be able to freely loosen the lock nut, after which the cable can be pulled out of the holder without risking injury to your hands.
- As soon as the cable is removed, its attachment points should be thoroughly cleaned of rust and dirt. The best way to do this is with a wire brush. Those places in the brake shield where the cable passes must be wiped with solvent.
- If too much rust has accumulated in the through passages of the cable, you should use concentrated acetic acid, as it corrodes rust well. You only need to work with it wearing gloves to avoid chemical burns.
- Before installing the brake drum, be sure to check the condition of the pads. If the spacers on the pads are very worn (and most likely this will be the case), they need to be replaced with new ones. A set of such strips can be purchased at any auto store.
When to tighten and when to change?
During operation of the machine, the steel cable gradually stretches and begins to sag. Then part of the lever stroke is used to remove this slack (the first 2-3 clicks), and only then the force is transferred to the brake pads of the rear wheels. As a result, they are weakly pressed against the surface of the discs or drums and the car does not brake reliably.
The first sign of a malfunction is that the handbrake stops working on the first two clicks of the handle and is raised by hand without any effort. In this case, it is definitely necessary to tighten the hand brake, or more precisely, the cable drive.
But the operation of the mechanism also depends on other factors:
- on the degree of wear of the brake pads;
- from the depth of excavation on the surface of the steel disk or drum.
Abrasion of the linings does not have much effect on the operation of the main system, since the stroke of the hydraulic pistons is quite large. But the effect of the mechanical “handbrake” gradually weakens. To return it to working condition, it is necessary to compensate for the wear of the elements by tensioning the drive. If the cable itself is in satisfactory condition, the extension of the tension pin will be enough to ensure the operation of the parking brake at any degree of wear on the linings.
The cable is replaced in the following situations:
- The element has stretched to such an extent that at maximum tension the pads do not grip the discs and the car rolls away on any slope.
- Due to the constant ingress of water under the cable casing, it rusted and became tightly jammed. This happens when a motorist rarely uses the handbrake.
Cable jamming also occurs in winter, when water trapped under the casing freezes inside. In this situation, do not rush to change it; first warm up the car in the garage, and then drive out the moisture using WD-40 aerosol lubricant.
Causes of malfunction and their elimination
As a rule, the reasons why the handbrake does not work are quite simple and do not require long or expensive repairs:
- torn cable. One of the common causes is a broken cable on the handbrake or under the car. The problem is solved by simply replacing the cable;
- jammed cable. Due to damage to the sheath in which the cable moves, it may become jammed, preventing you from using the handbrake. And the cable itself consists of many steel strands, which, if damaged, can also prevent proper operation. The solution is to replace the cable;
- dirty brakes. If dust, dirt, ice or reagents that are sprinkled on roads in winter get on the pads, this can cause the brakes to not work properly. The solution is to press the brake pedal several times smoothly while the car is moving. Thanks to friction, the pads will be cleaned;
- incorrect adjustment. It may happen that the cable system is not adjusted properly, the bolt is not tightened correctly, or the length of the cables is incorrectly selected. The solution is to adjust the system and correct tension of the cables;
- pad wear. The pads are subject to abrasion during operation. Every time you apply the brakes, the pads gradually become unusable. The solution is to replace the pads;
- oil in the pads. Oil or brake fluid leaks can cause the car to not hold up with the handbrake. The most important thing in this case is to identify the cause of the leak - it could be the rear axle seal or the brake cylinder. The solution is to eliminate the leak and clean the pads. If the pads are very oily, replace them.
New Lada: Stalls when the revs are reduced, when starting off when cold.