Priora support bearings are installed on the struts and are usually changed along with them. But it also happens that bearings fail much earlier - the quality of not all products is ideal. This element ensures the correct functioning of the entire suspension, as well as the rotation of the wheels. If the bearings fail, there are many inconveniences that affect the ride. Even a person who knows only superficially the design of the car can make the replacement independently.
Bearing manufacturers
You need to select spare parts before replacing the bearings on the machine. Similar products are installed on Priora and Tens. The highest quality products are produced by the following companies:
- SKF.
- KOYO.
- SNR.
The cost of products is very high - this is a fact. But their service life is longer than that of their domestic counterparts. If you want to save money, purchase domestically produced products, their cost is about 500-700 rubles per piece. It is advisable to choose spare parts from those companies that are recommended by AvtoVAZ. Remember that installing a new bearing will ensure stable operation of the suspension and will eliminate rattling in the place where the strut is attached to the body for a long time.
What to do if the support bearing on the Priora is worn out?
To complete the work, you will need to purchase a new component. You can find it in any car store.
The most expensive, but also the most reliable, are products from SKF, Koyo and SNR. They have a long service life, so replacing the support bearing on a Priora with one of these components will permanently solve the problem of rattling in the area of the front pillar when driving.
You can also choose a suitable element among offers from domestic manufacturers. The attractive low price of the support bearing for the Priora makes it affordable for many motorists.
You should purchase budget consumables from companies recommended by AvtoVAZ itself. You can consult with the craftsmen and purchase a replacement part from them.
The repair work is quite simple and takes minimal time. For Priora, replacing the support bearing can take about 3 hours. And if you carefully follow the instructions, it will not cause any difficulties. Carrying out the service in the workshop may take longer due to the busyness of the craftsmen.
The support bearing on the Priora is being replaced in a well-equipped garage. To carry out the work you will need a good lift. It is simply not possible to carry out renovations in an ordinary room. Therefore, you should select the location for the repair in advance.
What is required for replacement
In order to independently replace the support bearing of the Priora strut, you need to have a minimum set of tools on hand. You will have to completely dismantle the shock absorber strut, and this is not an easy task. But try to outline the position of all elements relative to each other - this will allow you to avoid adjusting the camber angles in the future. You need the following tool:
- Set of wrenches and socket heads.
- Screwdriver.
- Marker.
- Puller for tie rod ends.
- Puller for springs.
Having all these tools, you can start repairing. It is also advisable to have strong steel wire on hand. If you follow all the recommendations, you will complete the repair in an hour, or two at most. This is relatively little.
The price of a support bearing for a Priora is no more than 700 rubles (if you purchase domestic products). Repair at a service station will cost the same as spare parts, sometimes more. There are no difficulties in the work, then there is simply no point in overpaying.
What is this?
It is not uncommon for owners of the domestic “fourteenth” VAZ model to notice that a knock occurs in the A-pillars. The reason for its appearance is failed support bearings.
Support rod brand SS20
But you don’t need to start replacing right away. The first priority is to check the condition of the support. And only then take appropriate actions.
In analysis
There are several types of supports:
- A bearing with an integrated inner or outer ring. No clamping flanges are required for its installation. There are corresponding holes for installation;
- With detachable outer ring;
- With detachable inner ring;
- Finishing and cutting structure, the characteristic feature of which is its strong rigidity.
Preparation for repair
Before you begin any repairs, you need to do some preparation. To do this, perform a few simple manipulations:
- Park the car (Priora or Ten, it doesn’t matter at all, the operating algorithm is the same for them) on a level surface.
- Fix the position of the car - place shoes under the rear wheels, squeeze the handbrake and engage first or reverse gear.
- Remove all the front wheel bolts from the threads (it is advisable to replace the bearings on both struts).
- Lift up the side on which you plan to replace the support bearing first.
- Remove the entire wheel.
At this point, the preparation stage can be considered complete; it is time to disassemble the suspension and replace worn elements. Pay attention to the condition of all boots - if they are damaged, be sure to replace them.
Step-by-step instructions for replacing a support bearing
In a specialized car service, you will have to pay at least 500 Russian rubles for replacing the 1st “prop” with a LADA Priora. rub., however, the replacement can be done independently, the work does not take much time.
Step-by-step instruction:
- The car must be parked on a level surface.
- Use a jack to lift the side from which the replacement will take place.
- We dismantle the wheel.
- Using a 19" wrench, unscrew the steering tip nut.
- If you have a special puller for pressing out the tip pin, you can use it. If there is no puller, you can press it out using a hammer and a small pry bar. The main thing in this process is not to damage the thread of the finger.
- Using the same wrench, unscrew the 2 nuts that secure the strut in the so-called steering knuckle.
- We remove the lid from the “glass”, then you need to unscrew the 3 nuts that secure the upper support to this very “glass”.
- Pull out the shock absorber completely, as if from underneath.
- In order to unload the upper support, you need to compress the shock absorber spring using a pair of ties.
- 9" and 22" wrenches will help tighten the nut securing the support to the rack.
- We remove the support and disassemble it in order to remove the support bearing.
- All that is required is to replace the worn “support” with a new device.
- We attach the support to the shock absorber.
- Assembly is carried out in reverse order.
Experts recommend replacing the bearings on both sides at the same time, and only after that adjusting the angle of the front wheels of the car.
In the cold season, it is more important than ever to install an electric heater in a car, which simplifies starting the engine in cold weather; on the website https://sto.ms/electric-heaters-installation you can order such an installation at a favorable price and with a guarantee.
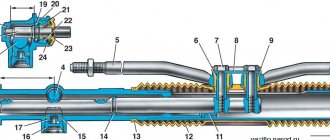
Removing the rack
Perform further work according to the following scheme:
- Remove the cotter pin from the hole in the steering pin and unscrew the nut.
- Install the puller and remove the tip pin, move it to the side.
- Move the brake hose to the side.
- Use a marker to mark the position of the steering knuckle relative to the shock absorber strut - this is what affects the camber angle of the wheels.
- Unscrew the nuts from the bolts securing the strut to the knuckle and remove them.
- Move the hub and steering knuckle down slightly.
- In the engine compartment, use a 13mm wrench to unscrew the three nuts from the studs securing the Priora support bearing to the body.
After all these steps, you can remove the entire rack assembly; nothing is holding it in place. In this case, the spring will not unclamp - it still “sits” firmly on the rack.
How to check the support bearing on a Priora
Some causes of car malfunction:
- expiration of service life (mileage has exceeded 70 thousand km);
- excess axial loads on the racks (careless driving, accidents);
- moisture and dust getting under the hood.
To do this, do the following:
- Raise the hood.
- Locate and remove the protective cover of the upper support cup.
- Start rocking the car body from bottom to top, while keeping your palm on the cup.
- If you feel a knocking noise with your hand or hear grinding and rattling noises, you probably need to replace the bearing.
It is important to know:
The support housing itself is changed together with the bearing, and the support bearing is also changed separately. It depends on the degree of damage and wear.
Separate support bearing VBF for Priora, Kalina
Kit with upper front support housing
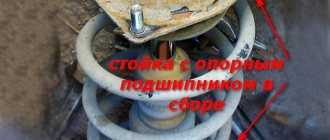
Removing the support bearing
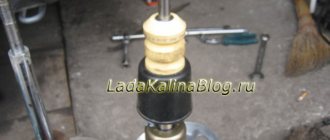
To remove the support bearing, you must use a spring compressor. Follow these steps:
- Install the device on three turns.
- Rotate the bolts evenly to compress the spring. There is no need to overdo it - it is enough for the spring to weaken and the pressure on the pillows to decrease.
- While holding the rod from turning, unscrew the nut with a wrench set to “17”.
- Carefully remove the bearing.
To ensure safe work, secure several turns of steel wire. It is most convenient to unscrew the nut from the rod using a special wrench. It often happens that the metal gets stuck, making it difficult to unscrew the nut.
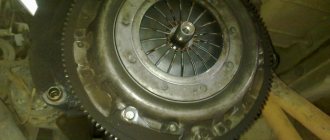
Support bearing replacement process
In order to replace a faulty support bearing, you need a garage and a basic set of tools that a car enthusiast should have. It is much more convenient to do everything in a pit or using a car lift. But more often than not, a garage, a jack and at least some plumbing experience are enough. It is worth considering: replacing the support bearing involves dismantling and servicing the shock absorber strut.
Tools you may need:
- A head designed for disassembling racks;
- Mount;
- Rod key;
- Long head;
- Pliers;
- Torque wrench;
- Ball joint remover;
- Hammer;
- Ratchet for the required fasteners;
- A spanner with a curved handle;
- Spring ties.
- Using keys, the upper rod is unscrewed.
- The lower part of the rack is removed from the support bowl.
- The shock absorber assembly is inspected and faulty elements are replaced if necessary.
- After dismantling the rack with support, you should check the mechanism, clean the seats, and if necessary, use a rust converter.
- The rack is assembled and the updated unit is installed in place.
- Having secured the stand to the lever, the unit is lifted with a jack. The landing pins are aligned.
- Once shrinkage is complete, the fastening nuts are tightened.
- Check to see if the strut spring tie is removed.
Of course, this is only a generalized diagram: each car has its own disassembly nuances and it is difficult to describe in detail all the individual subtleties. In particular, some foreign cars use non-standard key sizes. In addition, in some cases the bearing is a replaceable part and you can try to inspect it. But given the uneven wear of the balls, the appearance of scuffing on the holder and the destruction of the seals, it is better to play it safe and make a complete replacement. Sometimes it makes sense to conduct a thorough inspection of the entire shock absorber assembly. If the support is damaged, it is better to replace it with a new one.
Assembly of the unit
After dismantling the old Priora support bearing, a new one is installed in its place. Next, do the following:
- Screw the nut onto the rod.
- Release the spring and finally tighten the nut.
- Place the rack assembly in its place and attach the nuts to the three studs.
- Install the steering knuckle into the shock absorber strut in the same way as it was before - follow the marks.
- Install the bolts and tighten the nuts on them. Please note that the top bolt has an eccentric-shaped adjusting non-removable washer.
- Replace the tie rod end, tighten the nut and insert the cotter pin. Be sure to unclench its antennae so that it does not fall out during use.
- Tighten all threaded connections.
- Install the wheel and lower the car from the jack.
At this point the repair is completed; work is carried out on the second rack in a similar manner. There is nothing complicated about this, but it will require patience and the ability to work with keys. And if the support bearing suddenly knocks on a Priora, you know what to do. It is advisable to treat all threaded connections with a penetrating lubricant such as WD-40 or at least brake fluid before starting repairs.
The important role of MacPherson struts
But MacPherson struts have another important function - they also serve as steering knuckles.
That is, the stand with the wheel hub attached to it can rotate around an axis, which allows the drive wheels to be steered. Naturally, where there is rotation, a bearing is used; in the case of this type of suspension, a support bearing.
To figure out where the support bearing is installed, let's briefly look at the car suspension structure.
Its main components are:
All these elements are assembled into a single whole, which provides the possibility of compressing and decompressing the spring and moving the shock absorber rod in the body (which is what the suspension is actually for, since vibrations are damped during these movements).
Signs of a faulty support bearing on a Kia Rio
Common signs of a faulty support bearing on Kia Rio cars are as follows:
- when the car is moving, a knocking sound is heard in the area of the right or left front side member of the body, it is especially noticeable when turning and on uneven roads;
- The car has become less controllable and does not immediately respond to turning the steering wheel.
For what reasons can the front bearing fail:
- Poor road conditions;
- Very harsh driving style;
- Factory defects, low quality parts;
- Natural wear of bearings during long-term operation.
It should be noted that support bearings cannot be repaired; a faulty bearing must only be replaced. There can be no talk of any repairs.
But the details can be prevented. You can remove the protective cover from the bearing race and treat the inside of the race with lithium grease. Of course, such an operation must be carried out on a working OP.
Replacing the support bearing "Lada-Priors"
External manifestations of a support bearing malfunction are not always clearly interpreted even by experienced car owners. A knocking sound appears in the area of the front pillars, which intensifies in the under-hood space while driving (especially when making turns). Added to this is a knocking sound in the spring shock absorbers and significant play in the steering wheel, which worsens the control of the car.
Most likely the cause is a faulty support bearing installed in the front strut.
Primary diagnosis
In order to confirm or refute the version of a faulty bearing. It is enough to perform a number of simple manipulations:
- Raise the hood;
- Remove the protective cover from the top cup;
- Rock the body “up/down” while keeping your hand on the cup;
- In the case when the palm feels vibrations and knocking (optionally, rattling or grinding is heard), you should definitely change the bearing.
You can only replace the bearing or support housing assembly (it all depends on the technical condition of the latter).
This bearing is an element of the upper support, which ensures rotation of the rack relative to the axis when the machine turns.
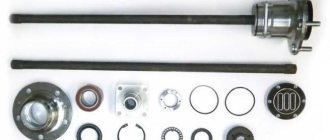
The market offers several product options; the best imported ones are SKF brand products. Product type, VKD 35032. From domestic, Vologda bearing type 1118-2902840 (VBF brand).
If you decide to change one bearing, it is necessary to replace, along with it, the vibration and noise insulators that come with the springs.
Replacing a faulty product
All upcoming work can be divided into three main stages.
Preparatory
The car is placed on a level surface and wheel chocks are installed. If a jack is used, insurance must be provided.
Then a set of necessary tools and new spare parts are prepared.
Dismantling works
Work begins with dismantling the front pillar.
- The hood opens.
- Remove the protective rubber cover from the support cup.
- To dismantle the fasteners, use a special head (extended double). They make it possible to prevent the shock absorber rod from turning when unscrewing the nut.
- We put the head inside, clamp it with an open-end or wheel wrench.
- We fix the small internal head with a spanner.
- Next, loosen the nut.
- Then the work is transferred to the lower part of the rack (the wheel has been previously removed). Lubricate the bolt of the steering tip and the knuckle mounting.
- The fastening bolts on the rack break off.
This operation is performed step by step. The tip of the ball joint is unscrewed (it should first be loosened using a spanner, then use a ratchet.
After this, the part can be knocked out with a hammer (you must use a wooden spacer) or removed with a puller.
- We return to the lower bolts. Using a wooden wedge and a hammer you need to carefully knock them out.
The upper fastener is responsible for adjusting the alignment/camber (do not confuse it with the lower one when reassembling it).
If you change the bearing without disconnecting the strut from the steering knuckle, it is not necessary to re-align the camber/toe. But such work should be performed on an inspection pit or overpass.
- By removing the fasteners and disconnecting the brake hose, the faulty bearing is removed. In this case, the entire assembly must be supported on a rigid stop, since it is not completely disconnected from above.
- Next, unscrew the top fastener (three points).
- The completely dismantled structure is removed (bottom-up to the side and towards you).
Installing a new bearing
- The assembly is clamped in a vice, then the springs are compressed by clamps (until the outer part of this support is weakened).
- The locknut on the rod is unscrewed.
- The top cover rises. The bearing can be changed.
- The bearing or the entire support is replaced (with the simultaneous replacement of rubber vibration isolators).
- Reassembly is in progress.