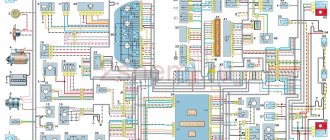
2nd generation Ford Focus compact car was produced in 2004, 2005, 2006, 2007, 2008, 2009, 2010 and 2011 with both gasoline and diesel engines. During this time, the car underwent restyling once, which affected both the interior and exterior. In this publication we will show a description of the Ford Focus 2 fuse and relay blocks, their locations, diagrams and photographs. Separately, we note the cigarette lighter fuse. And in conclusion, we will offer complete electrical diagrams of the car for download.
The actual purpose of the fuses may differ from those shown and depends on the year of manufacture and country of delivery of the Ford Focus 2. Check the designation with the diagram on the back of the protective cover. And if you have the wrong generation of model, look here: Focus 1 and Focus 3.
Purpose of the fuse mounting block
The figure shows the location of the blocks under the signs A and B.
The mounting areas have one purpose - to place the safety elements in one place. This allows you to quickly and easily find the damaged element without disassembling half the machine.
The external module (under the hood) looks like a black plastic box. Elements responsible for the power supply circuits of the power plant and main equipment are mounted here.
The indoor (cabin) unit is responsible for auxiliary networks and devices. On cars after 2011, the arrangement of individual elements has changed, but the principle remains the same.
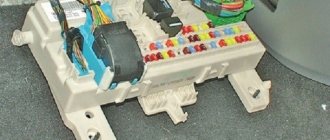
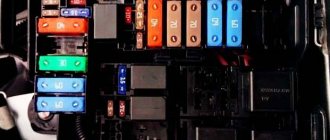
Fuse box in the passenger compartment
It is thoughtfully located under the glove compartment.
The photo shows the module without a protective cover and lining. Here, each element is responsible for a specific device or circuit. The photo above shows the first generation shield. In the first versions of the machine from 2006-2007, some instruments and elements are missing, which simplifies the design of the module. After 2008, the device was updated, new parts and elements appeared. Therefore, the modified pinout needs to be further described.
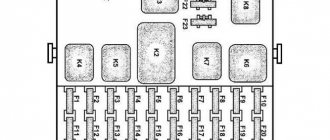
Under the hood
It is closed with a special lid that prevents dust and dirt from entering the compartment. Here the inserts are primarily responsible for the powertrain systems and carrier electronics. To allow installation of additional equipment, the installer has spare sockets.
Fuses Focus 2 dorestayl
The first modifications of the car had a simplified layout of inserts and relays, relative to the last years of production. The modules do not contain batteries for complex devices and equipment.
Fuses for the restyled Focus 2
After the update, the element panel has changed slightly in appearance. The type of device remains the same, the main difference is in the type of power supply and connection.
The stove only works in position 4! Ford Focus
Hello dear friends!! My stove only works in position 4! Help me figure it out)
to evenff1: The stove resistance block is to blame, which needs to be replaced. It is located near the heater motor, behind the glove compartment.
- remove the glove compartment by unscrewing a couple of screws from the bottom.
- When you remove it, you will see the stove motor, and to the left of it in the depths there will be a plate secured with one or two self-tapping screws with a connector.
- Squeeze the latch and remove the connector.
- Unscrew the screws and remove the resistance block.
As a temporary solution to the problem, you can fix it. In your case, most likely the thermistor has burned out. It can be replaced with a simple piece of copper wire. But this should be done by a specialist to avoid fire. Therefore, it is better to buy a new one!
The original stove regulator costs around 1 thousand rubles.
aleskus: The original stove regulator costs around 1 thousand rubles. #
And we'll fry. miser pays twice
aleskus: And we’ll fry. miser pays twice #
In any case, the resistance block itself is not anything complicated. And an ordinary radio and television technician can easily restore it.
evenff1: The essence of the failure of the resistor block is not only that the thermal fuse has blown, it performs the function of protection against high temperature and functions like a regular fuse, like it costs 10 amperes. So the point is that it doesn’t just burn out like crazy. We need to look at the root cause. lack of lubrication on the motor bearings, jamming, etc. Which will definitely lead to an increase in current consumption above the norm by this device. The result is a blown fuse. Remove the root cause, and then change your resistor block. Otherwise it will just be a pointless job. After some time he will again be covered with a copper basin)))))
to Vovan_mail: I support.
to Vovan_mail: Thank you for your feedback.
Hello everyone, please tell me. My resistor block gets very hot. What is the reason? The fuse constantly blows, the heater motor disassembled the bearings and lubricated them
Lexa Shum:
My resistor block gets very hot. What is the reason? #
It is built into the air duct for cooling because... gets very hot. Well, the fuse blows for another reason.
vitalliy:
Well, the fuse blows for another reason. #
to Lexa Shum:
Check the contacts on the fuse itself and the connectors.
Why does the thermistor burn out? Please explain, I really need it
I encountered the same problem (only the 4th heater fan speed works), read the forums, and decided to fix the heater resistor block myself.
Messir:
To replace it: remove the glove compartment by unscrewing a couple of screws from the bottom. When you remove it, you will see the stove motor, and to the left of it in the depths there will be a plate secured with one or two self-tapping screws with a connector. Squeeze the latch and remove the connector. Unscrew the screws and remove the resistance block. #
I removed the block according to the instructions from Messir (the glove compartment has 3 screws on the bottom, then I removed the connector and unscrewed this block).
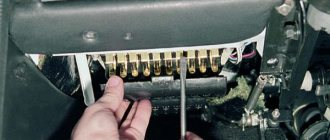
In FF1 the heater resistance block is located here:
The block was screwed onto one self-tapping screw.
Next I wanted to replace the burnt thermal fuse (thermistor) as shown here.
But there were no thermistors at the electronics store, so I bought a new unit at an auto parts store.
I screwed the unit onto a self-tapping screw, inserted the chip, checked the fan - it works at all speeds