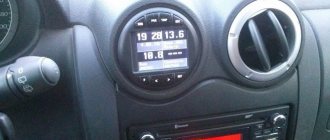
Voltmeter instead of a Priora watch
The current time is displayed on the Priora dashboard, so there is no particular need for a separate clock.
To install a voltmeter instead of a clock you will need:
- digital voltmeter with LED scale of suitable size;
- hot glue;
- file;
- knife or jigsaw;
- a piece of plexiglass or CD case;
- a piece of tint film.
To install a voltmeter in the body of a standard clock, you need to dismantle it and remove the mechanism. After this, you need to install the voltmeter panel into the case, slightly filing its corners. It is better to secure the panel to the housing with hot glue.
There is a hole in the middle of the glass for the time adjustment knob, so you need to find a replacement for it. You can cut new glass from a CD case or from a piece of plexiglass. To hide the “filling” of the voltmeter, the glass should be tinted before installation, for example, with a piece of tinting film. In this case, only the luminous LED display of the voltmeter will be visible from the outside.
Next, all that remains is to solder the wires to the voltmeter terminals and insert the voltmeter instead of the Priora clock. Connecting the wires will be discussed below.
How to remove a beard on Prior 2?
How to remove the center console on a Prior?
you never know why you need it. We suggest you familiarize yourself with the topic: “how to remove a beard on a Prior 2?”, including the latest trends.
| If you need to install sound insulation on the floor, or paint, or reupholster the interior plastic of the Lada Priora, then you first need to remove the central tunnel (beard). The procedure is not complicated and you can easily do it without an assistant in 30 minutes. |
Tools required: 10mm socket, Phillips screwdriver, tall 10mm socket, flathead screwdriver.
Disconnect the negative terminal from the battery, and for ease of work you can remove the front seats. Then:
- Unscrew the nut securing the air duct to the feet of passengers in the rear seat using a 10mm socket.
- Remove the air duct. Remove the second air duct on the right side in the same way.
- Raise the armrest and pry off the armrest hinge pad.
- Remove the armrest of the Lada Priora.
- Unclip the latches to pry open the container for storing small items. Get him out of the tunnel.
- Unscrew the 2 bolts securing the armrest hinge using a 10mm socket and remove it.
- Unscrew the 4 screws securing the floor tunnel using a Phillips screwdriver.
- Through the opening, press the latch and remove the block with wires from the trunk lock control button.
- Unscrew the 2 tunnel fastening nuts using a high 10mm socket.
- Place the front seats in place and move them forward as far as possible. Unscrew the self-tapping screw securing the tunnel to the base on the left and similarly on the right, using a Phillips screwdriver.
- Remove the plastic plug at the bottom of the cup holder using a flathead screwdriver.
- Unscrew the tunnel fastening screw using a Phillips screwdriver.
- Unscrew the 2 screws securing the floor tunnel on the left and similarly on the right, using a Phillips screwdriver.
- Remove the plug in the handbrake housing using a slotted screwdriver.
- Unscrew the screw securing the side panel of the tunnel using a Phillips screwdriver.
- Remove the left tunnel shield, and similarly the right shield.
- Unscrew the screw securing the front part of the tunnel using a Phillips screwdriver. Unscrew the screw on the right side in the same way.
- Unclip the latches and remove the Priora gearbox cover. Leave the frame with the cover on the gearshift lever.
- Remove the 2 screws securing the tunnel to the instrument panel console using a Phillips screwdriver.
- Lift up the tunnel.
- Press the latch and disconnect the block with wires from the cigarette lighter. Remove the central tunnel of the Priora.
Installation of the tunnel lining is carried out in the reverse order.
The question of removing the center console on a Priora worries quite a few car owners, since this has to be done quite often and here’s why. The fact is that some control elements, such as a clock, a heater control unit, or the central heater deflector, cannot be replaced without removing the console.
To remove it, you will need a minimum of tools and the main one, which you simply cannot do without - a Phillips screwdriver.
Removing and installing the center console of the instrument panel on a Priora
The center console trim on cars with “standard” and “luxury” configurations may differ in the size of the cutout for the radio. Otherwise, there will be no difference in fastenings. Moreover, many owners cut a hole out of a regular one for installing a 2-din radio and everything works out quite successfully. So, let’s get closer to the point - if you have a radio installed, you must first remove it, using special removable keys that usually come with it.
After the niche is free, pressing on the button connectors from the inside, we take them out, approximately as can be seen in the photo below.
Then we disconnect the block with wires from the buttons that go to the console.
Next, you need to remove the ashtray by pulling it with a certain force from each edge in the open state, since it is attached along guides in the grooves:
After this, two fastening screws are clearly visible in the recess, which, of course, will need to be unscrewed.
In this case, we are dealing with a 2-din console that has already been cut out, so the two remaining screws are not visible, and only a little lower are the attachment points that were once there visible. In the photo above they are visible - slightly in the recess. If you have everything in factory form, then everything will look like this - a couple of screws are under the cover:
Connecting a new
Installation of a new audio device is carried out in the standard mounting hole. When using alternative equipment that has a different configuration of the front part, transition frames are used to allow the unit to harmoniously fit into the interior of the car. For switching, adapters are used to ensure compatibility between the wiring harness on the car and the connector on the player body.
On Priora 2 cars, the standard configuration did not include a standard radio; in its place there was a trapezoidal pocket that could accommodate a 1 din head unit. But additional sealing of the resulting cracks or the manufacture of a decorative frame is required.
Many owners place the radio in place of the plug located below the standard mounting socket. Algorithm of actions:
- Remove the rubber mat in the niche located below the climate control controls. Remove 2 screws.
- Pry up and remove the decorative cover of the gear shift knob, under which there are 3 more screws.
- Remove the lower part of the console, providing access to the lower mounting points of the front cover of the instrument panel console.
- Remove the plastic cover above the control buttons, under which there are 2 more screws.
- Remove the decorative frame.
- Remove the cover and modify the seat to a size sufficient to install the guide shaft.
- Install and secure the shaft in the console, and then insert the radio into it.
After installing the shaft, it is necessary to mount all the removed parts in the reverse order. The same scheme is used to replace the original radio on Priora 2 cars.
- Kenwood radio says protect what to do
- How to install a navigator in a car radio
- How to install Navitel on Android radio from an SD card
- How to cut music onto a disc for a radio tape recorder
Lada Priora Sedan › Logbook › Removing the center console of the Priora
How to remove a torpedo on a Priora? practical method and sequence of actions
I’ll just tell you this for those who don’t know.
To remove the center console you need a Phillips screwdriver.
1. Remove the cover "*** Open ***" and the ashtray below. 2. Take out the buttons (they come out from the front, just pry them off with a flat-head screwdriver)
3. Take out the “emergency lights” button (the same as those buttons)
4. We take out the radio along with its box.
5. 2 bolts in place of the radio (they will be at an angle towards you)
6. 2 bolts in the pocket where the cover was *** Open *** 7. 2 bolts in the ashtray 8. Now pull the console towards you, smoothly without jerking (resistance is possible)
9. The console will not come out completely, because... the clock and control unit for the stove are connected there. The clock connector is located between the air ducts
Now turn off the control unit of the stove.
Well, that's all, we have the console in our hands, congratulations!
By the way, I want to “hoard up” a little. To remove the watch, unfasten the latches on the console
, and to remove the used stove, unscrew 4 screws from the console.
Dismantling the panel on Lada Priora
How to remove a generator on a Priora with a steering wheel
Removing the Priora center console involves dismantling the radio, if installed. Usually, special keys are sold with the radio for removing the device, but if they are not available, just select the appropriate size and unscrew the nuts.
After you remove the radio, follow the instructions explaining how to remove the center console on a Priora:
- Press the buttons on the inside of the console; they should fall out of the connectors.
- Remove all the buttons located on the console, carefully disconnecting the box with wires from the buttons.
- Open the compartment with the ashtray, carefully but forcefully pull its edges. Remove the ashtray and set it aside.
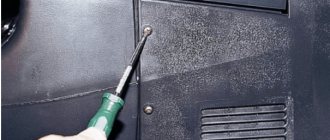
- Inspect the area where the ashtray was just pulled out. The two bolts that secure the bottom of the console are now visible. Take a cross-shaped screw and unscrew the bolts.
- Inspect the recess from which the radio was pulled out. There are bolts on the sides and top, unscrew them.
- There is a cover under the three buttons that regulate the temperature in the cabin; open it. You will see two screws inside, unscrew them.
- The panel can be detached. Gently pull it back, threading the wires through the empty button compartments.
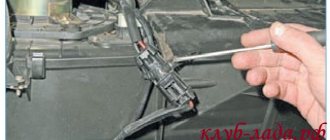
- It remains to disconnect three devices with wires - a heating control device, a clock and an alarm. Gently pull the connectors and disconnect the wires.
- Now remove the console completely.
Note! If there is a need to replace the Priora instrument panel, then do not forget to disconnect the heating control unit from it, the wires with the clock and the air duct nozzles from the stove. Installation of the console is carried out in the reverse order - repeat the above steps, starting from the ninth point, gradually moving up to the first
Now readers know how to remove the console on a Priora car
Installation of the console is carried out in the reverse order - repeat the above steps, starting from the ninth point, gradually moving up to the first. Now readers know how to remove the console on a Priora car.
When a driver needs to replace the instrument panel on a Lada Priora, problems with the purchase may arise. It is not easy to find in specialized stores, but you can find it at a dealership or car market, and even at a lower price.
Why do you need a voltmeter in the Priora cabin?
Headlight block Lada Priora: replacement and type of lamps
Most modern car models do not have a voltmeter on the instrument panel. Manufacturers decided that information about the on-board network voltage is not needed by the driver. This indicator is monitored by the on-board computer, which signals problems in the event of an obvious malfunction of the charging system or the vehicle’s on-board network. At the same time, a voltmeter is one of the most popular additional devices installed by car owners. This is caused by the following circumstances:
- the device allows, if necessary, continuous voltage monitoring;
- analysis of voltmeter data allows you to determine the load on the generator and its operating efficiency.
Selecting the sound in Owners
Watch the video antifreeze has leaked, can you drive? Categories
of car Lada Priora can choose one or another sound timbre for the interior by pressing the EQ key and then selecting the classic “style”, “rock”, “pop”, “vocals”, etc. To accurately more configure the parameters, you need to press briefly after “8”, then select the desired value using keys 4-5 and 5-6 - mode value. Here you can select “balancing” - Fade of the front and rear speakers, “Balance” - harmonization of the side speakers, “Bass” - low frequencies, “high” - Treble frequencies. A review of the instructions indicates that the improvement in sound quality can be achieved by the “Loud On” mode. In addition, in the same “can” section you can set stereo or mono mode, enter sound signals for pressing keys (What is On / Of), etc.
Beep is an RDS feature? Radio stations sometimes accompany their broadcasts with such options. RDS, for example, in text form, allows you to broadcast songs, stations, etc. on the display title. In the “TA” mode, you can display information about the traffic situation from certain modes.
Radio disc playback is quite simple. The CD is started, inserted, paused using the "1" key, and after ejecting automatically the radio turns on. Scanning tracks (Int key) allows playback of each for 10 seconds. To stop scanning, the key must be pressed again. Music from a disc can be played repeatedly (RPT button) or in random RDM (order). The radio successfully reads music from the card memory or via the USB connector. media on If they contain music tracks, then playback begins immediately after placing the media in the corresponding Card. The memory connector is removed by pressing again.
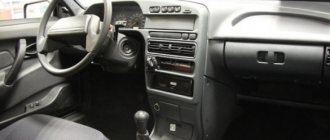
How to remove the center console on a Priora
The reasons for removing the console may be its damage in the form of cracks, the appearance of extraneous noise or knocking under the panel while driving. Or you may simply want to install a console of a different color.
Before getting started, it should be noted that on the Priora the console body and the instrument panel are one solid part. However, an independent decorative trim on the console itself can be removed for easy access to the cavity of the instrument panel. The decorative panel of the console itself, together with the gearbox tunnel, is also called the “beard”.
Since in the process of removing the console it will be necessary to disconnect various electrical contacts, in order to avoid a short circuit it is recommended to turn off the ignition or disconnect the negative terminal from the battery. To remove the console you will need a Phillips and flathead screwdriver. It would also be a good idea to pick up some small box for collecting unscrewed screws and other small items.
So let's get down to business. First of all, you need to remove the radio. If you have a car with a standard radio, then you should not try to pick it out with something sharp. To remove it, it’s time to use available materials. Stiffening plates from VAZ windshield wiper blades can help with this. Locking grooves are provided along the edges of the plates. There are narrow grooves on the radio under the Scan (on the left side) and Tab (on the right) buttons. We insert the plates from the windshield wiper blades into these grooves, move them slightly apart and carefully pull the radio towards you.
If a regular, non-factory radio is installed, then removing it is much simpler. It is enough to pry the radio frame with a small screwdriver, and the entire assembly can be easily removed. It happens that special keys are needed to remove the radio frame itself.
After removing the radio, remove the heated rear mirror button. The button is carefully pryed up with a screwdriver and pulled out, and the chip with wires is disconnected from it. Afterwards you need to remove the ashtray. The plastic insert is removed from it and, by slightly pulling outward, the ashtray body itself is removed. Then the glove compartment lid is removed from the pins.
Then four screws are unscrewed: two are located under the already removed ashtray and two are located just below the glove compartment. To get to the screws located under the ashtray, you must first remove the decorative panel with a cup holder located on the gear shift lever. To do this, use a thin screwdriver to pry up and remove the leatherette cover from the box lever, and unscrew the fastening of the panel itself, or, as it is also called, the tunnel cover. After this, access to the lower console mounting screws opens. For convenience, we put all the unscrewed screws into a pre-prepared box or jar.
When unscrewing the console mounting screws, it is recommended to use a magnetized screwdriver. This will prevent you from losing screws during disassembly and assembly of the panel. It happens that washers are placed under the mounting screws, which should also be carefully and carefully collected in a jar for small items.
Next, remove the top panel of buttons and disconnect the chips with wires. The chips are disconnected from the power window buttons, heated windows and the hazard warning light buttons. After disconnecting this panel of buttons, two more screws are unscrewed, located a little deeper in the vacated niche. It is recommended to mark all disconnected chips by sticking self-adhesive paper on them and sign which button or regulator the connection corresponds to.
After releasing all the mounting screws, carefully, without sudden movements, pull the console panel towards you. It should come off without much effort. After removing the console from it, you need to disconnect the interior heater control unit. It is detached by unscrewing the four screws on the back of the console. After this, you can consider the console removed.
As you can see, there is nothing complicated in this process. The main thing is to remain patient and carefully handle the console parts when prying them with a screwdriver, otherwise you may leave burrs on the edges of the plastic parts. If you are removing the console for the first time, then not everything will work out right away. Next time everything will be much easier.
Now all that remains is to disconnect a few connectors.
The first is from the heater control unit:
Second from standard quartz watches:
- And the last one is from the hazard warning button. The most convenient way to do this is with the button already removed from the console body:
- Now you can remove the console, since nothing else prevents this.
- I think there is no need to explain that if it is necessary to replace this part, from the inside it will be necessary to unscrew and remove the control unit from the heater, as well as the clock and the central nozzles of the heater air duct.
Installation occurs in reverse order. If you need to buy a new console, this may be a problem. It is not so easy to find it in stores and car markets, although the price is not high and is about 700 rubles. You can buy a similar thing at a car disassembly for no more than 400-500 rubles, and the quality is better than “new” ones.
Main process
Using a screwdriver, remove the windshield blower nozzles. Then the upper fastener, consisting of three clamps and bolts holding the instrument panel, is removed. The next step will be dismantling the amplifier. After a visual inspection of the bottom of the console, remove the corresponding screws that are located at the bottom of the panel. Next, the wiring of the instrument assembly is dismantled by unscrewing the pads and clamps.
The wiring system associated with the ignition switch is also inspected and removed. Together with it, the ground fastening, the power supply structure of airbags and other components with an electrical connection are disassembled. The final step is to dismantle the Priora dashboard itself with the center console. The part in question is a rather weighty part; it is advisable to have an assistant to remove it from the cabin. At this stage, the operation to remove the center console can be considered completed and further planned work can begin.
Connecting a voltmeter to the on-board network
A digital voltmeter in a car must meet two main requirements:
- show the voltage on the battery as accurately as possible;
- turn off when the engine is not running so as not to discharge the battery while parked.
Accurate data on the voltage on the battery can be taken directly from its terminals. To do this, you need to connect the wire from the positive terminal to the installation location of the voltmeter. To prevent conductor resistance from causing a voltage drop across the device, the wire cross-section must be at least 0.5 mm.
The wire must have strong, good insulation so that a short circuit does not occur over time.
It is important that this way of connecting the wire bypasses the standard fuse box, so care should be taken to protect the circuit from overload. For safety, install a fuse between the battery and the wire going to the voltmeter
Otherwise, the wiring may even catch fire in the event of a short circuit.
It is best to lay the wire into the cabin to the place where the voltmeter is installed in the general wiring harness of the Priora. To do this, you will have to bring it into the cabin and stretch it under the dashboard.
It is ideal to dismantle the entire torpedo for this, but this is a complex and time-consuming job. The problem is solved by partial disassembly: removing the dashboard or center console. To do this, there is no need to disconnect the wiring harnesses; you just need to move the “tidy” a little to be able to pull the wire to the right place.
It is enough to connect the second wire of the voltmeter to ground where it is convenient. When connecting a voltmeter to the wires of the ignition switch, tape recorder or other wires located in the dashboard area, its readings will be lower due to the voltage drop across the contacts and connections.
In order for the voltmeter to turn off when the ignition is turned off, an electromagnetic relay must be inserted into the gap in the wire between it and the battery terminal. The relay winding should be powered from any wire on the ignition switch, on which voltage appears after turning the key.
If you have no experience or desire to tinker with laying the wire from the positive terminal of the battery to the car voltmeter
The first step, of course, is to dismantle them. This is quite easy to do on a VAZ classic, but not so much on a Priora. In order to remove the watch, you need to remove the plastic decorative panel. Then remove two screws, and we will find a couple more under the ashtray.
But it doesn’t end there, there are still screws waiting for us, we will find them after we remove the radio. And only then can you remove the panel by gently pulling it towards you. Take a knife or flat screwdriver and press on a fairly tight latch.
Now we need to disassemble the watch, and this is easier than removing it. We see four latches on the sides; we snap them off. Now carefully remove the arrows. If desired, the arrows can be replaced, if, of course, there are other more elegant ones at hand. But you don’t have to do this, since we are annoyed by the shade of the arrows, and not by the elements themselves. Therefore, they can simply be repainted, but this must be done carefully and efficiently. To do this, we degrease the hands, and at the same time remove the annoying orange color with a solvent. Then everything is simple: as paint, you can use ordinary office putty, or, as it is also called, a touch, because buying a can of white enamel for two arrows is not constructive. In addition, moisture will not get inside the watch anyway, so the touch will fit perfectly - it gives an even white color and dries instantly.
How to disassemble the instrument panel?
It often becomes necessary to dismantle the car interior in order to replace a part, for example, backlight bulbs. To do this, first of all, you need to understand how to disassemble the instrument panel. Removing the panel is quite simple. Select the required screwdriver and carefully unscrew the attached hardware.
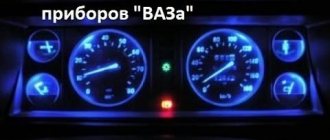
Disassembling the panel begins with removing the hands on the dial, which can be disconnected with a knife. The main thing is to be careful and not damage the speedometer parts. It is advisable to use cardboard as a holder for glass elements. Replacing the backlight is done by scraping out the cover of the gasket in the speedometer. If you do not need to change the backlight of the sensors, you can simply clean them and leave them brighter.
But in most cases, the driver wants to change the color of some elements in the speedometer and make it much more useful. For example, the backlight of the instrument panel will be able to display the maximum permissible speed or extremely high engine overheating with indicators of a different color. To do this you will need a thin multi-colored cellophane bag.
You need to use a small piece of brightly colored cellophane to cover the indicator you are interested in on the inside of the dial. Dashboard lighting is limited to more than just highlighting indicators. Many motorists try to ensure that the lighting of their devices is uniform.
To achieve brighter and more even illumination, it is necessary to cover the panel with a special LED strip, which must be connected to the stock backlight wires in accordance with all the rules of current resistance. The set of instruments on the Priora can be easily supplemented with the latest method of illuminating the needles.
You can use CMD diodes, which can be easily fused into the glass panel using a soldering iron. To do this, we disassemble the dial and begin soldering directly under the base of the hands. The contact wires must be connected from the reverse side. If the instrument panel in Priora is broken, qualified assistance may be needed to repair it.
But you can easily do it yourself. To do this, you will need a panel pinout, that is, a diagram indicating the correspondence of the contacts with certain car devices. It looks like this:
- 1 — power steering;
- 4 - hand brake;
- 7 — external lighting regulator;
- 8 — right turn signal;
- 9 — left turn signal;
- 12,13 — immobilizer antenna sockets (A and B);
- 14 — mileage reset regulator;
- 15 — brake fluid regulator;
- 18 — instrument panel backlight control;
- 20 — battery terminal 30;
- 21 — battery terminal 15;
- 23,24 — forward and backward buttons on the steering column;
- 25,26 — outside temperature regulators (- / +);
- 27 — fuel tank regulator;
- 31 - panel diagnostic service.
Pinout numbers that were not specified are backup pins.
About the console
Lada Priora was produced with an interior in two color options: gray and black. It is worth noting that a light interior was installed on the first Priora models, starting in 2007, and later a black interior with black seats and upholstery was added to it. But the center console itself was not subject to changes in color, and many owners of this car repainted or covered the Priora’s center console with film.
Modifications to the center console allowed for a more formal look that would suit the tastes of every owner. Many installed 2DIN radios with a large screen or completely replaced the standard multimedia player with something more advanced and powerful.
2DIN radio in Priora
It should be noted that when installing a 2DIN radio in a standard Priora console, you need to work with a hacksaw and cut out a completely additional capacity for various kinds of small things. But with the console from the luxury Priora, such alterations do not need to be done.
Removing a standard device on a Hyundai Solaris - photo
The main pitfall of the described procedure lies in the security code embedded in the memory of most radio tape recorders. The bottom line is this: disconnecting the music center from the external power supply for 10-15 minutes will lead to the fact that the next time you turn on the car radio, it will require you to enter a security code (usually a four-digit one), without which it will not function.
Advice. Removing the device to replace it with a new one is not a problem, unless you plan to use the old player on another machine. In any case, try not to disconnect the battery for a long time.
The device requests a code after connecting to the on-board network
If the card with the code is lost or missing, the issue can be resolved in several ways:
- when it comes to a standard device, for a certain fee they will help you find the code at a dealership that sells cars of your brand;
- the free way is to search for code using various programs.
there are companies and individual specialists dealing with these problems;
Serial number location
Regardless of the method chosen, you will have to remove the radio from the socket to find out the serial number. It is printed along with a barcode on a tag glued to the side or top of the case. After taking out the device, rewrite these numbers, and then try to calculate the PIN code using them using various online calculators on the Internet. If it was not possible to determine the required code using this method, then remove the music center and take it to specialists in this field and prepare to pay for their services.
Important point. If you do not know the PIN code of the radio, then when searching on your own, do not enter combinations of numbers more than 3 times! Otherwise, the device will be blocked, and in this state, decoding it will cost much more.
The issue of removing a car radio from its socket is not very difficult and will not require much time. But the consequences can be unexpected for an unprepared motorist. Hence the last piece of advice: find the lost pin code before turning off and removing the player in order to save your time and nerves.
How to remove a VAZ 2110 torpedo
In the interior of the VAZ 2110, the dashboard is the most noticeable part. Every driver wants to sit in a stylish and well-maintained interior. But the standard panel looks angular and gray. This is especially noticeable after long-term use, when abrasions, scratches and cracks appear on the panel.
Motorists solve this problem in different ways - some install another standard dashboard from a VAZ 2110, other drivers prefer to install a Europanel - this is the name of the trim from a third-party manufacturer. The trim allows you to transform the interior and turn the “ten” into a foreign car, at least on the inside. Whatever you choose, removing the panel is a must.
In this material we will tell you how to properly dismantle the standard panel and install the Euro version.
This is what a standard VAZ 2110 torpedo looks like