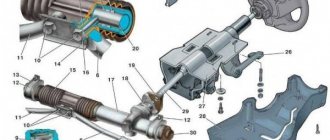
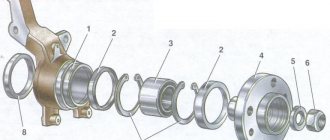
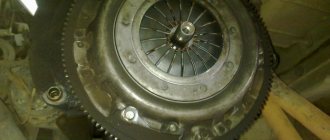
Steering rack mechanism
Section of the steering mechanism assembly: 1 – protective cap; 2 – steering gear housing; 3 – rack; 4 – drive gear; 5 – inner tie rod end; 6 – spacer sleeve; 7 – tie rod mounting bolt; 8 – connecting plate; 9 – support sleeve; 10 – steering gear support; 11 – rack support sleeve; 12 – protective cover; 13 – clamp; 14 – rack restrictive ring; 15 – sealing ring of the rack stop; 16 – nut; 17 – rack stop; 18 – roller bearing; 19 – ball bearing; 20 – retaining ring; 21 – nut sealing ring; 22 – gear bearing fastening nut; 23 – boot; 24 – lock washer
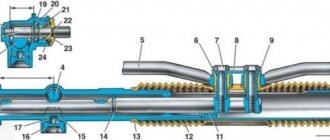
The steering rack in a VAZ 2109 car consists of the following elements:
- a toothed guide rack with two threaded holes for attaching the inner tip of the rod;
- drive gear with a splined shaft for connection to the steering clutch;
- support half-rings to create smooth sliding;
- a locking mechanism for adjusting the design clearance required for the gear pair;
- a crankcase in which parts are assembled and attached to the car body;
- sealing elements that prevent the entry of dust and dirt.
How to eliminate backlash
You are the owner of a VAZ 2109 car, and while driving you heard pronounced knocking sounds coming from the steering column, you can be unequivocally sure that the VAZ 2109 steering rack requires immediate repair.
Naturally, it is not always necessary to carry out major repairs or replace some parts. If you know how to tighten the rail, you can easily remove the tapping without unnecessary hassle and expense. But this is only possible in a situation where the noise is generated as a result of factory or operational play in the rack itself. To work, you will need an inspection hole to find the nut for adjustment and turn it with a 17 key:
Causes of damage
Steering rack breakdowns are as follows:
- The steering rack is loose;
- The gears were worn;
- The clutch of a pair of rods is not adjusted at all or poorly;
- At the junction of the rack and steering rods, the bushings are worn out.
A correctly configured rack does not always prevent its incorrect operation. This arises because an impressive generation of components is being formed. This can be determined by disassembling. Since if the adjustment did not help to cope with the problem, you will have to remove the rack from the car and check what exactly is working wrong.
Causes of knocking
Now I won’t go into the weeds and tell you about the structure of the steering rack (there will be a separate article), now it is important for you to understand that the rack is not a cast mechanism, it is composite.
Again, if we exaggerate then:. In a hollow cylinder (housing), there is a shaft, which essentially should not come into contact with the body; it runs on special wear-resistant bushings made of plastic. To ensure that wear is minimal, there is a lubricant inside, which prolongs the life of the bushings and other mechanisms
In a hollow cylinder (body), there is a shaft, which essentially should not be in contact with the body; it runs on special wear-resistant bushings made of plastic. To keep wear to a minimum, there is a lubricant inside that prolongs the life of bushings and other mechanisms.
The steering rack shaft is actually connected to another shaft that comes from the steering wheel. When you turn the steering wheel, force is transmitted through special splines; the shaft inside the rack begins to move right and left, pushing the wheels. A small diagram.
Now the most interesting part is why the knocking occurs. Yes, because the bushings that are inside wear out over time, and the shaft begins to dangle in them (play appears).
You can’t put metal there, otherwise there will be a lot of wear on the shaft, so the bushings are the weak link - they simply break over time. In fact, they need to be changed, which is what the mechanics at the service station hint at, but at the initial stage, when the play has just appeared, this matter can be tightened up.
Removing the steering rack on a VAZ 2109
For dismantling and future repairs of the steering rack, the car enthusiast will need a set of tools. Such a set may be complete or incomplete - it all depends on the type of breakdown. For example, a complete repair kit includes spare parts that need to be replaced with some regularity.
In cases where the teeth and sharpening are pretty worn out, you will have to buy a complete repair kit, which can include everything from ball bearings to pressure springs. This service kit does not include the crankcase only.
Steering rack disassembly steps:
- Between the pedals under the steering shaft you need to unscrew the cardan from the rack. You should unscrew two bolts to make it easier to get to them, you need to rotate the steering wheel. Then unscrew the shaft and remove it from the rack;
- The tie rod end is removed by straightening the bent end of the tie rod end with pliers. Remove the opening pin using a 19mm wrench. After this, tighten the nut and squeeze the ball bearing out of the rotating arm of the suspension strut using a puller;
- Then the protective casing is removed. This is done through the engine compartment by unscrewing three nuts. Using a socket with a diameter of 13 mm, you need to unscrew the two nuts with which the crankcase brackets are attached to the car body;
- The cylinder block is clamped with a vice, the corners of the retaining bar are bent, which prevents spontaneous unscrewing of the bolts securing the tip inside the lever;
- Using a 22 mm socket, the locking and connecting pins are removed and both rods are disconnected;
- The jack support separating the ring on one side is removed. The protective caps and removable support are detached. Remove the dust cover using a screwdriver;
- Using wire cutters, cut off the two plastic clips and remove the protective cover.
After dismantling, the protective elements must be checked to determine their level of shock absorption. If there is no damage or wear, they can be used again during assembly. Old parts must be replaced with new parts.
Repair of the steering rack in a VAZ 2109 car
If the wear of the working part of the VAZ 2109 steering rack is small, then it can be easily tightened, avoiding complete disassembly, thereby increasing its service life by tens of thousands of kilometers.
The 17mm nut that needs to be tightened to connect the steering shaft to the rack must be tightened with a special wrench of the appropriate size.
Repairs are carried out in the following order:
- The end caps, as well as the trunk and stops, are disconnected from the steering rack. It is necessary to evaluate the quality and degree of wear of all removed parts of the machine. In case of the slightest error, replace the parts.
- Using an octahedron, unscrew the plugs so that you can get to the retaining rings, springs and bushings.
- Then you need to remove the bearing and evaluate its “well-being” by eye. If any defect is found, it should be replaced with a new one.
- Next you need to remove the gear and rack.
- Install the new hub onto the axle shaft.
- It should be noted that there is a rubber element on the fitting designed for protection. First you need to put it in the hydraulic cylinder of the power steering, cut off the excess with a knife.
- A universal bearing puller should be used. Or use a screwdriver and a one and a half millimeter drill to make a hole in the center. After this manipulation, it is knocked out of the crankcase.
- Before assembly, the entire steering rack housing must be cleaned of dust and dirt.
- The moving parts of the mechanism must be treated with lubricating oil.
The repair of the VAZ-2109 steering rack has been completed. The entire assembly is reassembled in reverse order, with new replacement components installed.
The steering, along with other important systems, is also responsible for driving safety. It is in the driver’s interest to monitor the operating system and its reliability.
Tools
To fully repair the steering rack, you should have the following spare parts and tools on hand:
a special repair kit consisting of all parts necessary for the steering rack;
- corrugation;
- gear shaft;
- bearing;
- lubricant mixture.
- octagon key 17;
- tools for mounting and dismantling bearings;
- set of wrenches.
For the highest quality repairs, it is advisable to use an overpass or inspection hole.
Repair frequency
The car owner should not forget that after a serious repair or replacement of the VAZ-2109 steering rack, the following steps must be performed:
- All elements connected by thread must be checked and, if necessary, tightened every three hundred kilometers.
- All dust collectors should be inspected at least once every thousand kilometers. Make urgent replacement if necessary.
- Check the condition of the steering wheel and its components regularly. Pay special attention to noises, and if they occur, carry out an immediate inspection.
- It is mandatory to check the quality of purchased products - anthers. With some manufacturers they can last more than tens of thousands of kilometers, while with others they won’t last even thousands.
Malfunctions
There are several corresponding defects in the control rack that owners of the VAZ 2109 encounter. In some situations, many get by with a simple adjustment, in others a more detailed intervention in the design of the unit and its components will be necessary.
Failures of the control rack are as follows:
- The control rack fastenings have become loose;
- The rack
itself or its gears have worn out; - The pair engagement is not adjusted as expected;
- The bushings at the junction of the rack and the control rods have worn out.
Read
Pros and cons of do-it-yourself repair of the VAZ 2109 steering rack
Do-it-yourself rack repair will significantly save the car owner’s budget. After all, in this case you only need to spend money on tools and oils.
If the owner decides to turn to a professional, he will spend an order of magnitude larger sum. And in this case, it cannot be completely protected from unscrupulous auto repair shop workers. Such “specialists” may not install new parts. Such lack of forethought can lead to unscheduled repairs.
But even independent repairs can lead to negative consequences if the slightest inaccuracies are made during disassembly or assembly. So even if the owner of the car can independently tighten the steering rack, change dust collectors and rubber parts, then it is better to entrust the main work of adjusting and troubleshooting the steering mechanism to a professional.
A qualified mechanic will be more confident in disassembling, fully examining and reassembling equipment in a specially trained workshop. Major repairs and removal of worn-out elements in the steering rack can only be carried out by a mechanic with extensive experience in repairing domestic cars.
Adjustment
What is necessary, the situation develops in such a way that tightening the control rails nevertheless gives a positive result. Therefore, you need to figure out how to tighten the knot and what you will need for this purpose.
DIY Volvo XC90 steering rack repair.
You can adjust the rack through the bottom of the car, removing the engine protection, or through the top. In the second case, the work will have to be done by touch. So decide for yourself what is more convenient for you.
- To adjust the control rack, you need to tighten the adjusting screw. You can find it without any problems in the control mechanism. To be more specific, in the end cap.
- It’s normal to have a flyover, also called a pit, in the garage. In this case, there are no similar criteria; many people make do with lifting the car using a jack. Only in this case will it be necessary to additionally secure the car to avoid it sliding off the jack and possible consequences.
- While raising the body using a jack, be sure to align the front wheels straight.
- There is an option to measure the free play using a playmeter. Moreover, they can be ancient or electric. The latter are more pressing and comfortable during the implementation process, but there is no choice. What you find is what you will use.
- According to current standards and standards, for the VAZ 2109 the free play of the steering wheel should not exceed 10 degrees.
- Find the adjusting screw and begin to tighten it evenly. The operation is carried out slowly. From time to time, check the steering movement, the presence of free play, or, in other words, a knock in the control column.
- Use a special key for adjustment. It is available at every auto parts store.
- The key is inserted into the adjusting screw
and turned counterclockwise. Scroll a little and check the result. - The procedure is delayed. And don't rush any further.
- When you feel that the adjustment has reached the appropriate level, take a test drive in your own car, feel how the steering wheel moves, whether the knocking has disappeared, free movement, how tightly the steering wheel turns.
- If the steering wheel has become very tight, you will have to slightly loosen the tension of the adjusting screw.
Repair of the VAZ 2110 steering rack with power steering.
If there is no positive result after the adjustment, you will have to eliminate play and knocking by dismantling, repairing or completely replacing the unit. Now decide for yourself.
There is no need to rely solely on reiki adjustments as a cure for all its diseases. And in addition, there is no need to rush to conclusions that the rack needs to be replaced. Try to adjust, and then act according to the situation.
When you sharply turn the steering wheel from the neutral position (wheels straight) and hear extraneous knocks or noises from the steering rack, beating of the steering wheel, the car pulling to the side and spontaneous deviation from the movement, this directly means that the VAZ 2109 steering rack needs to be repaired or replaced, and urgently. The steering rack is the most important unit for controlling the direction of movement of the car; backlash and other problems make steering difficult and pose a danger to your health and life. How often do you hear in the news: a driver lost control of a car? You yourself understand perfectly well what consequences this leads to. Our instructions will help you repair and replace the rack yourself.