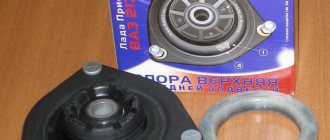
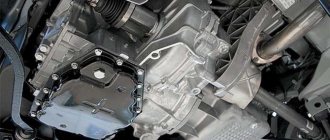
Priora support bearings are installed on the struts and are usually changed along with them. But it also happens that bearings fail much earlier - the quality of not all products is ideal. This element ensures the correct functioning of the entire suspension, as well as the rotation of the wheels. If the bearings fail, there are many inconveniences that affect the ride. Even a person who knows only superficially the design of the car can make the replacement independently.
Bearing manufacturers
You need to select spare parts before replacing the bearings on the machine. Similar products are installed on Priora and Tens. The highest quality products are produced by the following companies:
- SKF.
- KOYO.
- SNR.
The cost of products is very high - this is a fact. But their service life is longer than that of their domestic counterparts. If you want to save money, purchase domestically produced products, their cost is about 500-700 rubles per piece. It is advisable to choose spare parts from those companies that are recommended by AvtoVAZ. Remember that installing a new bearing will ensure stable operation of the suspension and will eliminate rattling in the place where the strut is attached to the body for a long time.
Supports for LADA Priora VAZ 2170-2172
The power circuit of the SS20 Master support for the Lada Priora family provides for the separation of loads from the weight of the car and from the shock absorbers.
Share with your friends
Applicability
- VAZ 2170-2172 (Lada Priora)
Advantages of using SS20 supports on a Lada Priora car
- silent operation of the support;
- improves vehicle handling and stability;
- the steering wheel returns to the neutral position better;
- ensures smooth and easy rotation of the steering wheel;
- precise and precise control without steering;
- equipped with SS20 bearings with rubber-coated cages.
Guarantee
The power circuit of the support SS20 Master for LADA Priora cars provides for the separation of loads from the weight of the car and from the shock absorbers. The loads from the rod of the shock absorber struts and bump stops are taken by the support damper, and the weight of the car is taken through the spring cup by a thrust bearing. This load sharing allows for high reliability, as with all SS20 supports.
The support body has a bend at an angle of 90°, which acts as a stiffener. This design creates increased bending resistance of the support body, as well as the plane of contact of its body with the body shell when it is installed on the car. This protects the body shell from extrusion (deformation of the contact plane), which is more likely when operating with supports of a standard design.
The support is equipped with a more reliable rubber-coated thrust bearing SS20. The SS20 bearing races are rubber-lined on the outside, up to 5 mm thick, which further increases the vibration isolation of the body from the suspension. In addition, the SS20 bearing has an increased load capacity compared to the standard one. The design of the SS20 support bearing provides reliable protection from dirt, as it has a rubber sealing collar similar to an oil seal.
Scheme of operation of the SS20 support for LADA Priora.
In area A, the rubber works in compression, in area B - in shear, in area C - in compression and tension, which ensures vibration absorption.
The X-shaped damper is blocked from being pulled out during critical impacts and ensures reliable operation of the rubber element. The reliability of the damper is increased thanks to a unique and specially developed rubber compound formulation.
The upper limiting cup of the SS20 support for the Lada Priora smoothly comes into operation due to the presence of 12-slot fins in the upper part of the damper, in contrast to the 8 slots of the standard support. This provides better vibration damping when the wheel moves down when it hits potholes and a softer perception of road irregularities, which reduces the load on the shock absorbers and increases their service life.
- The support SS20 Master for VAZ 2170 cars is equipped with an upper limiting cup SS20.
- For support SS20 for VAZ 2170 cars, the lower limit cup is not installed.
- When installing SS20 Master supports for VAZ 2170 cars, the geometric parameters of the suspension ( Castor angle and transverse angle of inclination of the strut
) do not change, that is, they remain standard and comply with the requirements of the vehicle manufacturer.
Marking
Buy SS20 products in our online store or in stores in your city.
Source: ss20.pro
What is required for replacement
In order to independently replace the support bearing of the Priora strut, you need to have a minimum set of tools on hand. You will have to completely dismantle the shock absorber strut, and this is not an easy task. But try to outline the position of all elements relative to each other - this will allow you to avoid adjusting the camber angles in the future. You need the following tool:
- Set of wrenches and socket heads.
- Screwdriver.
- Marker.
- Puller for tie rod ends.
- Puller for springs.
Having all these tools, you can start repairing. It is also advisable to have strong steel wire on hand. If you follow all the recommendations, you will complete the repair in an hour, or two at most. This is relatively little.
The price of a support bearing for a Priora is no more than 700 rubles (if you purchase domestic products). Repair at a service station will cost the same as spare parts, sometimes more. There are no difficulties in the work, then there is simply no point in overpaying.
Hood deflector: why is it needed, pros and cons, do-it-yourself installation
Everything about the signs is very clear. But you need to know why such a malfunction occurs, and try to prevent premature wear of the support bearing on the front struts in the future.
- Natural destructive processes. Each OP has its own resource, which is usually developed after 80-100 thousand kilometers. Sometimes, if operating conditions are difficult, wear occurs faster. Therefore, it is better to check the condition of the OP every 20 thousand km.
- Aggressive driving. If you like to race, corner sharply and literally rape your car, which I categorically do not approve of, then your OP will not last anywhere near 100 thousand km. Such piloting speeds up the wear process significantly.
Preparation for repair
Before you begin any repairs, you need to do some preparation. To do this, perform a few simple manipulations:
- Park the car (Priora or Ten, it doesn’t matter at all, the operating algorithm is the same for them) on a level surface.
- Fix the position of the car - place shoes under the rear wheels, squeeze the handbrake and engage first or reverse gear.
- Remove all the front wheel bolts from the threads (it is advisable to replace the bearings on both struts).
- Lift up the side on which you plan to replace the support bearing first.
- Remove the entire wheel.
At this point, the preparation stage can be considered complete; it is time to disassemble the suspension and replace worn elements. Pay attention to the condition of all boots - if they are damaged, be sure to replace them.
When to change
Another equally popular question. In general, bearings have to be replaced as they break and wear out.
If we imagine ideal operating conditions, then factory support elements can last 100 thousand kilometers. This is their declared resource.
In real conditions, taking into account the condition of the roads and the frequent entry of dirt into the bearing, a scheduled replacement should be performed every 50 thousand kilometers or every 2-3 years. This is especially true for situations where bearings have already been replaced before and now you have non-factory products.
Examination
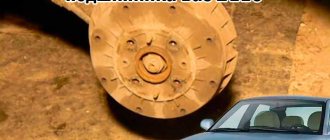
Before proceeding directly to replacing the suspension element, you should make sure that it is really worn out, broken and needs urgent replacement.
We recommend carrying out these measures not only when signs of wear are detected, but also as preventive measures. This way you can find faults in time and take appropriate action to eliminate them.
The check should be carried out approximately after every 15-20 thousand kilometers. The procedure is carried out as follows:
- Turn off the car, turn on the handbrake and install chocks under the wheels. Safety comes first;
- Lift the hood, remove the cover located on the hub bearing from the glass;
- Touch the support with your palm, and in the meantime your partner should rock the car. Moreover, it should be swung to the sides;
- Make sure that the stand does not “play”;
- If during rocking you hear extraneous sounds, crunches or squeaks with knocks, then all is clearly not well with the bearing. The only correct solution is to replace the element.
What does a breakdown lead to?
When signs of a support bearing failure begin to appear, many car owners simply ignore it. But in vain. In fact, this can lead to very sad consequences for your car and budget.
Worn element
It’s not uncommon for a worn-out prop to break after hitting a pothole, of which there are more than enough on our roads. This led to the formation of a hole on the hood, since the support simply pierced the metal. If at the same time you were moving at low speed, then you are lucky; you will only have to repair the body. And I don’t even want to talk about the support column breaking down at speed. Let's just say that there were deaths.
Broken hood
All this is said not with the intention of scaring, but to make you think about the importance of timely repair of the support.
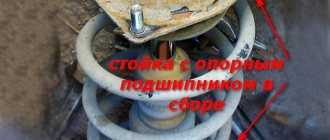
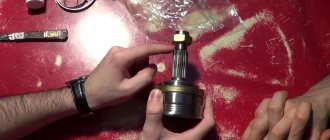
Removing the rack
Perform further work according to the following scheme:
- Remove the cotter pin from the hole in the steering pin and unscrew the nut.
- Install the puller and remove the tip pin, move it to the side.
- Move the brake hose to the side.
- Use a marker to mark the position of the steering knuckle relative to the shock absorber strut - this is what affects the camber angle of the wheels.
- Unscrew the nuts from the bolts securing the strut to the knuckle and remove them.
- Move the hub and steering knuckle down slightly.
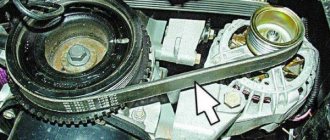
- In the engine compartment, use a 13mm wrench to unscrew the three nuts from the studs securing the Priora support bearing to the body.
After all these steps, you can remove the entire rack assembly; nothing is holding it in place. In this case, the spring will not unclamp - it still “sits” firmly on the rack.
see also
Comments 12
I have been using these supports for three and a half years. After half a year I installed SS20 comfort shock absorbers front and rear. Until now I drove with standard springs and was pleased. The other day I bought a ss20 -30 and installed it. There were no problems in the rear, but in the front the springs were rubbing against the cups of the supports (body). I spent a couple of days trying to find out the reason on the internet, and apparently I’m not the only one with a problem. After reading a lot of things, and about the fact that the manufacturer admitted a mistake with the labeling. In the end, I decided to rearrange the supports and try. But that was not the case...) The left spring still rubs the body. I bought the springs from each other in another city. We went there and got new springs to check, but nothing changed. One hundred suggested knocking a couple of times on the contact point of the spring on the body). I didn’t want to go to collective farming, but there was no way out). Now everything seems to be working fine and not rubbing. Interestingly, when the original springs were in place, nothing bothered me. I would be guilty of using springs from another manufacturer, but they are also SS20)). The car is not used. It turns out that there was a defect on the part of the SS. That's how I go for now. I want to call them for clarification after the weekend. Let's see what they answer...
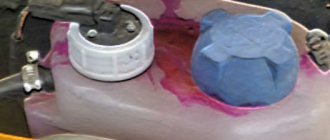
Removing the support bearing
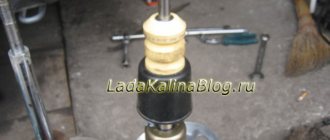
To remove the support bearing, you must use a spring compressor. Follow these steps:
- Install the device on three turns.
- Rotate the bolts evenly to compress the spring. There is no need to overdo it - it is enough for the spring to weaken and the pressure on the pillows to decrease.
- While holding the rod from turning, unscrew the nut with a wrench set to “17”.
- Carefully remove the bearing.
To ensure safe work, secure several turns of steel wire. It is most convenient to unscrew the nut from the rod using a special wrench. It often happens that the metal gets stuck, making it difficult to unscrew the nut.
Product added to bookmarks!
- Description
- Reviews
Upper strut support “EVOLEX” with an offset of 6 mm for Lada-Kalina, Lada-Priora, Lada-Granta and Lada-Kalina 2.
APPLICABILITY:
VAZ 2110, 2111, 2112 as part of a module from VAZ 2170-2172 (Lada Priora);
VAZ 1117, 1118, 1119 (Lada-Kalina);
VAZ 2170, 2171, 2172 (Lada Priora);
VAZ 2190, 2191 (Lada Granta);
VAZ 2192, 2194 (Lada-Kalina 2).
EVOLEX company is developing the production of advanced automotive suspension components for passenger cars.
The result of the activities of the EVOLEX was the appearance on the secondary market of new original automotive suspension components, primarily for the most popular VAZ .
The company's main products are upper strut supports, telescopic struts, shock absorbers, suspension springs and compression stroke buffers.
EVOLEX upper support has a “split” type of design, identical to the supports of the original equipment of the car.
The elastic element of the upper support, made of rubber based on natural rubber, allows it to withstand loads on the body of axial and radial forces transmitted from the suspension guide device.
The upper support ensures high reliability and safety in operation.
The average service life of the supports under general operating conditions is at least 100,000 km of vehicle mileage.
Includes: 2 upper strut supports without bearings.
Source: tuningsport.ru
Assembly of the unit
After dismantling the old Priora support bearing, a new one is installed in its place. Next, do the following:
- Screw the nut onto the rod.
- Release the spring and finally tighten the nut.
- Place the rack assembly in its place and attach the nuts to the three studs.
- Install the steering knuckle into the shock absorber strut in the same way as it was before - follow the marks.
- Install the bolts and tighten the nuts on them. Please note that the top bolt has an eccentric-shaped adjusting non-removable washer.
- Replace the tie rod end, tighten the nut and insert the cotter pin. Be sure to unclench its antennae so that it does not fall out during use.
- Tighten all threaded connections.
- Install the wheel and lower the car from the jack.
At this point the repair is completed; work is carried out on the second rack in a similar manner. There is nothing complicated about this, but it will require patience and the ability to work with keys. And if the support bearing suddenly knocks on a Priora, you know what to do. It is advisable to treat all threaded connections with a penetrating lubricant such as WD-40 or at least brake fluid before starting repairs.
Let's sum it up
After the bearings have been replaced on the popular LADA Priora model, a knock will certainly occur in the upper part of the shock absorber, and comfort will return to the driver and reliability to the car.
After replacement, be sure to visit a service station so that specialists in their field can adjust the wheel alignment.
Over the last few months I have started to notice a noise from the front right side. The noise manifested itself as dull quiet knocks when passing small bumps at low speed. At high speed, when driving over speed bumps and large bumps, no noise was heard.
After analyzing the information received, I decided to replace the front supports along with the struts.
After a difficult choice, I settled on Asomi products. ComfortPRO A170.2902.821 front strut supports were purchased.
To remove the support from the rack, I additionally purchased special spring ties.
In the future, for work we will need socket wrenches for 13, 17,19, ring wrenches for 17, 19, 22, a hexagon for 6, a steering end puller, pliers, and a hammer.
The day before carrying out the replacement work, I strongly recommend pouring WD40 on all the nuts and bolts securing the strut to the steering knuckle, the rod to the support, and the steering tip.
Jack up the right side of the car and remove the wheel.
We release the brake hoses from the bracket on the rack.
Using pliers, carefully bend the locking pin on the steering tip pin, remove it and unscrew the nut with a 17mm wrench.
Then we use the steering tip remover.
Now unscrew the nuts securing the support to the body under the hood using a 13mm wrench.
Remove the strut assembly from the wheel well.
Let's move on to analyzing the design. We install the spring ties by the second turns from the bottom and top of the spring. The second tie should be located symmetrically on the opposite side of the spring. Then we compress the spring until the load is removed from the support.
Now you need to unscrew the nut securing the strut rod to the support. To do this, you need a 22mm spanner and a hexagon.
Most likely, when unscrewing the nut you will have to apply a lot of force. It's better to work with an assistant.
Then remove the rebound limiter, support, support bearing and compression limiter.
Please note that rebound and compression limit washers of the same size are installed as standard.
Remove the spring cup with rubber damper, the spring itself and the compression buffer with boot.
Let's move on to inspecting the removed rack.
Let's start assembling the new shock absorber. We move the rack rod to the upper position. We put the compression buffer and boot on the new stand. Then we put on the spring, rubber damper and spring cup. Make sure that the lower shank is in place.
Then we put on a small washer from the Acomi support set, the support itself with the installed bearing, a large washer, and attach the rod fastening nut.
The nut must be tightened while holding the rod with a 6mm hexagon. Full tightening must be done after installation on the machine.
Remove the spring clamps.
The support must be oriented so that the arrow on it points forward and slightly inside the car body. Then we install the rack assembly in its place.
We fasten the support bolts from above, then we put the stand on the steering knuckle, put an eccentric bolt with a washer in the upper hole, a regular bolt down and tighten them. Next, you need to insert the steering tip pin into the rod on the rack, tighten the nut, insert the cotter pin into the hole in the pin and spread the antennae to prevent the nut from unscrewing. Carefully thread the brake hoses into the bracket on the rack.
The stand is installed. All that remains is to put the wheel on, lower the car and finally tighten the nut securing the rod to the support. You can rock the car a little on this side to further bleed the strut.
We repeat all operations on the left side.
Priora support bearings are installed on the struts and are usually changed along with them. But it also happens that bearings fail much earlier - the quality of not all products is ideal. This element ensures the correct functioning of the entire suspension, as well as the rotation of the wheels. If the bearings fail, there are many inconveniences that affect the ride. Even a person who knows only superficially the design of the car can make the replacement independently.